This section covers procedures most often needed to get moving again after an on-road breakdown— procedures every bicyclist should know: removing and replacing wheels, tube and tire repair, and cable and lever, maintenance.
Because of lack of knowledge, beginning bicyclists are afraid of flat tires and other minor on-road problems. After you have fixed a couple of flat tires, you will regard them as only a small inconvenience, taking just a few minutes of your time.
REMOVING WHEELS
You must remove a wheel to replace a tire and for other mechanical work on the wheel assembly. You may also need to remove the wheels to transport a bicycle by car, airplane, train or bus.
CAUTION: When shipping a bicycle as baggage, install “dummy” axles in place of the wheels. With out the support of wheel axles, the front and rear forks of the bicycle frame are easily bent.
A repair stand is convenient when removing a wheel, but not needed; for on-road repairs, correct positioning of your body lets you remove the wheel gracefully. When removing the front wheel, stand in front of the bicycle with the wheel clamped between your knees, and lift on the handlebars. When removing a rear wheel, stand to the left of the bicycle and lift the bicycle off the wheel with your left hand on the right seatstay and the saddle braced against your side.
CAUTION: Don’t turn a bicycle with dropped handlebars upside down. You will damage the brake cables.
If you are working on a bicycle with caliper brakes, sight down over the tire to see if there is enough room for the tire to clear the brake shoes. If there is not sufficient clearance, it will be necessary to release the brake shoes farther than normal in order for the tire to clear. This is accomplished by loosening a quick- release assembly at the brake lever or at a centerpull brake-cable hanger. On some centerpull brakes, you may slip the transverse cable loose from one brake arm.
If none of these convenient ways of spreading the brake shoes is possible, remove the mounting nut from one of the brake-shoe holders, and then remove the complete brake shoe from the brake. Still another method, provided you have a pump or air supply handy, is to deflate the tire, which will then usually clear the shoes, and you need not disturb the brake shoes or the brake adjustment.
Removing a Front Wheel
After loosening a rim brake as described above, remove a front wheel with a nutted hub by loosening the two axle nuts, one on each side. Hold the bicycle upright with one hand while turning the wrench with the other. Then stand in front of the bicycle and lift it off the wheel. If basket or fender supports are attached to the axle, remove the axle nuts, and then slide the supports off the axle prior to removing the wheel. If you remove the axle nuts, note the positions of all of the parts, so you can put them back in the correct order. Unless basket or fender supports are attached to the axle, it’s not necessary to remove the axle nuts; only loosen them. Then all axle hardware will stay in its correct position.

When shipping a bicycle, always install “dummy” axles to protect the
forks from being crushed together.
If the wheel has a hub brake, disconnect the cable at the brake and undo the brake-arm clamp from the fork blade before loosening the axle nuts. Many hub brakes have quick-release cables which can simply be slipped off the brake.
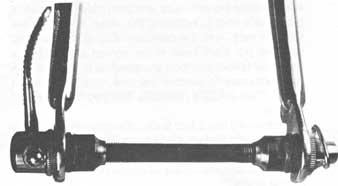
Remove a quick-release wheel by pulling the lever outward, away from the wheel, not by trying to turn it like a wingnut. Flip the lever completely over, then lift the bicycle off the wheel. The quick-release assembly is a pressure clamp, not a nut and bolt.
Removing a Rear Wheel—Derailleur Type
Many people believe that removing the rear wheel of a derailleur-geared bicycle must be more difficult than removing a single-sprocket rear wheel. In fact, the opposite is true, because the shifting mechanism of the derailleur-geared bicycle is attached to the frame, not the wheel.
To remove the rear wheel from a derailleur-geared bicycle, loosen the rim brake as discussed at the beginning of this section. If the wheel has a hub brake, disconnect the cable at the brake and undo the brake- arm clamp from the left chainstay. Many hub brakes have quick-release cables which can simply be slipped off the brake.
Shift the chain onto the smallest rear sprocket, to get it out of the way of the wheel as much as possible. Next, loosen the axle nuts or quick-release lever, just as for a front wheel.
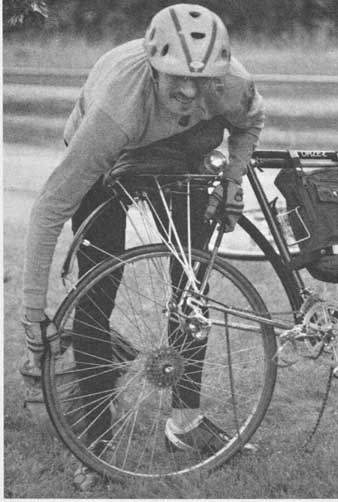
Then stand at the left side of the bicycle and lift up on the right seatstay with your left hand, stabilizing the bicycle by bracing the saddle against your left side. With your right hand, pivot the derailleur toward the rear of the bicycle. The wheel will now be free to slip down and forward, out of the fork end slots and off the chain. If necessary, help the wheel along with your right knee.
Once the wheel is free of the slots, tilt the bicycle toward you and lift it, so the wheel clears the lower part of the chain. Set the bicycle down on its left side so you don’t damage the rear derailleur.

This tourist has just had a flat tire, but he is smiling
because he is prepared. Standing at the left side of the bicycle, he lifts
it by the right seatstay to remove the rear wheel. Besides his tube-repair
kit, ho is carrying a spare tire rolled into three loops on the rear rack.
Removing a Rear Wheel—Non-derailleur Type
To remove a single-sprocket rear wheel, loosen the rim brake as discussed at the beginning of this section. Remove the cable from a cable-operated drum brake. Many hub brakes have quick-release cables which can simply be slipped off the brake.
Loosen a three-speed cable adjusting barrel locknut, and then remove the barrel from the indicator spindle. Remove the mounting screw from the brake-arm strap of a coaster brake or drum brake, and then slide the brake arm free of the strap. If a plastic protector is used on the right-hand axle nut, remove the protector. Loosen both axle nuts by turning them in a counter clockwise direction.
Usually there is no need to remove the axle nuts. If fender or rack support brackets are clamped under the axle nuts, you must remove them. If you do, take note of the washer and support arrangement on the axle.

Exploded view of a nutted front-wheel hub, showing the arrangement
of parts mounted on the axle. The cone lockwasher is used only on some Schwinn
hubs; see the text for explanation. Some components: QUICK RELEASE LEVER; AXLE
NUT; FENDER BRACE; ADJUSTING NUT

Pulling the quick-release lever away from the hub allows you to remove
the wheel quickly without the use of tools.
Some bicycles have serrated washers installed against the frame to prevent the wheel from moving forward under tension of the chain. Washers are usually in stalled between the fender and accessory supports to keep them from twisting when the axle nuts are tightened.