Modern bicycle tires are divided into two broad groups: conventional clincher “wired-on” tires and tubular tires.
The clincher tires are similar to automobile tires which use inner tubes. The tire, or casing, is made of cloth for strength, coated with rubber for traction and tread wear. The inner tube is made of airtight rubber and filled with pressurized air. Without the cloth of the casing holding it in place, the inner tube would blow up like a balloon.
Clincher tires—more properly called wired-on tires— are used on children’s and adult bicycles for almost all purposes except track and road racing. Clincher tires are easy to repair, because the inner tube is exposed as soon as the casing is removed from the rim. Many diameters, widths, weights, and tread patterns are available for heavy-duty or sport use.
Tubular tires, also called sew-ups, are sewn together on the inside next to the rim, completely encasing the inner tube within the tire. The tire is mounted to the wheel with a special cement to prevent it from “creeping” over the edge of the rim under the pressure of a high-speed turn. Tubulars are available only in light weights and in a few sizes. Their use is limited to racing and to training for racing.
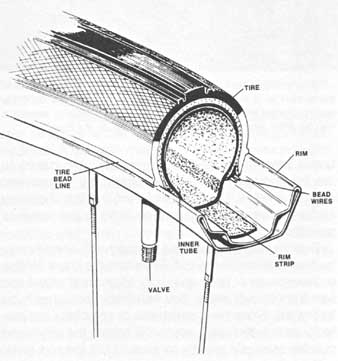
Cutaway view of a typical clincher tire, showing the principal parts
of the tire and rim.
Tubulars are not practical for average riding on city streets, because the tire and tube are almost paper- thin, which means they are vulnerable to punctures and other road-hazard damages.
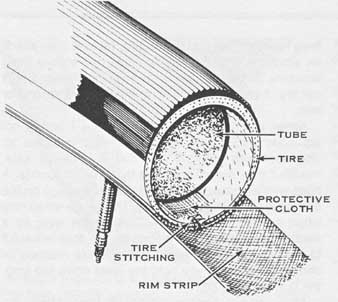
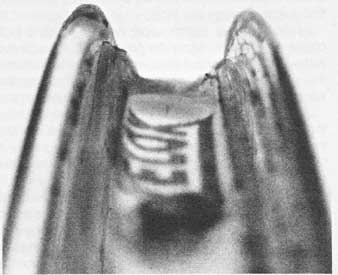
Cutaway view of a typical tubular (sew-up) tire, showing the principal
parts of the tube and tire. BEAD WIRES. TIRE” STITCHING; TIRE; PROTECTIVE CLOTH;
RIM STRIP
In addition to its light weight, another advantage of the tubular tire is that it can be folded and carried under the seat as a spare. Because it’s difficult to repair but can be quickly changed, the spare is usually mounted and the patching work performed at a later, more convenient time. The repaired tire is then carried as a spare.
Clincher-type and tubular tires cannot be interchanged on the same rim. Each must be used only on a wheel designed for its specific use. For this reason, many serious cyclists have two sets of wheels and tires, one set for the clincher tires used for normal riding and the other with tubular tires mounted for racing.
The type and design of tire treads for bicycles is as varied as those for the automobile. A wide range of patterns is available to meet the preference of the individual rider and the purpose for which he intends to use his bike.
Thorn-resistant tubes are available for riding through areas that abound in cactus vegetation. Thorns shed from these plants are blown onto the roadway, where they lie in wait for the cyclist, ready to do their dirty work. One defense against such an attack is to install a device commonly called a “thorn puller” in the South western United States or a “tire saver” in other areas. This is a very lightweight device (approximately 1/2 ounce) attached to the pivot bolt of the caliper-brake assembly on the side opposite the brakes. The puller actually rides on the tire, and if a thorn or piece of glass is picked up, it will scrape it off during the next revolution of the wheel to prevent puncture of the tire.

Maximum strain is placed on a tire and wheel when cornering hard. Seconds
after this picture was taken during a criterium race, a rear tubular tire rolled
off the rim as a rider crossed the railroad tracks, resulting in nasty skin
burns on his arms and legs. Proper inflation and careful attention to maintenance,
especially cementing of tubulars to the rim, cannot be overemphasized.
Tire Size Markings
There are several national systems of tire size markings. Sometimes the same markings are used for different sizes. The most common confusions are:
BRITISH 27-inch (630mm) is slightly larger than FRENCH 700C (622mm). If you will be using tubulars and clincher tires on the same bicycle, use the 700C size, whose rim diameter is exactly the same as for tubulars. Using 27-inch wheels would require repositioning the brake shoes.
SCHWINN 26 x 1% S-5, S-6 (597mm) = BRITISH 26 x 1¼, slightly larger than BRITISH 26 x 1% (590mm).
SCHWINN 24 X 1% S-5, S-6 (546mm) = BRITISH 24 x 1¼, slightly larger then BRITISH 24 x 1% (540mm).
20 x 1¾ (41 9mm) and all fractional sizes ending in ¾ are slightly larger than corresponding decimal sizes:
20 x 1.75 (405mm), etc.
The markings in millimeters are the only ones which can be trusted. Fortunately, they now appear on almost all new tires, like this: 28-622. The 28 refers to the width of the tire and the 622 to its inside (bead seat) diameter, both in millimeters.
A rim can accommodate a range of tire widths, but the tire inside diameter must be exact. Never force a tire. For a full chart of tire sizes, refer to Sutherland’s Handbook for Bicycle Mechanics. The bike shop where you buy tires should have a copy.
Inflation
One of the most common causes of tire failure, and the one that the rider can control, is failure to maintain the correct pressure. CAUTION: A bicycle inner tube Is thin and has a small inner volume, so air seep age Is rapid. Pressure should be checked every week. Many tubulars have gum-rubber (latex) inner tubes, which improve roiling performance but re quire re-inflation every day. A soft tire makes the bicycle hard to pedal, and leads to rim and tire dam age. As the bicycle goes over a bump, the soft tire is crushed against the rim. The rim is dented, the inner tube punctured, and the tire bruised. Often all three need replacement. The hub axle may also be bent.
Overinflation is one of the most common causes of blowouts and usually occurs at the neighborhood ser vice station. If the tire pressure is low and the rider feels he can make it to the station, he may then attach an air hose with 200 psi (pounds per square inch) pressure. Since a bicycle tire is so much smaller than a car tire, it can fill and blow oft the rim in a second or less.
Never use a service station air hose which is not equipped with a built-in gauge. A wall-mounted air dispenser with a crank and dial is relatively safe, though it may overinflate a tire by 10 or 20 pounds. A hose with a squeeze lever and pressure gauge on the end is safe if you use it carefully. The gauge works only when the lever is released. Squeeze the lever for a fraction of a second to let air into the tire, then release it to read the gauge. Repeat until the tire reaches its correct pressure. If you hold the lever down too long, the tire will blow out.
After using a service station air hose, check the pressure with your own pressure gauge.
Using a Hand Pump
Every bicycle should be equipped with a frame- mounted hand pump to inflate the tire after an on-road repair.
Correct use of this type of pump is necessary to inflate the tire to full pressure. With each stroke, pull the pump handle out all the way and push it down all the way. Because air is compressible, a bicycle pump does not work quite the same as a water pump. The first part of the downstroke only compresses the air in the pump; at high pressures the pump puts air into the tire only with the last few inches of the stroke.
If you hear a hissing sound, check the tightness of the connections. The tire is losing air, and you will never inflate it fully.
If your arms are not strong, brace your pumping arm against your side and the pump against your knee. If this doesn’t do the trick, rest the end of the pump on the ground or against a wall. Then you can push the pump with your weight, not just your arm muscles.
CAUTION: Make sure that you don’t pull on the tire valve with the pump; you could tear off the valve or pull a pump hose apart. Hold one hand around the rim and pump head, or if you are resting the pump head against a wall or the ground, place a tool handle under it so it transfers its force to the ground.
A pump with a hose lets you carry hoses for each type of valve, to help another bicyclist in distress. The trouble is in removing the hose from a Schraeder valve. As you unscrew the hose, air escapes from the tire. It can easily lose 20 or 30 pounds of pressure.
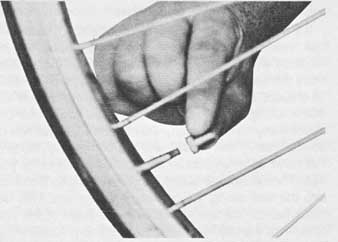
An adapter is required to fit a Schraeder pump to a tube with a Presta
valve. Open the valve stem of the tube, thread the adapter onto the stem, inflate
the tire, remove the adapter, and then close the valve stem.

Clipping the spring assembly from a Schraeder valve and removing the
pusher from the pump hose avoids air loss when unscrewing the pump. Many metal
valve caps, as shown, include the small wrench to remove the valve core. Always
use a valve cap, to prevent dirt from entering and making the valve leak. MODIFIED
VALVE CORE
One remedy for this is to clip the spring from the valve core and pry the pusher from the pump hose. Metal valve caps include the tiny wrench which will unscrew the valve core. A high-pressure bicycle tire will hold its valve closed without a spring (but use a valve cap). Any pump or service station hose can inflate a modified valve, but a modified pump hose won’t inflate a standard valve.
Tubular tires and some clincher-type tires are equipped with a Presta or Woods Continental-type valve. In order to use a service station air supply, an adapter is required that screws onto the valve stem. The Presta valve is not spring-loaded, but must be rotated counterclockwise to open it prior to inflating, and then rotated clockwise to close it after the desired pressure is reached. If you use a press-on-type bicycle pump, you don’t need an adapter, but you must push it on quickly and remove it fast, using a quick rap with your fist to prevent leakage.
Most tires have the recommended inflation pressure embossed on the side wall. If the tire is not so marked or the marking is illegible, the following chart can be used as a guide for minimum pressures to be used for the tire sizes indicated. If the tire bulges noticeably, because of an above-average load, its life can be extended by adding approximately 5 psi to the amount listed.
= = =
Inflation Chart [Tire Width vs. Pressure]
Tubular tires
Track—smooth surface
Front tire
Rear tire
Road—uneven to rough surface
Front tire
Rear tire
Touring:
Front tire
Rear tire
= = =
Always carry a spare tube or tube repair materials with you. For bicycles equipped with clincher-type tires, a repair kit or a spare tube can be carried with very little additional weight. A spare tubular tire can be folded and carried under the seat for quick and easy access. If you carry a spare tubular tire, be sure to refold it every few days to prevent a set from developing at the fold. Fold the tire with the tread on the outside and the valve stem positioned at one end of a fold so it does not chafe against the tire, and so the cemented surfaces all face each other. Then fold it twice more to fit in your tire bag.
Types of Tire Damage
Blowouts are most often caused by overinflation at a service station when attempting to bring the tire up to pressure. Blowouts can also be caused by the tire’s not being evenly seated on the rim. As the tire is inflated the bead is forced over the rim, causing part of the tube to escape. Overloading a bicycle with underinflated tires may also result in a blowout.
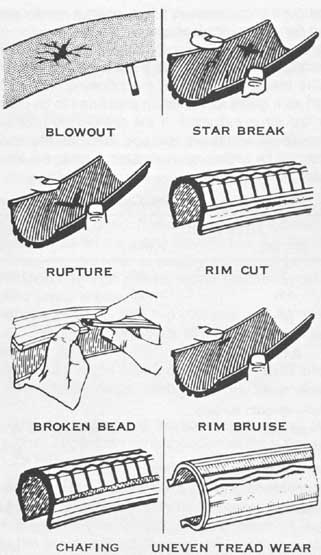
Types of tire damage discussed
in the text. The best protection against tire injury is careful riding, with
a sharp eye for road hazards. STAR BREAK;
BLOWOUT; RUPTURE; RIM CUT; CHAFING; UNEVEN TREAD WEAR
Ruptures are usually caused by running over sharp objects, jumping curbs, or riding over a rough hole in pavement or concrete.
Star breaks result from running over pointed objects, such as rocks or pieces of metal, and are difficult to detect from the outside of the tire. Therefore, if the cause of the flat is not readily determined, inspect the inside carefully for this type of damage.
Broken beads can almost always be traced to the use of improper tools when mounting the tire. To pre vent breaking a bead, use only your hands or a smooth, rounded tool when working the tire onto the rim. Never use a screwdriver or other pointed tool.
Rim bruises and rim cuts may be the result of run- fling into a curb, jumping over a curb, or running into rocks, holes, or other objects with the tire underinflated.
Chafing on the side of the tire may be caused by a crooked wheel, misalignment of the wheel in the frame, or a generator roller that is not properly positioned.
Uneven tread wear may be the result of brakes that grab or lock when applied, or of making skidding stops.
Clincher Tire Repair
If the cause of the flat is easily recognized, such as a nail, thorn, or piece of broken glass, the tube can be repaired without removing the wheel from the bicycle. Mark the damaged area of the tire with a piece of chalk or crayon, arid then work one side of the tire off the wheel using a pair of tire levers (as shown in the accompanying illustration). Don’t use a screwdriver or pointed tool. First, deflate the tire completely, holding the valve open and squeezing out as much air as you can. Then push one side of the tire inward so it can fall into the well along the centerline of the rim. This will allow part of the tire to slip over the edge of the rim. One lever can be hooked on an adjacent spoke while the other lever is being used to pry the bead off the rim. Pull the tube from the tire in the area of your chalk mark on the tire, and the puncture can usually be located. Mark the spot and you are ready to make a repair.
If the cause of the flat cannot be determined from an inspection of the exterior of the tire, or if the tire or tube must be replaced, the wheel will have to be removed from the bicycle and then the tube completely removed from the tire.
As described above, deflate the tire, push one side into the well of the rim, and then work that side loose from the rim using tire levers. With a narrow rim, start near the valve, since the part of the tire opposite the valve will go into the well more easily. After one side of the tire is off the rim, pull the tube out of the tire.
CAUTION: Be careful when removing the tire from the rim not to break the bead or to pinch the tube, causing further damage. Remove the other side of the tire from the rim, and then pull off the rim strip.
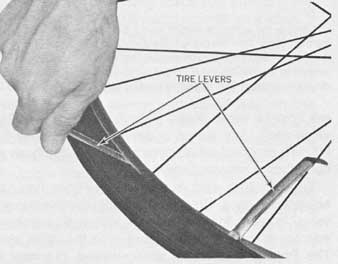
Tire levers ease the job of removing a clincher tire. With a narrow
rim, start near the valve, so the opposite side can easily fall into the well
of the rim. Some tires with nonmetallic, flexible bead wires require a special
plastic tire lever. Never use a sharp tool such as a screwdriver, which can
make a new hole in the tube.
Check the spoke heads and file smooth any protrusion that might damage the tube.
Inflate the tube slightly, and then immerse it in a container of water. Move the tube slowly through the water and watch for bubbles, indicating the leak. When the source of the escaping air is discovered, dry the tube and mark the hole with a piece of chalk or crayon.
Always remove the cause of a puncture, or it will flat the tire again. If necessary, spread the sidewalls of the tire and look for the puncturing object from the inside. A tiny wire or shard of glass may not be visible from the outside.
If a tire has a hole more than ½ inch long, it must be covered with a “boot”—a piece of heavy cloth slipped into place to keep the inner tube from ballooning out. It’s wise to carry a boot about 2 inches square in your tire-repair kit. You can cut a temporary boot from a discarded lightweight tire; glue it in place with contact cement when you get home. If a hole in the tire is more than ½ inch long, your best hope is to carry a spare tire, though a “bandage” of duct tape wrapped around tire and rim can get you to the next bike shop. Don’t use the rim brake on that wheel!
Making a Cold-patch Repair
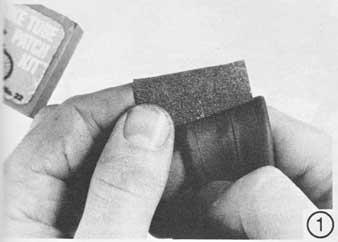
(below) 1. Roughen the area around the puncture, using a piece of medium-grit sandpaper, or by rubbing it on clean pavement until the rubber looks dull. Don’t use the grater supplied with auto patch kits; bicycle inner tubes are too thin for this. Work on an area slightly larger than the patch you intend to use. The patch should overlap the puncture by ½ inch on all sides.
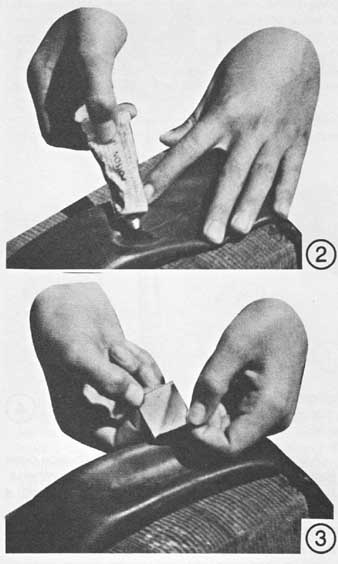
(top) 2. Apply an even coating of cement onto the tube and allow it to dry until it’s tacky. Don’t install the patch while the cement is still wet! The cemented area must overlap the patch on all sides.
(above) 3. Separate the backing from the patch and place the center over the hole, with the adhesive side facing down. Hold the patch firmly in place for a short time to allow the cement to set, and then sprinkle some talcum powder over the patch to prevent it from sticking to the tire.
4. Stretch the rim tape around the rim, starting at the valve-stem hole. Be sure the strip is the correct width. It must not be wide enough to cover any portion of the bead part of the rim.
The purpose of the rim tape is to shield the inner tube from the spoke heads. An adhesive-backed cloth rim tape works better than a rubber one with a narrow rim, because a rubber rim tape is likely to break around the valve hole. If a rim has large, recessed spoke holes, a cloth rim tape must be used. A rubber rim tape would allow the inner tube to bulge into the spoke holes and blow out.
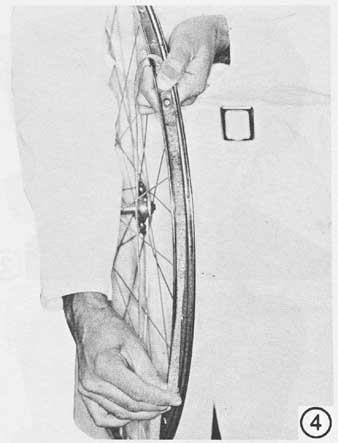
[4] A good rim tape can be made of ½-inch-wide glass fiber filament
tape or of duct tape ripped lengthwise. Use two or three layers. Cut out the
valve hole with a utility knife after pressing the tape into place.
5. Inflate the tube just enough to hold its shape, and then insert it into the tire. A tube with a flexible rubber valve-stem base must be used with a narrow rim; a valve stem with a metal washer or nut will hold the valve out of position, stretch the inner tube around the valve stem, and lead to a blowout. If this happens even with a rubber valve stem, install a leather washer around the valve stem or build up a ramp of plastic rubber material on both sides of the valve hole in the rim.
Feed the valve through the hole in the rim strip and wheel rim. Position both sides of the tire bead into the wheel rim except in the area of the valve.
A rim strip which is too wide for the well of the rim will ride up
on the shoulder, causing a lump in the tire.

[4, see above; see below: 5,6]
6. Now deflate the tube. Use your thumbs to work both beads of the tire onto the rim in both directions, starting opposite the valve, If you have difficulty working both sides of the tire onto the wheel at the same time, do one side and then work the other into position, using the tire levers for installing the final portion. CAU TION: Be careful not to pinch the tube. Inflate the tire partly and check to be sure the bead is properly positioned in the rim and the valve stem is straight. Press the valve into the tire to make sure that its base is inside the tire, not wedged between the tire and the rim. Spin the wheel to make sure that the tire is evenly seated, then inflate it to the specified pressure and install it on the bicycle.
Tubular Tire Repair
Special materials are needed to repair a tubular tire. They can be purchased in kit form. The kit includes very thin patches, plus a large piece to enable you to cut one to your own size, waxed linen thread, a needle, a thimble, some fine sandpaper, a tube of rubber cement and a small colored marking pencil. The quantity of items is enough to make about a dozen repairs. In addition to the kit, you will need a sharp knife or single- edged razor blade and some talcum powder. CAU TION: Don’t attempt to repair a tubular tire with a thick patch; it will cause a lump inside the tire, which will thump each time the tire rotates.
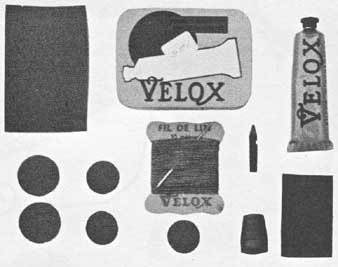
A repair kit for tubular tires contains all of the items needed to
make about a dozen repairs, as described in the text.
Remove the wheel and damaged tire from the bicycle. If the tire is not mounted, install it on an old rim if you have one handy. If not, you will have to work with just the tire. Inflate the tire to approximately 60 psi, and then slowly rotate it in a container of water; watch for air bubbles. You may notice air seeping from around the valve stem for a short time. This is normal, because the tire has a rubber strip cemented over the sewing in the area of the valve and this is the only place trapped air can escape except from an injury. When you locate the puncture, mark the spot with the colored pencil from the kit or a piece of chalk. Remove the valve nut and deflate the tire. Remove the tire from the rim by working it off with your hands and thumbs, starting on the side of the wheel opposite the valve. CAUTION: Don’t use any type of tool or you may damage the tire or the tube.
If tape is used on the rim, be careful not to wrinkle it or pull it loose from the rim unless you intend to remove it for inspection or work on the spoke heads.
RIM STRIP
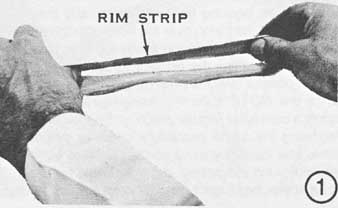
[1] Carefully peel back 5 inches of the rim strip from the tire on
both sides of the puncture. Make a couple of marks across the stitching with
the pencil. This will ensure that the original holes are used during the re-stitching
so the tire will retain its proper shape. Fold the tire at the stitching, and
then carefully cut about 2 inches of the stitching on both sides of the injury,
using a single-edged razor blade or sharp knife. Work cautiously to prevent
cutting the tire cords or the tube. Remove the old thread.
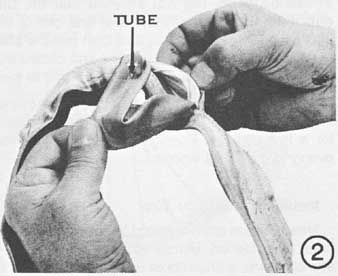
[2] Push back the protective cloth and pull out about 6 to 8 inches
of the tube. Inflate the tube slightly with a hand pump and locate the puncture
by holding the tube close to your face and feeling for escaping air. Or wet
the area with soapy water, and then watch for bubbles. Dry the tube thoroughly
and mark the hole plainly with a colored pencil or piece of chalk.
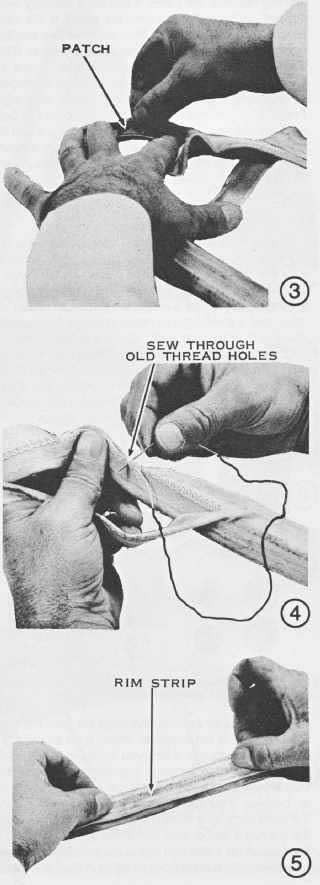
[3,4,5]
[3] Deflate the tube and stretch it out on a flat surface until it’s free of wrinkles. Roughen the area around the injury with a piece of sandpaper. Be careful not to let any dust or dirt enter the tire casing. Work an area slightly larger than the size of the patch you intend to use. Cover the buffed area with a smooth coating of cement and allow it to dry until it has a hard glaze. Remove the backing from the patch, and then place the center of the patch over the hole, with the adhesive side facing down. Hold the patch firmly in place for a short time to allow the cement to set. Sprinkle some talcum powder over the patch to prevent it from sticking to the tire. NOTE: lithe tire casing has a small fracture, apply a canvas or regular patch on the inside of the tire following the same procedure used for patching the tube. Use hardware-store contact cement. However, if you do patch the casing, the tire should be used only for a spare, because it has lost considerable strength.
[4] Place the protective cloth over the tube and smooth it free of wrinkles. Fold the tire at the stitching and align the pencil marks you made before cutting the tire open. This will ensure that the old holes are aligned and that the tire will retain its proper shape. Thread the needle with the waxed linen thread from the kit and begin stitching the tire, starting a few stitches back from the cut. Make the first few stitches over the end of the thread to prevent having to make a knot for the thread to hold. CAUTION: Be extremely careful during the sewing operation to ensure that the holes on both sides of the tire are aligned, and that the tube is not punctured with the needle. Pull the thread up snug, but not so tight that the thread cuts into the casing. Place the end of the thread under the last few stitches, and then pull the stitches taut. This is a sailmaker’s method and eliminates the necessity of knotting the thread at the end of the job.
[5] Apply a thin coating of rubber cement to the rim strip and to the tire over the repaired area, and let it dry for a few minutes. Position the rim strip on the tire evenly and without wrinkles.
Installing a Tubular Tire
New tubulars often are hard to install until they have been pre-stretched. Before installing a brand-new tire, stretch it over a rim without using rim cement or tape, inflate it to full pressure, and leave it overnight. Old, dry cement on the tire-stretching rim is all right, but don’t add any new cement. It’s helpful to keep a couple of old, dented rims to use for stretching tires.
For a quick on-road tubular tire replacement, both the tire and rim must have a layer of tire cement. Don’t use a brand-new tire as your spare. If necessary, mount and remove a tire so that it will have cement.
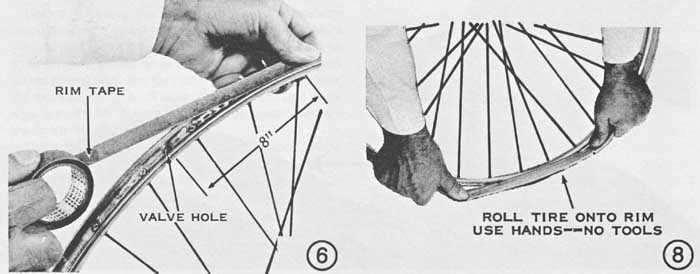
[6] On the wheel on which you will finally install the tire, check all the
spoke heads to be sure they don’t protrude to cause tire damage. If any of
the heads do extend above the rim, file them smooth. Remove any old tape that
is wrinkled or dirty, or if you suspect it won’t hold the tire properly. If
cement is used instead of tape and it’s dirty or flaky or does not appear to
be in good condition, clean the rim thoroughly with solvent. It’s not good
practice to apply new cement over the old because a buildup will result in
bulged areas on the rim. If the tire is old and overstretched, use rim tape
to build up the rim. Apply new rim tape by starting about 8 inches from the
valve hole and setting it evenly in the rim channel. The tape is a double-coated
type, with adhesive material on both sides. Pull the tape firmly around the
rim and overlap the starting end by approximately 2 inches. Press the tape
firmly into the rim channel with the handle of a wrench or other rounded object.
If cement is used, apply two or three light coats to the tire and the rim, allowing each to dry until tacky before applying the next. Use road-type tire cement from a bike shop or trim cement from an auto-parts store. (Track-type tire cement is not made for easy tire replacement.)
For an on-road repair, use a tire which has been on a rim previously, as described above. Unless it was cemented recently, use care in cornering. If you might need the spare tire in a race, apply fresh cement to it before the race.
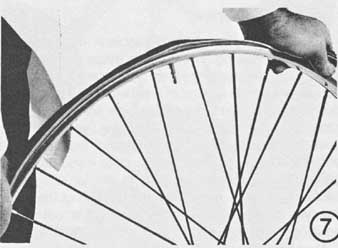
[7] Cut a valve-stem hole in the tape with a sharp knife or single-edged
razor blade. Deflate the tire completely or until there is just enough air
to give it a little shape. Place the valve stem through the hole in the rim,
with the wheel in an upright position, as shown. Position the tire in place
on the rim by working it on with your hands and moving it in both directions
from the valve.