This section outlines a regular maintenance program for your bicycle--this includes all-important preventive maintenance. It also includes some basic information on tool use, mechanical construction of the bicycle, and lubrication.
For the cyclist active in racing, touring, or merely riding for pleasure or health, the results of maintenance work are immediately evident in less effort for the distance traveled, or in more speed for the amount of energy expended, not to mention the dollar savings in parts and labor.
A national study, including all types of bicyclists, classed 17 percent of bicycle accidents as being due to mechanical failure. Another study, limited to adult bike club members, found only 3 percent of accidents due to mechanical failures. Why the difference?
Mostly, it’s that the bike club members kept mechanical performance high, catching problems before they led to abrupt failures. The good riding skills of these cyclists also contributed to their accident rate, one-fifth of the national average.
AVOIDING CREEPING DECAY
It’s easy to let a bicycle’s performance deteriorate when changes happen slowly. Brakes wear out, bearings loosen up, cables dry out and stick, but there are no dramatic changes from one day to the next.
If you let your bike deteriorate, you tend to ride within its limitations. You can’t ride fast because you know that it wouldn’t be safe. The brakes are weak, the steering is shaky, the tires are about to blow out.
Don’t let it happen. Your bike could fail you when you can’t afford to lose control.
If your bicycle does not seem to work right, read through the problem charts in the sections about the different parts of the bicycle. These will help you find the cause of the problem; then perform the necessary maintenance. If you follow the instructions in this guide and rebuild your bike regularly, you won’t only put it into peak condition, you will know how to fix common problems as they crop up.
Inspect Before Riding
Before getting on a bicycle, give it a quick inspection for tire pressure, wheel rotation, gear and brake operation, and rattles. Pinch the tires, spin the wheels, squeeze the brake levers, and shift through all of the gears. Bounce the bike off the ground a couple of times and listen for rattles. See whether anything falls off.
CAUTION: Be especially sure that nothing could fall Into the spokes.
A pre-ride inspection is especially important if you were not the last person to ride the bicycle, if you are carrying baggage, or if the bicycle has been through any unusual treatment—a fall, a trip in an airline bag gage compartment, a long period of storage. Many accidents and breakdowns can be avoided by a simple checkover.
Inspection and maintenance don’t stop when you get onto the bicycle. The mechanical parts of a bicycle are on the outside, so most problems give clear warning signs. If anything sounds, looks, or feels unusual, stop for a safety check.
Tracing Problems
Trace a noise or vibration according to where you hear and feel it, and how often it repeats.
Does a noise repeat once every time the wheels turn around? Then it almost certainly is in a wheel—a bent rim rubbing a brake pad, a loose spoke sawing against its neighbor, a lump in the tire.
Does it repeat once every time the pedals turn around? Look for a bent chainwheel or a loose crank or pedal. Or it could be a creak or squeak in the saddle or handlebars as your weight shifts with pedaling.
The chain comes around once for every three or four turns of the pedals. A bent chain link will catch that often; a dry link will squeak that often.
Little experiments can help you trace noises and vibrations. For example, for a squeak once every time the pedals come around, try standing up to see whether it’s the saddle; then try pedaling with one foot at a time to see if it’s in a pedal. Shift the front derailleur to see whether the squeak changes—it might be in the chainwheels.
A well-maintained bicycle does not rattle. A rattle deserves your serious attention. Most things that rattle will eventually shift position or fall off.
For example, a loose generator could eventually fall into the spokes. Then you will come to a very quick unplanned stop. This is a fairly common type of accident—yet the generator was rattling for miles before it got loose enough to slip.
If you hear a rattle, stop to identify it. Lift each wheel off the ground a couple of inches and drop it. Find the rattle and tighten up the loose part.
PERIODIC MAINTENANCE
The accompanying illustration and listings point out specific areas requiring periodic attention and the type of lubrication to be used. The tasks are keyed to the illustration.
If you ride your bicycle through the winter, a good time to perform annual maintenance tasks is in the spring, when the sloppy weather is over.
Maintenance intervals are flexible. If you ride in foul weather or on dirt, service your bicycle more frequently. If a bicycle is out of use, maintenance can be postponed; but after two or three years, lubricants and rubber parts may dry out, so a bicycle should be inspected and overhauled as necessary before returning it to service.
Weekly Maintenance Tasks:
- W1 Inflate the tires to the correct pressure. Bicycle tires lose pressure much faster than car tires. Some tubulars, with latex inner tubes, need daily re-inflation.
- W2 Spray the chain with a lightweight lubricant.
- W3 Pry out glass splinters and other small penetrating objects from the tire treads. Check the tires for wear and damage.
- W4 Test hub and crank bearings for looseness or binding.
- W5 Check the adjustment of a derailleur or internally geared hub.
- W6 Check all bolted-on parts for looseness, and tighten as necessary.
Monthly Maintenance Tasks:
- M1 Lubricate front hub. Use a few drops of light oil if an oil fitting is provided. Use grease if equipped with a fitting.
- M2 Lubricate the rear hub. Use a few drops of light oil or grease depending on the type of fitting.
- M3 Clean the chain and re-lubricate it. Clean the sprockets.
- M4 Apply a few drops of lightweight oil to the ends of the brake and shift cables where they enter the housings.
- M5 Apply lightweight oil to all pivot points of the caliper brakes.
- M6 Apply lightweight oil to the moving parts and pivot points of the rear derailleur.
- M7 Apply lightweight oil to the pivot points of the front derailleur.
- M8 Pedals—apply medium-weight oil at the oil hole in the dustcap, if any.
- M9 Apply lightweight oil to the freewheel mechanism.
- M10 Clean the saddle with warm soap and water. For a leather saddle, use saddle soap.
Annual Maintenance Tasks:
- A1 Overhaul the front-wheel hub. See Section 8.
- A2 Overhaul the pedals. See Section 15.
- A3 Overhaul the headset. See Section 18.
- A4 Overhaul the rear derailleur. See Section 11.
- A5 Overhaul the front derailleur. See Section 12.
- A6 Overhaul the rear hub. This task applies to single-speed and multispeed rear hubs. See Section 14.
- A7 Overhaul the hanger set. See Section 15.
- A8 Overhaul the freewheel cluster body. See Section 10.
- A9 Remove, inspect, and re-lubricate all control cables. Replace as necessary. See Section 6.
SOME BASIC MECHANICAL THEORY
Working on your bicycle is easier if you think of it as a collection of basic mechanical elements—bearings, screw threads, friction surfaces, and a few others. Each part of your bike is a system of these basic mechanical elements.
Periodic maintenance of a typical derailleur-equipped bicycle. The letter prefixes indicate W for weekly. M for monthly, and A for annual tasks, as outlined in the text.
For example, a wobbly wheel and a chattering brake arm may seem very different, but each of them rotates around a bearing, and the bearing is too loose. You will learn to adjust both bearings in very much the same way. If you think about similarities like this, you will progress quickly as a mechanic.
About Bearings
A bearing is the connection between two parts in relative motion— for example, the brake arm and the brake bolt on which it pivots, or the turning wheel and the stationary axle. A bearing shouldn’t be loose, but it shouldn’t be so tight the parts jam together.
A non-turning axle passing through a hole in the turning wheel is an example of a sleeve bearing. This is the simplest kind of bearing, used in a primitive donkey cart. The sliding motion between the axle and the wheel generates friction, making more work for the donkey.
Bicycle brakes still use sleeve bearings—the brake bolt passes through a hole drilled in each brake arm. The hole is just a little larger than the bolt, so the brake arm can swivel and press the brake shoe against the rim.
There needs to be something to keep the brake arm from sliding lengthwise off the bolt, so behind the brake arm there is a widened part of the bolt to keep the brake arm from sliding back. In front of the brake arm a couple of nuts are screwed onto the threaded end of the bolt, one behind the other. These nuts keep the brake arm from slipping forward off the bolt.
These nuts also let you adjust the bearing. When you use the brake, the brake arm and nuts slowly wear each other down, so the brake will slowly get looser. Every once in a while, you need to adjust the nuts so there is just a tiny bit of space between the inner nut and the front brake arm. Then the brake arm can swivel freely, but it can’t wobble or chatter.
Ball Bearings
Like the brake or the donkey cart, the first bicycle wheels had sleeve bearings. Since bicyclists complain about overwork better than donkeys, ball bearings were invented for bicycle use, toward the end of the nineteenth century.
Each end of a bicycle’s hub shell has a cup-shaped recess. A ring of steel bearing bails rolls around inside. The axle passes through a hole in the bottom of the cup.
The axle is threaded, and a cone is screwed onto each end. The inner, angled surface of the cone contacts the balls in the cup. The balls rolling between the cup and cone eliminate the sliding contact of the sleeve bearing, greatly reducing friction. Ball bearings are used in the hubs, pedals, bottom bracket (crank bearings), and headset (steering bearings)—wherever low friction is important.
As you screw the cone down tighter, you are reducing the clearance inside the bearing, just as you did with your brake. This stops the wheel from wobbling.
Once you have the cone in its correct position, you have to keep it from unscrewing. A locknut holds the cone in position once it has been adjusted. The same principle is used on the hub, the brake, and wherever else a bearing’s clearance is adjusted.
This is slightly different from using a nut and bolt to clamp a fender bracket or handlebar in place. We simply want to tighten these down; but we don’t want to tighten down the hub cones or brake arms. We want them just loose enough to turn freely. For this reason, we use two nuts and tighten them against each of her. The double-nut system of hub cone and locknut, or the two nuts on the brake bolt, allows free motion in the bearing while securing the adjustment.
You check the hub cone or brake arm for tightness or wobble, and turn the nuts bit by bit until the bearing is adjusted perfectly—just short of binding.
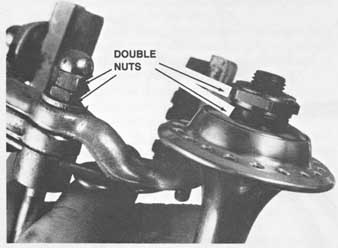
Two nuts tightened against each other are used to set the adjustment
of bearings in the brake, the hub, and other moving parts.
Tightening Threaded Parts
Threads on a bolt, hub axle, or other part work like a wedge wrapped diagonally around the bolt. Turning a nut on a bolt moves it slowly along the bolt. This multiplies the force you apply with your wrench. The nut and the bolt head can be made to squeeze other parts tightly together between them, securing these parts.
If you don’t tighten a nut or bolt enough, it might loosen. If you overtighten it, you could strip the threads or break it off. How do you tell that you have tightened it enough?
There is a tool, called a torque wrench, for measuring the tightness of nuts and bolts, but you should not need to use one on a bicycle. With a little experience, you can tighten nuts and bolts by feel.
As a nut or bolt tightens, it becomes harder and harder to turn, for maybe a sixth of a turn. At this point, it begins to get harder much more quickly. Turning it backward, in the loosening direction, becomes almost as hard as turning it forward. Tighten the nut or bolt into this zone, but not too far. Test by trying to turn it both ways, to make sure that it won’t unscrew easily. The exact amount of tightening will depend on the size of the nut or bolt. Smaller-diameter threads and thinner nuts must be tightened with less force.
A screwdriver does not apply enough force to tighten a bolt securely. Use the screwdriver to start the bolt, and to hold the bolt from turning while you tighten the nut onto it with a wrench. As the nut tightens, friction will help keep the bolt from turning.
If a nut or bolt gets harder to turn and then easier, you have over-tightened it and stripped the threads; the part should be replaced. Usually, axles are made of harder metal than axle nuts, so you have to replace only the nut. First, clean out any pieces of the nut still wrapped around the axle threads.
Every nut or bolt head should press evenly against a flat surface. A washer is used to provide such a surface where it does not already exist. The fork ends of a bicycle are a good example. Because of the axle slot, the nut does not bear down all the way around. If it’s tightened directly against the fork end, without a washer, it will grab harder on one side of the slot or the other, and “walk” along the slot. The wheel will move out of position. With a washer, the nut will tighten securely.
When tightening, hold the bolt steady and turn the nut. Friction between
the bolt and the parts being assembled will help keep the bolt from turning.
Washers also prevent damage to the parts, by keeping them from scraping over each other as they are tightened. In some applications, special lockwashers or non-turn washers are used. Don’t leave out the washers when you reassemble parts!
Lubricate Before Tightening
To aid in tightening a threaded part, oil or grease the threads and the surface against which the part tightens. CAUTION: Failure to oil threads can result in stripped nuts, especially axle nuts. Lubrication also prevents the parts from rusting together. A very few threaded parts should not be lubricated; these exceptions are given in the rebuilding instructions in later sections.
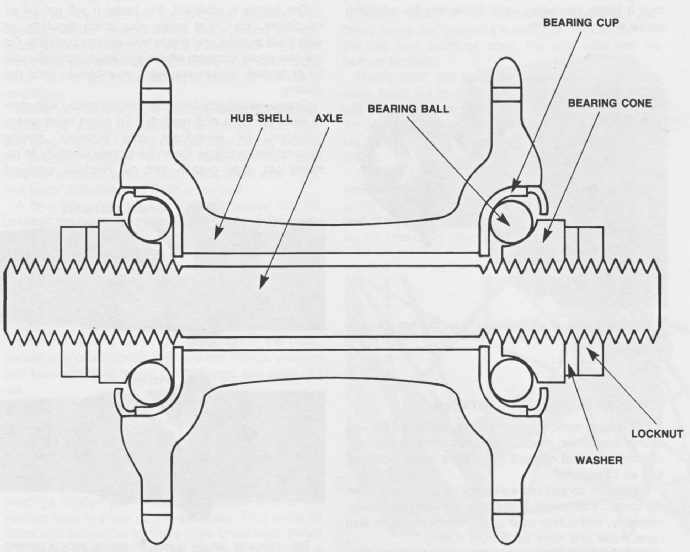
A cross-section drawing of the bearings of a conventional cup-and-cone
front hub. The bearing adjustment is set by threading either cone along the
axle. Then the cone is secured with the locknut. Compare this drawing with
the front hub on your bicycle. BEARING CUP (race); HUB SHELL; AXLE; BEARING
BALL; CONE; LOCKNUT WASHER
Using Tools
A good feel for tools is basic to bicycle work, as to any other type of mechanical work. Special techniques are described in the rebuilding instructions, but for the basics of how to hold and apply tools, it’s best to spend a few hours working alongside an experienced mechanic. There’s nothing mysterious about tools, but they serve you much better when you are using the right one for the job and applying it effectively.

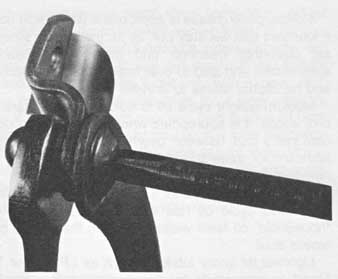
You must use a wrench of exactly the correct size to prevent damage to parts.
Unless the wrench fits snugly, don’t use it. You must make an adjustable wrench
the right size. Every time you turn it to a new position, rock it lightly into
place while tightening the adjusting screw with your thumb.
Each time you turn an adjustable wrench to a new face of a bolt or nut, rock the wrench and tighten the adjusting screw to fit the wrench to the nut.
LUBRICANTS AND LUBRICATION
For bicycle work, you use grease, which is thick and sticky, like butter; medium-weight oil, about the consistency of salad oil; and lightweight spray lubricant, thin as turpentine.
Lubricants spread into a slippery layer between moving parts. Lubricants make the parts move easily, smoothly, and quietly over each other. Lubricants also repel water and keep parts from rusting.
Each lubricant has its proper use in bicycle maintenance.
Multipurpose grease is appropriate where you need a lubricant that will stay put, as for the bicycle’s head set (steering) bearings and other major bearing assemblies, and also to coat brake cables, seatposts, and handlebar stems to prevent corrosion.
Medium-weight cycle oil is sold in squirter cans at bike shops. It’s appropriate where you must run lubricant into a part, between overhauls. It’s also the right lubricant for three-speed hubs and is acceptable for non-derailleur chains.
CAUTION: Don’t use “household” oil on a bicycle. Good cycle oil has a light, sweet smell. Acid “household” oil feels watery between the fingers and smells sour.
Lightweight spray lubricant such as LPS-3® or Tri- Flow® is appropriate for derailleur chains; a heavier lubricant would attract excessive dirt. A lightweight spray lubricant also penetrates cracks, to help you disassemble parts which are stuck.
The lighter a lubricant, the faster it will run off or evaporate. You must spray your chain regularly, or else it will squeak and waste your energy pedaling. Don’t use spray lubricant where you would normally use oil or grease, unless you want your bike to wear out quickly.
Grease eventually becomes contaminated with met al wear particles and road dirt. To avoid rapid wear:
Rebuild or re-lubricate your bicycle’s moving assemblies regularly. Clean parts very carefully to re move old, dirty grease and oil. Replace worn-out parts—they’re where metal chips come from. Adjust bearings carefully to prevent excess wear.
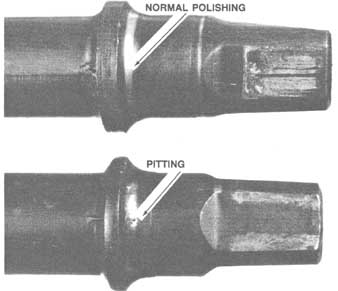
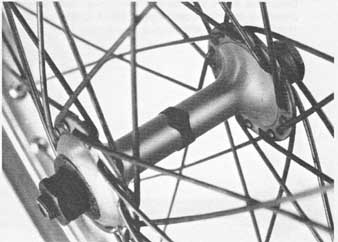
The upper axle can be reused; its bearing track is polished smooth
with normal wear. The bearing track of the lower axle has begun to flake off,
leaving tiny pits. This axle must be replaced.
Keep your stock of lubricants clean. Grease, especially, picks up dust and dirt easily. If you bought grease in a can, scoop it out only with a clean tool. Take out as much as you need for a work session, pack it in a clean paper cup, and then put the lid back on the can. If you bought grease in a tube like tooth paste, keep the cap on the tube except when you’re squeezing the grease out. Don’t touch the end of the tube to anything dirty. Plastic tubes can suck dirty grease back inside when you release pressure on them.
Sealing Bearings
You can prolong the life of lubricants and reduce wear by sealing bearing assemblies to prevent dirt from getting into them.
Most bicycle bearings, as sold, are shielded with dustcaps which cover most of the opening through which grit could enter, but they are unsealed—between the turning and stationary parts there is an open crack which can let grit in, especially in dusty or wet riding conditions.
Some very simple tricks will help keep the grit out. Fenders go a long way to keep dirt off the bike. They also keep it off you! A ring of inner-tube rubber around the headset bearings will seal them. Ordinary pipe cleaners wrapped around hub cones, crank axle ends, and pedal spindles seal them quite well.
A bike store can sell you a plastic sleeve that fits between the bottom bracket cups. It protects the bearings from dirt inside the frame. If your bike has an open-topped seatpost, plug its top. This will keep dust and sand from falling down the seat tube.
Adding Oil or Grease Fittings
Consider adding oil or grease fittings to the hubs, pedals, and crank housing. With these fittings, you can add lubricant from inside the bearings and flush dirt out.
You can drill oil holes in pedal dust-caps, hub barrels, and bottom-bracket shell—install the bottom bracket without a plastic sleeve, or puncture the sleeve with a heated spoke.
Drill the oil holes during a rebuild, so that you can clean out the metal chips from drilling. Grease the bearings lightly—you’ll need the grease to hold the bearing balls in place during assembly. Plug pedal oil holes with toothpicks o leave them uncovered; install hub barrel clips from another model of hub; plug a bottom-bracket oil hole with a self-tapping screw.
An ordinary pipe cleaner wrapped around the gap between dust- cap and
cone can serve as an effective dust shield.
Another tactic: If you’ve carefully cleaned out your bike’s frame and capped the seatpost, you can remove the cap and squirt oil down the seat tube into the bottom bracket.
Heavy (SAE 90) gear lubricant from an auto-parts store stays put longer, so it’s better than cycle oil for ball bearings, except in three-speed and coaster hubs. An on-the-road oiling kit is available from many bicycle supply shops and Internet order.
Oil once a week, and after riding in wet weather. Oil when you bring the bike home; don’t wait until you’re going for a ride. After oiling, lay the bike on its side on a bed of old newspaper. Then wait a while, oil again, and lay the bike on its other side so oil will get to both sides of the bearings. Oil hubs sparingly and wipe off the excess afterward, or oil will run down the spokes to the rims. Then your brakes will slip or grab.
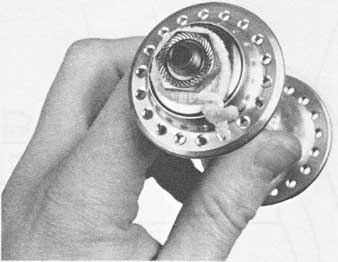
The spring clip at the center of the hub barrel covers an oil hole.
Frequent oiling will flush dirt from bearings and increase their life. DIRECTION
OF THRUST FORCE SEAL; RETAINER; BEARING BALL; OUTER RING
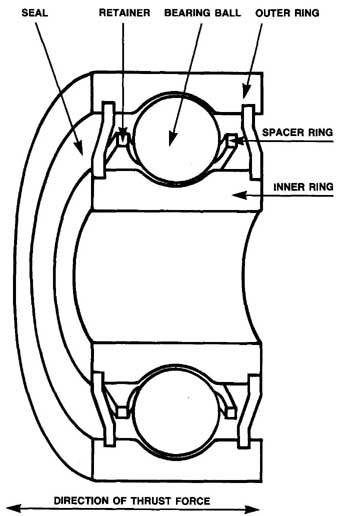
Seated-bearing components use radial-contact bearing cartridges. A spacer
ring positions the balls into a full circle. Thrust (lengthwise) forces must
be kept low to avoid damage; special procedures are detailed in Sections 8
and 14 on hubs and Section 15 on crank hangers and pedals.
Grease fittings avoid the runoff problem, and are especially recommended for hubs. A grease fitting must be installed in a threaded hole. You can buy the fittings and a grease gun at an auto-parts store. A good hardware store will carry the tap (threading tool) and special-sized drill required to install grease fittings. A bike shop may be able to sell you a replacement axle for a nutted hub with a grease fitting on the end.
If you can’t be bothered with oil or grease fittings, do what is more common but less effective: Rebuild and re-grease your bottom bracket, hubs, and pedals once or twice a year.
Sealed-bearing Components
A final dirt-fighting strategy is to use commercial sealed-bearing components—hubs, bottom brackets, and pedals with rubber or plastic wiper seals designed to keep dirt out.
Some high-grade bikes have these as original equipment, but most sealed-bearing components are purchased as upgrades. Rebuilding is simple, using standard ball-bearing cartridges, or else the component is discarded when worn out. This guide includes instructions for installing and rebuilding sealed-bearing hubs, crank-bearings, and pedals.
Sealed-bearing components use radial-contact bearing cartridges. Their construction is different from that of conventional angular-contact bearings, and so special procedures are necessary in adjusting them. These procedures are covered in the instructions on rebuilding sealed-bearing components in Section 8 and Section 15.