You don’t need many tools and supplies to work on your bicycle, but you need the right ones. You can buy some of your tools at any hardware store; others are special items available only at bike shops. The first tools you buy should prepare you to handle common on-the-road repairs such as a flat tire.
A full maintenance program in a home workshop requires more tools, and some thought to organizing your work area. You can save yourself time and money by maintaining a stock of spare parts. This section is intended to give the guidance you might need to set up an efficient bicycle workshop.
BASIC ON-THE-ROAD TOOL KIT
Buy the following tools and carry them with you whenever you ride your bicycle. They will get you through most on-the-road repairs. Except for the tire pump, which clips to the frame, all of these tools fit in a small pouch. Sometimes you can buy a neatly pack aged kit which includes most of these tools, but every bicycle has a few special tool requirements, so you may have to make a few additions to a prepackaged kit.
Buy good-quality tools. Cheap tools wear out fast and can damage your bike, so they cost more in the long run. Some major brands of fine tools carry a lifetime guarantee.
Framefit Tire Pump
Buy a pump which clips to your bicycle’s frame and fits your tire valves. There are two common types of tire valves in use on bicycles: Schraeder (automotive-type) and the smaller Presta.
The cheapest framefit (carry-along) bicycle pumps have a hose that attaches to the tire valve. Inflating a tire fully can be difficult with a cheap pump, especially if you don’t have strong arms. Better pumps have a locking head which clamps around the valve stem and prevents air from escaping. A pump with a thin barrel is preferable; it may take a few more strokes to reach full pressure, but it’s much easier to push.
Tire-pressure Gauge
Most tire-pressure gauges sold at auto parts stores register only up to 50 pounds per square inch. Buy yours at a bicycle shop; it must read to 100 pounds or more. Schraeder and Presta valves require different tire-pressure gauges. Buy the gauge which fits your valves. A few framefit bicycle pumps have a built-in gauge, making a separate gauge unnecessary.
Tire-patch Kit
Buy a small patch kit at a bicycle shop. It should have thin, tapered patches, a small tube of patch cement, and a scrap of sandpaper. Large patches in kits intended for automobile inner tubes are not only bulky but work poorly. Their thick patches overstress a thin bicycle inner tube, and the coarse metal grater included in these kits can cut right through one.
Tire Irons
Usually sold in a set of three, tire irons aid in levering a tire off the rim to get at the inner tube. If you lose one of your tire irons, don’t despair; two will do the job. Your screwdriver is no substitute, though; too often, it will make a new hole in the inner tube.
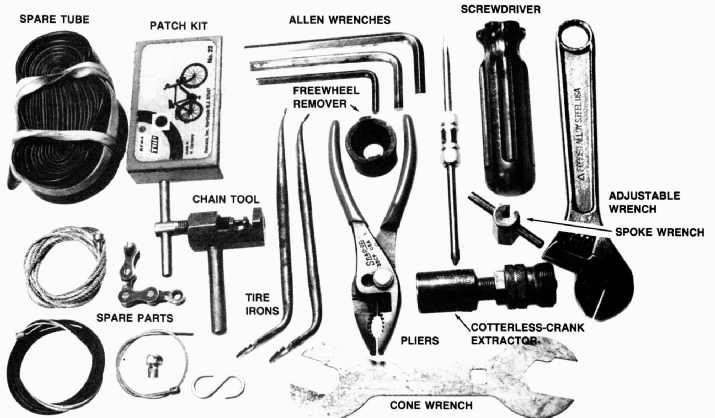
The basic on-the-road tool kit includes tire-repair supplies, adjustable
wrench, cone wrenches, Allen wrenches, reversible screwdriver, spoke wrench
freewheel remover, cotterless-crank extractor, and chain-rivet tool.
Adjustable Wrench
The adjustable wrench is important because there are so many different sizes of nuts and bolts on bicycles. There are two systems of English dimensions, besides metric. Often, all will be represented on the same bicycle. While a bicycle shop will have a full set of fixed wrenches of each type, these would be heavy baggage in a traveling tool kit.
Buy a 6-inch adjustable wrench for general use. If you have weak hands, buy an 8-inch one instead, for more leverage. It’s best to buy a high-quality American-made wrench, which will weigh less and last longer. Usually, the best deals on wrenches are in the tool department of a hardware store or department store.
Open-end and Box-end Wrenches
In addition to the adjustable wrench, it’s helpful to carry a few small open-end and box-end wrenches in the more common sizes, especially for work on brakes. Save weight by buying double-ended wrenches. Common useful sizes are 7, 8, 9 and 10 mm. Check your bike to see what it needs. Bike shops carry these wrenches.
Hub-cone Wrenches
These are thin open-end wrenches used to adjust hub bearings. Cone-wrench sizes differ from one bicycle to another, so either buy a full set or take your bicycle with you to the bike shop when you buy one.
Allen Wrenches
Many modern bicycle components have recessed- head bolts with the hexagonal holes for these wrenches. Allen wrenches are simple and lightweight. On bicycles, 5mm and 6mm Allen fittings are common; 3mm, 4mm, and 7mm fittings are less common. Buy these wrenches at the bike shop or at a well-stocked hardware store; take your bicycle so you can find out what you need.
Spoke Wrench
This small, slotted wrench is needed to replace broken spokes and to repair a damaged wheel. Spoke nipple dimensions are not all the same; check the fit before buying your spoke wrench.

A frame-mounted tire pump is essential for on-road repairs. The type
at the right, with a locking head, is easier to use.
Screwdriver
Small bolts on your bicycle may have plain slotted or Phillips (cross-slotted) heads. The most convenient screwdriver has a reversible shaft to fit both. This may not even be necessary on your bicycle, as most Phillips screws used on bicycles have one slot widened so they will also work with a plain screwdriver. Check to see.
Freewheel Remover
You’ll need this special splined or slotted tool to fit the brand and model of freewheel (rear-wheel sprocket assembly) on a derailleur-equipped bike. This will let you take off the freewheel to install a new one, or to get at a broken spoke on the right side of the rear hub.
Cotterless-crank Extractor
Most bicycles are sold with cotterless cranks these days; each arm of the crank has a square hole which fits over a square axle end. The cotterless-crank ex tractor is two tools in one: a wrench to turn the bolt that holds the crank to the axle, and a small gear-puller to pull the crank off the axle. Buy this at a bicycle shop. Different models of crank require different extractors, so take the bike with you.
Chain-rivet Extractor
This tool is necessary to replace a chain on a derailleur-equipped bicycle, and is helpful to clean a chain. On-the-road trouble with a chain is rare, but this tool is small, light, and convenient. Sometimes it’s easier to take a chain apart to remove it from the derailleurs than to take them apart. Some types of chain, particularly the Shimano Uniglide chain, require a special extractor; check before you buy yours.
ON-THE-ROAD REPAIR MATERIALS
There are a few spare parts which it makes sense to carry in your on-the-road tool kit.
Spare Cables
Brake and shift cables can break without warning, so carry a spare for the rear brake or derailleur: Coil up the excess length if it’s the front cable that needs replacement.
A cable has a molded-on metal fitting at one end to secure it to the brake lever or shift lever. “Universal” cables are sold with a different type of fitting on each end. Have the bike shop cut off the end you don’t need, or cut it off yourself—or else you won’t be able to install the cable. A drop of instant glue on the cut end will prevent the cable from unraveling.
Spare Bulbs and Batteries
If you ride at night, carry spares for your lights. Some lights have a clip for a spare bulb inside the housing; otherwise, you can carry bulbs in a 35mm film can cushioned with tissue.
Spare Spokes
Especially on a longer trip, you may need to replace a broken spoke. Spare spokes must be of the same length as those on your bicycle; sometimes lengths are different on the front and rear wheels. You can carry your spokes taped to the bicycle frame.
Lubricants
A small can of lightweight spray lubricant is helpful to quiet a squeaky chain and is worth carrying on a lengthy tour, especially if there might be bad weather. During a longer ride, a small bottle or can of medium- weight oil also comes in useful for cables, brake pivots, and threaded parts. Buy a good bicycle oil. CAUTION: So-called “household” oil, such as 3-in-1, has a vegetable base and contains acids. It will harden and gum up mechanical parts.
You’ll rarely need grease for an on-road repair, but it has many uses in the home shop; you might as well buy it with the other lubricants. Buy a good multipurpose bicycle grease.
Spare Inner Tube and Tire
If your bicycle has quick-release hubs, it’s much faster to replace an inner tube than to patch one— especially helpful in bad weather or if you are commuting to work. Also, a tire or tube sometimes becomes damaged beyond repair, so it’s worth carrying spares on a long tour. Special foldable tires are available, but you can also roll a conventional tire into three loops and fit it into a small bicycle bag. Tape it together so it won’t pop open unexpectedly. Don’t try to roll it into two loops—you’ll just end up with a large, clumsy figure- eight.
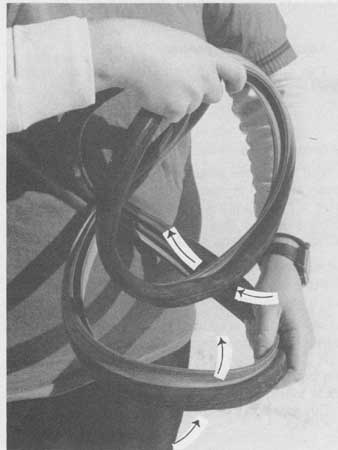
It’s easy to roll a tire into a triple loop as shown, so it will fit
into a bicycle bag.
EQUIPPING THE WORKSHOP
Beyond the on-the-road tool kit, additional tools are required for overhauls.
Many of the tools listed here are common and in expensive; others are rare or expensive. In many cases, you could make a substitute tool cheaply, or use a somewhat more time-consuming technique that does without the tool. Such possibilities are covered in the following section and in the sections on overhaul of the different parts of the bike. If you doubt whether you need a tool, you can afford to wait until you are learning the particular repair in which the tool is used.
Tools are listed here in approximate order of importance.
Work Stand
A work stand raises the bicycle to a convenient height and allows both wheels to turn. Many commercial work stands are available. Some are floor- standing; others attach to a wall and double as bicycle storage racks. Many have a clamp which secures the bicycle by one of its frame tubes.
CAUTION: Always position the frame-tube clamp of a work stand over a bare section of the frame. A fitting or cable under the work stand’s clamp can dent the frame.
A compact, improvised work stand for the home shop can be made of a couple of loops of rope hung from hooks in the ceiling, about 3 feet apart. One loop goes under the saddle, the other under the handlebars. You could even hang the front of the saddle over an overhead pipe or a tree branch—especially useful in on-the-road repairs. If you happen to have a car-trunk rack for your bicycle, this can also serve as an outdoor work stand.
CAUTION: Don’t rest a bicycle with dropped handlebars upside down. The weight will fall on the brake cables and kink them. Even on a bicycle with wide, upturned handlebars, it’s inconvenient to work on parts which rest on or near the floor. It’s better to prop the bike against a wall or lay it on its side for many jobs.
Bottom-bracket Tool Set
It’s possible to rebuild a bottom bracket (crank axle assembly) using a hammer and punch or large lock joint pliers, but they will leave a visible mark. A set of tools made especially for your brand of bottom bracket will include all of the necessary wrench sizes. You may be able to use substitutes for some of these tools or make them yourself.
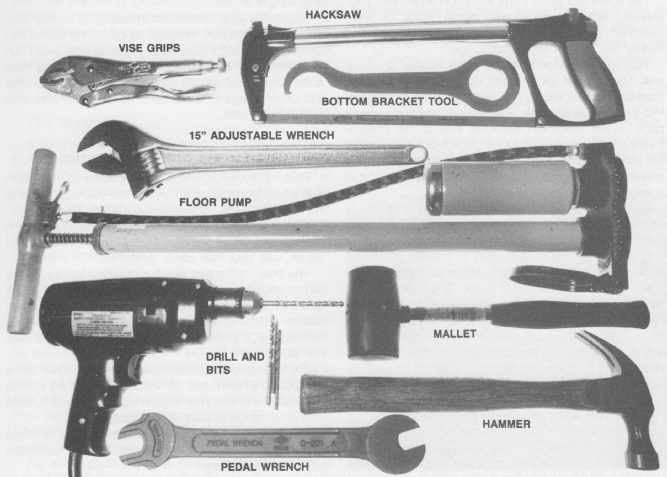
12-inch or 15-inch Adjustable Wrench
A 12-inch adjustable wrench fits most headsets (steering assemblies). The 15-inch size also fits bottom-bracket cups with wrench flats. Either a 12-inch or a 15-inch adjustable wrench will turn a freewheel re mover. Buy one at a hardware store.
Cable Cutters
These are special wire cutters with four-sided jaws, sold at a bike shop. Cable cutters will clip a multistrand bicycle control cable neatly; regular wire cutters will fray a cable.
Files
A flat file is needed to shape crank cotters and neaten cable-housing ends, and is useful for many small jobs of smoothing and fitting. Buy a relatively small file, with medium-fine teeth. A small half-round file and rattail (round) file are also useful for a few jobs where you have to cut an inside curve.
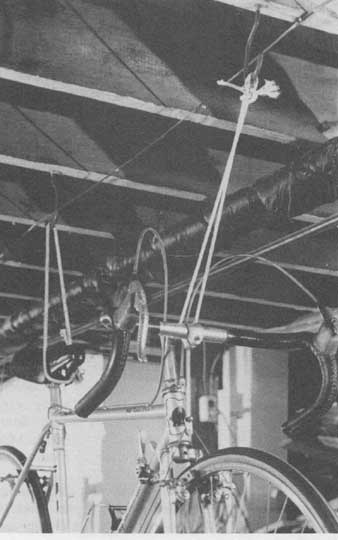
An inexpensive and effective work stand may be made from loops of rope
strung from hooks in the ceiling.
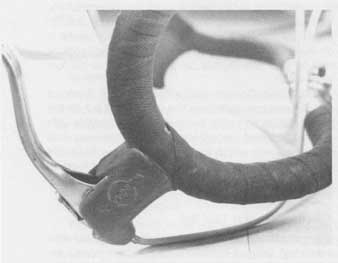
Don’t turn a bicycle with dropped handlebars upside down, or you will
damage the brake cables.
Adjustable Pin Spanner
This special wrench turns headset parts, bottom- bracket cups, freewheel lockrings, and other parts which have two small drilled holes opposite each other.
Chain Whips
You must have two chain whips (lengths of bicycle chain attached to metal handles) to remove sprockets from a multi-sprocket freewheel. Chain whips are in expensive, and they are also easy to make out of scraps of metal and some old chain.
Punches
A set of small drift punches (punches with flat ends) in several sizes is needed to install and remove some parts of multispeed hubs.
A center punch (pointed-end punch) will establish the position of holes for drilling and also stake (lock) parts together.
Buy these at a hardware store or department store.
Hammers and Mallets
You’ll need a hammer with a steel head to drive punches and to loosen some reluctant parts. A normal- weight (approximately 16-ounce) carpenter’s claw hammer will do, if you already have one for woodwork, though a ball-peen hammer (with a flat face like a carpenter’s hammer and a ball-shaped face which re places the claw) is more traditional for metalwork—it allows you to reshape sheet-metal parts and flatten rivets.
A well-equipped shop will have a rubber mallet for frame-straightening work and a plastic mallet to loosen handlebar-stem bolts. If you do such work only rarely, use your regular hammer cushioned with a wooden block.
Tweezers
Ordinary tweezers from a drugstore are ideal for installing bearing balls without getting dirt on them and for handling other small parts.
Slip-joint Pliers
A small pair of slip-joint pliers will help you pull cables tight and will perform a large number of grabbing and holding tasks. CAUTION: Pliers don’t substitute for wrenches: They will round off nuts and bolts.
Measuring Tools
An accurate metal ruler with etched divisions lets you check for wear in a bicycle chain and measure spokes. Accuracy is important; don’t use a wooden or plastic ruler, which can change size with the weather, or a ruler with painted-on divisions, which may never have been accurate. A foot-long ruler with inch and metric divisions is enough.
A ¼-inch-wide flat self-retracting tape measure 3 meters or 8 feet long, preferably with metric divisions, is useful to measure rims for spokes, and to measure bicycle frame sizes.
A vernier caliper can help you measure the diameter of parts very accurately and keep you from assembling parts which don’t really fit each other. An adjustable wrench can be used to substitute for this tool much of the time.
A thread gauge, inch and metric, will help you avoid threading together parts which don’t fit properly. It’s possible to compare threads directly in many cases and get by without this tool.
Bench Vise
A large metalworker’s bench vise makes freewheel removal easier than with an adjustable wrench; even a small vise is very useful to hold small assemblies while working on them. A large vise can be expensive unless you buy it used or on sale. The vise must bolt to a workbench for full effectiveness.
Socket Wrenches
The wrenches listed up to this point will turn all of the fasteners on your bicycle. However, it’s more convenient to have wrenches of different types for some uses. Work goes faster if you have a ¼-inch-drive metric socket wrench set with a ratchet, spinner, 4-inch extension, universal joint, and Allen, Phillips, and slot ted-screwdriver fittings. A well-equipped shop will also have full sets of metric and inch-size open and box-end wrenches.
Universal Cotterless-crank Extractor
This special bike tool is larger and heavier than the one which fits only one type of crank, but it’s worth having if you work on several bicycles. Note that it does not fit older Stronglight cranks correctly; you will need the correct Stronglight tool.
Pedal Wrench
It’s possible to remove and install most pedals with your adjustable wrench, but some pedals need this special narrow wrench. It’s extra-long, providing the leverage needed to remove rusted-in pedals.
Floor Pump
This inflates tires much faster than your frame-fit pump. It’s a real convenience if you do much work on wheels or if you have lightweight tires which must be re-inflated frequently. Better floor pumps have a built-in air reservoir and pressure gauge.
Vise-grip Pliers
These special pliers with a double-leverage system are especially useful for gripping rounded or frozen nuts and bolts. They will loosen parts which it’s no longer possible to turn with a wrench. A 10-inch Vise- Grip works for large jobs; a 4-inch is worth carrying in your on-the-road tool kit. Buy these at a hardware store.
Hacksaw
A hacksaw will help you build brackets and fittings. You may also occasionally need it to cut apart a component that has rusted or bent and cannot be removed normally.
Rim Jack
This special bike tool pulls out flat spots in a dam aged wheel—a real help if you do much wheel work.
Dishing Gauge
This tool is used when building a spoked wheel, to determine that the rim is properly centered on the hub axle.
Drill and Drill Bits
A small electric or hand drill with a set of drill bits is very useful in fashioning brackets and fittings for accessories on your bicycle.
Soldering Iron and Electrical Solder
These hardware-store items will help you make secure connections in bicycle lighting systems and tin the ends of control cables so they can’t unravel.
Bench Grinder
An electrically powered grinding wheel is useful to sharpen other tools and to resurface and shape some small bicycle parts, especially ones of very hard steel which a file won’t cut.
Specialty Tools
The tools listed above will assemble and disassemble conventional bicycle components. Unusual components— For example, sealed-bearing components— may require special tools.
This may be obvious from the appearance of the component, but always read the manufacturer’s instructions before working on an unusual component. Sometimes a special tool is necessary to avoid damaging a component on which the conventional tool would appear to work properly. This is especially true of sealed-bearing components.
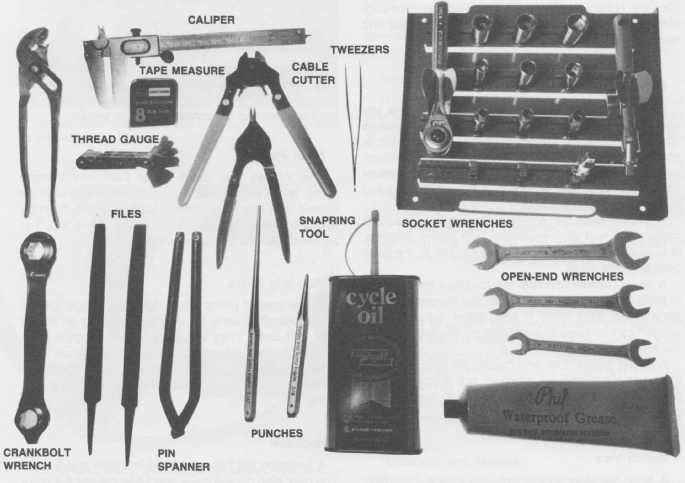
A selection of small tools for the workshop. Including: CALIPER; TWEEZERS; CABLE
CUTTER; FILES; SNAPRING; SOCKET WRENCHES; TOOL; OPEN-END WRENCHES; PUNCHES
CLEANING PARTS
When rebuilding the bearings and other mechanical parts of a bicycle, it’s very important to get them perfectly clean. During a ride, sand and grit can enter through the crack between the moving and stationary parts of a bearing. Also, normal wear releases tiny flakes of metal. If these are allowed to accumulate in the lubricant, wear will speed up and the bearings will fail prematurely. Regular rebuilding with thorough cleaning of parts is important to replace old, contaminated grease before serious wear begins.
Solvents
To clean mechanical parts, you must use a solvent which dissolves and washes away the old grease or oil along with the dirt. Some good solvents for bicycle work are kerosene, paint thinner, automotive-parts cleaner, and isopropyl alcohol.
You can buy kerosene at hardware stores and at some gasoline stations. Paint thinner is sold at hard ware stores. These will cut grease faster if you add in a commercial auto-parts cleaning compound, sold at auto-parts stores. Follow the mixing instructions on the can. Some types of parts cleaner can damage paint. Keep them away from the painted parts of your bicycle and other painted or plastic surfaces.
Solvents smell unpleasant, and getting them on your hands and breathing the vapors is not good for you. Automotive-parts cleaning fluid is unhealthier than kerosene alone. Read the cautions on the label. Use solvents in a well-ventilated place, outdoors if possible, and if you will be handling parts wet with solvent very much, wear rubber gloves.
Isopropyl alcohol is an effective solvent. It costs more than kerosene or paint thinner, but it’s much less smelly and unhealthful. If you must work where there is poor ventilation, it’s the best choice. You can buy it at a drugstore.
CAUTION: Don’t use gasoline! It’s very dangerous. It evaporates quickly, and the vapor flows along the floor, where any tiny spark or flame is enough to set off a big explosion and fire.
Lacquer thinner is not the same as paint thinner. Like gasoline, it evaporates very rapidly and can make you sick.
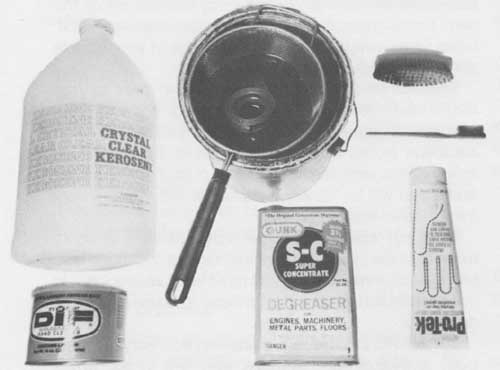
Cleaning supplies: solvent, parts cleaner, scrub brush, old tooth brush,
“invisible glove,” and hand cleaner.
The Parts Washer
You could just slosh parts around in a pan with your solvent, but especially with small parts, a well- designed parts washer makes the job neater and makes the solvent last much longer.
You can buy a commercial parts washer or make one. Use an old gallon paint can and a small-mesh food strainer. Fill the can with solvent. Drop small parts into the strainer to soak. The strainer lets you retrieve parts easily, while dirt particles sink to the bottom. Every once in a while, pour off the solvent in the top of the can and dispose of the grit in the bottom. When the solvent becomes too oily to cut grease, dispose of it in a service station’s oil-recycling barrel.
CAUTION: Don’t run solvent down a sewer. It can damage septic-tank systems and can contaminate water supplies.
Often, scrubbing is necessary to remove hardened grease from mechanical parts. Make sure you remove it all, so notice bare metal. A screwdriver will scrape dirt from between chainwheels. An old tooth brush is ideal for scrubbing out small nooks and crannies. Rags and a small scrub brush will take care of larger parts. For parts too large to fit into the parts cleaner, lay out old newspapers or a cookie tin and use a scrub brush dipped in solvent.
After the solvent bath, a final washing with dishwashing detergent and rinsing with water are good to get parts completely clean. Commercial parts-cleaning fluids in fact require a water rinse. Water is cheap, so you can run a lot of water over a part to get rid of those few last particles of grit. Don’t worry about rusting; just dry the parts thoroughly before reassembling them.
Cleaning the Outside of the Bicycle
Clean the outside of a mechanical assembly as well as the inside; when you put it back together, grit might fall into the new clean grease and spoil it right away. When you rebuild a hub or pedal, clean the shell; when you rebuild a headset or bottom bracket, clean the surrounding area of the frame inside and outside. If you rebuild the entire bike at once, you have a good opportunity to clean the entire frame.
CAUTION: Some commercial parts-cleaning compounds dissolve paint, so don’t use them to clean the frame. Kerosene, paint thinner, and isopropyl alcohol are safe on paint. These are useful where greasy dirt has accumulated.
Hosing the frame off with detergent and water is effective for road dirt and mud on the frame and rims. Try to keep too much water from seeping inside the frame tubes where the components attach. A coat of automobile wax or furniture wax will help preserve the paint and make it easier to clean next time.
CAUTION: Keep wax, solvent, and lubricants away from rubber parts and rim braking surfaces. They can damage rubber and can make the brakes slip or grab.
If you ride your bike much in muddy or slushy conditions, you may be tempted to clean the frame frequently. However, excessive cleaning can wash dirt and water into the bearings. Unless the bearings have been converted for oil lubrication or forced grease lubrication, it’s better to leave the bike dirty until rebuild time.
Keeping Yourself Clean While Working
Fortunately, you are unlikely to get dirt all over yourself when working on a bicycle, but you can get your hands dirty.
Chain marks are the main hazard to your clothing. A shop apron helps prevent them. For an on-the-road repair, use your rain cape, inside out.
The chain is the part which most often leaves lasting dirt on your hands. Avoid handling it if you can. Keep a thin pair of work gloves for chain work. If the chain comes off the sprockets during a ride, hold it with a screwdriver, a piece of paper, or a leaf as you lift it back into place.
For a long repair session, auto-supply stores sell a compound which forms an “invisible glove.” Be sure to get a lot of it under your fingernails. Cooking oil rubbed into your hands is also fairly effective.
Mechanics’ waterless hand cleaner is best to clean greasy hands. Rub it in until it lifts the dirt, then wash with soap and water.
A small fingernail brush helps remove the last traces of dirt.
SETTING UP THE HOME WORKSHOP
Bicycle work can be much more pleasant if your work area is organized to make it easy to find tools and keep projects in order.
The Work Area
Your work area needs to be large enough so you can walk around your bicycle on its work stand. The work area should be well lighted, dry, and well ventilated, with a hard floor surface which can be mopped clean.
It’s convenient to keep your shop set up permanently; it’s easier to leave a project and come back to it if you can leave parts spread out on a bench. However, the tools and supplies you need for bicycle work will fit in a couple of cardboard boxes in a closet. Then you can carry them to where you will use them. If you have to work on bikes on your living-room floor, roll back the carpet so you won’t lose small parts in it or stain it. In good weather, you can work outdoors— maybe the only option if you live in a cramped apartment or dormitory.
A traditional workbench with a metalworker’s vise is best, but any sturdy table will do. Bike parts can be oily and dirty, so cover your workbench with newspapers or other protection if you also use it for woodwork or for dining. Especially if your work-area floor might become damp, it helps if the workbench has a shelf underneath to store boxes of tools and parts.
Tool Storage
A mechanic’s tool box will keep together your collection of hand tools, or you may hang them on the wall either with a pegboard or by driving nails into a sheet of plywood. Outlines of the tools drawn with a felt-tip marker will show you instantly which ones have strayed at the end of a work session. A freestanding chest with drawers makes sense if you have a lot of tools and spare parts.
Parts Storage
If you don’t buy a parts chest, you can organize spare parts quite well using salvaged containers. Plastic gallon milk jugs with the top cut down diagonally, leaving the handle, are convenient for storing medium- sized parts such as pedals and freewheels. Several milk jugs will fit in a cardboard box, making it easy to haul them up from under the workbench. Then you can lift each jug out by its handle. Keep extra cardboard boxes for larger parts.
For small parts like nuts, bolts, and bearing balls, a set of miniature shelves with drawers is most convenient; hardware stores sell these. Plastic 35mm film cans also work well for small parts. Any photo processing shop will give these away. Take a couple of dozen.
Label containers for your parts and tools, especially if the storage container hides them. Keep a roll of masking tape and a felt-tip marker in the shop. Then you won’t have to open all of your film cans to know which one has the ¼-inch bearing balls.
ORGANIZING AND PLANNING YOUR WORK
Plan your bicycle maintenance projects for the long term, and maintain a stock of spare parts to save time and money.
Planning a Project
Before you begin any maintenance project, first try to obtain all supplies you may need. This way, you can ride to the bike shop before you have disassembled your bicycle. A reputable bike shop will take back parts that you don’t need, so keep your receipt.
Make telephone calls to bike shops to locate the parts you need. Unless you’re sure what you need, take the bike, or the part which you are going to rebuild, with you when shopping. Don’t throw away any old parts until you have made sure that your new parts match them. Take notes as you rebuild a part so that you’ll know the parts needed for your next rebuild.
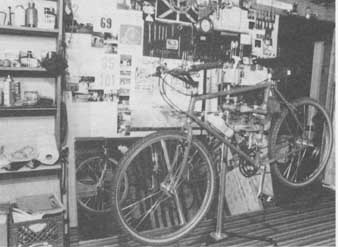
A well-equipped home workshop, with storage area (left), tool board,
and work stand.
Stocking Up on Spare Parts
There are a few spare parts used so often that it always makes sense to buy them in advance: bearing balls, inner tubes and tires, handlebar tape, small nuts and bolts, and similar items which you need repeatedly but which are not worth a trip to the bike shop.
CAUTION: Never mix bearing balls from different sources, or new and worn balls. Balls from different production runs may be different enough in size that the larger balls will carry all of the load.
Beyond keeping regularly needed supplies, you can save money on rebuilds by stocking up on parts for your make and model of bicycle. Bike shop sales, used-part bins, mail-order offerings in the bicycle magazines, bicycle club bulletins, flea markets, and classified advertisements are sources for new and used parts at bargain prices.
You may accumulate parts toward the next rebuild of your current bike, or you may try to scrape together most of the parts to build up a complete “new” bike. As you come to know what is marketable, you may also buy parts to trade with other bicyclists. If you’re not in a hurry, you can cut your component costs way down. Fortunately, bicycle parts are compact. A couple of cardboard boxes will hold a stock of parts which will last for years.
Make a special effort to look for spare parts if your bike has any unusual or old components. Many parts have gone in and out of production over the years. Especially, stock up on chainwheels and on parts for geared hubs; it’s annoying to have to replace an entire hub or crankset for the lack of one crucial part. Many models which are no longer in production were once very common, and there are still many of them avail able for salvage.
Upgrading Your Bicycle
Every time a part wears out, you have an opportunity to replace it with one which fits your needs better. If you have to replace a worn-out component anyway, you might as well replace it with something more to your liking.
You could buy a component which will last longer, makes the bike fit you better, or suits it better to your particular use. For example, it makes good sense to replace an uncomfortable saddle, even if it’s in good condition; and it makes good sense to equip your bike with lower gears if you live in hilly country.
One useful trick, especially if you ride in a city, is to put together a bicycle out of high-grade parts which look beat-up. This rides like a new bike but is un attractive to thieves. There are a couple of pitfalls to avoid in an upgrading project, though.
It doesn’t make sense to put high-grade components on a poor-quality or damaged frame. It won’t be good to ride or worth much to sell. The positive side of this is that a bargain frame is an especially nice find, the starting point for a bike-building project.
You can’t save money by assembling all-new components. Thanks to manufacturers’ buying power, a complete, assembled bike costs less than the parts to build one. Nonetheless, some people choose to assemble new components into a bike, simply so they can choose the exact parts they want.
