ii. Other Component-Related Safety Issues:
Wheel and Quick-Release Hubs: Be sure both front and rear wheels' quick-release levers are closed or locked -- locking them should require ample force. Grasp the wheel with your and and try move it back and forth to be certain the hubs are tight. top of page
Pedals: I have never cared for clip on or shoe/clip varieties. I feel they are a bit dangerous if one needs to rapidly dismount a bike. Non-clip pedals can be dangerous, too, if your shoes slip off. The best solution I've found is using large, "platform" pedal, such as the Performance "Stomp". top of page
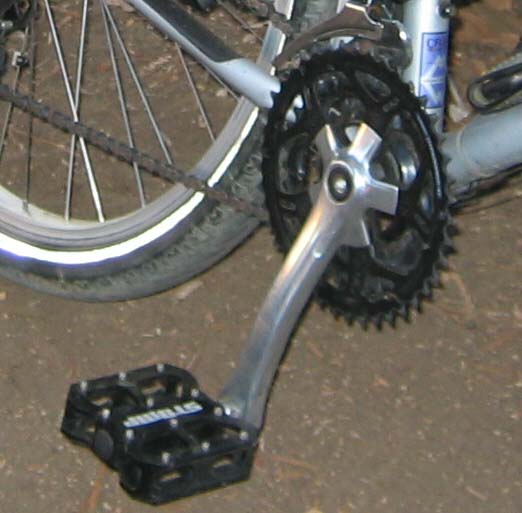
Above: Large platform pedals with miniature,
shoe-securing "studs" (as found in the Stomp model by Performance)
are excellent for commuting and touring.
Nuts, Bolts and Other Hardware: Examples include seat post clamps, handlebar stems, brake assemblies, fenders, etc. Check them for looseness or play. Tighten nuts and bolts as necessary, but do not over-torque. top of page
Brakes: This is perhaps the most important safety issue with bikes. Braking effectiveness is a bit complex. First, it's based on the proper adjustment of the brake assembly, using the right brake pads (which are in good condition), and using the proper braking technique. It is also based on the weather (wet or dry), gravity (such as going downhill), and mass of the bike plus the bike rider. Brakes pads get hot and may develop a "glaze" as a result. Take some sandpaper and lightly buff the pad until the glaze is gone. Brake pads and rims may also get oil on them from bicycle lubricants. Use alcohol and a clean cloth to wipe off the residue.
My Gary Fisher bike uses the slightly older cantilever-style bakes,
which in my opinion work as well as the newer V-pull variety. I have achieved
best results using smaller, softer brake pads.
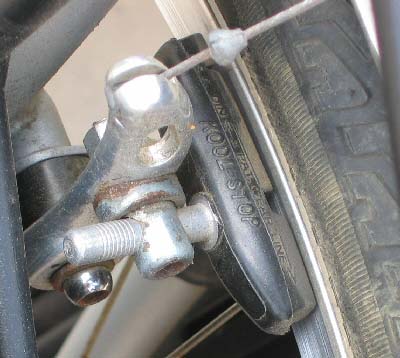
Above: A properly adjusted
brake pad on a cantilever-style braking system. A couple of things to
note. First: notice the distance between the pad and the rim and that
the pad is "toed-in" towards the front (1mm from the rim in
the front, 2mm in the back). Second: notice the "wear line"
-- replace the pad when you can no longer see this line. And, third: notice
the pad's proper installation for this side of the rim: the longer segment
of the pad is on the rear-facing side of the mounting pin. Tweaking brakes
for optimum performance requires a bit of reading, and then practicing
what you learned. The References
and Resources section of this web site has several book recommendations
as well as web links that will help educate you in bicycle-maintenance
skills.
"Emergency" Braking Procedure: The front brakes are significantly more important than the rear because they do most of the stopping. The most effective emergency-braking procedure is to use the front brake only. Also, pulsing the brake, a technique similar to the anti-lock braking (ABS) system used in modern automobiles, is a very effective method to bring the bicycle to a short, controlled stop.
An important question for you (and don't look at your bike for the answer!):
Which side of the handlebar has the rear brake lever, and which side has the front?
The answer should be Right for Rear (remember: "R for R") and Left for Front. This is the standard. Check your bike to make sure this is true. If not, and you are comfortable with this arrangement, don't change it. The important point is that you know which lever to use during a panic stop. top of page
Normal Braking Procedure: For normal braking, such as coasting to a stop, apply more pressure to the front than to the rear, and gently bring the bike to a stop. During wet or slippery conditions, ride slowly and apply comparatively more pressure to the rear brake than the front. To control skid, use pulsed braking as noted above.
Braking is so fundamentally important, it is advisable that one practice stopping techniques on a non-busy street or empty parking lot before venturing on to the road. top of page
Cables: Brake cables are critical. If one breaks during an emergency stop, the consequences could be deadly. Speed-shifting cables are important, too. Inspect the cable and cable jacket from one end to another. Look for signs of splitting or fraying. If you see any damage, replace the able and/or jacket. Once every six months, spray a light oil on the cable and in the cable jacket. Rub grease onto the cable in areas where cable "rides" the jacket, such as around bends. top of page
Tires: Inspect the tires for cracks, cuts or bulges. If you notice anything unusual replace it with exactly the same model. Many tires have treads that are designed for a specific direction of rotation (clockwise) which improves handling and control. Look for arrows that indicate this and install the tire accordingly. top of page
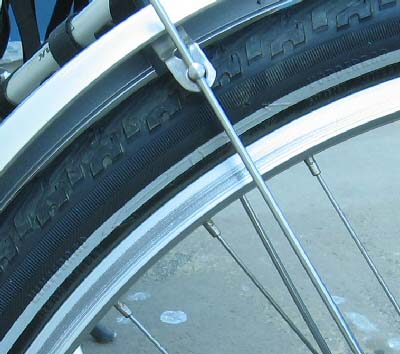
Above: A picture of the front wheel showing
direction-of-rotation arrows embossed on a Continental Top Touring 2000
tire. The lettering may be a bit hard to read in this image: "REAR"
next to the counterclockwise arrow; "FRONT" next to clockwise
arrow. Don't let the REAR "counterclockwise" arrow confuse you:
since this image shows the front wheel, the tire is correctly
installed to turn clockwise. For the rear wheel, make certain
that the arrow is also pointing in the clockwise direction. The tread
on the Top Touring looks like this: >>>> (see image of tire
tread below ). When the tires are correctly installed on both
the front and rear wheels, the respective tread patterns will be mirror-imaged:
Direction of rotation for both wheels (and direction bike is traveling): ===>
Tread pattern on tires:
(Rear) <<<<< >>>>> (Front)
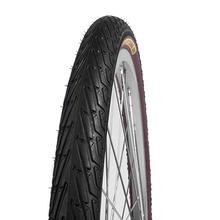
Above: Continental Top Touring
2000 tire. Notice the tread pattern.
Tubes: Tubes are usually replaced or repaired when you get a flat. I have found that a tube's inner diameter (the side where the valve is) will start developing leaks once the tube is over four or five years old, regardless of use. This may be due to the fact that some manufacturers reduce the thickness of the inner wall as a weight-reduction measure. The best preventive-maintenance measure may be to replace a tube that is over five years old. top of page
Tire Pressure: Tire pressure is an important and often-overlooked safety issue for bicycles. Unless you are riding on snow (and riding slowly at that!), inflating tires to the upper end of their recommended range is ideal. Why? Commuting/touring bikes have more payload (weight); hence, extra tire pressure is necessary in order to keep the tire/road interface optimal. Under inflated tires tend to give the bicycle a spongy, "disconnected" feel, which I consider an impediment to controlling a bike. This is especially noticeable as the tire rides over cracks, gutter grates, stones, and other imperfections on the traveling surface. top of page
Guide to Bicycle Safety: [Part 1 | Part 2 | Part 3 | Part 4 | Part 5 | Part 6 | Part 7]