C. Safety Accessories
The following list of accessories are what I consider essential for serious commuters and tourers. You may already have some of these accessories. Or perhaps, some came pre-installed on your bike, such as reflectors, a safety light or a bike bell. If you are using or plan to use your bicycle more extensively, consider the items on this list essential.
Helmet: Buy a good helmet and use it. Get one that fits your head and be sure it won't slip or shift to a sub-optimal position in the event of an accident. Ventilation is also important because you gain or lose heat from your head more than from any other part of your body. When it's warm, you need a helmet that will keep you cool. From experience, I can note that if your head isn't properly ventilated, you will sweat and be miserable. For rain protection, you can get a rain shield that fits over the helmet. If you bike in colder climates, you can purchase a liner, sometimes called a "winter kit."
Biking Gloves: They help you grip the handle bars better so you have better, more-confident steering control. Perhaps just as important is the protection they provide when you take a spill (which will happen every once in a while). When you go down, your arms and hands automatically extend out to protect the rest of your body from the impact. Gloves help to keep your hands from getting too scratched up. top of page
Clothing: Wear what's comfortable and allows the all-important freedom of movement. Despite the fact that I live in Southern California, I wear full-sleeve shirts and pants. They are made of synthetic materials and specifically designed for warm-weather use. This strategy provides excellent protection from the sun's (UV) exposure as well as some protection from scrapes and cuts.
For visibility, wear contrasting articles of clothing: bright shirt and dark pants or vice versa. I also wear a reflective vest (the kind often worn by joggers or runners). top of page
Ankle Straps (reflective): If you wear pants (which is often the case for commuters), ankle straps are needed to keep the seams out of the chain and chainring. Reflective ankle straps also provide an extra "layer" of visibility.
Shoes: Running shoes are my favorite because they are the most comfortable. As noted in Pedals (below) I don't like biking shoes -- the kind that are designed to be mated with special pedals. As long as you have good, grippy pedals any shoe will work.
Rear-View Mirror: I consider this accessory to be an absolute necessity for the road. Why? Because you can shift your view from front to rear in the fraction of a second, almost instantly becoming aware of your immediate environment.
You can use one that attaches to the helmet, your sunglasses or the end of the handlebar.
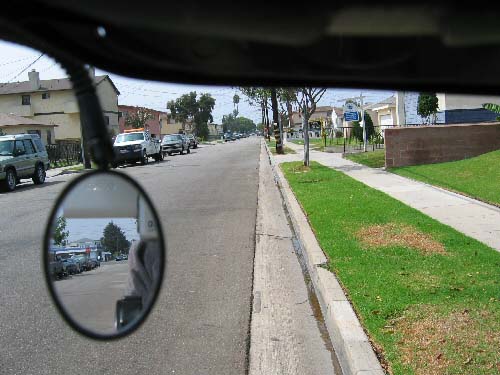
Above: The view from a helmet with a properly
attached rear-view mirror. This is excellent safety information of your
surroundings, conveniently in front of your eyes.
Eye Protection: Sunglasses and Goggles are another important accessory item for both day and night use: they reduce the sun's blinding glare and help deflect bugs and debris. For me, the use of eye protection was learned via the school of hard knocks ...literally. While riding my bike to high school, back in my teens, I was once struck in the right eye by a large, flying insect. This was a pretty scary event: not only was the startle/shock of the impact disorienting (and painful), I could not see out of that eye (both immediately, and for about a week afterwards).
I wear sunglasses during the day. They came with interchangeable lenses (dark, amber) for day use. For night use, some "sunglasses" come with clear lenses. For night use, you can also do what I do: use the variety of safety glasses that resemble (and fit like) eyeglasses. Check your local hardware store. top of page
Reflectors and Reflective Surfaces: As far as reflective surfaces, the more the better. They are especially important at intersections, where others can only see you from the side -- an angle at which most bicycle lights are invisible. In the flash-illuminated picture below, you will note the reflective strips on the panniers (bags on front and rear); these come as built-in features from the pannier manufacturer. Also, I chose a model of tire that has a reflective side wall.
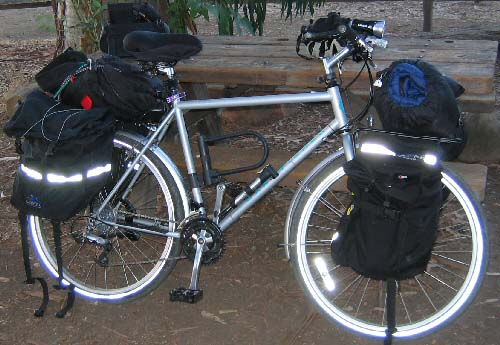
Above: The reflective sidewalls on the Continental Top Touring 2000 tires and reflective strips on the front and rear panniers "glow" under the flash of the camera. They reflect equally well in the path of a motor vehicle's headlights.
Bicycle Lights: Another necessity, in my opinion (and from experience). And they are not just important for night riding. The pulse mode setting is extremely effective -- often increasing your visibility over other motor vehicles, which is exactly what you want! Studies prove pulsers are much more noticeable than continuously-on light sources. This is why ambulances and law-enforcement agencies use them. Another advantage to using the pulsing mode in modern LED-based bicycle lights is that it conserves battery power by as much as 50% (percent) compared to the continuous-on mode. Speaking of batteries, use the NiMH rechargeables. Although they initially cost more, they last longer than alkalines and they can be recharged over 1000x, ultimately proving to be a substantial cost saving...and being environmentally friendly to boot!
Types of Bike Lights: Some older lighting systems were based on a dynamo (generator) or large battery pack that supplied power to an incandescent-bulb(s)-based lighting system. Modern bike light tend to fall into two varieties: Xenon halogen-bulb systems with external (rechargeable) battery packs and LED-based lights.
The Xenon systems tend to be expensive and are usually for headlight or front usage only. Their advantage is high-power illumination. I have no experience with high-power halogen systems.
LED lights are my lights of choice. They employ solid-state circuitry and are very energy efficient. As noted earlier, they can also operate in several modes: continuous-on, pulsing, random, and other "patterns".
How Many Do I Need?: First, and admission: I am a bit of a lighting fanatic. Living in Los Angeles and riding in the streets at night has somehow convinced me that I need to be "ultra-visible" in the visual "noise" of automobile traffic. Please don't think you have to take lighting to this level!
If you don't ride at night or ride on well-lit streets, install a white LED safety pulser on the front and a red LED safety pulser on the rear. The color scheme used here is similar to automobiles: white for front, red for rear -- the universal standard. If you travel through dark, unlit areas or are touring, you will also need a headlight to illuminate the path in front of you.
Where should the lights be installed?: The best position is at the eye level of a motorist. The greater the distance between you and the motorist, the less vertical positioning matters. See pictures below to give you some ideas.
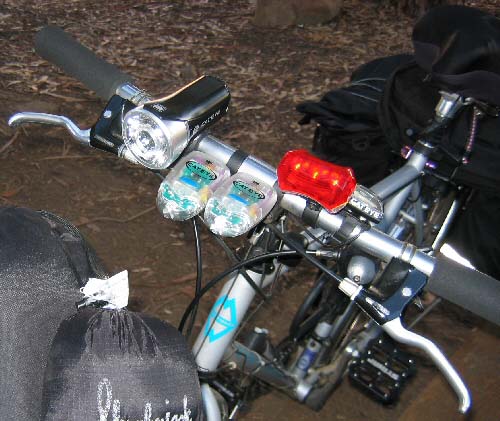
Above: (left to right) Cat
Eye HL-EL 500 Power Opticube Headlight, two Cat Eye LD260 CWC Front Safety
Lights (operated in pulse mode), and a red Cat Eye LD 170 Taillight (Why
the red taillight on the front? If night traffic gets very dense,
you may need an extra attention-getter.). Incidentally, although I have
several lights mounted here, I will only turn on additional units
as needed. If you run them all always, they appear gimmicky
or are viewed as a novelties, and people are less likely to take you seriously.
Too many lights may also be distracting or annoying to motorists -- this
is not what you want!
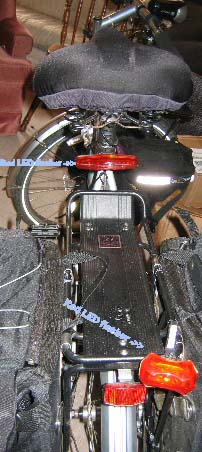
Above: Bike from the rear
with "Red LED pulsers" -- this is what the illegible (sorry!),
blue-text labels say next to the two lights. If you mount a rear light
on the seat post (as seen here), be sure not to block it with something
you may be securing to the rack. These lights have 4-5 LEDs inside them,
and can be used in several modes of operation: continuous-on, pulse, random
pattern, etc. These particular lights are made by CatEye and operate on
AAA batteries.

Above: A Cat Eye Compact Safety Light - White,
easily and comfortably attached to the wrist. It is used in pulsing mode
here. The elastic strap let's you attach this light almost anywhere. In
the continuous-on mode, it is excellent for map reading and emergency
use. This light is operated by a magnetic switch that toggles between
the three modes: Continuous-on, Pulse, Alternating (there are two LEDs
inside this unit) and Off.
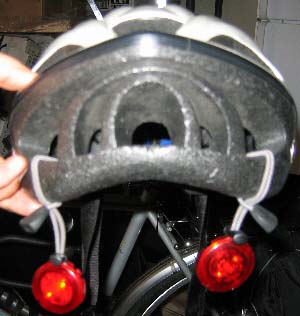
Above: Red Cat Eye Compact
Safety Lights attached to the back of a helmet. These are identical
to the Compact White light above. The red hue
is an important indicator of the rear of the vehicle.
Guide to Bicycle Safety: [Part 1 | Part 2 | Part 3 | Part 4 | Part 5 | Part 6 | Part 7]