Even the most complicated bicycle repairs are relatively easy compared to working on automobiles.
Any mechanically inclined person can perform all of the regular maintenance required to keep a bicycle running smoothly. Learning how will allow you to keep your bicycle on the road without excessive downtime and will save you money.
This Section is designed to give you the in formation you need to take care of your bicycle on a day-to-day basis and perform minor repairs on the road; it's not meant to be a complete guide to bike repairs. For this type of comprehensive treatment, we recommend books in our References and Resources section.
BASIC MAINTENANCE PRINCIPLES
There are numerous opportunities to learn bicycle maintenance and repair. Many bicycle shops run clinics and classes. You can learn on your own from books. Most component manufacturers provide detailed installation instructions with their products and post maintenance procedures on their websites. Many technical schools offer professional training that may lead to certification as a bicycle mechanic.
Cleanliness and Orderliness
Keep your work area clean and orderly. Bicycle parts are often coated with grease or oil and can pick up dirt and debris, both of which increase friction and wear. Keep your tools organized in a designated toolbox or on a pegboard so you can find what you need when you need it. (A peg board allows quicker access; a toolbox is more convenient for travel.) After every work session, take a few minutes to clean your work area and put away the tools.
Tools and Supplies
Bicycle maintenance requires generic mechanics' tools such as wrenches and screwdrivers, and cycle-specific tools that are designed to work on a particular component and for which there are no practical alternatives. You can equip yourself with the basics for $200 to $300, which will pay for itself quickly compared to the cost of professional maintenance. You can start by buying the generic tools, and add the specialized ones as you need them. For example, you won't have to buy a bottom-bracket tool until you need to remove the bottom bracket.
Specialized tools are usually not interchange able among manufacturers. For example, if you have a Campagnolo bottom bracket, you'll need a Campy tool. Likewise with Shimano. Even within the same company's line, there may be different bottom brackets that require different tools, so it's essential to know the make and model of your components before you buy.

---- A clean, orderly work area ensures that you can easily find the tools
you need.
--------
PRICES OF BASIC BICYCLE-SHOP TOOLS
Floor pump $20-$80
Bottom-bracket tool $15
Set of hex wrenches $10-$30
Chain wear indicator $10
Chain tool $15
Tire levers $5
Cassette tool $5
Wheel truing stand $50-$200
Chain whip $15
Spoke wrench $5
Adjustable wrench $15
Spoke tension meter $60
Crank puller $15
Workstand $80-$300
Pedal wrench $15-$30
Cone wrenches $20-$40
Screwdriver set $10-$40
Torque wrench $30-$200
Wire cutters $10
Cassette brush $5
Housing cutters $30
Magnet bowl for small parts $6
-----------
A few parts and supplies are needed so regularly that you should keep spares in your shop:
__brake pads
__brake cables and housings
__shifter cables and housings
__cable and housing ends
__chain
__chain master link
__tubes
__tires (an old one is OK for emergency replacement)
__rim tape
__spokes
__bar tape
__shoe cleats
__chain lube
__grease
__electrical tape
Tighten/Loosen
With few exceptions, nuts and bolts on bicycles (and everywhere else) tighten by turning clockwise and loosen counterclockwise. Clockwise-tightening fasteners have what are known as "right-hand" threads. Some people find the saying "righty tighty, lefty loosey" a good way to remember: if you picture a nut or a bolt head as a clock, the top of the clock, at twelve o'clock, tightens to the right. Make sure you're looking at the nut or bolt from the correct direction: if you approach it from the back, clock wise and counterclockwise (and left and right) are reversed.
The only parts with left-hand, or reverse, threads are the left pedal and the drive side (the side with the chainrings) of English-style bottom brackets.
Right-hand threads are so common that it requires careful attention to work with reverse threads.
Every bolt has a specific torque established by the manufacturer to keep it from being stripped by overtightening or coming loose due to undertightening. To measure torque, you need a torque wrench.
Check Your Work
After completing a maintenance procedure, check that all the bolts are tightened to the appropriate torque and everything is in proper order. Inspect the bicycle while it's still on the stand. Make sure that the cables are routed properly so they do not bind and everything moves as it should. Some problems may not appear on the stand and don’t become apparent until the bicycle is placed under the stress of riding, so take the bicycle for a short, non-demanding ride to ensure that everything is in working order before really pushing it on a long ride.
CLEANING
Although many people think of cleaning the bicycle as a cosmetic job, it's really about preservation. As we ride, the sweat rolls off our bodies and onto the bicycle. Sweat has a tendency to corrode just about any metal part it comes in contact with and can even remove the protective coating from a paint job.
After every ride, wipe down your bicycle with a damp cloth to remove sweat and grime, and wash the bicycle about once a week. All you need is soapy water, a sponge, a soft brush, a hose, and dry rags.
Start by wetting down the bicycle with a little water. Don’t use the high-power spray on your hose nozzle, and never wash your bicycle at a car wash with a high pressure sprayer; this could force water into the bearing sets, displacing the grease and leading to premature bearing wear. Even with a gentle flow, don’t spray water directly into the bottom bracket, seat post, headset, or wheel hubs. Wipe down the frame with a soapy sponge and rinse everything clean. Use a soft-bristle brush to reach areas that the sponge can’t reach. After washing the bicycle and cleaning the drivetrain (discussed next), wipe away any excess water with a dry cloth.

------- Cleaning your bicycle not only keeps it looking good, it washes
away sweat (which can cause corrosion) and road grime (which can cause wear
to the drivetrain).

---------Use a cassette cleaning brush to remove grime wedged deep between
the cassette cogs.
Cleaning the chain, chainring, and cassette every week or two will greatly extend the life of the drivetrain. The oil that is used on the chain to reduce friction between moving parts picks up debris that, over time, actually increases friction, causing accelerated part wear. Because cleaning the drivetrain is messy, you may want to tackle it before the rest of the bicycle.
To do this, you will need degreaser and a brush.
Bicycle-specific degreasers are available, or you can use liquid dish soap. Purchase a cassette brush with long, stiff bristles to get between the cogs. An old toothbrush works well for cleaning the chain.
Mix the degreaser with hot water, then use the brush to scrub the chain, chainrings, rear cassette, and pulleys on the rear derailleur. Rinse clean the drivetrain as you scrub, then remove the excess water with a dry cloth and apply fresh chain oil (see the upcoming "Chain" section).
AFTER RAIN
It is inevitable that you will be caught in the rain from time to time. Riding in the rain can be a valuable training tool because eventually you will have to compete in it. But it's not good for your bicycle, because water and grit picked up from road spray get into the moving parts. After riding in heavy rain, some preventive maintenance is in order. (You may also want to consider these steps if you were overzealous with the water hose while washing your bicycle.) Wipe any excess water from the bicycle, then lubricate where necessary. Water has a tendency to enter the bicycle frame at the seat post, so remove the post, drain the water, and allow the frame to dry before replacing the post. If you pour out an excessive amount of water, pull the bottom bracket, clean and dry the bottom-bracket shell, and clean, dry, and re-lube the bottom bracket.
Water may also get into the headset, which should be removed, cleaned, dried, and re-greased. All of these procedures are discussed below.
MAINTENANCE PROCEDURES
Bicycles are, happily, somewhat generic (although less so now than a few years ago), with generally similar engineering across various makes and models and common dimensions and threads for many parts. This makes many parts interchangeable and most maintenance procedures broadly applicable to most bicycles. (In contrast, just try putting a Chevrolet wheel on a Ford axle.) Nevertheless, some companies produce proprietary products that re quire special tools and procedures. The following procedures are therefore somewhat generalized.
The best source of detailed instructions for specific components is often the manufacturer.
Removing and Replacing Wheels
The first step to removing either wheel is to open the brake caliper so the tire can slip between the brake pads. On Shimano and SRAM brakes, lift the quick-release lever on the calipers; on Campagnolo brakes, use the pin on the shift/brake levers.
Next, open the quick release on the skewer. You may have to loosen the knurled nut on the opposite end of the skewer; in most cases, the wheel should then just fall out. If not, you have retention tabs on your fork, so loosen the nut on the side opposite the quick-release lever until the wheel is free.

---- Lift the quick-release lever on the brake caliper to open the calipers
and allow the wheel to slide free.
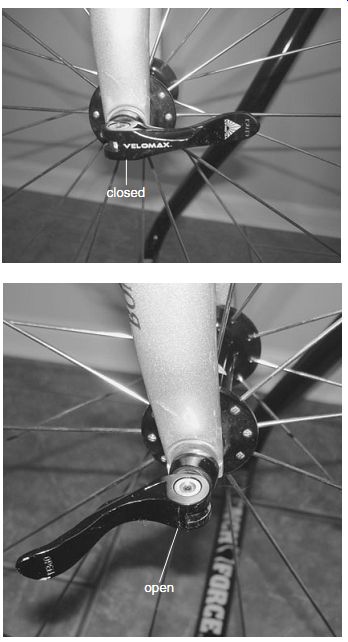
--------- To release the wheel from the bicycle, open the skewer by pulling
out on the skewer lever . (top shows the lever in the closed position; bottom
shows the lever in the open position).
Reinstall the front wheel with the quick release lever on the left side of the bicycle. Slide the axle into place on the fork dropouts and make sure it's centered, then close the quick-release lever, making sure it faces the back of the bicycle.
The quick release should feel firm when you close it. If you had to loosen the nut to remove the wheel, you need to retighten the nut until the lever feels firm as it closes. Once the wheel is in place, close the brake's quick release to move the calipers back into position. Spin the wheel to make sure it's centered between the brake pads.
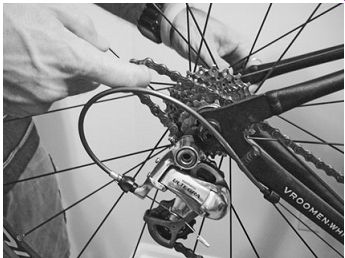
The steps for the back wheel are the same with a minor exception. Before attempting to remove the rear wheel, shift the chain onto the smallest rear cog and the small chainring. (Cross chaining such as this is to be avoided when riding, but it's OK now because there's no stress on the components.) This will minimize chain tension and move the chain to the "outside" at the rear of the bicycle, out of the way. After opening the quick-release lever, gently pull the rear derailleur straight back so it's not beneath the cassette, then allow the wheel to drop down. If you have horizontal dropouts, you need to pull the chain back as you pull the wheel back.
To reinstall the rear wheel, place the chain on the small cog, then push the wheel into place in the dropouts. (Make sure you haven't changed the derailleur setting in the meantime.) The rest of the steps are the same as for the front wheel.
Brakes
Inspect the brakes often. Adjustments must be performed frequently, and cables and shoes need regular replacement.

-------When removing the rear wheel, open the skewer and gently pull back
the rear derailleur to allow the wheel to drop out.
--- When removing the rear wheel from horizontal dropouts, pull the chain
straight back to release the wheel.
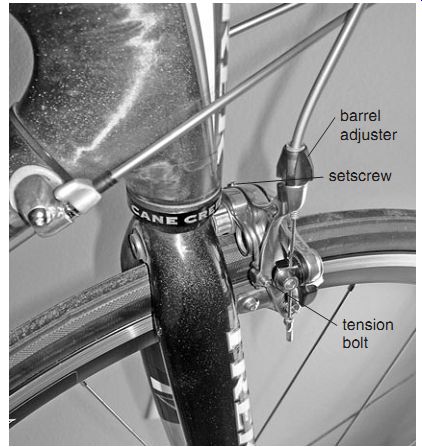
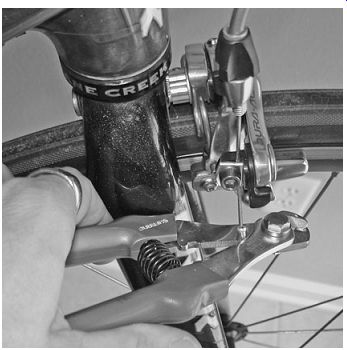
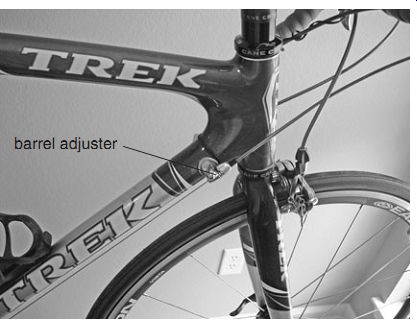
----- Center the brake calipers by adjusting the setscrew. The barrel
adjuster is used to alter the distance between the brake pads and rim.
Adjustment
The calipers must be centered, with equal gaps on both sides of the rim. First, make sure the wheel is true and placed correctly in the dropouts. If the calipers need centering, start by simply gripping the caliper and moving it one way or the other. Test it by squeezing the lever. If it doesn't stay centered or otherwise function properly, or if it was loose and moved too easily, move on to the second method. Use a cone wrench (a narrow wrench designed to adjust wheel-bearing cones) to hold the caliper centered while tightening the mounting bolt on the opposite side. The last method involves adjusting the setscrew located on most dual pivot brake calipers. Tightening or loosening the screw will move the caliper left or right.
Once the brakes are centered, check the distance from the brake pads to the wheel rim. The recommended clearance is about three millimeters on each side. If the clearance is too wide, braking power is greatly impaired; too tight, and they may drag on the rim if the wheel becomes even slightly off center or out of true. Small adjustments can be made by screwing the barrel adjuster on the brake caliper in or out to create or remove slack in the cable. If you have to screw the barrel adjuster all the way out, the cable is too loose, in which case you should screw the barrel adjuster back in and adjust the cable itself. Loosen the nut on the cable anchor bolt, hold the caliper at the desired clearance, pull the slack out of the cable, and retighten the anchor bolt.
(A tool called a third hand can be used to hold the calipers at the proper distance while you work on the cable.) Work the brakes a few times to make sure the clearance is right and the cable doesn't slip.
Shoe Replacement
Brake pads are "consumables," designed to wear out so your rims do not. Examine the brake pads once or twice a month. Some pads have wear lines to indicate when it's time to replace them. With others, just watch the grooves and replace the pads when the grooves start to disappear. Riding on worn pads can damage the rims and negatively affect braking.
Always replace brake pads in pairs.
Some brake pads are integral with the shoes and must be replaced as a unit. Others mount in reusable shoes, and only the pads need to be replaced when worn. With either type, remove the brake shoe from the caliper by removing the mounting nut. With the single-unit pad and shoe, just discard and replace. For brake shoes with replaceable pads, loosen the small bolt on the shoe to free the pads; these fit snugly and may require the use of pliers to remove and insert. Replacement pads must be installed into the shoe in a specific direction. Most are marked with an R or L for "right" or "left." When reinstalling shoes with replaceable pads, ensure that they are installed on the correct side. If you install the shoes on the in correct side, the pads will be facing in the wrong direction and will rip out during braking.

--------- Brake shoes come in two styles: disposable shoes (top) and shoes
with replaceable pads (bottom).
Refasten the shoes to the caliper tight enough so they stay in place but loose enough so you can move them. Depress the brake lever gently so the pads make contact with the rim. Locate one shoe at a time against the rim, making sure the shoe doesn't hang below the rim, extend above it, or take a tipped-up or tipped-down attitude. Apply force to the brake lever to hold the shoe firmly in place, and tighten the mounting nut. (You may need to hold the shoe steady with pliers to prevent it from turning.) Apply the brakes and make sure that the pads are engaging correctly on the rim.
If your brakes make excessive noise when you ride, clean the rims with rubbing alcohol and a rag, and use sandpaper to remove a thin surface layer from the brake pads. If this doesn't correct the problem, examine how the pads make contact with the rim as you activate the brakes. If the back end of the pad makes contact first, you need to toe in your brake pads so the front end makes contact first. Loosen the shoe mounting nuts and angle the shoes so the back edge of the pads is about half a millimeter off the rim when the front end just touches, then retighten the nuts. If you have old brake shoes that lack this adjustment capability, replace them with a new model.
Another common cause of squealing brakes is cheaply made or worn-out calipers that vibrate when in use and can't be stabilized. The only fix for these is replacement.

----- When replacing the brake pads, make sure the new ones line up with
the rim and that shoes with replaceable pads are facing in the correct direction.
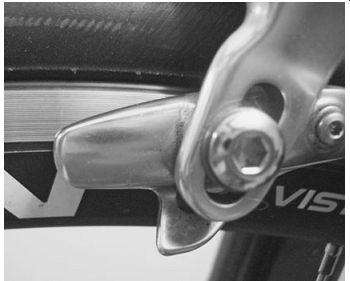
---------- Don’t allow the shoes to tip up or down (as shown) when replacing
them.
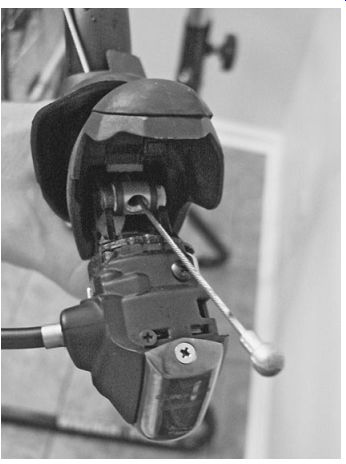
-----After releasing the brake cable, pull the brake lever a few times until
the head of the cable protrudes far enough to be grabbed.
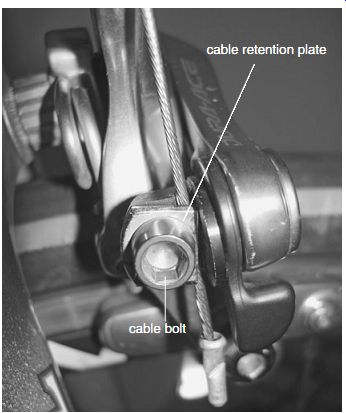
---------After routing the cable behind the cable retention plate, adjust
the brake calipers to the desired distance, pull out all the slack in the cable,
and tighten the cable bolt.
---------After cutting the cable, place a cable end cap over the end of the
cable and crimp the cap in place to prevent the cable end from fraying.
Cable Replacement
You should replace brake cables when they become corroded or frayed. Replacement procedures vary slightly from bicycle to bicycle, so these are just the basics.
If you notice that the brakes stick a little or are slow to disengage, there may be a buildup of gunk inside the housing. Lubricate the cable by squirting chain lube into the housing. If this doesn't correct the problem, the cable is corroded or you've got impacted gunk and need to replace the cable. In either case, you should replace the housing as well. I recommend brake housings that are coated with PTFE (that is, Teflon) because they offer very low friction.
Loosen the cable bolt at the calipers and cut the lower end of the cable end so it can be pulled through the bolt. Next, pull and release the brake lever a couple of times. This should pull the head of the brake cable out of its socket in the lever so it can be gripped and the cable pulled free. Check the ends of the cable housing to make sure they aren't corroded. If the housing is fine, insert the new cable, feeding it through the socket at the lever end and rerouting it through the housing down to the brake caliper. Run the cable through the anchor bolt between the caliper arm and the cable retention plate, pull out all the slack, adjust the brakes accordingly, and tighten the anchor bolt.
Work the brakes a few times to make sure that all the slack is out and the adjustment holds. If it doesn't, loosen the cable bolt and readjust. Things have to seat themselves firmly, especially if you replace the housing, so it usually requires a couple of times before you get the correct distance.
Next, cut the end of the cable with cable cutters (use good ones to prevent fraying), leaving ½ to 1 inch extra. Place an end cap on the bare end of the cable and crimp it in place to prevent fraying.
If you need to replace the housings as well, do one brake at a time so you remember the proper route of the cable along the frame. Start by removing the bar tape from the handlebars, then remove the cable.
Next, remove the tape holding the brake housing to the handlebars. If the old housing is the correct length, save it as a guide for cutting the new housing.
The housing for the front brake runs from the lever, along the handlebars, and down to the front caliper. Two pieces of housing are needed for the back brake: one from the lever and along the handlebars, then to a housing stop on the top tube. The cable runs bare along the top tube to another housing stop near the back of the top tube, then enters the second piece of housing, which runs to the back brake caliper.
Cut the housing to length so it takes a smooth curve without excessive slack. If in doubt, cut it a bit long. Hold it in place, then trim it shorter as needed. Use cutters designed specifically for cut ting housing, and make sure the ends are cut clean.
Do not use regular cable cutters, which will smash the ends of the housing. And do not cut cables with your housing cutters: it will ruin the cutting edge.
Here's the process using the front brake as an example. When the housing is ready, thread the cable through the lever and pull out the slack. Run the cable through the housing, and seat the upper end of the housing in the lever. Thread the cable through the barrel adjuster and the cable retention plate on the caliper, and seat the lower end of the housing into the barrel adjuster. Pull the slack out of the cable and anchor it at the caliper.
Make sure the lever actuates the brake smoothly and the housing doesn't hang up on anything when you turn the headset. If either problem is present, you may need to adjust the length of the housing or play with the routing. Tape the housing to the handlebars with electrical tape along the same route that was used previously and check brake actuation again. Adjust the brakes and cut off the excess cable.
The rear brake follows the same procedure, with obvious accommodations being made for the different cable routing and the two-part housing.
Other Brake Maintenance Issues
Levers are usually trouble free, requiring only a bit of lube on the pivots and an occasional check for corrosion. If the brake lever feels wrong (explained next), the problem is usually elsewhere.
If a brake feels mushy or you can pull the lever all the way to the handlebars, there is too much clearance between the brake pads and the rim. First, make sure you closed the caliper's quick release after reinstalling the wheel. If the cable hasn't slipped through the anchor bolt and if brake shoe wear isn't excessive, you need to adjust the caliper clearance.
If the brake is slow to return to its normal position after braking, there may be a kink in the housing or cable, or the housing is gunked up or corroded, or the caliper's return spring has fatigued. Check the first two scenarios first; both require replacing the cable and housing. The last requires increasing the spring tension in the caliper. On some newer calipers, there is a tension bolt for in creasing spring tension. On calipers without this feature, you can attempt to increase tension by bending the springs outward. You'll have to disassemble the calipers to access them, and you'll still end up with fatigued springs, but it might re solve the problem for a while. A better solution is to replace the caliper.
Shifters and Derailleurs
Poor shifting due to misadjusted derailleurs is a common occurrence. To avoid this problem on the road, check your shifting before you leave home. If everything is in proper order, most adjustments on the road can be made quickly and easily, usually with no tools at all.
Shifters
As with the brakes, when there is a problem shifting it is rarely in the levers; more than likely it is in the cable, housing, or derailleur. When they occur, most lever problems must be solved by replacement. Some shift levers can be serviced, but this is complex and beyond the scope of this Section.
Adjusting the Front Derailleur
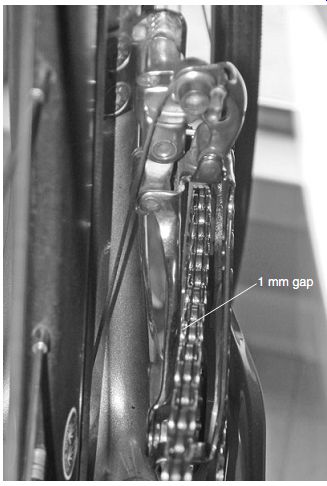
Before making any other adjustments, make sure the front derailleur is mounted correctly. Shift or push the derailleur over the large chainring; there should be a 1 to 2 mm gap between the bottom of the derailleur cage and the chainring teeth, located on the large chainring. If adjustment is necessary, shift to the small chainring, loosen the cable retention bolt, loosen the binder bolt on the mounting bracket, and move the unit up or down as needed. Retighten the bracket, then the cable anchor, and recheck for height.

--------- When the front derailleur is adjusted properly, there is a 1
to 2 mm gap between the top of the large chainring and the bottom of the cage.
It will vary. The gap will be larger near the back portion of the derailleur.
You measure at the top of the chainring.
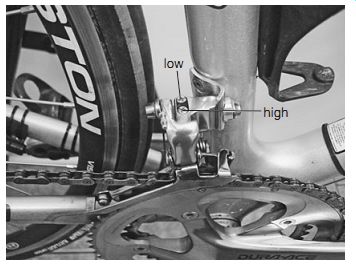
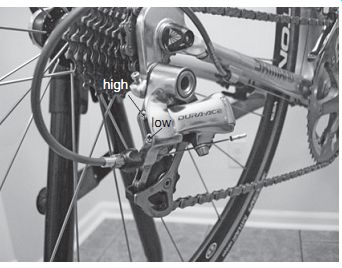
----------The low- and high-gear limit screws are designed to limit the outward
and inward movements of the derailleur.
----------- Adjust the low-gear limit screw until there is a 1 mm gap between
the small chainring and the inner front derailleur plate.

----------Adjust the high-gear limit screw until there is a 1 mm gap between
the large chainring and the outer front derailleur plate.
Next, look at the derailleur from ahead to make sure the cage is parallel to the chainrings.
Follow the same steps as above to change the angle if necessary.
Limit screws on the derailleur body restrict the distance that it travels in and out. If travel is insufficient in either direction, the chain will not shift onto the desired chainring, but at least you can still keep pedaling on the present one. If derailleur travel is too great, the chain will be "thrown" past the desired chainring and you'll be out of business.
The limit screws-marked L and H for low gear and high gear-prevent the cage from moving the chain too far inward or outward, respectively.
I hope it goes without saying that you can't shift the chain unless you're pedaling forward, so you'll have to support the bicycle on a stand, with the rear wheel off the ground, for derailleur adjustments. Pedal at sufficient speed to mimic riding: 50 to 60 rpm will do.
Start by setting the lower limit. Shift the chain to the small ring in front and the largest cog in back. You don’t want tension on the derailleur, so release the cable by loosening the anchor bolt. If necessary, tighten or loosen the L screw so there is about one millimeter of clearance between the chain and the inner plate of the derailleur cage.
Pull the slack from the cable and retighten the anchor bolt. While turning the crank by hand, shift to the large ring and back down again. The chain should drop smoothly onto the inner chainring.
If the chain falls off to the inside, tighten the L screw and try again. If it is slow to drop, loosen the L screw and check the gap again. Most adjustments to the limit screws should be small- typically one-eighth to one-quarter turn at a time.
Next, set the high-gear limit. Shift to the large ring in front and the smallest cog in back. Manu ally pull the cable tight to ensure that the derailleur is firmly against the limit screw. Turn the H (for high gear) limit screw to set a 1 mm gap between the outer derailleur plate and the chain.
Shift back and forth between the chainrings as before, and readjust as needed.
Now that the limit screws are properly set, you need to adjust the shifting. Shift to the small ring in back and the large ring in front. If the derailleur cage contacts the chain, increase the cable tension by turning the barrel adjuster until you have the appropriate 1 mm clearance. The chain should now shift smoothly. If the barrel adjuster can't take out all the slack, loosen the anchor bolt, pull out the slack, and retighten, then check the shifting again.

------ The spring-loaded cage on the rear derailleur is designed to keep
tension on the chain as it moves between cogs on the rear cassette.

-------The body screw is used to set the clearance between the rear derailleur
and the cassette.
--------- Adjusting the low- and high-gear limit screws on the rear derailleur
prevents the chain from traveling into the spokes or becoming wedged between
the cassette and the frame.
Adjusting the Rear Derailleur
As with the front derailleur, make sure the rear one is mounted correctly. First, ensure that the mounting bolt is tight. When shifted into the lowest gear, the top pulley, known as the jockey wheel or guide pulley, should be as close to the largest cog as possible without interference. This usually translates to about six millimeters of clearance to allow room for the chain in between. If necessary, tighten the B (for body) screw to tilt back the derailleur body and increase the clearance, or loosen the screw to tilt the body forward and reduce the clearance.
Next, set the limit screws. The low-gear (L) limit screw prevents the derailleur from shifting into the spokes, and the high-gear (H) limit screw prevents the chain from being thrown off the cassette to the outside. The limit screws are not used to adjust shifting from cog to cog.
Start with the high-gear limit, placing the chain on the large ring in front and the smallest cog in back. Loosen the cable bolt and release the cable tension. The guide pulley should be directly under the smallest cog. If necessary, turn the H screw until the pulley and the cog are aligned perfectly. Pull the slack from the cable and tighten the anchor bolt.
Shift to the next largest cog on the cassette and back down again. The chain should move smoothly.
Set the low gear limit next. Shift the bicycle to the small chainring and the largest cog. Grip the derailleur cable and pull, or push the derailleur by hand to ensure that the derailleur is against the lower limit screw. The guide pulley should line up perfectly with the largest cog, and the derailleur should not touch the spokes. Adjust the L screw as needed, and check shifting between the largest and next-largest cogs.
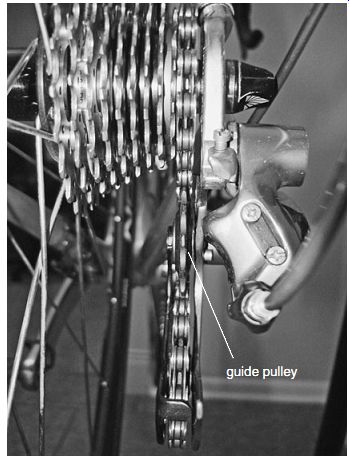
--------- When the high-gear limit screw is properly set, the rear derailleur
guide pulley should line up directly below the smallest cassette cog.

--------- When the low-gear limit screw is properly set, the rear derailleur
guide pulley should line up directly below the largest cassette cog.

---------The barrel adjuster on the rear derailleur can be used to fine-tune
shifting by increasing or decreasing cable tension.
Now adjust the shifting between cogs by changing the cable tension at the barrel adjuster on the rear derailleur. First remove any slack from the cable at the anchor bolt. Place the chain on the large ring in front and the smallest cog in back.
Shift from the smallest to the next-largest cog. If the chain hesitates while moving to the next gear, increase the tension by turning the barrel adjuster counterclockwise. If the chain tries to move beyond the next cog, decrease the tension by turning the barrel adjuster clockwise. After making these adjustments, try the next two or three cogs. If the chain shifts smoothly, move on to the next step. Shift the chain into the small ring in front and the largest cog in back. Shift from the largest cog to the next one down. If the chain hesitates or will not shift down, decrease the tension. If it tries to go too far, increase the tension.
Check shifting up and down and make adjustments accordingly.
Replacing Cables
Smooth-running cables facilitate quick and precise shifting. Corroded cables and gunked-up housings should be replaced. If you replace cables, replace the housings as well.
Access to the upper end of the shift cable differs by manufacturer. For Shimano, you need to pull the brake lever to gain access. For Campagnolo, the entry point is on the side, below the thumb lever. Access on SRAM levers is on the side, beneath the rubber hood.
The front derailleur cable starts at the left shift lever. Shift the chain onto the small chain ring, loosen the cable anchor bolt on the derailleur, and cut off the end of the cable so it can be pulled through. Push the cable so its end fitting comes out of the shift lever. Grip the fitting and pull the cable free. Remove the old housing and use it to measure the new housing. Cut the new housing with housing cutters, then add the housing ends.
Route the housing from the left lever to the barrel adjuster on the left side of the down tube.
Thread the new cable through the lever, through the new housing, through the barrel adjuster, through the cable guide on the underside of the bottom bracket shell, between the chain stays, and up to the derailleur. Pull out the slack and anchor the cable in place, then cut the cable with wire cutters, leaving about an inch extra, and crimp an end cap in place. Adjust the derailleur as described earlier. As you ride, you may need to increase tension in the cable a few times before the housing has completely seated itself.
Procedures are nearly identical for the rear derailleur cable and housing. Work with the chain on the smallest cog, and route the top section of housing from the lever to the barrel adjuster on the right side of the down tube, and the second piece from the housing stop on the chain stay to the barrel adjuster on the rear derailleur. Run the new cable through the lever, the first piece of housing, down alongside the down tube, through the cable guide under the bottom-bracket shell, along the right chain stay, through the second piece of housing, and to the anchor bolt on the derailleur.

------------- The cable guide, located on the underside of the bottom bracket
shell, ensures that the cables are routed along the correct path. The guide
also protects the frame from cable rub.
Chain
Worn chains wear down the rest of the drivetrain and tend to break easily. Keeping the chain clean and lubed will greatly prolong its life. You should replace the chain every 1,000 to 2,000 miles, depending on its quality and how well it is maintained.
Lubing
Depending on your local weather, you can choose a wet or dry chain lubricant. Dry lube picks up very little debris, but it washes off easily in wet conditions. Wet lube picks up more debris but can with stand wet conditions. Only use bike lubes: many other popular lubricants (such as motor oil) attract excessive amounts of debris and should be avoided.
Before lubing, remove any old lube and debris by wiping down or thoroughly cleaning the chain, as needed. Apply new lube to the rollers (the side plates do not need it) and let it soak in. Remove any excess with a rag. This will help prevent an immediate buildup of debris.
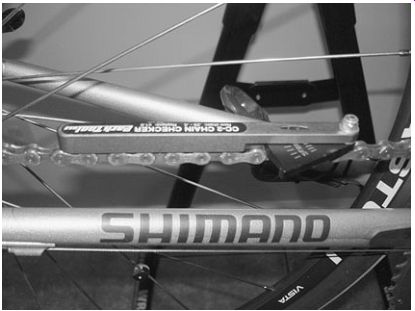
--------- Use a chain gauge to determine whether the chain is worn and
needs to be replaced.
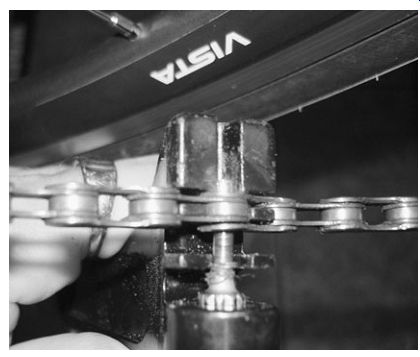
------Use a chain tool to push the connecting pin through the link to break
the chain for removal.
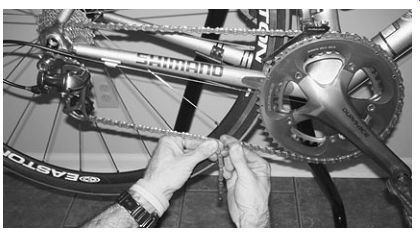
------------To determine chain length, route the new chain over the large
chainring, through the front derailleur, over the smallest rear cog, and through
the rear derailleur. Pull the two ends of the chain together beneath the chain
stay until the rear derailleur pulleys are lined up vertically.
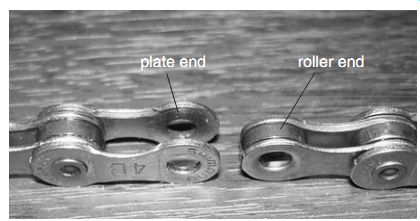
----------When joining two ends of a chain with a connecting pin, make sure
you have a pair of side plates at one end of the chain and a roller at the
other end.
Replacement
If the chain is skipping on the cassette, a replacement is overdue. Before you get to that point, you can use a chain gauge to determine whether the chain is worn, comparing your measurement against the manufacturer's specifications. If a new chain skips on the rear cassette when under strain, you waited way too long and the cassette will need to be replaced as well.
Choose the correct chain. Eight- and nine speed chains are wider than ten-speed chains and are not interchangeable. To remove (or "break") the old chain, place it in the chain tool and turn the handle until the pin falls free. Clean the rest of the drivetrain before you install the new chain.
Before installing the new chain, it must be sized, or broken to the proper length. If the old chain was the correct length, you can use it as a guide. Because it has elongated from use, you can count links or line up the two chains side by side and match them link for link. If you do not have the old chain or if its length was incorrect, route the new chain over the large chainring, through the front derailleur, over the smallest rear cog, and through the rear derailleur. Pull the two ends of the chain together beneath the chain stay until the rear derailleur pulleys are lined up vertically. Mark the chain and remove the excess, making sure you end up with a roller at one end and a pair of side plates at the other. The exception to this is if you will use a master link (discussed later), in which case cut the chain one plate short so you have two roller ends.
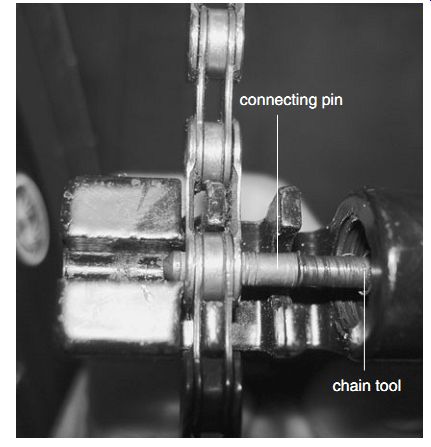
There are two ways to join the ends of the chain. First, here's the method utilizing a chain tool and the connecting pin that's included with all new chains. Shift the front derailleur to the small chainring and remove the chain to the inside so it's draped over the bottom-bracket shell. This will release all tension from the chain, making it easier to work with. Bring the two ends together and place the pin, pointed end first, through the pin hole in the near side plate. Fit the two ends into the chain tool and screw down the handle, forcing the pin through the roller and into the far side plate. You will feel the pin ends snap into place.
Remove the chain tool and use pliers to snap off the pointed end of the pin, then wiggle the newly joined link up and down to ensure that it moves freely. If a seven-, eight-, or nine-speed chain does not move freely, wiggle the link from side to side to loosen the connection. Don’t use this method with a ten-speed chain; it is too thin and the plate may come loose from the pin. Because of the difficulty of joining a ten-speed chain with a pin, I recommend using a master link instead. A master link also makes it easy to remove the chain for maintenance. Master links are designed to connect two roller pin ends by the use of pins connected to the plates of the master link. The master link consists of two plates that are designed to connect two roller ends of a chain. Each plate has one pin that is designed to fit through the roller and connect to a slot on the opposite plate. After connecting the chain, turn the pedals and watch the rear derailleur for any catches as the chain passes through the pulleys.
If the rear derailleur jumps, the link is too tight and not operating smoothly. Loosen the link and repeat the installation.
-----Use the chain tool to push the new connecting pin through the chain until
it seats.
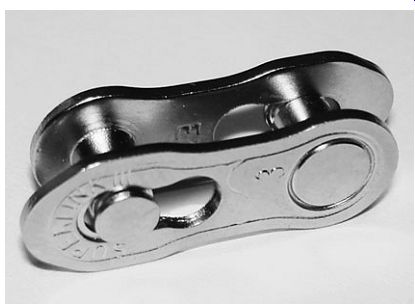
----Using a master link instead of a connecting pin makes it easy to install
and remove a chain.
Tires
Inspect your tires before every ride. Make sure no debris is lodged in the treads or is cutting into the rubber because it can work its way through into the tube.
Check the tire pressure. Cycling tubes are permeable and lose as much as 10 to 20 psi over night. When the tire pressure is low, the sidewall can be compressed by a bump in the road, causing a pinch flat. Low tire pressure also negatively affects handling and speed.
If your tire has a slow leak, don’t ignore it because it will eventually become a large leak.
Take the time to replace the tube in the comfort of your home before you ride.
Flats are a common occurrence in Cycling, and tires wear out with fair regularity. It is not practical to run to the shop every time, so learning how to fix flats and change tires is a must. Clincher and tubular tires require different procedures.
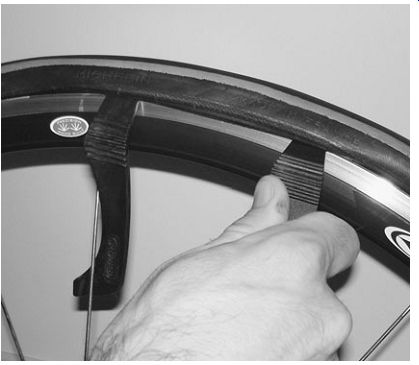
---------- Tire levers are used to remove a tire from the rim by prying the
tire bead up and over the rim wall.
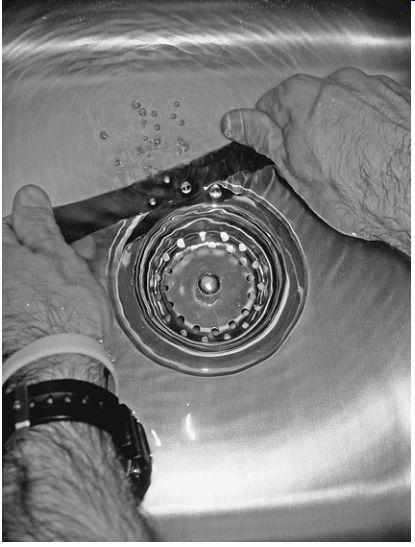
-------- You can locate a small hole in an inner tube by inflating it,
submerging the tube in water, and watching for bubbles.
Clincher Repair and Replacement
Remove the wheel from the frame, and remove the valve cap from the valve stem. There is no need to take the entire tire off the rim to fix a flat, so unless you're replacing the tire, you'll need to free only one side of the tire. You will need two or three tire levers. Place one tire lever between the tire and the rim. Being careful not to pinch the inner tube, pry the lip of the tire over the rim, levering the tool all the way down so you can clip the other end around a spoke and hold it in place. Repeat with the other tire levers until you have freed a sufficient amount of the tire bead from the rim so you can free the rest by hand.
Grip the tube and pull it out of the tire, feeding the valve stem through the rim last. Inspect the tube and look for the hole. You want to deter mine where and how the puncture occurred; if the flat was caused by a tack or a bit of glass lodged in the tire, you've got to find it before it causes another instantaneous flat.
If you can't see the puncture easily, inflate the tube. If the hole is still not obvious, hold the tube next to your ear and rotate it bit by bit until you can hear or feel the leak. If you still can't find it, place the tube under water in a sink, a few inches at a time, and watch for bubbles. When you find the puncture, mark it with a grease pencil.
Punctures from sharp objects are usually small pinholes. (In contrast, pinch flats are usually oval shaped and often come in closely spaced pairs.) In case of a sharp-object puncture, deter mine whether the object is still embedded in the tire. Inspect the tread, then carefully run your fingers along the inside of the tire to feel for any debris or protrusions. Remove any objects you find.
Check the rim tape that protects the tube from the spoke nipples. Make sure it's still in place and no spoke ends or burrs are projecting through. If a spoke projects through the nipple, file it down before reinstalling the tape.
You have the option of patching small holes or using a new inner tube. Large holes and holes located around the stem can’t be patched. I recommend using a new tube when possible, and saving patches for emergency road repairs.
There are two types of patches: self-adhesive and vulcanizing. Self-adhesive patches are easier to use and take up less space in your road kit.
Vulcanizing patches, which come in a kit with a tube of glue, are more reliable.
To use the latter, rough up the area surrounding the hole with the abrasive found in the patch kit. This is usually sandpaper, but if it's a metal nutmeg-grater-like device, be careful about roughing up the tube too much. Clean the roughed-up area with alcohol and let it dry.
To use a glue patch, apply the glue to the area, then affix the patch. Make sure that the edges are adhering, and hold the patch in place firmly with your thumb for 30 to 60 seconds. To affix an adhesive patch, just peel off the backing and apply as above.
If you're replacing the tire as well as the tube, place the tire halfway onto the rim-with one bead all the way on and the other hanging off the side.
If you're simply fixing a flat, that's exactly where you left the tire when you removed the tube. From this point, the procedure is the same whether you're using a new tube or a patch.
Inflate the tube just enough so it begins to take shape. Place the valve stem through the hole in the rim, then push the rest of the tube into the tire all the way around. Start working the tire back onto the rim, starting with both hands at the twelve o'clock position and pushing with your thumbs or the heels of your hands. Work to the left and right with both hands simultaneously until you get the tire bead all the way inside the rim.
If there is too much air in the tube, it will get in the way, so let a little out if necessary. Don’t use tire levers to force the tire back onto the rim; this can easily pinch and damage the tube. Check that the tube is not pinched between the tire and the rim, then inflate the tire to the pressure marked on the tire sidewall.

----- Once you find the hole in the tube, you can repair it with a glue
patch or a self-adhesive patch.
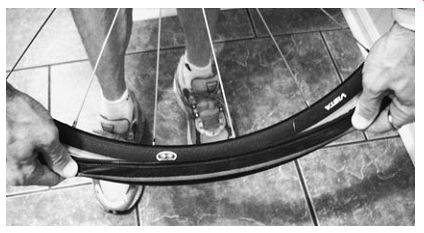
--------- Once you replace the tube, work the tire back onto the rim. Be
careful not to pinch the tube between the tire and the rim, and make sure the
bead seats against the rim.
Tubular Repair and Replacement
It takes a little more time and effort to change a tubular tire. Remove the old tire from the rim by hand, and remove any clumps of remaining glue from the rim with acetone and a plastic scraper.
Acetone is hazardous, so wear goggles, a respirator, and plastic (not latex) gloves. Acetone will also remove the decals from your wheels, so apply the acetone carefully to avoid the decals. You don’t want to remove all the glue from the rim, just the clumps of glue.
You can patch tubular tires, but patches are not as reliable as new tires. I advise against using patches on a race wheel: it's not worth risking a race to save money.
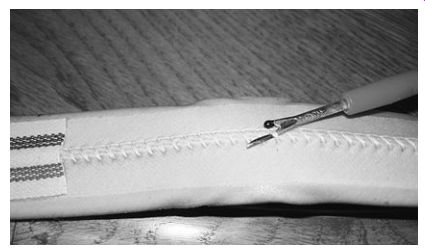
---------- Once you locate the hole in the tube of a tubeless tire, use
a seam cutter to cut the thread and open the casing.
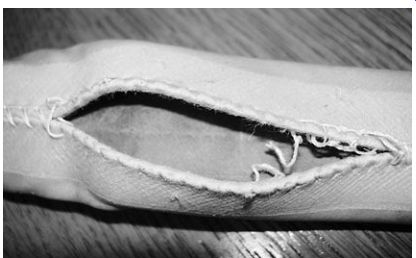
--- With the casing open, the tube is exposed and ready to be patched.
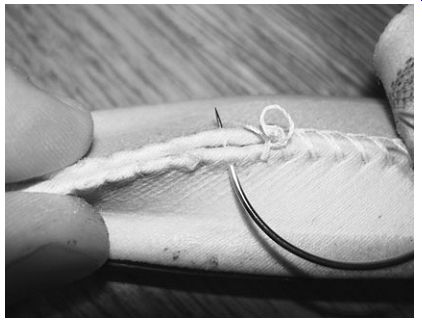
---------After patching the hole, sew the casing shut and glue the base tape
back down.

------ When placing the tubular tire back on the rim, start at the top
and work your way to the bottom.
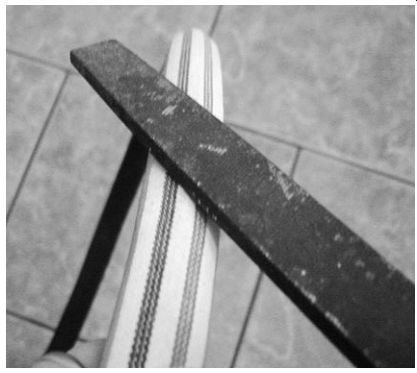
--------Inflating the tubular off the rim causes it to turn inside out, making
it easy to abrade the base tape with a file

--------- When applying a glue strip, make sure the rim is clean. A truing
stand makes the job easier.
To patch a tubular tire, you need a special tubular patch kit, which will have almost every thing required. Remove the tire from the rim, inflate it, and place it in water. Mark the tire where bubbles are coming out, then remove the base tape an inch above and below the mark. Cut the stitches that hold the tire together, using a seam cutter from a sewing kit. Pull a length of tube out of the tire and locate the hole. Repair the hole with the patch from the kit. Apply talcum powder to the tube, push it back into the tire casing, and sew up the tire with a needle and thread. If possible, use the original holes to stitch the tire back together. Once you finish sewing, glue the base tape back in place.
If you're installing a new tire, you should stretch it first. Place the wheel on the ground with the valve-stem hole at the top. Place the stem through the hole and work the tire onto the rim, moving your hands downward on both sides at once. When you get near the bottom of the wheel, pick up the wheel and roll the last section of tire onto the rim. Inflate the tire to full pressure and let it sit a few minutes to a few days. The longer you let it stretch, the easier it will be to work with.
Next, deflate the tire and remove it from the rim. If the base tape on the inside of the tire has a PTFE (that is, Teflon) coating, abrade it gently with a file. This will give the glue something to grab onto. Inflating the tire until you can rotate the bottom side out will make this easier. Always ensure that the rim is clean before you begin the gluing process. Any dust, dirt, or debris could hinder bonding of the glue. Apply a thin layer of glue to the rim and the base tape of the tire with an acid brush or a toothbrush. Make sure the glue ex tends all the way to the edge of the rim's mounting surface. Allow the glue to dry overnight. Repeat this process one to two more times. You can cut this process short, but you may run the risk of the tire separating from the rim. Finally, apply another thin layer of glue to the rim and let it sit for 10 to 15 minutes. Mount the tire to the rim using the same method you used to stretch a new tire, being careful to keep the glue off the sides of the rim. (If you get glue on a metal rim, clean it with acetone.
If you have composite rims, consult the manufacturer for cleaning procedures.) Inflate the tire and place the wheel in a truing stand. Rotate the tire and check that the treads are centered, moving the tire one way or the other as required. Allow the tire to sit for at least 24 hours before riding.
Pressure-sensitive glue strips, produced by Tufo tires, are less messy and easier and faster to use than regular glue, and I recommend them highly. Follow the same steps for removing the old tire and preparing the new one. Wrap a glue strip around the rim, then cut a hole for the valve stem.
Leave the backing on the glue strip, but bend both ends of the backing so they will protrude between the tire and the rim. Install and center the tire on the rim, then pull out the ends of the backing, making sure the tire stays centered. Inflate the tire fully. You can begin riding immediately, but go easy for the first 5 to 10 minutes, avoiding sharp corners and steep descents until the glue sets.
There has been some concern about glue strips causing carbon fiber to separate when removing the tire. If you have composite rims, check with the manufacturer before using the glue strips.
Wheels
Properly functioning wheels enhance performance and produce an enjoyable ride. A wheel that is out of true and rubbing the brakes, or a hub with pitted bearings, greatly increases the amount of energy required to pedal.
Hubs
Hubs are designed to rotate on bearings around the axle as the wheel spins. To minimize friction and wear, the bearings are packed with grease and enclosed from the elements. But over time the grease breaks down and moisture and dirt work into the bearings.
Hubs need to be serviced every year or two, depending on the frequency and conditions of your rides.
Hubs also loosen with use, so you should check for play on a regular basis. Hold the frame steady with one hand and the wheel with the other.
If you can move the wheel from side to side or hear any movement, you need to tighten the hub.
Although hub adjustment and overhaul are not difficult, the procedures vary greatly by make and model, putting them beyond the scope of this guide. Consult the manufacturer for procedures and any special tools required.
Truing
When a wheel is out of true, you feel a noticeable wobble when riding, and it becomes impossible to adjust the brake calipers close enough for good braking performance. Wheel truing is not difficult; if you ride frequently you should consider investing in a truing stand. You can make passable truing adjustments with the wheel on the bicycle, but the process is not as accurate or convenient as when using a stand. The following description assumes that the wheel is in a stand.
Remove the wheel from the bicycle and place it in the truing stand using the quick-release mechanism. Spin the wheel and slowly move the truing calipers (or pointers) toward the rim. When you hear the caliper scrape the rim, stop and locate the spot where it makes contact. Loosen the spoke on that side of the wheel with a spoke wrench, and tighten the spoke on the opposite side. Make small adjustments, turning the spoke nipple one-quarter to one-half turn at a time. Counterclockwise tightens and clockwise loosens-if you view the spoke nipple from the end of the spoke, not from the in side of the rim. You might need to adjust several spokes on each side to straighten a wide section of rim that's out of true. Spin the wheel to see if it clears. If the caliper does not clear, repeat the process. If it does, tighten the calipers and repeat until the wheel is true. Keep in mind that wheels are never perfectly in true; a variation of 1 mm is usually acceptable.
------------- Make small adjustments when truing a wheel, turning the spoke
nipple one-quarter to one-half turn at a time using a spoke wrench.
Changing the Rear Cassette
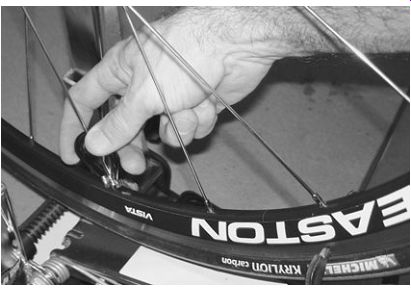
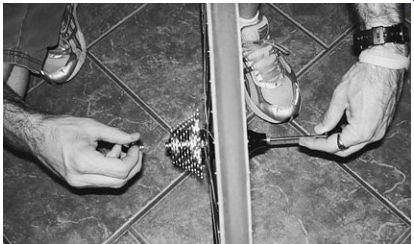
You will need to change the rear cassette from time to time to adapt to the terrain in which you are riding. Two special tools are required: a chain whip and a cassette tool.
Remove the wheel from the bicycle, extract the rear skewer, and lay the wheel flat with the cassette facing up. Wrap the chain whip around the cassette in the direction shown so you can apply clockwise pressure to the cassette. Place the cassette tool, which is splined and designed to fit into the lockring in the cassette and insert the quick-release skewer through it, tightening the quick release to hold the cassette tool in place. Hold the cassette tool with a big adjust able wrench, and unscrew (counterclockwise) the cassette lockring. It is normal to hear loud clicking as the lockring releases. Lift the cassette off the freehub. Remove the old grease from the hub body with a rag and apply new grease before you replace the cassette. The cassette is "keyed" specifically to one wide spline and can go on only one way. If the individual cogs are not bolted or riveted together, make sure that the side that is stamped with the number of teeth faces out when reinstalling the cogs on the freehub. Once the cassette is in place, use the cassette tool to retighten the lockring. When you're finished, there should be no play between the cogs.
---------- To remove the cassette, first remove the skewer.
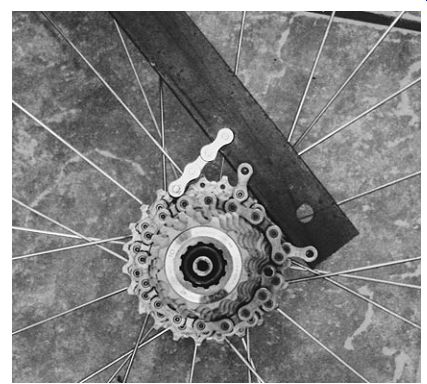
--------- Wrap the chain whip around the cassette so it holds the cassette
in place.
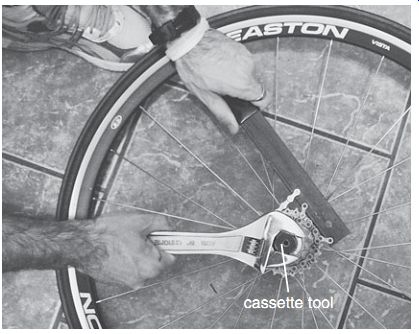
---------- With one hand, hold the cassette in place with the chain whip.
With the other hand, loosen the cassette lockring, using a large wrench placed
on the cassette tool.
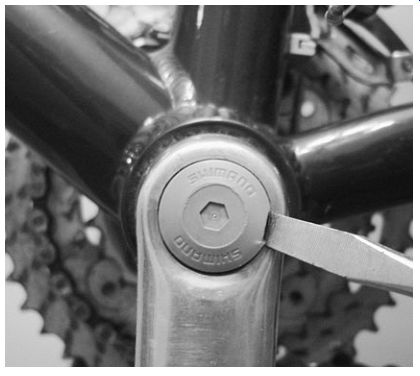
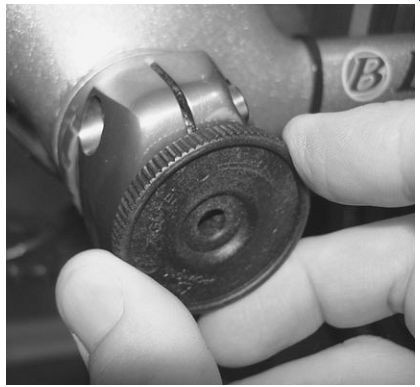
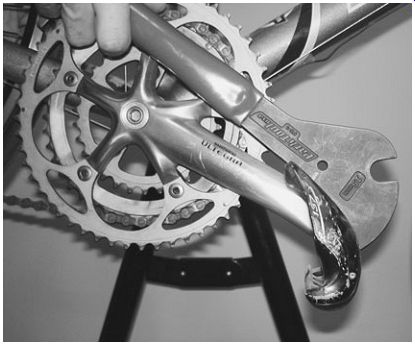
----With a screwdriver, remove the dust cover from the crank arm to expose the
crank-arm bolt.
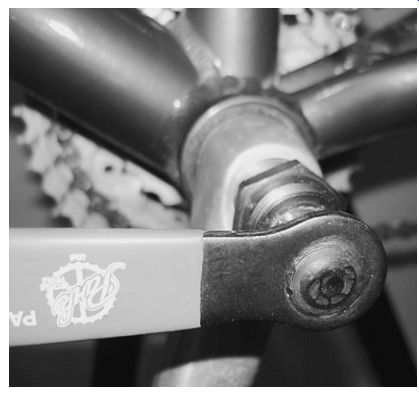
-----------After removing the crank-arm bolt, back the crank arm off the spindle
using a crank puller.
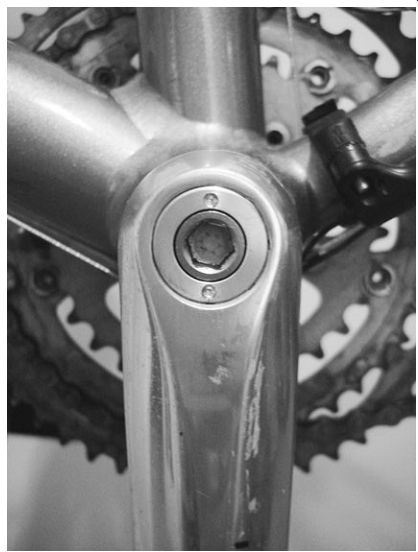
--------Some cranksets have self-extracting bolts and do not require a crank
puller.
Crankset
Removing a crankset is easy if you have the right tools. There are three basic methods to remove a crankset, determined by its style.
The first method, used mainly on older bicycles, involves a crank puller designed for your crank. Begin by placing the chain on the large chainring.
It may be necessary to apply a large amount of force to the wrench. If your hand slips, the chain will protect it from the chainring's teeth. Pry or screw out the dust cover and back out the crank bolt with a socket. Make sure the push pin is backed all the way out in the crank puller, then screw the crank puller into the crank arm by hand.
Turn the handle clockwise on the crank puller; as it begins to tighten, it will bear against the spindle and push off the crank arm. Follow the same procedure for the other side.
To reinstall the cranks, begin by cleaning the bottom-bracket spindle. Splined spindles should be greased; square tapered spindles should be left dry.
With square tapered spindles, align the crank arms at 180 degrees from each other. If the spindle is splined, make sure the splines are aligned correctly between the spindle and the crank arm, or you may ruin both. On keyed spindles (Shimano OctaLink or the ISIS standard drive), one spline is larger than the rest; make sure this spline lines up correctly with the appropriate notch in the crank. Apply grease to the bolts, and tighten the crank arms with a torque wrench. Lastly, replace the dust cap.
The next method involves cranksets with self-extracting bolts. This type of crankset has a dust cover with a hole in the center to allow a hex wrench access to the crank-arm bolt. Insert the hex wrench and loosen the crank bolt. As the bolt loosens it presses against the dust cover and backs off the crank arm.
For installation, remove the dust covers from both crank arms using a pin spanner. Remove the crank-arm bolts. Clean and lube the threads on the crank arms, the dust covers, and the crank arm bolts. Line up the crank arms and tighten the crank-arm bolts, then reinstall the dust covers.
Most newer bicycles have integrated cranksets with the spindle attached to the drive-side crank arm instead of the bottom bracket. This type is the easiest to remove and install. Loosen but don’t remove the clamp bolts on the left crank arm. Remove the crank-arm retention cap and pull off the left crank arm. Next, slide off the drive-side crank arm.

-------- Use a pin spanner to remove the dust covers before reinstalling
the crank arms.
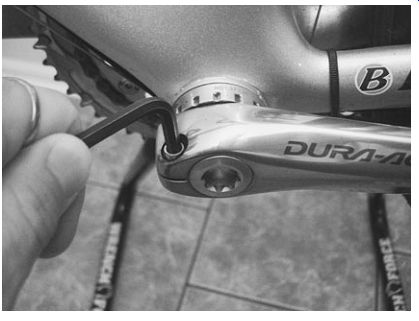
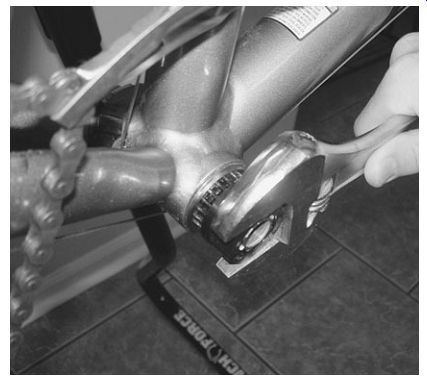
--------Loosen the clamp bolts on the non-drive side.
--------After loosening the crank-arm bolts, remove the crank arm retention
cap.
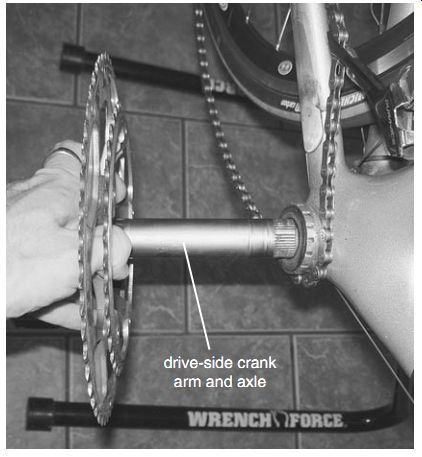
--------Once the non-drive crank arm is removed, slide the drive side crank
arm and axle free from the bottom bracket.
Clean and lubricate the spindle prior to re-installation. Take the drive-side crank arm and slide the spindle through the bottom bracket until it bottoms out. The left crank arm is keyed so it goes on only one way. Slide on the left crank arm and fasten it in place with the retention cap, turning the cap only hand tight or with a torque wrench if specified. Tighten the clamp bolts on the crank arm by alternating between the two bolts.

-------- There are three basic styles of bottom brackets-from left to
right: outboard bearing, cartridge-style splined, and cartridge-style tapered.
-- With a cartridge-style bottom bracket, remove the bottom bracket by loosening
and removing the right side first.

-- Bottom-bracket tools are specific to each type of bottom bracket. This
is an outboard bearing bottom bracket.
Bottom Bracket
There are different types of bottom brackets, and we will look at only the two main types: cartridge style and outboard bearing bottom brackets. Both types of bottom brackets are manufactured with either English or Italian threads. English-threaded bottom brackets are reverse threaded on the drive side, so you must turn the bottom-bracket cup clockwise to loosen. Italian-threaded bottom brackets are "normal" threaded on both sides. If you have a proprietary bottom bracket, contact the manufacturer for detailed maintenance instructions. You will need a bottom-bracket tool de signed for your specific bottom bracket.
Cartridge-style bottom brackets are manufactured with either splined or tapered spindles.
To remove a cartridge-style bottom bracket, first remove the crankset. Next, remove the bottom bracket by loosening and removing the right side first. Next, remove the left-side bottom-bracket cup. Clean and grease both the bottom bracket and the shell.
The bottom-bracket cups are marked right and left. Insert the left cup halfway, then insert the right side and tighten it. Return to the left side and finish tightening the left cup. Check that the spindle rolls smoothly, then reinstall the crankset.
Outboard bearing bottom brackets don’t have a spindle and are designed to accept the spindle on integrated cranksets. Removal and installation follow the same procedures as cartridge bottom brackets.
Headset
Keeping the headset bearings clean and lubed prolongs their life. Due to the different styles of headsets and the specialized equipment necessary to remove the cups, service and inspection are covered here, but not removal and installation.
When servicing your headset, pay close attention to where each part goes as you remove it.
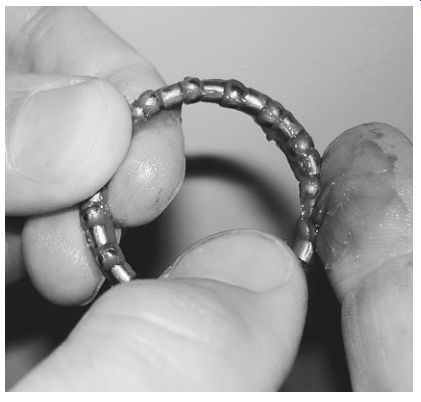
To service the headset you must first remove the stem. Start by completely removing the top cap and bolt, loosening the stem bolts, and pulling out the stem. Assuming that the brake and shifter cables are still installed in the levers, place a rag on the top tube to protect against scratching the finish when you rest the stem and handlebars on the top tube. Push the fork down 1 to 2 inches, then push it back up. The compression washer and cover should come back up with it; remove them from the fork, then pull out the fork. If the fork is stuck, tap it out with a rubber mallet, or place a block of wood on top of the steerer tube and tap it out with a hammer, using caution if the fork has a car bon fiber steerer tube. Inspect the upper and lower bearings for wear. (If the bearings are pitted, the headset must be replaced.) Clean the old bearings with degreaser and allow them to dry.
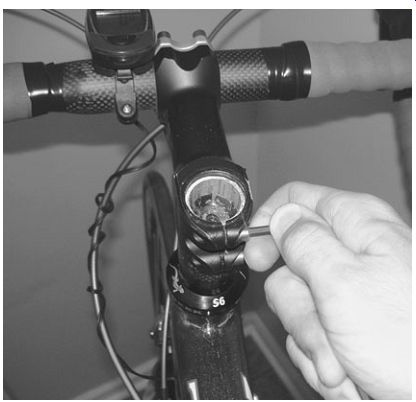
--------- To remove the stem, remove the top cap and loosen the stem bolts.
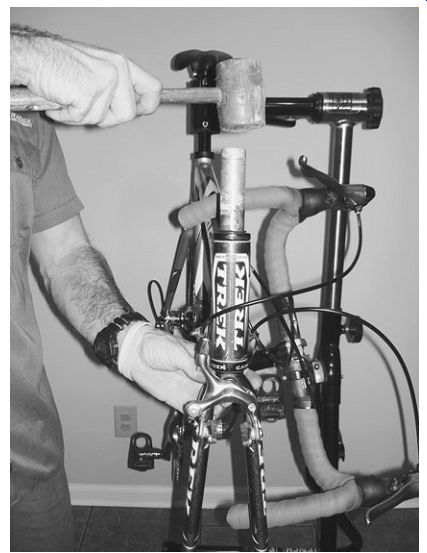
------- Remove the fork by gently tapping on the steerer tube with a rubber
mallet.
To reinstall, repack the bearings with grease.
Place the lower bearings and seal on the fork and insert the fork back through the head tube. Place the upper bearings, compression ring, and top cover on the top of the head tube, then replace the spacers and the stem. The top of the steerer tube should be just slightly below the top of the stem.
Then replace the top cap and bolt.
It is important to understand how these parts interact. Although the top cap pulls up on the star nut or compression plug inside the steerer tube, you still need a gap between the top of the steerer tube and the stem so that pressure from the top cap is applied to the stem. In turn, pressure from the stem is applied to the spacers, down through the bearing races and to the bearings. Tighten the top bolt until it feels snug. You want the top cap tight enough to hold the fork in place with no play but loose enough to allow the handlebars and fork to steer smoothly. Next, ensure that the stem is straight, then tighten the bolts on the stem.
Check that you have the top cap tightened an appropriate amount. The handlebars should rotate from side to side smoothly and easily but with no play whatsoever. If necessary, loosen the bolts on the stem, then back off or tighten the top-cap bolt.
Retighten the stem bolts and test again.
------------ After cleaning the headset bearings, pack them with grease
before replacing.
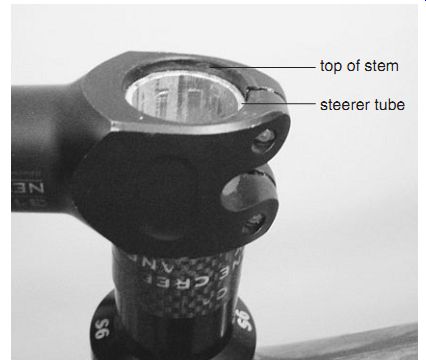
----There should be a slight gap between the top of the stem and the top of
the steerer tube.
Handlebars
Inspect the handlebars on a regular basis for corrosion or damage and replace them at the first sign of problems. Although extremely light aluminum bars are nice, they fatigue faster than thicker, heavier bars. Most sources recommend replacing your bars every one to four years, or after any crash.
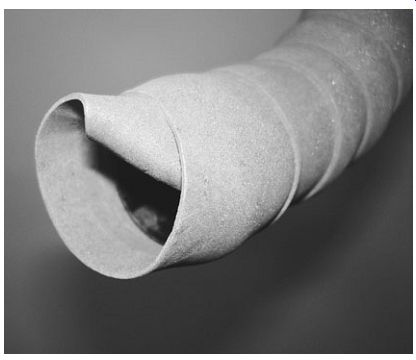
Bar Tape
Change the bar tape regularly. Bar tape soaks up sweat, which promotes the growth of bacteria and mold. Sweat also corrodes the metal under the bar tape, and you need to remove the tape to inspect for corrosion and cracks.
Remove the end caps, then unwrap the bar tape from the top down. Although you will install new end caps, keep the old ones to replace lost caps down the road. Remove the short pieces of tape directly below the shift/brake levers, then clean and inspect the handlebars (see photos next page).
Peel back the rubber hoods on the levers, then replace the pieces of tape below the levers. Start wrapping the tape from the end of the handlebars, leaving enough extending over the end to be tucked into the bar later. Begin wrapping at an angle so the tape overlaps itself by one-third of its width on each turn, keeping it tight and rolling directly from the roll around the bars as you go. If the tape has a peel-and-stick backing, remove it as you wrap.
Work your way up the bars and around the lever.
Push the hoods back down to ensure that the bars are covered by the hoods or the bar tape. When you reach the point where you wish to end, cut the bar tape at an angle so it ends evenly. Secure the cut end with the tape provided or with electrical tape.
I prefer electrical tape: it seems to hold better. Finish by installing the new end plugs.

----------- Peel back the hoods on the levers and replace the short pieces
of bar tape under the hoods.
--------- Leave enough tape protruding beyond the bar end so it can be tucked
inside and held in place with the end cap.
-----------To loosen the pedal, turn the pedal wrench toward the back of the
bicycle; to tighten the pedal, turn the wrench toward the front.
Changing Pedals
The left pedal is reverse threaded; the right one is normal. To keep it simple, remember that turning the wrench to the back of the bicycle loosens the pedal; turning it to the front tightens it; this is true on both sides. Most pedals require a pedal wrench, although some newer pedals use a hex wrench on the pedal axle. After removing the pedals, wipe the threads clean and apply fresh grease. During installation, tighten the pedals by hand as far as possible to prevent cross threading.
The pedal should go on smoothly. If it does not, you may have cross threaded or need to clean the threads. Finish tightening the pedal using a pedal wrench.
Seat / Post
Before removing the seat post, mark it with electrical tape so you can easily replace it at the correct height. Loosen the clamp bolt and pull the post free. When working with a carbon post, don’t rotate the post back and forth while removing; this can score the carbon and weaken the post.
When installing a metal post into a metal seat tube, always apply grease. This prevents the post from seizing in the seat tube and helps keep moisture out of the frame. Never apply grease if the post or the seat tube is made of carbon fiber. Use a torque wrench and the manufacturer's recommended torque to tighten the clamp bolt, and be ware of overtightening, especially when using a car bon post. Seat posts are marked with an insertion limit line. If the limit line is showing, the post is too high and could break. Insert the post farther into the tube, or replace the post with a longer one.
REPAIRS ON THE ROAD
"Mechanicals" on the road are inevitable. It's essential to know how to repair the most common problems, if only to keep from having to hike many miles back home several times each season. This section addresses most breakdowns and is designed to get you rolling again if you experience one.
Road Tools and Spares
To avoid carrying excess weight, you need tools designed specifically for repairs on the go. Most cyclists carry these in an under-the-seat pouch.
Your kit should include the following:
__Small multi-tool. These include most hex wrenches you'll need, plus a chain tool.
__One to three tire levers. The less skilled you are, the more levers you'll need.
__Spare inner tube and a patch kit. Murphy's Law says that if you flat once, you'll flat again. If you're riding tubulars, take a spare tire with dried glue on the base tape.
__Master link for the chain, or an extra chain pin. I prefer a master link, which works even if a link is broken; not so a spare pin.
__Spoke wrench for minor wheel truing.
__Tire pump.
You have three basic choices when choosing a pump. A frame pump allows you to inflate your tires to high pressure, but it is relatively heavy and, being so long, it must be mounted on brackets beneath the top tube. A mini pump is light weight and fits into an under-the-seat pouch or a jersey pocket, but achieving high psi with it is difficult. A carbon dioxide (CO2) pump, which uses a compressed-CO2 cartridge, is lightweight, fast, and small enough to fit into a jersey pocket, but you need a new cartridge for each use. If you flat more than once, this could be a problem.

------------ Be prepared if you're stranded by having a well-stocked road
kit.
--------When riding, use the barrel adjusters on the down tube to make minor
adjustments to shifting.
Shifting Problems
Front derailleurs are usually less troublesome than rear derailleurs, but both may need adjustment on the road. If you're having difficulties moving to a larger chainring or a larger cog in the back, adjust the appropriate barrel adjuster on the down tube to increase the cable tension. If you're having trouble going to a smaller chainring or cog, decrease the tension. You can make these adjustments without stopping. If this does not correct the problem, pull over and make adjustments using the barrel adjuster located on the derailleur, as described earlier.
If the chain is being thrown off the chain rings, the limit screws are not properly adjusted.
Normally, you would pull over and manually re place the chain, but during a race you may be able to reengage the chain without stopping if it is not lodged. If the chain is thrown while you're moving to the smaller chainring, stop pedaling and adjust the front derailleur as if you were shifting to the large chainring. Resume pedaling slowly; the chain should be picked up by the small chainring, at which point you can resume pedaling normally.
If the chain is thrown to the outside, simply shift to the smaller gear while pedaling slowly forward; the chain should reset itself. This procedure does have the potential to damage components and the frame, so if you're not racing, do not risk it. Pull over to manually set the chain.
Tire Repairs
One of the most common problems you will experience on the road is a flat. During a supported race you don’t have to fix a flat; you will be handed a whole new wheel for a quick change. Everyday riding, however, requires fixing your own flats. I recommend practicing field repair of flats in the comfort of your home before you need to do it on the road.
Move a safe distance off the road if possible.
If you must make a repair on a narrow shoulder, face the oncoming traffic so you can move quickly if necessary. Stabilize the valve stem when using a hand pump; moving it back and forth with each stroke may cause the stem to tear at its base.
Chain Repairs
Breaking a chain can be scary. It usually occurs when a large amount of force is placed on the pedals during sprinting or climbing. All of a sudden the chain snaps; there is no resistance on the pedal, you fly forward, and your heart jumps into your throat.
Hopefully both tires will stay rubber side down.
Most of the time the break will be simple, with only one or two links damaged. Remove any dam aged links, reroute the chain, and connect the two ends with the master link from your tool kit. Losing some links from the chain when it breaks is possible although uncommon. Before you connect the chain, make sure you have the entire length.
When you get home, inspect the chain to see whether it is salvageable; if the chain is fairly new, look for any damaged links. (If the chain is old, do not even bother to inspect it; just buy a new one.) In 90 percent of the cases, the chain should be replaced. If in doubt, replace it.
Wheel Problems
Most wheel deformities are caused by hitting pot holes, encountering debris in the road, running off the road, and crashing. Wheels can also come out of true due to insufficient spoke tension. Make a habit of regularly checking spoke tension before you ride.
If a wheel goes just slightly out of true while you're riding, you can probably just open the brake calipers a bit so the rim does not hit the brake pad, and wait until you get home to true the wheel. You can also use a spoke wrench to bring the wheel back into true, although it may be difficult to get the wheel in perfect alignment without a truing stand.
If a spoke breaks, tape it to or wrap it around an adjacent spoke so it does not hit the fork or frame as the wheel rotates. If you're riding a race wheel with a low spoke count, however, you may not be able to ride with a broken spoke.
If you're not racing, avoid high speeds when riding a wheel that is out of true or missing a spoke. Travel back to your starting point by the shortest route at a leisurely pace. If you doubt the stability of the wheel, call someone to pick you up or bring you a spare wheel.