Proper bicycle fit is important for optimal performance and injury prevention. When Cycling, you are in a fixed position, and your legs turn over continually in that position. If your position is incorrect, you may impose inappropriate stresses on your body that can lead to overuse injuries. The body can’t effectively be adjusted to fit the bicycle, so the bicycle must be adjusted to fit the body.
The bicycle can be adjusted by altering saddle height, fore and aft position of the saddle, saddle tilt, stem length, handlebar height, and cleat position on the shoe.
When determining a bicycle setup, start with the lower body and work your way up. It is important to wear your normal cycling gear when setting up the bicycle, to ensure that you are in your normal riding position and to make it easier to find the necessary landmarks located on the body.
Although the following procedures result in a good "fit" for most people, they don’t work for everyone. They do, however, give everyone a good place to start. If you find that certain aspects of the fit do not correspond to your individual biomechanics, make adjustments in small increments.
PERFORMANCE VERSUS COMFORT
A technically proper setup may put you in the perfect aerodynamic position, but if you are uncomfortable in that position you will not be able to perform optimally. One way to overcome this is to adjust your bicycle's fit in small increments over time, so your body can adapt to a better position without discomfort. If you are not interested in racing or otherwise achieving peak performance, an aggressive racing position may not be necessary, and adjusting your bicycle for greater comfort may be entirely appropriate.
Altering your bicycle to a more favorable setup may lead to a temporary decrease in performance. Your body has adapted to the position that you currently ride in; when you switch to a new position, it takes time for your body to readapt. If you have changed your position due to an overuse injury, it may take a while for your symptoms to diminish or disappear.
FRAME SIZE
Ensuring that you have the correct size frame is the first step in bicycle fitting. If the frame is too small or too large, you will be unable to achieve a proper bicycle fit regardless of adjustments to the components. To ensure that the frame is the correct size, you need to step through the fitting procedures.
Road frame size may be measured in two ways. The first, called center to top, measures from the center of the bicycle's bottom bracket to the top of the top tube. The second, called center to center, is from the center of the bottom bracket to the centerline of the top tube. On a traditional-style frame, there is usually about a one-centimeter difference between the two: for example, a frame that measures 56 cm center to top will measure 55 cm center to center, but this varies with the size and profile of the frame tubing. Furthermore, some manufacturers measure their frames differently; one manufacturer, for example, measures from the center of the bottom bracket to the top of the seat-tube collar.
CRANK-ARM LENGTH
The next step is to determine crank-arm length.
Stock bicycles are equipped with crank arms sized proportionally to the frame; because of this, most cyclists skip this step. In fact, it is rarely necessary and often not cost-effective to alter the crank-arm length on a new bicycle. Nevertheless, it is important to confirm that the crank-arm length is appropriate to your needs.
The crank-arm length ranges from 160 to 185 mm (measured from the center of the pedal axle hole to the center of the bottom-bracket hole), with the most common lengths being 170, 172.5, and 175 mm. The length is usually engraved on the back of the crank arm.
A longer lever arm provides more leverage, but in practice this does not necessarily translate into greater power production with each stroke.
More torque is required to spin a longer crank arm, and your body may not be capable of producing that amount of torque at an efficient cadence over a long period of time. A too-long crank arm also increases knee flexion (bend in the knee), which can lead to overuse injuries.
The crank-arm length is usually determined first by the rider's height or inseam (that is, leg length), then adjusted for the style of riding or type of event. Because height alone does not account for variations in leg length among individuals, inseam length is a better starting point.
To measure your inseam, you will need an assistant, a book, and a measuring tape that reads in centimeters (the latter can be purchased in fabric and hobby shops). Place your back against a wall with your feet about five centimeters apart.
Place the book between your legs, with the upper edge tight against your groin and the back edge flush against the wall. Have your assistant measure from the top of the book to the floor. Make your initial crank-arm-length determination based on the table below.
Inseam Crank-Arm Length
<70 cm 160 mm
70-73 cm 165 mm
73-81 cm 170 mm
83-86 cm 172.5 mm
86-89 cm 175 mm
>89 cm 175-185 mm
Longer cranks are recommended for time trialing and climbing, and shorter cranks are recommended for track racing and criteriums. Cyclists who prefer to push larger gears at lower cadences usually like longer cranks; those who prefer to "spin" (maintain a high cadence) tend toward shorter cranks.
For optimal performance, the crank-arm length should allow you to maintain a cadence of 90 rpm or greater with a smooth pedal stroke.
(See Section 4 for more information on cadence.) A crank arm that is too long will cause an obvious glitch in your stroke as it passes through the top of the circle. A too-long crank arm also increases the risk of clipping the ground with your pedal while cornering.
If you do choose to change the length of the crank arm, it will take some time for your legs to adapt to the change. Be especially careful if you increase the length because it will increase the torque placed on the knee. Refrain from hard workouts until your body has adapted to the new length.
CLEAT POSITION
If you are using clipless pedals, you need to position the cleats properly on your shoes. The fore and aft position of the cleats is easy: you want the cleats positioned so that the ball of your foot (the meta-tarsophalangeal joint) is directly over the pedal spindle. To accomplish this, place masking tape on the inside of the shoe so it covers the ball of the foot. Through palpation, find the center of the ball of the foot and mark it with a line on the masking tape. Adjust the cleat fore and aft until this line is centered on the pedal axle. Cyclists with larger feet (more than size 10 1/2 U.S.) should place the ball of the foot slightly in front of the pedal axle to reduce stress on the Achilles tendon.
The next step is to determine cleat rotation.
Sit on a table and let your feet dangle. Give your legs time to relax, then observe the natural position of your feet. Because modern clipless pedals have enough float to allow the foot to find its natural position, the majority of riders should have the cleats face straight forward. If your feet point too far out or in, you may need to adjust the rotation of the cleats for a more natural position.
Some pedals have adjustable float. Beware of dialing in too much float, which forces the muscles of the ankle and leg to work harder to stabilize the joints and can lead to injury as easily as with too little float.
Inversion and eversion are misalignments of the feet. In inversion, the soles of the feet rotate toward each other, as though you were standing on the outside edges of your feet. Eversion is the opposite, with the soles rotated away from each other. Cycling when either condition exists can lead to overuse injuries. Cleat wedges, which fit between the cleat and your shoe, will enable you to compensate for inversion or eversion by bringing your feet closer to neutral. Cleat wedges can also be stacked to compensate for slight leg-length discrepancies. Although you can make these adjustments on your own, you should seek professional advice before making alterations to compensate for eversion, inversion, or leg-length discrepancies.
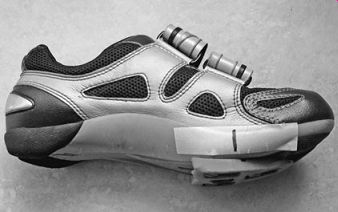
----Locate the ball of your foot. Mark the position on the shoe on masking tape
with a pen, then align the pedal cleat accordingly.
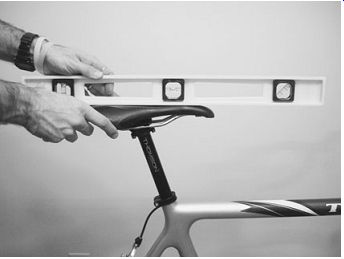
----Adjust the saddle so it's level, then make small adjustments up or down as
needed.
SADDLE ADJUSTMENTS
Saddle Tilt
In most setups, the saddle should be leveled be fore adjusting the height and fore-aft position. You can use a bubble level to check this. If the saddle is tilted up at the front, it will make for an uncomfortable ride and can lead to numbness and chafing of sensitive regions. If the saddle is tilted down, it creates a tendency for the rider to slide forward, causing more weight to be placed on the hands and arms. This can lead to a sore upper back, shoulders, and neck and numbness in the hands. It also places extra weight on the front of the bicycle, which negatively affects handling. If you are using aero bars, the required hip angle might call for a saddle with the nose tilted slightly downward.
Saddle Height
Research that I conducted determined that a saddle height that sets the knee at an angle of 25 degrees when the pedal is in the six o'clock position is optimal for power output and efficiency. Other research indicates that anything over 35 degrees may have negative consequences for knee health and stability. There are four common methods for adjusting saddle height, but I recommend using only the Holmes method, which provides the best results for injury prevention and performance. (Because the other three methods are mentioned frequently in Cycling literature, they are discussed as well.)
The Holmes Method
To set the saddle height using the Holmes method, you will need a goniometer (a device consisting of two arms fixed around an axis used to measure the angle of a joint), which you can purchase from any medical supply store for about $12. Select one with long arms, which make it easier to line up the required landmarks on the body. You'll also need an assistant, some visible tape or colored sticky dots from an office supply store, and a stationary trainer.
The most accurate way to determine the correct saddle height is with a goniometer, which allows you to adjust the knee angle to 25 to 30 degrees.
Place your bicycle in the stationary trainer and pedal for a few minutes to find your "comfort" spot on the saddle. Once you are comfortable, stop pedaling with one foot at the six o'clock position. The assistant should check that you have not pushed your heel down or shifted in the saddle when you stopped pedaling. The assistant then places the axis of the goniometer on the lateral femoral condyle at the knee, and aligns the lower end of the device with the lateral malleolus of the ankle; he or she aligns the upper end with the greater tro chanter at the hip. Before aligning the goniometer, find these spots using palpation, then place tape or the sticky dots on these three spots to ensure that the same place is measured each time. Be cause these boney landmarks will move under the skin if the saddle height is changed drastically, check that the tape remains over the landmarks before the knee angle is measured again. It is imperative to find the correct boney landmarks and align the goniometer accordingly. Move the saddle up and down to produce the desired angle. Once you have the saddle height set, pedal again, then stop for another measure. Do this two to four times to ensure the same measurement.
Using the Holmes method gives you a starting point; from there you may make minor adjustments from 25 degrees to dial in the height that works best for you. I recommend staying between a 25- and 30-degree knee angle; to prevent overuse injuries, you should never go beyond 35 degrees.
When you think you are finished, mount up again and have the assistant watch you from be hind. If your hips are rocking from side to side, the saddle is too high. If your knees are pointing out and not centered over the pedals, the saddle may be too low. Also have the assistant watch from the side. If your knees are locking out at the bottom of the stroke, the saddle is too high. Watch for too much bend in the knee at the top of the stroke.
This may be due to a crank arm that is too long rather than a saddle height that is too low.
It may take two to four weeks for your body to adapt to a new saddle height, during which time you may experience a decrease in performance. But once your body adapts, performance should improve.
Other Methods
There are three other common methods for setting the saddle height, none of which I recommend. I describe them here so that, if your bicycle shop or a colleague recommends them, you'll recognize and know why to avoid them.
To use the Hamley method, measure your in seam and multiply by 1.09. Use the resulting number to set the saddle height by measuring from the center of the pedal axle to the top of saddle, with the pedal at the bottom of the stroke and the crank arm in line with the seat tube. Measure the saddle at the point where your ischium (your "sit bones") contacts the saddle.
These are the "boney landmarks" used in the Holmes method for measuring the knee angle with a goniometer.
To use the LeMond method, measure your inseam as before and multiply by 0.883. Use the product to set the saddle height by measuring from the center of the bottom bracket to the top of the saddle.
Both of these methods rely on formulas that don’t take individuals' differing body proportions into consideration-that is, longer or shorter femurs, longer or shorter tibias, larger or smaller feet. The LeMond method also takes no account of crank-arm length. Half of the time, these methods produce results that fall outside the recommended 25- to 35-degree knee angle, sometimes by a large amount.
The last method is the heel-toe method. Set up the bicycle in a stationary trainer and place your heel on the pedal with your knee locked out. Adjust the saddle so you are just sitting on it when your leg is straight. Pedal backward with your heels on the pedals, making sure that your hips don’t rock back and forth; your heels should just about come off the pedals. Ideally, then, when you place the ball of the foot over the pedal spindle, you will have the proper bend in your knee. Unfortunately, this is often not the case, and it frequently produces saddle heights outside the recommended 25- to 35-degree knee-angle range.
Saddle Position Fore and Aft
Now that you have set the saddle height, you need to determine its fore and aft position. You will need a plumb line, which you can buy at any hard ware store.
Ride for a couple of minutes with the bicycle on a stationary trainer and get comfortable in the saddle.
Stop with the crank arms parallel with the floor.
Place the plumb line right at the tibial tuberosity on the forward leg, where the patella tendon attaches to the tibia, and let the weight hang straight down.
For climbing specialists, it is recommended that the line should drop 1 to 2 cm behind the center of the pedal axle. Cyclists have a natural tendency to shift to the back of the saddle while climbing.
For this reason it is not necessary for the majority of us to shift the saddle back. For sprinters and time-trial specialists, the plumb line should fall 1 to 2 cm in front of the pedal axle. The majority of cyclists, however, should have the line fall directly over the center. Aligning the axis of the knee over the pedal spindle places the line of power directly through the pedal. Adjust the saddle fore and aft until you accomplish this. You will need to pedal for a couple of minutes each time you adjust the saddle to ensure that you are sitting in the same spot.
When you are finished adjusting the saddle fore and aft, recheck the saddle height, because moving the saddle forward lowers it and moving the saddle aft raises it.
HANDLEBAR ADJUSTMENTS
Handlebar Width
Now that you have the lower half of your body dialed in, it's time to look at the upper half. The first consideration is the width of your handlebars, which should equal the width of your shoulders.
Too narrow makes for an uncomfortable ride; too wide makes you catch a lot of wind unnecessarily.
Stem Length Of all the steps in the setup, stem length is the one that will be most personalized based on comfort.
You need to place your bicycle in a stationary trainer and use a plumb line.
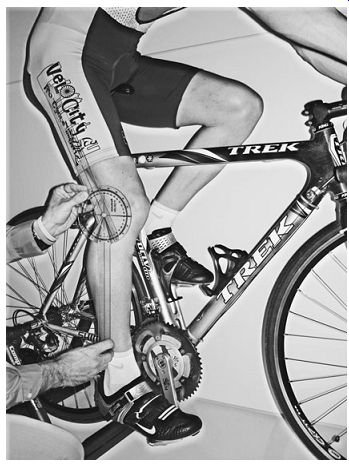
---------- Use a plumb line to adjust the saddle's fore and aft position so
the knee is aligned with the pedal axle.

--------- Use a plumb line to determine stem length.
Pedal for a few minutes to get comfortable, with your hands in the drops (lowest portion of the handle bars) and your head up, duplicating the position of looking down the road. Have your assistant hold the plumb line to the end of your nose. The weight should fall somewhere between the centerline of the handlebars and 1 cm aft of the handlebars. This places your elbows at an optimum angle between 15 and 20 degrees and provides the necessary 1 to 2 inches of clearance between your knees and your elbows.
Adjusting the stem length so that the plumb line falls one centimeter behind the handlebar will stretch you out just a little more and improve aero dynamics. Beginners may find this uncomfortable, however, and may wish to use a shorter stem.
Adjust the stem length by changing the stem.
For proper bicycle handling, the stem length should be between 90 and 120 mm. If you can't achieve a good setup within that range, you should look for a different-size bicycle frame with an appropriate top-tube length.
Handlebar Height
Racers and other performance-oriented riders should set their handlebar height so that when they are in the drops, their back is flat when viewed from the side. For most riders, this means the top of the handlebars should be 1 to 3 inches lower than the top of the saddle. This optimal position is not practical for all riders, however. If you are not very flexible, it may take a while to work into this position; if you have a bad lower back, you may need to ride in a more upright position permanently.
You can change the height of the handlebars by adjusting the stack height or changing the angle of the stem. The stack height is adjusted by adding or removing spacers between the top of the headset and the bottom of the stem. Lower the stack height in small increments and get accustomed to changes over a period of a few weeks until you achieve the position that you find to be optimal, keeping in mind that comfort is of primary concern on this aspect of bicycle setup. Don’t cut the steerer tube until you are completely satisfied with the position; if you cut it too short, you'll have to buy a new fork. Some manufacturers of all-carbon forks set limits on stack height to prevent fatigue to the steerer tube. You can also purchase an adjustable-angle stem to raise or lower the height of the handlebars.
If you have a threaded headset and fork sys tem, you can adjust the height by raising or lowering the stem. When adjusting a threaded system, always check the quill (the section of stem that inserts into the headset and steerer tube) for the insertion limit mark. It is unsafe to have this mark showing above the headset.
If you drastically change the stem height, you will need to recheck the stem length.
TIME-TRIAL SETUP
The lower half of the body is positioned the same for time-trial and traditional setups, with saddle tilt being the only possible exception. You may need a slightly nose-down tilt on the saddle due to the rotation of the pelvis. Even so, keep the saddle as level as possible.
The big difference in the setup on a time-trial bicycle is in the positioning of the upper body; the objective here is to reduce the rider's wind resistance by bringing the arms close together, further flattening the back, and lowering the chin. Professional cyclists use a wind tunnel to optimize their time-trial position. This isn't practical for most of us, so a simpler procedure is used.
To improve aerodynamics during a time trial, aero bars are used; they decrease the frontal area of the rider that is exposed to the wind. However, aero bars don’t magically improve aerodynamics.
If your arms are set wide apart and you're sitting high, aero bars are of little use. Set aero bars so your arms are as close together as possible while still maintaining comfort and control.
Change the stem as needed, so a plumb line dropped from the front of the shoulder runs through the back of the elbow. The stem in a time trial setup should be long enough to place the elbows at an 80- to 95-degree angle.
The handlebars should be low enough to allow for a flat back but still retain a couple of centimeters' clearance between the quadriceps (upper surface of the thighs) and your abdomen when you're at the top of the pedal stroke. Have an assistant observe your position, and confirm that your pelvis is tilted forward. If your back is rounded, you may be sitting upright on the saddle and just bending forward to get into the aero bars. This places unnecessary stress on the lower back, which will decrease performance and can lead to lower back injury.
Many cyclists find it difficult to achieve a flat back at first. Start with a higher stem height, then lower it incrementally as your flexibility increases.
The position should always be comfortable and allow for good control of the bicycle.
Use a power meter to determine whether a new position has improved or diminished your power output, but don’t compromise comfort too far to achieve additional power.
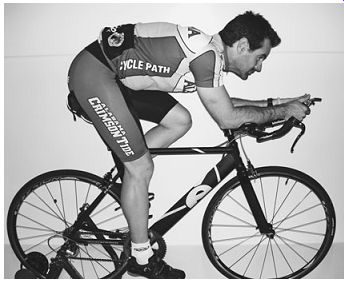
------------- In the proper aero position, the pelvis is rotated forward and
the back is as flat as comfort allows.
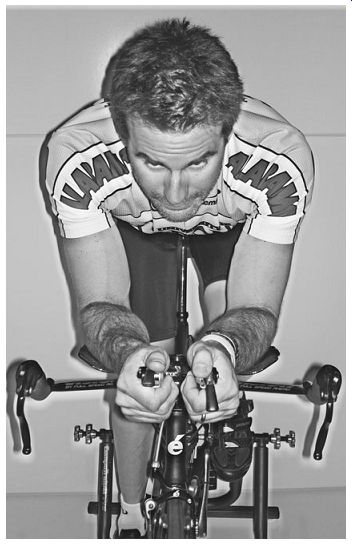
------------ Position the aero bars as close together as comfort and safety allow.
RECORDING YOUR SETUP
It can take a long time to dial in your bicycle to where you are really comfortable and efficient. Because of this, it's a good idea to take measurements and record them so you can set up your bicycle the same way in the future. The seat post has a tendency to slip over time, but if you have recorded the height, it will be easy to readjust without going through the whole measurement routine again. Measurements also allow you to set up two bicycles the same way. You can use a table similar to the one below to keep your data organized.
Measure the saddle height from the center of the pedal axle to the top of the saddle. To determine the saddle's fore-and-aft position, use a plumb line and a ruler to measure the horizontal distance from the nose of the saddle to the center of the bottom bracket. Use a long bubble level and a ruler to measure the drop from the nose of the saddle to the top of the handlebars.
---------
BICYCLE MEASUREMENT RECORD
Date
Make
Model
Year
Frame size
Top-tube length (center to center)
Head-tube angle
Seat-tube length (center to top)
Seat-tube angle
Stem length
Handlebar width
Crank-arm length
Pedal axle to top of saddle
Nose of saddle to center of bottom bracket
Drop from top of saddle to handlebars
-----------