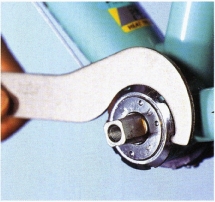
- C-spanner
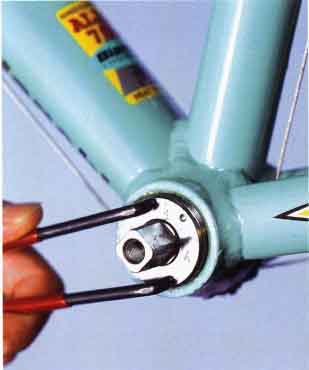
- Peg wrench
- Fixed-cup spanner
Many older bikes are fitted with an open- bearing bottom bracket. To test the bracket for wear, take the chain off the chainrings and turn the crankset by hand in a pedaling action. If you hear grinding noises, or if the action feels rough, check the bracket. Then hold one of the crankarms near the pedal and push it inward -- more than 1mm of play means the bracket needs servicing.
The bearings may suffer more wear than those in cartridge-bearing brackets because they are not as well sealed and so let in dirt and water. However, regular cleaning and lubrication can drastically reduce this wear. A properly adjusted open-bearing bottom bracket is subject to less internal friction than many cartridge-bearing brackets.
If a bottom-bracket cup proves difficult to remove or refit, ask any good bike shop for help -- they will have special removal equipment and tools to clean and reinstate the shell threads.
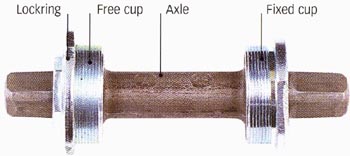
Below: Parts of an open-bearing bottom bracket:
CLICK HERE to shop for bottom bracket products
Maintaining an open-bearing bottom bracket
1. First remove both crankarms (see Steps 1-4 on this page).
- Use a C-spanner to remove the lockring on the non-drive (free-cup) side. Turn the C-spanner counterclockwise for all hikes.
- Make sure that the hook of the C-spanner is correctly located in one of the notches around the lockring. You need to use a fair amount of force, so he careful.
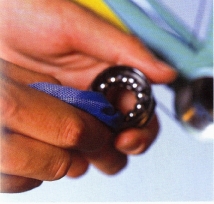
2. Insert a peg wrench into two of the holes on the free cup.
- Turn counterclockwise and remove the free cup.
- Take out the axle and look inside the bottom-bracket shell for a plastic sleeve. Remove this sleeve and make sure it is intact. Clean it with degreaser and then replace it in the shell.
- Check that the axle is straight by rolling it along a flat surface. If it moves up and down, it is bent and must be replaced.
3. Remove the fixed cup on the drive side of the bike by using a fixed-cup spanner on its two flats and turning clockwise.
- Turn the spanner counterclockwise for Italian- threaded brackets, which you can identify by the 36 x 1 stamped on the fixed cup.
- Ask a good bike shop for help if the fixed cup is hard to remove.
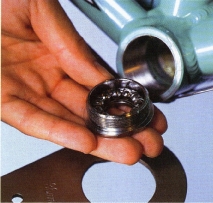
4. Clean and examine the two cups now that you have removed them.
- Use a rag soaked in degreaser to clean the cups, bearings, and axle.
- Look at the inside of the cups and the raised bearing surface on the axle. Replace them if they are marked. Replace the bearings, too, if they are marked or no longer round.

5. Grease the inside of the cups, press the bearings into the grease, and smear some grease on top of them.
- Fit the fixed cup and bearings into the drive side.
- Insert the axle and screw in the free cup and bearing over the end of the axle, so that the axle spins freely with a very small amount of play.
- Lock the free cup in place with the lockring.