Properly fitting your bicycle to your individual body type is crucial to your enjoyment of the sport. Although rich in the positive versus negative aspects of various bicycle components, bicycle literature does not dwell much on the comfort of the rider. Instead there is a tendency to think that all problems can be solved with a better component.
There are two major stumbling blocks to the increased use of bicycles in our society: first, the general lack of physical fitness along with an unwillingness to undertake a gradual, systematic program of conditioning; and second, the discomfort and strain so often associated with bicycle riding. We think the latter dominates the former in that no matter the excellence of your physical condition, if your bicycle is not adjusted to your personal dimensions there is a reduction in efficiency and comfort and an increased chance of injury.
The bicycle is the most efficient means of transportation yet designed but its efficiency is greatly affected by how well the rider fits the machine. Whether you are a Sunday afternoon recreational rider or a potential cross country candidate, certain mechanical and human factors must be in adjustment to allow for the highest possible degree of energy production. Many times in our classes and on tours we have witnessed the transformation that occurs when an individual’s bike is finally properly fitted. “I had no idea a few simple changes could make such a difference.” That comment betrays the belief of most cyclists that they can eventually get used to any discomfort, as though a certain amount of physical stress is to be expected. Such may be the case if the enthusiast is an occasional rider but in general, discomfort should decrease on a properly fitted bi cycle as the body’s level of physical fitness increases.
Efficiency and comfort are good reasons for properly fitting your bike, but even more important is the prevention of actual injury. Many aches, pains and serious injuries can be traced to improper adjustment of various components. The machine and the body must be working together to insure a smooth, compatible system. If one component is out of adjustment then the system is interrupted with injury as a possible result. Let’s look at some basic adjustments that can be made to a touring bicycle in order to insure efficiency, comfort and the prevention of injury.
-Frame Fit-
The most important fitting of your bicycle takes place when you make the initial purchase. Does your frame fit you? Proper frame size is like the foundation of a house; if it isn’t right in the beginning, nothing else will be right through the entire building process.
There is a simple test to check for proper frame size. You should be able to stand over the top tube comfortably without your crotch touching yet with no more than a 1.5” clearance. Try this with the tires fully inflated, while wearing your normal cycling shoes. The frame either fits or it doesn’t fit. If the frame can’t pass this simple test, no favorite color, style, sales pitch or sale price should make any difference.

To determine correct frame size, straddle bike with no more than 1 1/2
inches clearance.
Many people are confused as to what constitutes frame size. We have heard 5’4” women say they need 27- inch bicycles. Twenty-seven-inch wheels, yes; frame, no. Frame size is determined by measuring from the center of the crank axle to the point where the seat tube joins the top of the top tube. Most adult bikes range from 19 to 25 inches with some models going up to 27 inches. The increment of increase is usually 1-1 1/2 inches depending on the make and model. Some models skip certain sizes so it may not be possible to obtain a proper fit in certain styles. Keep this in mind before making any final decisions.
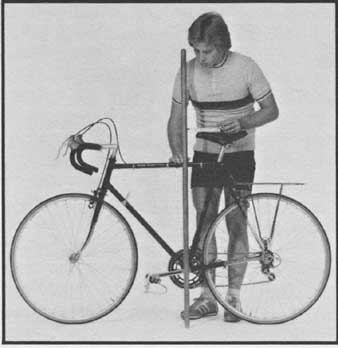
If you want a mixte frame (women’s style), you should first fit yourself to a man’s frame, then ask for the corresponding size in a mixte. Exceptions can be made, however. One advantage of the mixte frame is that it allows shorter men and women to comfortably straddle a bicycle with 27-inch wheels. Due to the difficulty of finding high-quality production-line bikes with wheels smaller than 27 inches, many short people can obtain a good fit only by using a 19-inch mixte frame.
At the risk of redundancy, let us say again that frame size is the single, most important fit on your bicycle. This is reflected not only in comfort when straddling the bike but in the lengths and angles of other tube members and in the sizes of certain other components. Be very sure that you begin with a proper frame size.

Bicycle with mixte-style frame for short people or people who prefer
this style.
-Saddle Positions-
Given the right frame size, there are other adjustments you can make. First take a look at your saddle height. Having a saddle too low is the most common error made by beginning and even some experienced riders. This not only causes very inefficient riding but is murder on the knees and upper leg muscles. Your legs must be able to extend almost their entire length to obtain maximum push; this requires proper seat height.
To check for proper saddle height, wear your normal cycling shoes, place your bicycle next to a wall, and climb aboard. Sit in your regular riding position on the saddle. Using the wall to balance, put your heel on the pedal (the bottom of the pedal if you have toe clips), and revolve the crank backward until you reach the lowest point in the revolution. If your saddle is at the right height, your leg will be perfectly straight with your heel just touching the pedal. Now, take your heel off the pedal and place your foot on the pedal in the riding position. The ball of your foot should be directly over the center of the pedal axle. With the crankarm still at its lowest point, you should have a slight bend in your knee. Anything more than a slight bend means your saddle is too low; no bend at all means your saddle is too high.

[left] The first step to determining proper saddle height is to sit with heel
on pedal with leg fully extended. [right] The second step is to place
foot in proper position on the pedal with leg slightly bent at the knee.
To adjust your saddle you must have either a small adjustable wrench, the right-size open- or box-end wrench (usually metric), or in some cases, one or two metric allen wrenches. If you don’t have the proper tools, you would be well advised to purchase a high-quality, six-inch adjustable (crescent type) wrench, the allen-key wrenches for your seatpost (usually five or six milli meters) and handlebar stem fittings. A high-quality six-inch adjustable wrench will cost $5-$7 and allen-key wrenches from 50 to $1 each. Good tools are a wise investment; don’t buy variety-store junk.
Change your saddle height by first loosening the seatpost binding bolt where the post fits into the frame. Re move the saddle with its attached seat- post. Wipe off the seatpost and look for an engraved horizontal line or warning statement that indicates maximum height. This point should be 2-2 1/2 inches up from the bottom of the seat- post. Engrave or deeply scratch a line at this point on your seatpost if there is not one there already. Next, remove the seatpost binding bolt. Clean and grease the threads before replacing the bolt in the seat tube. Grease the seatpost itself up to the warning line to insure its easy removal two days or two years from now. Replace the post in the seat tube, align the saddle with the top tube, then tighten the seatpost binder bolt. Don’t overdo it; just so the fit is snug. Now, climb aboard and repeat the saddle height test. If it’s not right, keep adjusting until you have reached the proper height.
If during this adjustment procedure you discover that you have to extend your seatpost beyond where the warning line is visible, stop. Many new bicycles have short seatposts and some people have frames that are too small to start with. In either case, you will have to buy a longer seatpost to reach the proper adjustment height. Take your old post along when you go to purchase a new one; they come in many different diameters and must fit exactly. Never adjust the seatpost to extend beyond the warning mark or you’ll risk it breaking off or bending the seat tube. Either one could ruin your day.
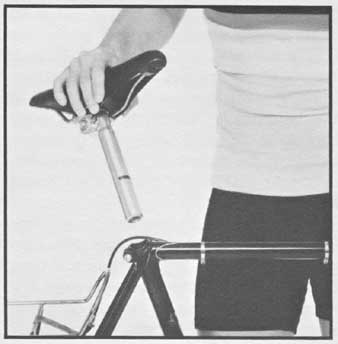
To determine how high you can raise the saddle, remove seatpost. Note
warning line on post and seatpost binding bolt on frame.
When your saddle is first put at its correct height, you may feel as though you are sitting on a flagpole. Ride it awhile. We think you will notice a vast improvement in your cycling ability. If the increase in saddle height is really too much, lower it some and gradually increase the height by ¼ inch per week until you feel you’ve found the correct height.
The “scientific method” is another way to find your saddle height. Measure your total inseam length while standing barefooted; it’s the distance from the floor inside the leg to the pelvic bone, which rests on the saddle. Be sure your legs are straight, close together, and that you push the tape measure right up to the bone. Next, take this measurement (in inches) and multiply it by 1 .09. The result is the recommended height of your saddle, measured from the top of the pedal axle to the top of the saddle when the pedal is in the down position and the crankarm is parallel with the seat tube. Care must be taken to insure that the measuring tape is kept exactly in line with the crankarm and seat tube. We find it easier to place a block of wood across the top of the saddle and measure to the bottom of the wood.

Measuring saddle height using scientific method employing tape measure
and block of wood. Try to keep tape aligned with crankarm and seat tube.
Once you have set your saddle height using the “straight-leg/heel” method, try the scientific method to see how close the one is to the other. You should be within 1/2 inch either way; if not, check each measurement again. Keep in mind, however, that these are recommended or approximate heights. Don’t be afraid to experiment. Factors such as foot size, angle of saddle and pedal type will influence the results. Using both methods along with some critical analysis should give you a saddle height that is ideal for your specific situation. You will then be well on your way to more efficient and comfortable cycling.
Once your saddle is adjusted vertically, it’s time to check its horizontal placement. Do this by placing your el bow against the foremost portion of your saddle keeping your wrist straight and fingers extended. In this position your fingertips should just barely touch the rear portion of the handlebars near the handlebar stem or extend no farther than the forward edge of the bar. If your fingertips don’t reach the bars or ex tend beyond them, an adjustment must be made.
Depending on the type of seatpost you have, you must either loosen the one or two side nuts that hold the saddle clamp to the seatpost, loosen the two 10-millimeter bolts that hold the saddle on a Campagnolo-style seatpost, or loosen the single or double allen-key bolts on the underside of a “laprade” style seatpost. Whichever style you have, once these bolts are loosened you will be able to slide or shove the saddle backward or forward.
Before tightening the seatpost clamp, take a level or just sight across the saddle to place it in a level position. Now tighten the clamp. After all these adjustments are made, take your bike on a long ride. Experiment with changing the level of your saddle slightly. A degree or two is a big change so do it in small increments until you find the most comfortable position. Some prefer a backward tilt, others a forward one. Let experience be your guide.
 To check proper horizontal saddle and stem
position with your arm, place elbow on front of saddle with fingertips just
reaching to back of handlebars.
To check proper horizontal saddle and stem
position with your arm, place elbow on front of saddle with fingertips just
reaching to back of handlebars.
To be sure that the fore-and-aft position of your saddle is correct, you must determine the position of the front of the saddle in relation to the center of the bottom bracket. Place one side of a yardstick or straightedge directly in line with the center of the bottom bracket axle. Use a level to make sure the straightedge is vertical (the bike must be standing on a level surface). Now measure the distance from the front of the saddle to the side of the straightedge resting on the center of the bottom bracket axle. It should be between 1 1/2 to 3 inches. In other words, the saddle should be that distance back from the center of the bottom bracket. In most cases this measurement will agree with your fingertip/elbow method. If not, you must consider get ting a handlebar stem with greater or lesser reach; then you will need to reposition your saddle to bring it to the proper relationship with the bottom bracket axle.
Remember as you are moving your saddle fore and aft that you are also changing the height because of the slope of the seat tube. Don’t forget to check and make minor readjustments once the proper fore-and-aft position is determined.
Fore/aft measurement of saddle checked with straightedge and level from the center of the bottom bracket.
-Handlebar Adjustments-
Handlebar stems are sold with 60-140 millimeter extensions — the distance between the center of the bolt or allen-wrench fitting to where the center of the bars pass through the stem. They also come in three common diameters so make sure you have the correct size when making replacements. Unless you are fairly skilled at bicycle repair, have the stem changed at a bike shop. One of the brakes must be removed so that the handlebars can be taken off the old stem and placed on the new one.
Another adjustment you should make at this time is the height of the handlebar stem in relation to the saddle. In theory, the saddle and the stem should be of equal height. In fact, this is seldom the case, especially on taller frames. Unfortunately, most stems are one specific height, usually about 150 millimeters from top to bottom. Due to this standard length many people have handlebar stems lower than their saddle. Usually they adapt to this unless they are troubled by severe upper back or neck pain. If you are so bothered, there is at least one stem available that may solve your problem. The SR Custom handlebar stem, 60-millimeter ex tension only, is about 180 millimeters long, giving you an extra inch to play with. This, coupled with the shorter ex tension, can make for a more comfort able ride although you may lose some efficiency.
As with seatposts, the amount of stem left inside the frame is critically important. We have seen a number of cases where the handlebar stem has been raised to the point where not enough is left in the head tube to pre vent it from shearing off. Some were weakened by cracks that had developed. Most newer bicycles have a warning mark on the stem indicating the maximum rise allowance, but it’s best to check the height for yourself by re moving the stem.
To do this, first use your adjustable wrench or correct allen wrench to loosen the top bolt or allen fitting two complete turns. Next, place a piece of wood on top of the bolt and strike it with a hammer. This should drive the wedge down and allow you to remove your stem. Once it’s out, clean it off and check for a warning statement or horizontal indicator mark. If you can’t find one, measure up 2’/2 inches from the bottom of the stem or 1 ¼ inches from the top of the split or from the top of the wedge cut, depending on the type of stem you have. Make a permanent mark on the stem with an engraving tool or sharp object; don’t raise your stem be yond this mark. While you have the stem out, grease the wedge bolt, threads and stem so that it can be easily removed in the future.
Once the stem is replaced and the bolt tightened snugly, there is one more adjustment to make. Take your wrench or allen key and loosen the pinch bolt that holds the handlebars in the stem. Loosen it just enough so that you can pivot the handlebars using some pres sure. Take a long straightedge — a broom handle will do — and place it under and against the nut or tightening side of the quick-release mechanism on your rear wheel. Extend the straightedge forward until it touches the drop portion of your handlebar on the bottom side. Move the handlebar until the bottom of the bar lies flat on the straightedge while the other end rests on the bottom of the rear axle bolt or quick-release. When you have the right position, tighten the pinch bolt on the stem.
Consider this measurement as a starting place. Take your bike on a long ride; you should feel an even pressure across the palm of your hand rather than in certain spots. Too much pres sure in certain places can cause dam age to the ulnar nerve that passes from the hand to the upper body through the narrow channel at the base of the palm. Tingling or numbness in the hands and fingers indicates trouble with this nerve. Change the angle of the bars by pivoting until you feel a good, even pressure on your hands while riding in the down position.
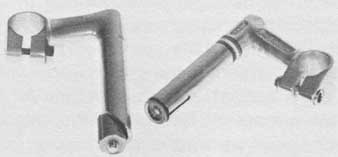
Two types of handlebar stems: the expander plug and the wedge.
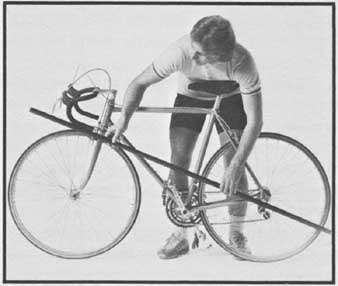
Check
handlebar drop alignment by using straightedge from the rear axle.
One more adjustment on the handlebars is the positioning of the brake levers. Most bikes are adjusted properly prior to sale, but you might as well be thorough in checking out how well your machine fits your body. The main criterion is whether you can easily reach them with the tips of at least two fingers while riding in the down position. You will probably have to shift your hands up from their normal placement but you should be able to do this with an easy, comfortable movement requiring no special gymnastics.
Check to make sure that you can ride comfortably with your hands on the brake-lever housings while in the up position as well. If your bike is not equipped with rubber brake hoods, you might try adding them if you like that hand position.
If you find you need to change the position of your brake levers you will have to disconnect the brake, unwrap a portion of the handlebar tape, loosen the clamping screw or nut, and move the brake to the desired position. If you don’t feel competent performing any of these operations, let a bike shop do it for you. Remember that you must be there to insure a proper fit, however.
Toe Clips
The final adjustment we will discuss is the sizing and positioning of toe clips. Toe clips and straps have two important functions for the bicyclist. First, they in crease efficiency in the pedaling action by allowing the rider to not only push down on the pedal, but also to pull up creating a much smoother, more efficient action. Second, toe clips keep the rider’s foot in the proper position on the pedal making for a more efficient and comfortable pedaling action. They also lessen the danger of developing knee problems. Knee problems are a common ailment among cyclists, but properly adjusted toe clips can help in preventing or alleviating such problems.
Toe clips usually come in three sizes: small — men’s 5-7; medium — men’s 8-10; large — men’s 11-13. You can sometimes get a satisfactory fit by just telling the salesman your shoe size, but it’s best to take your bike along to the shop wearing the shoes you cycle in. The easiest way to fit a pair is to make a mark on the side of the sole of your shoes where the ball of your foot is. Now take a toe clip, hold it against the pedal, place your foot on the pedal and slide it forward all the way into the clip. If the toe clip length is correct, the mark on your shoe sole should be directly over the center of the pedal axle. If not, try another size.
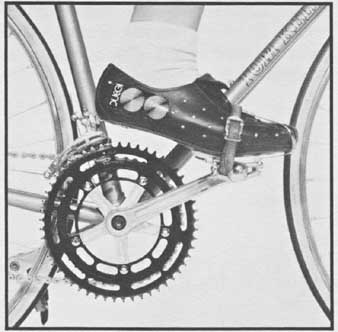
Proper position of foot in toe clips and straps with ball of foot directly
over pedal axle. Note how cleat bottom engages pedal.
If you have especially big feet and small pedal it might be necessary to use washers or spacers to extend the large-size toe clips even farther out. We have found through personal experience that even a two-millimeter extension can make a considerable difference in comfort, so be exact.
When installing toe clips, begin by aligning them directly on the centers of the pedals. If you notice any discomfort in your feet, ankles, or knees after riding awhile, adjust them sideways (laterally) until the discomfort disappears. It’s very important that you find the position that allows your feet, ankles and knees to keep in the proper alignment so that lateral movement is kept to a minimum.
If you are new to toe clips, we ad vise you to ride without the straps until you have learned the necessary technique of getting into and out of the met al clip. There is a degree of skill in tipping the pedal to the upright position when pulling away from a stop. Once you feel confident, put your toe straps on but keep them loose. Then, after you feel at home with both clips and straps, begin to tighten the straps until your feet are held firmly in place. You don’t have to pull your straps super-tight. They should be firm, but not so tight that they put your foot to sleep or don’t allow you to remove your foot without loosening the straps. Unless you are using shoe cleats (metal, leather or plastic plates attached to the sole of the shoe that have a groove into which a portion of the pedal fits), there is no reason to ever feel trapped in the pedals.
Once you have completed all of these basic adjustments don’t think that you are finished. Most people find tremendous improvement in their comfort and riding efficiency, but that doesn’t mean you can pedal away into the sun set never to be plagued by a body ache, or never to have to make another adjustment. You will have a basically well adjusted machine, but slight changes and experimentation are needed to obtain that ever elusive state of perfection. We’re continually amazed at what minor adjustments do for our cycling com fort. Herein lies much of the appeal for many in the cycling fraternity; it’s neither the machine nor is it the use of the human body that predominates, but a close, almost magical combination of human and machine that produces the most efficient means of propulsion yet devised.