In order to choose a good touring bicycle, you must first understand exactly what a touring bicycle is and how it differs from other bikes. Some say it’s any bicycle not meant for serious racing. Others see it as a bicycle specifically designed for use on long-distance, cross-country or around-the-world ad ventures, and say it’s as rare as a clean bike chain. We see the touring bicycle as one suitable for journeys of more than 50 miles a day and, most important, one that can be ridden day after day with the greatest safety, comfort and efficiency possible.
There is no single “best” touring bicycle, rather a continuum along which some meet the needs of touring cyclists better than others. Final selection is usually a blend of knowledge, experience, prejudice, capital availability, peer pressure and vague gut feelings.
We hope the knowledge you gain here will lead you to the touring bike that is best for you.
How Many Speeds?
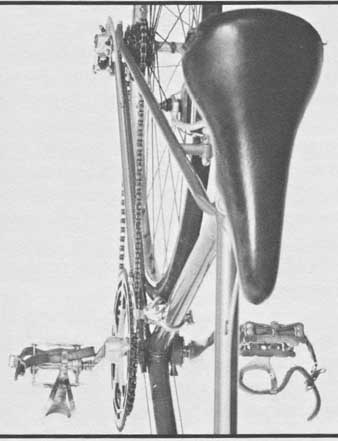
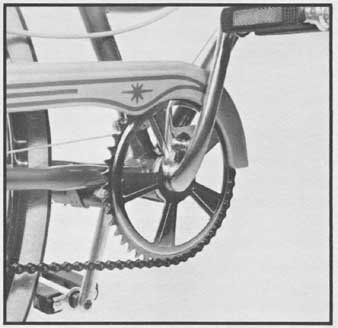
The 1-speed bicycle with its single front chainwheel (see Figure 1) and single rear cog cannot be shifted as the terrain varies to allow the cyclist to maintain a regular cadence or pedaling rhythm. This, along with the substantial weight of the 1-speed, eliminates it from our discussion of touring machines al though 1-speeds have been ridden across country and even around the world.
The 3-speed bicycle has some touring possibilities. It has a well-designed, rugged, multi-speed gear selection mechanism in the rear hub, which is controlled with a narrow cable moved by a shifting lever that is usually mounted on the handlebar. Three- speed advantages are simplicity of operation, rugged construction, completely enclosed mechanism, minimal maintenance, ease of gear selection and a relatively low cost. However, you are strictly limited to a few gears. The rear cog and front chainwheel can be changed or close- or wide-ratio hubs in stalled, but you still end up with only three specific gear choices. That may be fine in a basically flat, sort-of-uphill, sort-of-downhill world, but in tough terrain and wind conditions 3-speeds are restrictive. The 4-speed or 5-speed internal rear hub is better than 3, but still is less adaptable to the individual rider than 10-speeds.
A final negative aspect of the 3- speed is that the basic bicycle is usually heavy, cheap and poorly designed. With inclination and cash you can produce a very acceptable 3-speed from quality parts or convert a 10-speed, but be pre pared to pay the tariff.
For an individual wanting only to tour relatively short distances over mild terrain, such a 3-speed would make a lot of sense.
The majority of moderate-distance tourers would be better off on simple, trusty 3-speeds but we know of no high- quality, lightweight (under 30 pounds with alloy wheels) 3-speed available on today’s market. Hopefully, some are on the drawing boards. Tim built his own 3- speed for commuting and around-town riding. It’s a joy to ride but cost well over $200 and took more time than Susan likes to talk about. Perhaps some manufacturer will produce a high-quality 3-speed or 5-speed bicycle for the American market; it’s overdue.
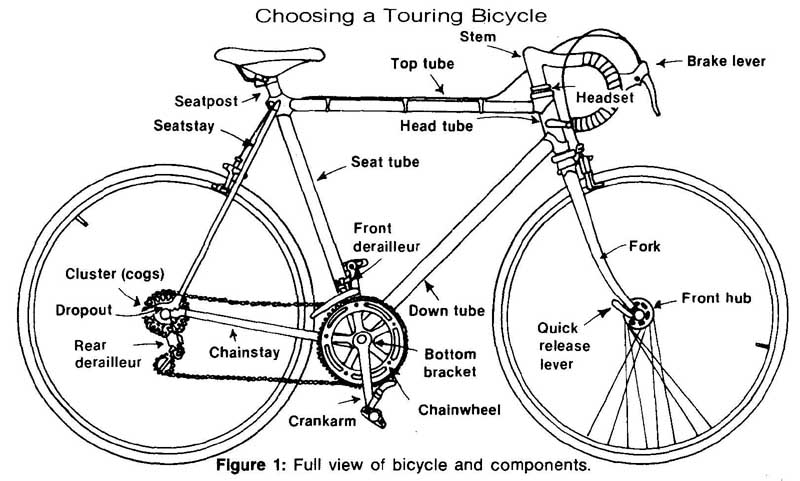
Figure 1: Full view of bicycle and components.
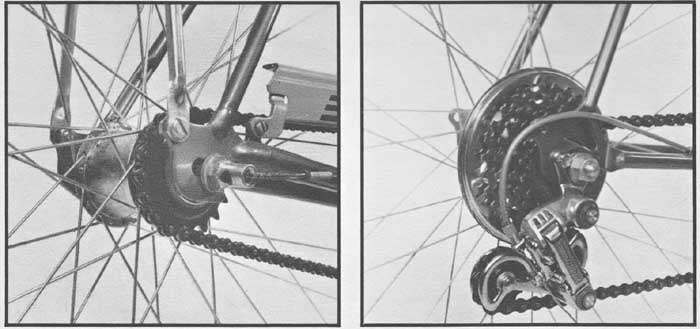
Rear derailleur/cog interrelationship. Three-speed hub mechanism
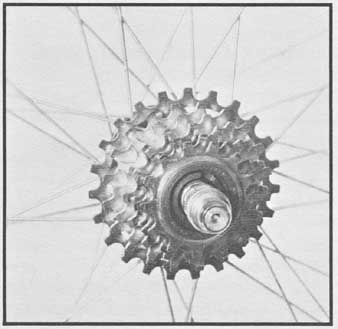
Cluster/freewheel.
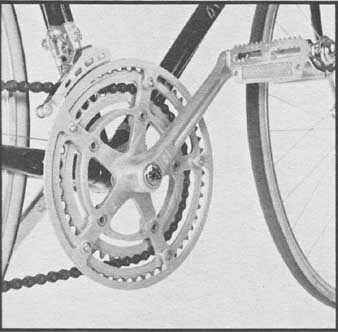
Most people automatically think of a derailleur-activated multi-speed bicycle when shopping for a bike. Such bicycles have either a single, double or triple chainwheel in combination with five or six rear cogs (cluster). The cluster is attached to a freewheel, which allows the chain to be driven at various speeds regardless of the wheel speed itself. The rear derailleur moves the chain over the rear cogs to change the drive ratio according to which cogs are engaged. The front derailleur moves the chain from one chainwheel to another.
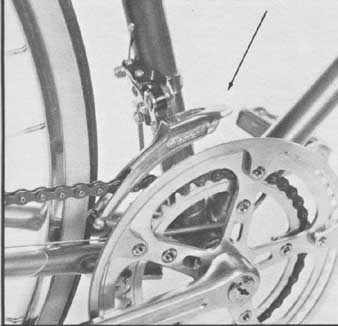
Arrow points to front derailleur attached to seat tube, positioned
over chainwheel.
Top view of two front chainwheels and five rear cogs.
A 5-speed bicycle has five rear cogs with a single front chainwheel. A 10-speed has two front chainwheels with five rear cogs giving 10 combinations (gears). The 15-speed is like the 5- speed and 10-speed but with three chainwheels making 15 gear possibilities. Some bicycles have rear clusters of six or even seven cogs to produce 12-speeds, 14-speeds, and 18-speeds. Because manufacturers are always bringing out new products, a variety of gearing systems is inevitable with the newest usually promoted as the best.
Since multi-speed derailleur bicycles dominate the adult market in the United States and lend themselves well to the needs of the bicycle tourer, most cyclists choose their touring bikes from among them. But how many speeds are enough? Since the passing of the English racer 3-speed with upright handle bars, the American public has been bombarded with advertising and peer pressures implying that a “serious” cyclist must have a 10-speed bicycle. Al though true for the cycle tourist riding more than 25 miles in hills and with bag gage, 10-speeds are really unnecessary for most short-distance recreational riders and commuters.
At first glance the 5-speed seems to offer just en speeds with only one derailleur. Beginning riders easily master a single rear derailleur with its five gear choices, but the additional front chainwheel and derailleur on a 10- speed seem just too much at first. How ever once the concept is mastered, the 5-speed too frequently becomes an ex pensive experiment on the way to a 10- speed. There are not many quality 5- speeds around; they are at the lower end of most bicycle lines and consequently have a lower resale value. If you really can’t fathom 10-speeds or are a beginning rider, it’s better to convert a good 10-speed into a 5-speed by doing away with one chainwheel or simply not using the front derailleur at all. You can either use your rear cluster as is or re-gear it in a suitable 5-speed range. You will still have a quality 10-speed with the option of returning it to its original gearing, yet you will be suiting your own riding needs rather than accepting a Madison Avenue version of what your needs are.
OK. If a 10-speed is good, isn’t a 15-speed better? Unfortunately, that extra chainwheel adds more than its share of trouble. Both front and rear derailleurs must be of special design to accommodate the extra chain length and greater range between the largest and smallest chainwheels. Adjustment and operation require special care to insure trouble- free shifting. Both chainstay and axle length are critical for correct operation. Finally, unless you fully understand the functioning of the various gear combi nations, much of the advantage of those extra gears will be lost in sloppy shifting by the rider. More is not necessarily better when it comes to multi-speed bicycles unless you live in mountainous terrain or have considerable experience backed by personal preference.
Does adding a sixth cog (as in a 12- speed) increase gearing capacity with out the hassles of that extra chain- wheel? Well, nothing is free. To accommodate the extra width of the sixth cog, the dish (offsetting of the rear hub to make room for the freewheel while allowing the tire to run centered in the frame) must be increased in most instances. This makes the angle at which the spokes run to the rim more severe, producing a less laterally stable wheel. In other words , for two extra gears you sacrifice some rear wheel strength, which is critical in touring bi cycles.
Some manufacturers have introduced 12-speeds with thinner spacers between the cogs so six fit in the space normally used by five. This maintains wheel strength but a thinner chain is needed. How that thinner chain holds up under stress is an open question. What happens when a chain or cluster needs replacing but the local bike shop on your tour doesn’t stock that “exotic” gear? Simplicity is of major importance in our personal touring philosophy so we suggest careful consideration of the advantages over the disadvantages of the 12-speed system on a long-distance touring bicycle. Innovations are always being made, but make sure they are substantial improvements, not just changes.
One innovation worth looking at is the Shimano EX Freehub, an integral hub-and-freewheel combination that offers many advantages over the standard h u b-and-freewheel system. There is a reduction in the spoke dish required on both 5- and 6-speed assemblies, which makes for stronger wheels.
Right now cog selection is somewhat limited, extending to only 28 teeth. This might be the trend of the future, but for now we are sticking to our reliable five- cog freewheel with easy-to-find-and- service parts. When touring, stick to the proven and reliable; leave innovations and “ultimate” components to the weekend rider who can always walk home or call for help. When new equipment is proven and commonly available, then is the time to change if it’s truly something better, not to change for the sake of change alone.
-Frames-
The frame is the largest, most expensive, and most important single component of your touring machine. Just about everything else can be changed but once you choose a specific bike you are pretty well stuck with that particular frame. Frames differ in material, construction and design.
Material
Most standard frames today are produced from steel alloy tubing. This varies in specific strength and proper ties depending on its purity, materials used, and the percentage of various additives, specifically carbon, chrome-molybdenum and manganese-molybdenum. At the very least, the frame on a touring bike should be high carbon or high tensile; chrome-molybdenum or manganese-molybdenum (Reynolds 531) is an even better choice. Better material means greater strength, which in turn allows for thinner, more resilient walls with a higher yield strength (the point at which a bent tube won’t return to its original shape). Resilience and strength translate into a more comfort able ride on a touring bicycle; the tubing flexes and springs back quickly and can take greater stress without becoming deformed. You will appreciate this most as you put on many miles over rough roads with a loaded bicycle.
Most inexpensive bike frames have plain-gauge, pipelike tubing with the same wall thickness throughout. The structural strength of the material used determines the thickness of the walls and the purpose for which it’s used. Most of the force exerted on the diamond-shaped bicycle frame occurs where the tubes are joined. The tubing must be thick enough to withstand force at these major junctions as well as the heat that is applied during the actual brazing process.
Another type of tubing is “double butted.” Generally found on specific tubes on better bicycles ($200 and up), this tubing is thicker at both ends and thinner through the center of the tube. This gives adequate strength at highly stressed joints yet it’s lighter and lets the tube flex in the center for a more comfortable ride. Not all tubes used in a cycle frame are double butted. Even on the highest quality frames, double butted tubes are usually used only for the top and down tubes (see Figure 1).
The seat tube, generally, is single butted (thicker at one end only), as is the steerer tube, which attaches the fork to the main frame body through the head tube. The fork blades are taper gauge (thicker walls at the top tapering toward the dropout) on Reynolds and a few other brands of butted tubing. The head tube, chainstays, and seatstays are all plain-gauge tubing. If you doubt these facts or talk with bicycle shop personnel who contradict them, refer to Table 2 DeLong’s Guide to Bicycles & Bicycling.
Manufacturers seem content to keep consumers guessing by not using specific decals stating exact information on materials and construction in the various tubes on a single frame. Most gloss over the information or even mislead through generalizations. You cannot see the inside of most tubes so you must rely on manufacturers’ decals. Carefully read specifications to make sure you are actually getting what you think you are getting and are paying for in frame tubing.
Butted tubing comes in various weights (wall thicknesses), depending on intended use. The earliest manufacturer, Reynolds of England, is still the most prestigious name in tubing for touring bikes. Reynolds 531 is probably the most commonly used material in top-quality bicycles in the world. Many other companies produce top-quality double-butted tubes, including Vitus (France), Columbus ( Italy), Champion ( Japan), and Ishiwata ( Japan). All make excellent tubing but the relative merits of each are matters for conjecture.
Some manufacturers have specific design features that better suit their product to different riding needs. On the whole, however, we are not so sure that the difference in various brands of similar-weight tubing can be detected by a rider on a fully loaded touring bike. More important, given good-quality tubing, are the actual fitting together of the tubes, workmanship, and the design of angles and lengths of the tubes them selves.
Construction
Workmanship is a difficult factor to determine unless you can actually witness the factory procedure. In lieu of that, you must rely on the manufacturer’s reputation and guarantee and dealer recommendations. Frame failure on moderate- and higher-priced bicycles is infrequent and most manufacturers stand solidly behind their products. Still, in this buyer-beware world there are some surface checks you can make to reassure yourself and reinforce the manufacturer’s claims. But first you must understand the process by which tubes are joined to make a frame.
The two most common joining methods on higher-priced bicycles are “lugged” and “lugless.” Lugless hand brazed joints are seldom found on production-line bikes — Viscount is an exception. In lugless types each tube is cut to fit the adjoining tube perfectly (mitered), then a bronze bead (fillet) is brazed completely around the joint. These high-quality bike frames are not welded, a process that can make the tubing brittle. Instead they are brazed, using lower temperatures and relying on the bronze or other material to make the actual bond.
Lugged construction is more commonly used than lugless. Some manufacturers use an internal lug that is not visible from the outside and produces a frame that may be mistaken for a lugless frame; some Schwinn models are an ex ample. Lugs are malleable steel sleeves made at specific angles, which fit over two mitered connecting tubes at the point where they join. They are brazed into place by filling the space between the lug and the tube with molten brazing material, usually a bronze alloy. In some cases lugs are silver-brazed into place. Silver brazing is stronger and can be applied at lower temperatures, which makes for an extremely strong joint.
Once the lugs are in place they are finished by filing the area around the joint to remove any sign of the brazing material. Here is your best clue to the quality of workmanship that has gone into a single frame. Is the lugwork smooth and clean looking? Are there bits of brazing material or little pin holes around the joint? You can’t determine the tolerances in the mitering process or whether the lug has been completely filled with brazing material, but notice if care was used to finish and paint it. Check several bikes of the same make and model to determine if they show the same quality control. If workmanship varies a great deal between the bikes, look at a different manufacturer’s line. Don’t assume any manufacturer produces only top-quality frames; even the best have their lemons.
Lugless frame joints.
Lugged frame joints.
The comparative strength of lugged versus lugless construction is debatable. Most high-quality bicycle frames are made with lugs, but many tandems and custom .frames are lugless. Workmanship, rather than method of construction, is a better test of frames from the consumer’s viewpoint.
Design
Design here refers to the length and angles of tubes on the frame itself. This really differentiates the touring frame from the racing or recreational frame and is easily detected by the discerning buyer. When you go shopping for your touring bicycle, take a tape measure and read the specification booklets carefully to make sure you are looking at a touring frame instead of one designed for racing. A touring frame will give you a more comfortable ride, because of its longer, lower construction.
The seat tube angle is measured between the top tube and the seat tube where they join under the seat (see Figure 2). This angle has varied over the years but generally a seat tube angle of 72 or 73 degrees is standard on touring bikes, whereas a larger angle (more vertical seat tube) of 74 or more degrees shows that the frame was designed for racing.
Another important measurement is the length of the chainstay. This largely determines the bicycle’s adaptability to wider range, especially 15-speed gearing. Without a long-enough chainstay the angle of the chain (viewed from above) as it moves over the chain- wheels in relation to the rear cogs is greater, putting more stress on the chain and causing more difficult shifting. The longer the chainstay, the smaller the angle between shifting extremes, hence the easier and less wearing the shifting process. Short chainstays also make removing the rear wheel difficult if fenders (mudguards) are attached, and can mean inadequate heel clearance for rear panniers. We consider 17¼ inches the absolute minimum length for touring chainstays, with 17 1/2 or 17 inches being a much better choice.
Fork rake is important to the riding comfort and handling of a touring bike. The greater the rake, the more forgiving the steering and the smoother the ride.
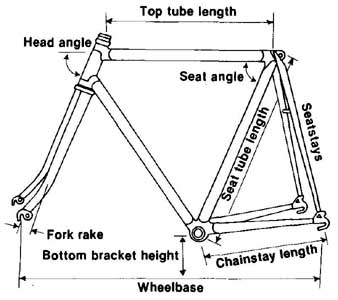
Figure 2: Basic frame angles and dimensions.
Fork rake is the amount of bend a manufacturer puts into the front forks of the frameset. Most touring bikes have a rake in excess of two inches, measured between the straight line of the fork and the center of the front wheel axle (see Figure 2).
These three design features — seat tube angle, chainstay length and fork rake — tell you what the builder had in mind in producing a specific frameset. They are the components of one single measurement, “wheelbase,” which is frequently used alone to determine the suitability of a touring frame. Wheelbase is the overall length from the center of the front axle to the center of the rear axle. Generally, 40 1/2 inches is the absolute minimum for an acceptable wheel base (23-inch frame) in a double-butted touring bicycle. Don’t settle for less. This measurement varies with different frame sizes; larger bikes have longer wheelbases and smaller bikes have proportionately shorter ones. The separate measurements of seat tube angle, chainstay length and fork rake give you a more accurate picture of your bike frame’s suitability for touring.
You will probably hear references to frame “stiffness” somewhere along the line. It means different things to different riders, but generally it refers to a frame’s ability to transfer power from the rider directly to the rear wheel with out loss through frame flex. A stiff frame can mean a stiff ride, but not necessary. It’s possible to design a bike to be tiff laterally (maximum power is exerted to the rear wheels with minimum whip or fishtailing), yet maintain a comfort able ride. Good frame angles, a long chainstay, deeper fork rake, resilient material and clean workmanship not only make the touring bicycle comfort able mile after mile, but also make it efficient in transferring rider power to the rear triangle. Your best bet is to ride as many different bikes as possible to determine for yourself which frame feels best for you.
Cranksets
The crankset consists of two crank- arms (which hold the pedals), chain- wheels (which engage the chain and determine the gear), and the bottom bracket assembly with its axle, fixed and adjustable cups, lockring and bearings to hook it all to the frame.
On most less-expensive machines the crankset is one piece, and is called an Ashtabula after one of the manufacturers. This type of crankset consists of a solid steel, one-piece crankarm/axle arrangement onto which the chain- wheels are attached. Although extremely strong, inexpensive and easy to service, it’s not found on touring bicycles because it’s heavy and makes it difficult to replace worn chainwheels or to change gear combinations.
Another crankset is the cottered three-piece type. The crankarms are held on the axle by tapered coffers that wedge against the axle. This allows for a variety of axle and crank lengths and can be fitted (on most models) with a wide selection of chainwheels. It’s lighter than the one-piece crank and is available in aluminum alloy. However, the cotters tend to work loose or mal function. On the majority of better touring bicycles, three-piece cottered cranks are being replaced with cotter- less cranksets.
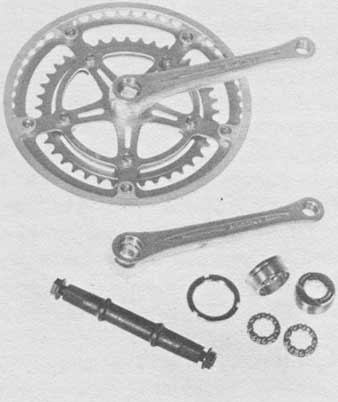
Parts of crankset (top to bottom) — chainwheel and crankarms, crankarm,
lockrings, cups, bearings, and axle.
The cotterless crankset, made of aluminum alloy, is held in place with steel bolts or nuts that force the crank- arms onto the tapered axle. Removal takes a special tool set but is relatively simple. Cotterless cranksets range in price from $30 to over $100. You usually get what you pay for in design and quality of materials. On cheaper sets be sure you can change both chainwheels if you want. On some the right crankarm is permanently attached to the outer chainwheel, making replacement of that chainwheel alone impossible.
One-piece Ashtabula crankset.
Cottered crankset.
You may be happy with the stock gear range on a particular crankset, but check the manufacturer’s range of chainwheel sizes available in stock. Some chainwheels are not available in the smaller sizes. There are only a few models of the triple chainwheels necessary for 15-speeds. The TA Cyclotouriste is the most versatile, having chainwheels available with 26-68 teeth on both double and triple sets. The TA is seldom found on production bikes so it must be substituted or be put on a custom bike. If the frame you select has a crankset you don’t like, the TA is worth considering.
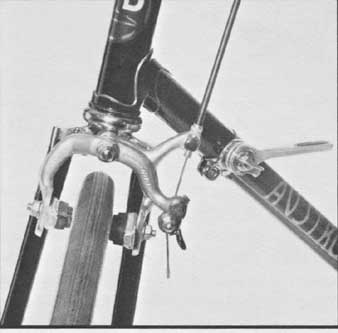
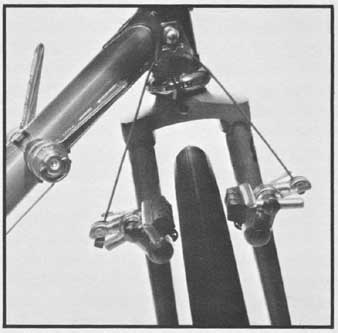
Brakes
There are three main braking systems — sidepull, centerpull and cantilever. Most factory production bicycles come with one of the first two. All are caliper systems.
Sidepulls are “in” on most moderately priced bicycles. Their popularity is partially due to the variety of models available and to their high grade of finishing. They are lighter than center-pulls since their simple design requires less material. The cable and housing run directly to the brake without the need for specific attachments for hanging gear. Easier installation and cleaner looks, along with firm action, add to their popularity with racers. All of these factors are important to the competitive cyclist but we question how important they are to the tourer. However, several of the past Tour de France bicycle races have been won by riders using centerpull brakes so maybe the pendulum will swing away from side-pulls.
Side-pulls are popular for all the wrong reasons. They are difficult to keep centered on the rim (especially in cheaper models), which makes for inefficient braking. More important, it generally takes more hand pressure on the lever to put a braking force on the rim equal to center-pulls, especially with the cheaper side-pulls. There seems to be a direct relationship between the amount paid for side-pulls and stopping power. It’s a bad situation when price is usually the main criterion for production components.
Cotterless crankset.
A touring bike requires brakes with a longer reach to handle the built-in allowance for fenders and larger tires. Reach is the length of brake arm between the mounting bolt and the brake pad. As the reach becomes greater, the brake is more flexible but more inefficient unless constructed of sufficiently heavy material. Most side-pulls are not so constructed even some higher-quality ones have such a short reach that they won’t fit on a touring fork and frame.
Center-pulls are less common on production models, perhaps due to their cost as well as the fact that side- pulls are generally better finished. Centerpulls have more parts, are thicker and heavier than side-pulls. This is a plus factor for the touring bike as heavier construction means less flex in the yoke arms on brakes with the long reach necessary for touring frame dimensions. Because centerpulls pivot on either side of the yoke arm at a point closer to the rim than on sidepulls, there is considerably less flex and a more positive, efficient action. The centerpull design requires less hand power to achieve good leverage on the rims and the pads are more prone to stay centered. Finally, a high-quality center- pull costs less than a high-quality side- pull.
Are centerpulls all positive? Hardly. They require special attachments where the brake cable leaves the brake housing, and they are definitely not as clean and simple looking as the sidepull. Some dislike their spongier, less responsive feeling due to the extra material and design geometry. You will have to decide for yourself which is best for your bike.
Sidepull brakes.

Centerpull brakes.
No matter which brake you use, stay away from so-called “safety levers,” which extend from the normal brake levers and are parallel to the top portion of the handlebar. In an emergency-stop situation, especially if the brakes are even slightly out of adjustment, safety levers won’t give you the stopping power needed because of their faulty design and limited lever action. If your bike has them, remove them or ask that they be removed before you develop the bad habit of relying on them. Removal is a simple operation and should not involve extra cost.
The third type of brake on the market is the cantilever. This brake requires a braze-on fitting (boss) on the front forks and seatstays so it can be mounted directly onto the frame. Unusually large brake pads increase the cantilever’s stopping ability. This brake is very rigid with a simple, powerful stopping action. Usually found on tandems and occasionally on custom touring frames, it’s rarely stock on production bicycles.
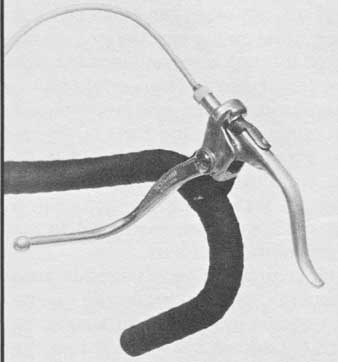
Safety lever (appears here horizontal to the top of the handlebar).
For better braking performance, we recommend removal of these levers.
Cantilever
brakes.
Brakes are a highly controversial subject among avid bicyclists. Feelings and opinions run strong so it’s best to listen to various knowledgeable touring cyclists, then decide for yourself on the basis of your own experience and the importance you place on the differing opinions. The brake pad itself is usually ignored in discussions of leverage, de sign and reputation. The type, condition and fit of the pad are extremely important, as are brake cable and housing quality. Most important overall is the attention given to maintaining close tolerances between the brake pad and the rim; that is the job of the cyclist (see section fourteen).
-Handlebars-
Handlebars are as critical to riding comfort as brakes are to operation. The three types of handlebars are upright, racing and randonneur.
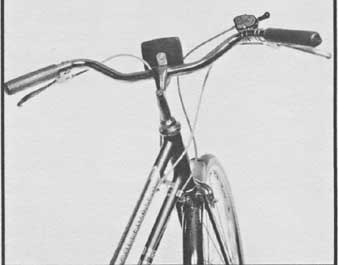
Upright bars allow the rider to sit in a relatively upright position and are usually found on lower-priced and mixte style (straight-bar women’s frame) bikes. They give short-ride comfort and easier visibility on commuter and around-town bicycles, although “serious” cyclists tend to look down on them. They are excellent for those who use their bikes only occasionally , for those who may have trouble balancing or are just getting used to riding a bike again after many years, and for those who spend most of their time riding in heavy traffic. For these situations, the upright “all rounder” is an especially good choice.
Upright bars are not best for long- distance touring because the body is not nearly as efficient at pedaling while sitting upright as in the drop position. Power is lost on the seat rather than distributed through arms and legs for more powerful strokes. The vertebrae are compressed against one another with each bump so that the back is actually more comfortable stretched out in the drop position. Wind resistance is greater in the upright position and, finally, the hands are restricted to just one position on the bars.
Most production 10-speeds have the racing (maes or drop-style) handle bar. It comes in a variety of shapes but all are flat across the top and have the characteristic ram’s-horn drop or curl. This style does away with most negative aspects of the upright ride and is used successfully by many cycle tourists. It does not, however, offer the refinements of the randonneur, specialized touring bar.
Upright handlebars (all rounders).
The randonneur is shaped basically like the racing bar but its drop is not as deep. The rider is able to use the drop position with less discomfort for the neck and upper back. The bar bends slightly upward and forward across the top to give the rider more comfortable hand positioning when riding on the top of the bars. A variety of hand positions helps prevent or alleviate pinching of the ulnar nerve in the hand, which can be permanently damaged when pinched for a long length of time while riding with your hands in the same position.
Randonneur bars in combination with padded riding gloves and handle bar tape help alleviate this condition if the rider uses a variety of hand positions on the bars. You can change from racing to randonneur bars anytime or you can have the dealer do it for you (for a small fee) before you take home your new bike. We highly recommend them for those contemplating lengthy touring or rides of more than a few hours a day.
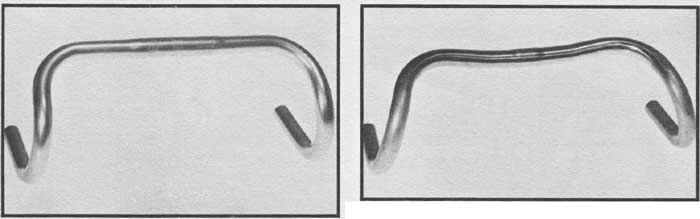
Drop racing handlebars.; Randonneur handlebars (compare with the drop
handlebars photograph at left).
-Shifters-
Shifters move the derailleurs that in turn move the chain over the cogs and chainwheels. There are three types, differentiated mainly by their location.
The stem shifter is located on the handlebar stem (gooseneck). Common on machines in the lower to moderate price range, it’s usually found in combi nation with safety levers to allow braking and shifting while the rider is in the upright position. This is a popular arrangement, although we wonder why bother with drop bars at all if everything is done while upright? In order to shift stem shifters, you must move your hand inward. For some this is an unstable and awkward maneuver. Some stem shifters extend ominously above the handlebars of the bike. If ever you take that infamous trip over the handlebars, or even get thrown against them, you will gain a better understanding of this negative aspect of stem shifters.
Another shifter is located on the down tube, and is favored on most moderate- and higher-priced bikes. Situated about three to six inches back from the head tube, it’s simple, reliable and out of harm’s way. It’s the most positive and quick acting of the shifting mechanisms because it requires the shortest amount of cable to reach each of the derailleurs. But with it down there, some where, it can be awkward to reach, especially if you are not riding in a down position when you want or need to shift. Your hand must leave the handlebar completely while reaching down to a position somewhere behind your spin-fling front wheel. Once you are used to this, it’s not nearly as disconcerting as it sounds, but don’t practice in heavy traffic or while coasting downhill. Some riders report uneasiness at having to spread the legs somewhat to make the shift. This is especially bothersome when pushing up a steep hill on a heavily loaded bike as you lose power and cadence during the maneuver. How ever, many experienced touring cyclists are happy with and defensive about their down-tube shifters.
A growing number of riders are turning to bar-end (fingertip) shifters. Located at the extreme tip of the drop handlebar, the cable housing runs underneath the handlebar tape to just be fore the brake lever where it emerges and travels to the derailleurs. Because of the extra cable, bar-end shifters have a less-positive shift but their added convenience somewhat balances out that drawback. You don’t have to remove your hand from the handlebar in order to shift — the primary advantage — and this is great when negotiating heavy traffic, high winds or steep grades. With practice you can shift with the palm and two small fingers while maintaining complete control of the bicycle.
Stem-mounted shifters. Down-tube shifters.
Bar-end (fingertip) shifters.
If you decide you want bar-end shifters, have them installed before you take your new bike home. They should cost under $20 and the trade-in value of the stock shifter helps defray the installation fee. If you aren’t sure about bar ends, borrow a bike that has them from a friend and ride it long enough to become comfortable with the shifting process. Don’t switch if you are happy with what you have.
Wheels
All of the components covered so far are critically important to the basic structure and performance of your touring bicycle. If chosen wisely in the be ginning, they won’t require much time or thought while you are out on tour. Not so with your wheels. Wheels, made up of hubs, spokes, rims and tires, are the bike’s single, most important feature in daily performance, reliability and safety. The spokes and tires are usually first to fail on a tour and will to a certain extent determine the amount of time you spend enjoying your tour as op posed to the time you spend sitting along the roadside making repairs or looking for someone to make repairs for you. If you must cut corners when buying a new bike or refitting a used one, look for savings in some component other than wheels
Hubs
The two hub types found on production bicycles are high flange and low flange. The flange is where the spokes attach to the hub; high or low refers to the distance from the center of the axle. High-flange hubs are heavier due to their extra material, require slightly shorter spokes, and make for a stronger wheel but a harsher ride. Lighter, low-flange hubs use longer spokes, which weaken the wheel later ally somewhat but soften the ride. The choice is yours and most cyclists have strong opinions about flanges.
Hubs come with sealed bearings or with the traditional, non-sealed cones and bearings found on most production bicycles. Sealed bearing hubs need no maintenance for the life of the bearings but sometimes require special tools and parts for complete replacement when they wear out. Non-sealed bearing hubs, on the other hand, are easy to adjust, require no specialized tools, have easily obtainable spare parts, but require periodic maintenance. The choice is whether you prefer to do your own maintenance (or remember to have it done) or whether you like to simply for get about it until the sealed unit needs replacement.
Be aware of hub prices. The quality difference between a $15 hub set and one for $50 is tremendous. When buying a production bike, ask to see the same brand and model of hub alone. Compare it to hubs on other more-ex pensive and less-expensive bikes and ask the price of the hub by itself. A quality hub is worth a lot on a touring bicycle; unless you have experience or someone to guide you, price is your best indication as to quality.
Spokes
Spokes attach the rest of the wheel to the hub and come in different lengths, thicknesses, shapes and materials. Most bikes have galvanized-steel spokes; the better types are the most re liable spokes on the market. They don’t rust but will turn a flat gray with expo sure to the elements. Some bikes have chrome-plated spokes. They look great for awhile, but will eventually rust through. There is a trend now toward stainless-steel spokes. These hold their shine indefinitely but cheaper grades are brittle and more prone to breakage than the best galvanized spokes.
If you prefer stainless steel, DT (Swiss made) spokes are your best choice with actual strength properties superior to galvanized-steel spokes.
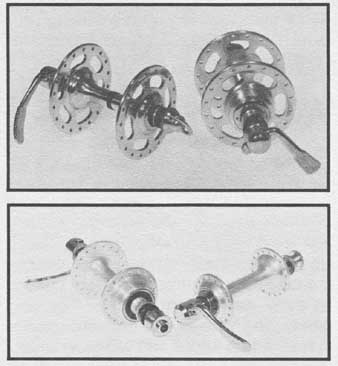
High-flange hubs. Low-flange hubs.
Spokes are either straight (plain gauge) or double butted. Double-butted spokes are thinner through the center portion of the spoke and thicker at each end. Since most spoke breakage occurs at the end around the curved head, strength is not sacrificed for the slight savings in weight.
Spoke thickness (gauge) differs with intended use. Most spokes for 10- speeds are 14-16 gauge (the higher the gauge, the thinner the spoke). For a touring bicycle meant to carry packs and panniers, straight 14-gauge spokes are a good choice. Double-butted spokes should be 1 or 14/15 gauge.
Spoke length is determined by whether it’s a high- or low-flange hub, the make of the rim, and the number of times the individual spoke crosses neighboring spokes from hub to rim. The greater the number of crossings the more flex there is in the wheel and the smoother the ride. All touring bikes have either a three- or four-cross (3X or 4X) pattern.
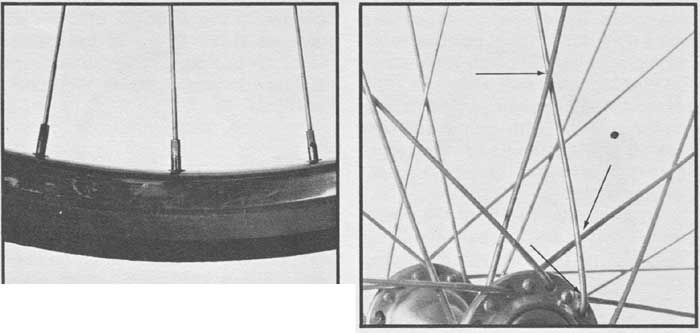
[left] Double-butted spokes. Note thickening at nipple [right] Three-cross (3X)
spoke pattern (crosses marked with pointers).
What spoke pattern to use is deter mined by the type of ride anticipated, the load to be carried by the bicycle (both rider and baggage), the type of hub (high or low flange) and the individual preference of the rider. Endless discussions and heated arguments occur over wheel patterns. For the sake of simplicity (or oversimplification, as some will say), Tim’s suggestions for wheel configuration, assuming 14 straight-gauge or 14/ double-butted spokes, are as follows: for those who want a rigid, solid-feeling pair of wheels, use high-flange hubs with three-cross (3X) spoking; for those wanting a resilient, smooth-riding pair of wheels, use low-flange hubs with four-cross (4X) spoking. He recommends Robergel Sport 14/ galvanized or DT 14-gauge stainless spokes.
The ultimate quality of the wheel depends on the skill and patience of the individual who builds it. Wheel building is not learned overnight. It takes experience and a definite feel for the job, so look around carefully before selecting a wheel builder.
Rims
Rims are made of chrome-plated steel on most lower-priced general-purpose bicycles. They are good looking, strong and heavy. They stand up to considerable abuse but add appreciably to the weight of the wheel and consequently to the amount of energy needed to get the bicycle moving or to stop it in wet conditions. Because the weight of the wheels is, within limits, the most important factor in determining responsiveness in a bicycle, steel rims have no place on a long-distance touring bicycle.
Aluminum-alloy rims are standard on most moderately priced bicycles (over $200). If properly built and not abused, good-quality alloy rims give excellent service; the better grades provide nearly the strength of the best grade of steel. Some of the better brands of box-type construction rims are Super Champion, Mavic, Weinmann and Rigida.
Tires
Tires are of two types, tubulars (sew ups) and clinchers (wired ons). A tubular casing is made of silk, cotton or nylon material with a thin tube actually stitched inside. Tubulars are very light and thin, weighing only 150-330 grams (5-12 oz.). Tubulars are held on a special rim with a coating of cement or double-faced tape. Advantages are obvious: both tire and rim are very light; they have minimal rolling resistance; they are easy to remove when necessary; and they are highly resilient due to almost complete surface exposure out side the rim. This latter point needs some explanation. Resiliency is the ability of a tire to spring back to its original shape after being compressed by an object on the road. It gives the wheel that lively quality associated with responsive bicycles. If all other factors are equal, the more tire area outside the rim, the more resilient the ride.
Tubulars have many disadvantages. They cost $10-$40 each although that wouldn’t be so bad if they lasted longer; but they are fragile and prone to flats, especially the cheaper ones. Tubulars are difficult to patch as they must be opened up once off the rim to expose the tube, then must be re-sewn after the tube is patched. (Most riders using tubular tires carry spares and save patching for later.) Tubulars and their special 700-millimeter rims are not generally available in non-specialized bike shops. Except for excellent road conditions and with light loads, we don’t recommend tubulars for touring bicyclists.
 Tubular tire, unmounted. (Tube is completely
en closed in tire.) [right] Clincher tire, unmounted (no tube).
Tubular tire, unmounted. (Tube is completely
en closed in tire.) [right] Clincher tire, unmounted (no tube).
Clincher tires, more correctly known as wired ons, are found on virtually all production-line touring bicycles. Usually made with nylon casings, they have a wire, nylon or fiberglass bead extending around the inner portion of the tire on both sides. When a tube is placed in the tire on the rim and inflated, it pushes the bead against the rim to hold the tire on.
Clinchers are heavier than tubulars, weighing 200-520 grams (7-19 oz.), and the lower-quality models have greater rolling resistance. They are harder to remove from the rims and are less resilient since more of the tire is enclosed by the rim. However, they are less expensive ($4-si 0) than tubulars, easier to patch, safer in that they are more securely held on the rim, more readily available, less prone to puncture, and more durable. Better brands stand up to thousands of miles of wear.
Tubes for clincher tires come with two types of valves. The Schrader valve is more common in the United States. Since it’s the same as the valve on automobile tires, it can be filled by any gas station or bicycle air pump. The other type is the Presta, or European style. It’s narrower than the Schrader with a small, nutlike fitting that must be opened before filling with air. Presta valves need either a specialized pump head or an adapter in order to be filled with a pump having a Schrader valve fit ting. Tubes with Presta valves are difficult to find while Schrader valve tubes are available everywhere in North America. Stick with Schrader valves unless you are planning a trip to Europe. Tubular tire tubes come with Presta-type valves.
Unless you can work out an amiable exchange with the dealer when your bike is new, it’s best to use up the poorer-quality stock tires, then switch to high-quality replacements. Some of the better heavy-duty tires (27x1 ¼-inch) suitable for long-distance touring are Schwinn Le Tours, Michelin High Speeds and Michelin Sports for heavy- duty use and poor or gravel roads, and Specialized Bicycle Imports Touring Tire for lighter duty on good paved roads. Michelin Fifties also are good for the latter.
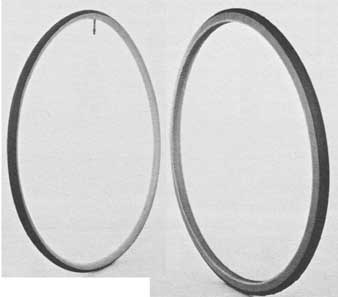
The cycling world is undergoing a revolution in rim and tire size. For several years there has been a movement away from the standard 27 x 1 ¼-inch tire toward a narrower width. First came the 27x1 / tire; now many bikes are coming off the line with 27x 1-inch tires. There is also considerable interest by some cyclists in converting their 27- inch tires over to the European equivalent 700C. The 700C tire, although close, is not interchangeable; it requires a special 700C rim. Once again, unless you are planning an extended tour in Europe, you are better off with the more readily available 27-inch tire and rim.
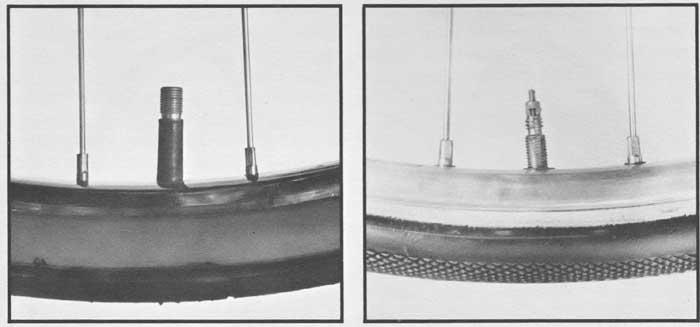
[left] Schrader valve. [right] Presta valve.
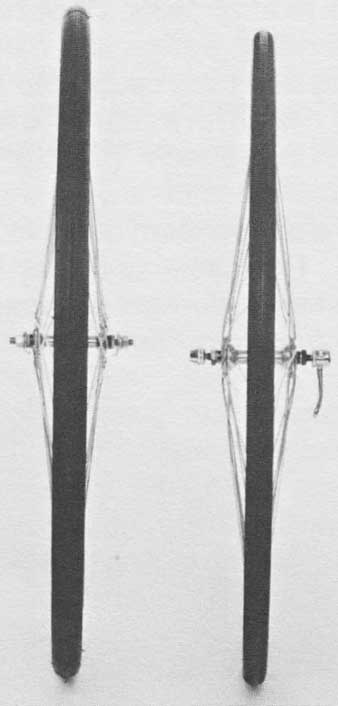
Frontal view of a 27 x 1¼-inch tire and a 27 x 1- inch tire, mounted.
Note different thicknesses in tire profiles.
The movement toward thinner tires on production bicycles is probably a result of amateur racers’ expressed desires to move away from the expensive, fragile tubular tire to narrower and tougher clinchers for training purposes. Since bicycle innovations have historically come from the racing element, manufacturers have begun to stock thinner wheels on most of their moderate- to higher-priced bicycles even though some of those are designated and designed for touring, not racing. This makes us wonder what the manufacturing concept is of a touring bicycle or perhaps they are concerned only with following the latest fads to maintain sales. Whatever the business reason for thinner tires on touring bicycles, touring cyclists are making a serious mistake if they purchase a touring bicycle with one-inch tires and rims.
Manufacturers and dealers will say that the thinner wheels are better for touring because they are lighter. For the racer, fine; for the tourer, no. Nar rower tires are not as resilient as 1¼- inch tires because a larger percentage of the tire and air is enclosed in the rim. This gives a harsher, more fatiguing ride. Rolling resistance should improve with narrower tires, but that might not actually be the case. The road surface over which a tire passes is not perfectly smooth, but is filled with irregularities. The narrow tire is more apt to be deflected by holes and loose material whereas a wider tire will simply run over smaller impediments. The safety aspect is obvious. Narrow tire deflection actually slows progress and makes the ride more unforgiving and dangerous. Wider tire stability is apparent when the two types are comparison tested.
The narrower tire is more prone to damage when the wheel bottoms out in potholes or on other uneven road surfaces. On the whole, the narrower tire is less durable and more liable to flats, sidewall damage, casing rupture and faster reduction in tread life. Most important, it does not have the stability and surefootedness necessary for a loaded touring bike. Finally, in a pinch you can always get a 27x 1¼-inch tire at Western Auto, K-Mart or even in a large supermarket. Not so with the narrower models. This may change as they become more popular; for the sake of the touring cyclist, we hope not.
====> A word about interchanging tires. When the new 27x 1 1/ tires came out they could be placed on rims that would also accept the more common 1 ¼-inch tire; this is not so with the narrower 1-inch tires. The standard rim is about 22 millimeters wide whereas the new 1-inch or 3 tire requires a rim with an outside width of about 19 millimeters. We have seen wider tires mounted on the narrower rim, but would be very cautious about doing it and would never recommend it. Since many moderately priced, production touring bicycles now come with the narrower rims and tires, we suggest you trade in the narrow stock wheels for a pair of wider touring wheels with high- quality components. Deal with a shop that is experienced and willing to build or otherwise get such wheels for you. An option is to keep the narrow stock wheels for day rides when not carrying a load so the added responsiveness can be appreciated. Then for longer trips use a pair of custom touring wheels from a recognized builder who specializes in touring gear. Remember, wheels are not the place to cut corners on your touring bike.
Air pressure affects your wheel’s life. The present trend in tires is for manufacturers to keep raising recommended pressure. High pressure is equated with better quality in some per sons’ minds. Actually the higher the pressure the harsher the ride and the smaller the imprint of the tire on the road. Both qualities are undesirable on fully loaded touring bikes. Choose tires for their durability, design and handling qualities and don’t get caught up in exaggerated high-pressure claims. Schwinn Le Tours work great at their rated 85 pounds, but if you want to soften the ride drop them down to 75 or 80 pounds. The same goes for other tires. Fill them to the right pressure for the type of riding you do, the load you are carrying and the road conditions. On rough paved and gravel roads we have been satisfied with Michelin Sports at 70 pounds; a very low pressure by most standards, but satisfactory and safe for that type of touring with a load.
Saddles
The saddle is too often a major sore point for long-distance riders. Saddles on most production bikes are of mediocre quality at best. When modifying a new or used bike for serious touring, there is little question as to whether to change the saddle; the only question is which one to replace it with. The length of time you can sit on the saddle is the main determinant of the daily distance you cover on tour — even more so than your strength and stamina. The highest- quality custom touring bike is no better than a department store special if you can’t sit on the seat for more than a few hours a day.
Some saddles are designed for recreational touring but most are cheap copies of saddles designed for racing. They are very narrow with a stiff, unforgiving base. These are good features for racing where light weight, minimum width (less leg interference) and stiffness are needed so no power is lost through the saddle. Their lack of suit ability for touring is quickly brought home when you try to sit upright for any length of time on a racing saddle.
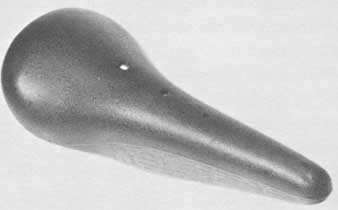
The pseudo-racing vinyl saddle is standard equipment.
 Wide, spring-loaded vinyl saddle.
Wide, spring-loaded saddles are no better for touring. They are too wide for comfortable leg movement, especially in the forward leaning position that pro vides the most powerful stroke. Too springy for efficient cycling (power is absorbed by the springs rather than the crankset), they are also too hot with their large, vinyl-covered surface be coming a mini-sauna in anything but arc tic conditions.
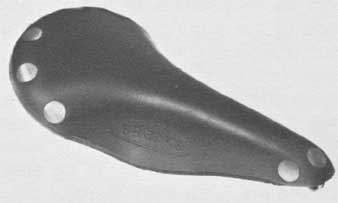
Hang in there. There are a variety of solid-leather or leather-covered saddles designed for touring efficiency and comfort. For many years top-quality leather touring saddles have come from either Brooks of England or Ideale of France. Each has a full line of leather saddles ranging from the not-so-good to the top-of-the-line “professional” models. Most are solid leather that needs conditioning and breaking in, but some are preconditioned to more quickly conform to the rider.
Unless you have a preconditioned leather saddle, take the time and effort to break in a solid-leather model. The more time you spend breaking in your saddle off your bike, the more comfort able will be your miles on your bike. First, place the saddle either directly in the hot sun or near a 100-watt light bulb. Don’t put it where your hand is not comfortable with the heat. Turn it over after about half an hour. When the leather is as warm and soft as it’s going to get, tighten the nut under the front of the saddle. On son’ saddles it’s necessary to hold the bolt that the nut tightens onto with a pair of pliers. Tighten the nut to the point where the saddle is drum tight, but don’t overdo it and tear the saddle from the rivets.
Next, while the saddle is still warm, apply some type of leather oil (Neat’s-foot, mink, Brooks Special Saddle Dressing, Huberd’s Shoe Grease) to both sides of the saddle. Keep the saddle warm and apply oil until the leather won’t absorb any more. If the leather loosens, tighten the saddle’s adjusting nut again to keep it taut.
Once the saddle is saturated, keep it in a warm place for 10 to 12 hours — in the sun or under a warm light. Now, find a comfortable place to sit and beat on the top of the saddle with a 12-ounce to 16-ounce ball peen hammer. Use the round ball end. If you don’t have a ball peen, use a rolling pin, section of pipe or any smooth rounded object. Beat on the entire upper surface but concentrate on the rear portion and along the top edge of the saddle where it folds over. Let the hammer do the work; you don’t have to pound hard, just continuously. How long? How soft do you want your saddle? The more you beat, the softer the saddle becomes.
If the saddle loosens up a lot, tight en the adjusting nut again. This process takes a few days to complete because your arm gets too tired. Do it while you watch TV or walk around the block — that will give the neighbors something to talk about. When you don’t want to beat anymore, wipe the saddle well with a dry cloth. The oil you put into the leather will take years to work itself out so be sure you ride in dark-colored shorts.
Now, test the saddle for flexibility. Most tourists like their saddles to flex a little; loosen the adjusting nut to accomplish this You don’t want it so loose that the nut and bolt squeak, but you don’t want it drum tight either. Your saddle is now ready to ride.
Try to keep a fine, solid-leather saddle dry at all times (saddle covers are available for $2); don’t ride on it if it be comes saturated. If your bike doesn’t have fenders, be especially careful to keep the underside dry and clean. When you clean your bike take a damp cloth and wipe down your saddle too.
Depending on how much you ride, periodically give the saddle a light coat of oil to keep it in good shape. With care it should last your lifetime and feel more like home the longer you ride on it. If ever our bikes are stolen, we hope the thief at least has the decency to leave the saddles behind.
There are now a number of leather- covered saddles with foam padding over a semi-flexible plastic or nylon base. When deciding between a solid-leather or padded leather saddle, keep some of the following points in mind. A high-quality solid-leather saddle, properly cared for, represents an almost life time investment. The longer you have it, the better it will fit and feel. Solid-leather saddles can be returned to proper tension as they loosen up by adjusting the nut under the nose of the saddle. This type of saddle has the important ability to breathe, allowing sweat and heat to pass through the pores of the leather away from the rider. Finally, a solid- leather saddle is fairly impervious to serious injury. Scratches and accidents detract from its appearance but not its effectiveness.
On the other hand, leather-covered cushioned saddles can be seriously harmed or even ruined when cut or otherwise damaged. Since there is no need to break them in, they feel pretty much for the first 50 miles as they will thou sands of miles later. Remember that when you first sit on one; it won’t feel much different as it wears.
Leather-covered saddles don’t breathe as well as solid-leather saddles due to the closed-cell foam padding and the nylon or plastic core. They tend to trap sweat and heat, although not as much as the all-vinyl saddles. Some covered saddles have suede leather tops, said to be more resistant to abrasion; but the extra friction adds heat where it’s least desired.
The better models of solid-leather saddles are Brooks Professional, the B17, and the B15. The latter is wider, of slightly poorer leather and costs a little less. Also good are the Ideale 90 and the slightly lesser quality Ideale 80.
What about women’s saddles? The Brooks B72 is wider where it needs to be and has double shock-absorbing rails; Susan prefers it to all others. The B15 is suitable for small or thin women and the Ideale 6 is a unique attempt to meet women’s special needs. These wider saddles are suitable for men who need more support or ride with upright handlebars. Tim uses an Ideale 6 on his upright, 3-speed commuter bike and is very happy with it.
Brooks Professional leather saddle.
The Avocet line has pretty much captured the market in leather-covered padded touring saddles. Be careful though as the difference between the Avocet Touring I and the Touring II models is minimal. You end up paying $10 more for basically the same saddle. Insist on seeing and feeling both models before you buy. Avocet also makes a women’s touring saddle of excellent de sign and quality.
Except for the Ideale 6 and the Avocet Touring I, all of the above saddles cost between $20 and $35. If you buy a saddle for your new touring bike, you should get a discount for trading in the stock saddle.
-Making Your Selection-
By now you should have a pretty good grasp of the major basic components as they relate to the specific needs of the touring cyclist. OK, but which bicycle should you choose? You will probably be buying a bicycle all built up and will have to make compromises. If there were only a few choices and the models remained the same each year, the answer would be easy. But there are more than 25 major bicycle brands and who knows how many models. The obvious answer is that there is no one “best” touring bike. There are just different bikes representing various compromises according to the design ideas and sales data of various manufacturers. It’s up to you to decide what is most important for your specific needs, then attempt to find a bi cycle that comes closest to your ideal for the amount of money you have to spend.
A word about weight. Overall weight is not the most important factor when selecting a touring bike. The majority of moderately priced bicycles weigh under 30 pounds; a difference of 2, 3, or even 4 pounds among brands is not significant. Look instead at the quality of the components and their suitability for your needs. Once loaded with gear for a long tour, the difference be tween a 27-pound and a 29-pound bicycle becomes inconsequential. It’s cheaper and healthier to remove 5 pounds from your own body (if you have them to spare) than to sacrifice quality or dependability for fewer pounds on your bicycle. Be wary of manufacturers’ weight claims. The only sure way of determining weight is to weigh it yourself.
You will probably want to make modifications no matter what model you choose. This is where the dealer is important. Is he easy to get along with and willing to work with you or is he dictatorial and unwilling to listen to your wants and needs? Does he have a full line of accessories and parts or is he concerned only with selling you a bike “off the shelf,” leaving additional modifications up to you? Will the dealer take trade-ins on stock parts toward other components not standard on that mod el? Who sets up the new bikes and how are they adjusted? Look at how the brakes are adjusted and aligned on floor models: Care there usually means care elsewhere. Check the crankset in the bottom bracket. Do the arms run smoothly and free or are they loose, sloppy or too tight? You will have to slip the chain off the inner chainwheel to feel this for yourself. Don’t be shy; it’s your money and might be your bike. If the dealer seems more concerned with moving bikes out the door than with providing honest, accurate information along with a correctly adjusted ma chine, you should move out too.
Stay away from chain store and discount house bicycles. They are generally of poor quality and usually don’t have a service department to back up their product. Many have odd parts and modifications can be a problem or even impossible. Keep in mind that the bottom line for a quality touring bicycle is around $250. A survey by Bicycling magazine found that the average price paid for a bicycle by readers in 1978 was $277. That is not cheap but with loving care a bicycle can be a life-long investment. How many items in our society can lay claim to that? Prices are rapidly escalating. Due to the floundering value of the American dollar abroad, you can expect even more dramatic in creases in bicycle prices. This is al ready happening for both components and complete machines.
Because of the rapidly changing nature of the bicycle business and the time it takes for a guide to move from the authors’ desks to the bookstore shelf, we have opted not to make specific recommendations or list the better touring bicycles. Rather we are listing some of the major components we would like to see on a touring bicycle. Although many come close, there probably is no production-line bicycle that matches our suggested list of components exactly. Use our list as a guide, not an edict. Study this section if necessary, talk with knowledgeable touring cyclists, find and consult a responsible bike-shop dealer, then make a decision. This takes time and requires work on your part but if you are going to spend in excess of $250 for a bicycle, we want what you bring home not only to be worth the money but to be the best possible bicycle for your needs.
-Shopping Guide-
Frame:
- Construction: double-butted, chrome-molybdenum or manganese-molybdenum (Reynolds 531)
- Seat tube angle: 72 or 73 degrees
- Chainstay length: 17¼ inches minimum
- Fork rake: 2 inches minimum
- Wheelbase: 40 1/2 inches minimum (23-inch frame)
Crankset:
- Cotterless alloy, double or triple chainwheels
- All chainwheels replaceable;
- Additional chainwheels available preferably down to 34 or fewer teeth
Gears:
- Rear derailleur: wide range (GS or GT) to handle up to a 34-tooth cog
- Front derailleur: wide range to handle up to an 18-tooth chainwheel difference
- Cluster: five cogs, low gear cog over 30 tooth
Brakes:
- Cantilever, centerpull, sidepull (in order of preference)
- No safety levers;
- Gum-rubber brake hoods
Handlebars: Randonneur
Shifters: Bar end
Wheels:
- Hubs: low flange, quick-release
- Spokes: 14 gauge, four cross
- Rims: alloy box-type construction, 27x1’% inches
Tires: clincher, 27x1¼ inches
Saddle: Solid leather