The common conception that the off-season is a time to relax and rejuvenate is only partially true. The off-season is not a time to stop training; rather it's the time to change your training to prepare for the following year. It's also a time to take a mental and physical break from long grueling hours on the bicycle and high-intensity workouts. But if you stop training completely, you'll enter the upcoming season with a poor base.
Seasons can be won and lost based on off-season training.
Although you will not ride as long or as hard during the off-season, you must not stop riding entirely. If you do, your fitness level will drop dramatically and it will take a long time to rebuild for the next season. The off-season is ideal for building strength on and off the bicycle. Your four main goals for the off-season should be the following:
__Recover from a hard race season (both mentally and physically).
__Maintain a sufficient endurance base.
__Develop strength through resistance training.
__Improve technical and tactical aspects of riding and racing.
In the off-season cyclists need to lower the intensity of training to allow the body to recover. It can even be beneficial to park the bicycle in the garage for anywhere from a few days to two weeks. Do not park it longer than two weeks, though, or you'll lose a lot of your base conditioning. Instead of taking two weeks completely off, you could take a couple of weeks off from a structured work out program, continuing to ride but not worrying about how hard you're riding. Do not worry about interval training or threshold training during this period. Most of your training (with the exception of hill training, discussed below) should be at a conversational pace. You should also reduce the volume of training by 20 to 40 percent. You can do this by decreasing the duration and the frequency of your rides.
The off-season also gives you the opportunity to recover mentally from the rigorous training and racing that occurs during the season. This includes recovering from high levels of mental stress, which can leave the body susceptible to illness and cause it to heal more slowly than normal.
And it provides a break from what can be the mind numbing monotony of training. This is a chance to ride simply because you love to ride-something that's easy to forget during the racing season. If you're feeling burned out at the end of the season, your motivation is probably waning and you really need a break. By the end of the off-season, you should feel mentally rested and be looking forward to resuming the rigorous, goal-oriented discipline of high-volume, high-intensity training.
INDOOR TRAINING
Depending upon where you live, road riding in winter may be perfectly reasonable, somewhat uncomfortable, or out of the question. But it's not just a matter of cold weather and poor road conditions; available daylight can be in short supply in winter. So even if you live in a climate that's warm year-round, indoor training can be an important part of your off-season training.
Trainers, Rollers, Spin Bicycles
To maintain your Cycling-specific adaptations, you should maintain your endurance base with an exercise that involves pedaling. For indoor training, you have three choices:
__Trainers. These are small metal frames that hold the bicycle upright, with the rear wheel off the floor, and provide some means of applying resistance to the rear wheel as you pedal.
__Rollers. These consist of three or four cylinder-shaped rollers, each about a foot wide, held in a flat framework. They don’t have adjustable resistance and they don’t hold the bicycle in place, so the rider must maintain balance while "riding."
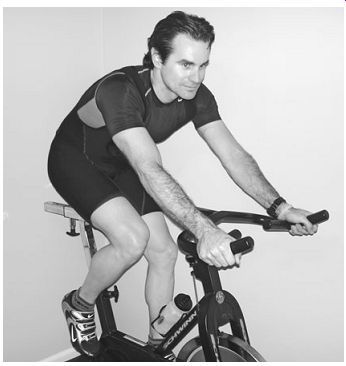
__Spin bicycles. These are stationary bicycles specially designed for bicycle training rather than general fitness exercise.
Physiologically, a trainer is often the best option because you use your own bicycle-the setup to which your body has adapted. Trainers are also far less expensive than spin bicycles.
The problem with trainers, however, is that they lock the back wheel and frame into a fixed position, preventing the side-to-side rocking that's typical when pedaling on the road. This places an extraordinary amount of force on the back wheel and the frame, which can cause early fatigue and failure of both. This is also tough on the rear tire, which can develop a flat spot after just a few rides on the trainer. (Continental has a tire designed specifically for use on trainers; it dissipates heat better than normal tires and lasts twice as long.) To avoid damage to your one and only race bicycle, you may wish to use an old bicycle or a training bicycle on a trainer. It may even be worthwhile to buy a used bicycle with similar geometry specifically for that purpose.

----------- A stationary trainer locks the rear axle in place and provides
resistance at the rear wheel.
Rollers don’t lock the rear wheel in place, so they don’t place unusual stress on a bicycle. But because the bicycle just sits on top of the rollers, and you do not have the benefit of forward momentum to assist you in maintaining your balance, rollers require a greater amount of skill and a highly developed sense of balance to use. Falling off rollers can cause serious injury and damage to any object located nearby. And you can’t adequately adjust the tension on a roller, which may limit your ability to train optimally. On the other hand, using rollers improves your balance and pedaling skills.
Spin bicycles have a fixed gear and a flywheel (which may weigh 30 to 50 pounds), so you can't just stop pedaling as you would on a road bicycle.
During my first spin class, we were spinning pretty hard during an interval session. The seat was bothering me, so I decided to stand slightly to readjust my bottom. Not realizing that the gear was "fixed," I stopped pedaling as I would on the road, and before I knew it I almost flew over the handlebars. My right knee was sore for a week.

-------- Because rollers do not lock the bicycle in position, they require
much more skill to ride.
--------Spin bicycles allow the cyclist to adjust resistance by increasing
or decreasing the force applied to the flywheel.
Indoor training can quickly become boring, producing a tendency to find other things to do besides getting on the trainer. Videos that provide structured workouts for indoor training are one way to break the monotony. Because the majority of these videos are for interval training, you should be careful not to train hard every day.
Another option is to invite friends over and have an indoor ride together. Socializing with your training buddies helps the time pass quickly, and establishing a "training date" with your friends on certain days each week provides the discipline to make sure you do it. You can ride casually as you watch your favorite Cycling movie (the movie doesn't have to be about Cycling), or the group can train hard while watching a training video.
One of my favorite products for indoor training is CompuTrainer, a computer-driven trainer from RacerMate Inc. (see the for their website). The software displays a route on the monitorAppendix using realistic, computer-game-like graphics, and changes resistance on the trainer as the terrain changes. As you ride, the sys tem captures training data such as cadence and power output. You can specify various courses- even the route for an upcoming race on your schedule-and change the view on the monitor to keep things interesting.
Many facilities offer spin classes, where a certified instructor leads you through an organized workout on spin bicycles. A good spinning class can give you an effective workout as well as entertain you. To find a good spinning program, call around to your local gyms.
CROSS TRAINING
It's best to stay away from the trap of cross training. Running, swimming, and other non- Cycling cardiovascular exercises are not valid off-season substitutes for Cycling because they lack the training specificity of cycling. Running and swimming improve your ability to run and swim, not your ability to cycle. Compare an elite marathon runner's legs with a professional cyclist's, and you'll notice that the runner's legs are smaller. This is due to the training specificity that occurs in these very different sports. Having said that, a little running, snowshoeing, or cross-country skiing added to your program will not hurt; in fact they can be beneficial by providing a mental break from cycling while helping you maintain cardiovascular fitness.
Cyclo-cross and mountain biking are better forms of off-season cross training. Both provide Cycling-specific benefits, and both can often be conducted more comfortably in the cold than can road riding; they are done at lower speeds, and many trails are sheltered from the wind. Riding on narrow, twisting, bumpy trails also improves your bicycle-handling skills, and the scenery is a pleasant change from long hours on the road.
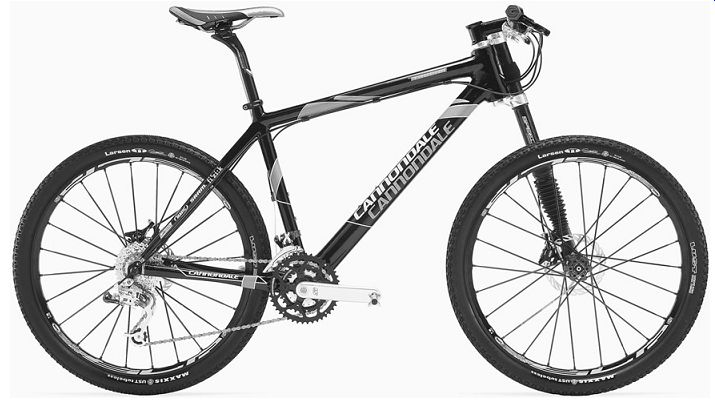
----------- Mountain bicycles have thicker frames, wider tires, and (usually)
smaller-diameter wheels than road bicycles, in addition to different shifters,
handlebars, and brakes. Most mountain bicycles also have shock absorbers.
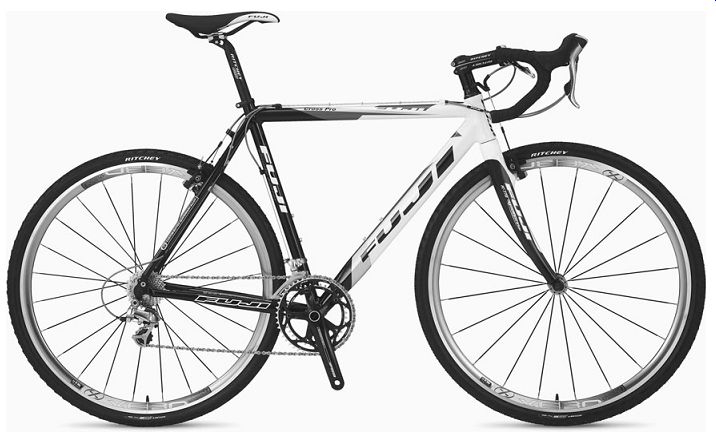
----------- Cyclo-cross bicycles are similar to road bicycles. The main
differences are wider tires, cantilever brakes (to provide clearance for mud),
and minor frame and fork details to accept cantilever brakes.

----------Cyclo-cross is an excellent way to train during the off season.
RESISTANCE TRAINING
Developing strength during the off-season gives you the ability to put more power into every pedal stroke during the "on" season. Through resistance training on and off the bicycle, you increase your average power output and peak power, boosting your over all speed and your hill-climbing and sprinting abilities. I use the term resistance training as opposed to weight training or strength training because it's a broader term. (Because weight training does little or nothing to improve cardiovascular fitness, however, it's important not to neglect aerobic training.) Resistance training may decrease your performance in the beginning of the following race season. It may take a short period for your newly strengthened leg muscles to relearn the proper firing sequence, and you may feel a little sluggish at first. That will change as your training switches to increased endurance and interval training. Then you'll see the improvements from your off-season resistance training.
--------------
DELAYED ONSET OF MUSCLE SORENESS
Concentric movement, or loading, occurs when active muscles shorten during contraction (for example, during the upward phase of squats). Eccentric loading occurs when the muscles lengthen during contraction (for example, during the downward movement of the squat). A condition known as delayed onset of muscle soreness (DOMS) occurs only as a result of eccentric loading. DOMS is the feeling of muscle soreness that occurs one or two days after a workout and can persist for one to three days.
The circular pedaling motion of riding is concentric, so DOMS does not result. (A cyclist's legs may be tired after a long day in the saddle, but they won't be sore. The exception occurs when riding a fixed-gear bicycle such as a track bicycle, in which you use eccentric movement to slow down.) Weight training, however, involves equal amounts of concentric and eccentric movements. You will feel sore the day after you lift. And if you really overdo it on Day 1, the amount of soreness that hits you one to three days later can be truly debilitating.
A friend called to tell me he had started his off season weight-training program and had a hard workout on his first day. I asked him to call me the next day and let me know how he felt. The following day, he informed me that he could barely get out of a chair and walk across the room. It took him almost a week before he felt like riding, and almost two weeks to return to the weight room.
You can limit DOMS by starting with very light weights for the first week or two, and gradually increasing. After a few weeks of training, you will scarcely notice any soreness.
---------------
Design your program so you gain "useful" muscle mass, concentrating on the lower body. Although you want to avoid developing an overly muscular upper body that adds weight and isn't helpful for Cycling, you do not want to ignore your upper body either. Upper-body strength is extremely important for cyclists-to support your upper body on the bicycle, to assist in bicycle control, to establish a strong base of support that will aid in power production, and possibly help prevent injury.
Lifting correctly for three months during the off-season will not make you overly large for three reasons:
__You'll keep your repetitions high (20 to 30 reps per set) with low weight.
__A portion of the resistance training will be conducted on the bicycle.
__You'll spend only an appropriate amount of time developing your upper body.
Although your body may be used to punishing workouts on the bicycle, it's not used to weight training. Start your program slowly to avoid injury. Doing too much too soon can damage muscles and ligaments, which will keep you out of the weight room and off your bicycle until you recover. It can also make you so sore that you won't be able to exercise again for days or weeks, as described in the sidebar.
Adaptations to Resistance Training
During the first eight weeks or so of resistance training, increases in strength come from three neuromuscular adaptations, without any increase in muscle-fiber size:
__Recruitment of more motor units. When you start lifting, your body recruits motor units that you have not been using.
__Better coordination of motor units. The muscles' contractions will be better synchronized, enabling them to work together more effectively.
__Extended golgi tendon organ threshold. The golgi tendon organ (GTO) is located at the junction of the muscle tendon and bone. As a muscle contraction increases in intensity, a greater amount of stress is placed on the tendon and its place of attachment to the bone. At a specific threshold, the GTO activates to inhibit the muscle contraction.
With training, the threshold of the GTO increases.
After about eight weeks, following these neuro muscular adaptations, further increases in strength will come from hypertrophy of the muscle-an increase in the size of the muscle fibers. Although these increases in strength occur more slowly than the three neuromuscular adaptations, these are the changes that will make the biggest difference in your upcoming season. So be patient and do not get frustrated if your increases slow after the first few weeks of strength training.
DESIGNING A STRENGTH TRAINING PROGRAM
A properly designed strength-training program incorporates these variables: frequency of exercise, number of sets and number of repetitions of each exercise within each set, the weight or other resistance used, and the type of exercise.
Frequency
The first thing to determine is frequency. During the off-season, you should do strength training two or three days a week. Take at least one day off between each resistance day to prevent overtraining and allow time for recovery. (I like to use Mon day and Friday for weight training and Wednesday for on-the- bicycle resistance training.) Lower the frequency during preseason to about once a week for maintenance until race season starts. Once the sea son starts, discontinue resistance training.
Reps and Sets
A repetition (rep) is a single movement against the weight or other form of resistance-for example, lifting a dumbbell a single time. A set is a specified number of repetitions done continuously. The combination of reps and sets determines the volume of training. Start with only one set, then slowly work up to as many as four. Because Cycling is an endurance sport, reps should be fairly high-between 20 and 30 reps per set. Once you can achieve 30 reps for every set, it's time to move up in weight.
Determining Resistance
For the first couple of weeks, restrict your lifting to extremely light weights to help prevent injury and limit the effects of DOMS. You should finish each set feeling that you could have lifted a much heavier weight. After a couple of weeks, slowly in crease intensity by lifting heavier weights. Choose a weight that allows you to complete 20 to 30 repetitions, reaching exhaustion at the end of every set.
Type of Exercise
In selecting exercises from those described here, concentrate on the lower body, choosing at least one exercise that works the major muscle groups in the legs, such as squats or the hip sled. Also select exercises that work individual leg muscles, including the quadriceps, hamstrings, gastrocnemius, and soleus. For the upper body, make sure you cover each major body part with one exercise, such as a bench press and a lat pull-down. Choose core exercises that will strengthen your lower back and abdominals. Be sure to include at least one day of on-the- bicycle resistance training weekly.
The order in which you do exercises is important. Because small muscle groups assist large ones, you should start with the large muscle groups to avoid fatiguing the small muscle groups too early. During a bench press, for example, the triceps assist the pectoralis major. If you have worked the triceps first in another exercise, you may be unable to work the pectoralis major to full potential in a bench press. The same thing would occur if you worked the biceps prior to the latis simus dorsi in a lat pull-down or a seated row. Use the chart below to determine which large movement to perform before the corresponding small movement. Shoulders and core movements should be your last exercises of the day.

---------
LARGE- AND SMALL MOVEMENT EXERCISE
Large Movement | Small Movement
Bench press | Triceps movements
Lat pull-down | Biceps movements
Seated row | Biceps movements
Squat | Quadriceps, hamstrings, gastrocnemius, and soleus
----------
The goal of the following section is to give you the tools to develop an adequate weight-training program for Cycling. It is by no means an exhaustive list of weight-training movements. You can add and switch out exercises. For example, if you do not like triceps push-downs, you can replace them with triceps extensions, and you can replace the over head press with lateral dumbbell raises. Although you can add to the leg workout, I would not remove any of the suggested exercises. For a full list of exercises, I highly recommend Anatomy for Strength and Fitness Training, by Mark Vella (see Appendix). This guide explains how to correctly conduct all movements and shows all muscles involved.
Weight-Training Log
It's important to keep track of your progress in a weight-training log. This will also help you organize your workout, so you know what exercises to do in what order. Your log should include the date, list the exercises you will do and in what order, and have space to fill in the weight or resistance and the number of reps and sets. Feel free to make copies of the accompanying sample log or modify it to meet your needs.
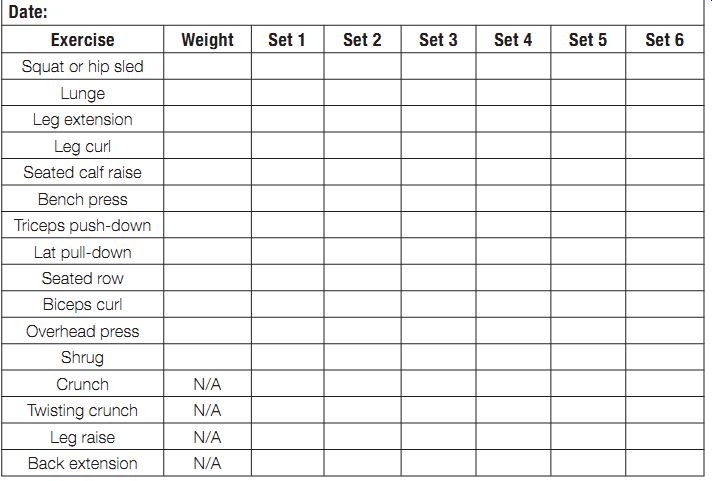
----------- WEIGHT-TRAINING LOG
Machines or Free Weights?
Weight machines and free weights both have benefits and drawbacks. Although the choice is a personal one, I recommend that beginners start on machines, then move to free weights later if they choose.
Because using free weights necessitates stabilizing the weight as you move it, it requires more skill to use. Machines limit the weights' ranges of motion, so there is less risk of injury. For example, when bench-pressing free weights, there's a tendency for the weight to move back and forth.
If you were to lose control of the weight, a serious injury could result. When using a chest press machine, no back-and-forth movement is possible, so there's less chance of injury. For this reason, most machines don’t require a spotter-another advantage-and changing weights is faster and easier than with free weights. However, some machines may not work well for individuals who are significantly shorter or taller than average.
Some of the liabilities of free weights can be considered benefits. When you begin, a free weight bench press will feel a little wobbly; but as you continue to work out and strengthen your stabilizing muscles, it will feel more stable. Free weights are more true to life as well. When we lift objects outside the gym, we must stabilize them as they travel through their path of motion.
So although I recommend machines for beginning lifters, choose whichever you feel more comfort able with. Most individuals use a combination of the two based on experience and personal preference.
WEIGHT-TRAINING TECHNIQUES
Learning the general guidelines for weight training, as well as the proper technique for each lift, is important. Improper technique can lead to injury and time away from training. If you have never lifted before, I recommend hiring a personal trainer or a coach. (Many gyms provide trainers for this purpose.) Follow these general guidelines for lifting:
__Never "throw" the weights around. Maintain proper technique throughout the movements.
__Always use slow and controlled movements.
__Keep a strong and controlled grip on the bar at all times. Always wrap your thumb around the bar, and never use a thumbless grip.
__Don’t lift beyond your ability. Ignore how much your workout partners can lift and pay attention to your own workout needs. Leave your ego at home.
__Listen to your body. Know the difference between discomfort and pain. You'll feel discomfort when lifting, which is commonly known as the "burn." If you feel sharp or shooting pain, you have caused damage that, if ignored, can lead to serious injury.
__Work large muscle groups before you work small muscle groups.
__Never hold your breath. This can lead to dizziness and fainting, which is bad if you have a hundred pounds or more on your shoulders.
__Always use a spotter with free weights. It takes only one slip to end your Cycling career.
__Always use collars with free weights to keep the weights on the bars.
__Ensure that the equipment you're using is functioning correctly, and do not ignore "out of order" signs.
__Pay attention to your surroundings and do not goof off in the weight room. Most injuries that occur in weight rooms are due to carelessness and horseplay.
Exercising the Lower Body
This section covers the primary muscles involved in the lower extremities during Cycling. This is not a complete discussion of all the lower-body muscles, but it does cover the ones that you need to pay the most attention to as a cyclist.
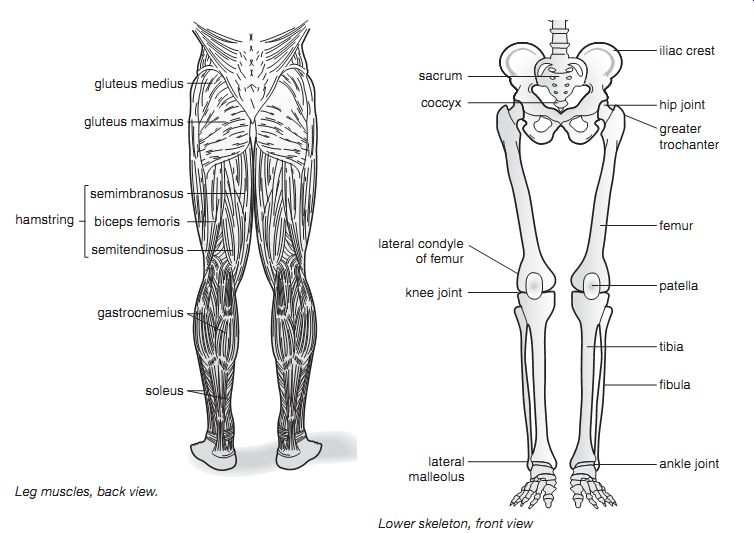
You usually hear the terms quadriceps and hamstrings in reference to the muscles located in the upper leg. Because some of the muscles that make up these groups have different jobs depending on the action of the joint, the groups are bro ken down into their individual muscles for this discussion. (The quadriceps consist of the rectus femoris, vastus medialis, vastus lateralis, and vastus intermedius. The hamstrings consist of the biceps femoris, the semitendinosus, and the semimembranosus.) A muscle that crosses more than one joint is responsible for movement at more than one joint.
The rectus femoris, for example, crosses the knee and the hip and is used during knee extension and hip flexion. The remaining muscles of the quadriceps are responsible only for knee extension.
Hip extension occurs during the downstroke of the pedal (from twelve o'clock to six o'clock). The muscles involved in hip extension are the gluteus maximus, the biceps femoris, the semitendinosus, and the semimembranosus. Also during this phase of the pedaling motion, extension occurs at the knee joint; it involves the rectus femoris, vastus medialis, vastus lateralis, and vastus intermedius.
Plantar flexion (pointing the toes down and away from the leg) occurs at the ankle; it involves primarily the gastrocnemius and the soleus- usually referred to together as the calf muscle.
Hip flexion occurs as the pedal moves from six o'clock back to twelve o'clock. The muscles responsible for hip flexion are the rectus femoris, iliopsoas, pectineus, and sartorius. Flexion also occurs at the knee; it involves the biceps femoris, semitendinosus, and semimembranosus. The tibialis anterior and the extensor digitorum are the primary muscles responsible for dorsiflexion (pulling the toes upward toward the lower leg) during this portion of the pedal stroke.
Squat Squats are good for developing leg strength. The main muscles used are the quadriceps, ham strings, gluteus maximus, gastrocnemius, and soleus. The core muscles are also used.

------ Leg muscles, front view.
----- Leg muscles, back view. Lower skeleton, front view

--------Down position of the squat. --------Up position of the squat.

----- Down position of the hip sled. -----Up position of the hip sled.
----Alternating leg lunge.
Place the bar centered at the base of the neck and across the back and shoulders. Keep a strong, full grip on the bar, and position your feet shoulder width apart. During the lowering phase, stay centered and do not allow your knees to move forward beyond your feet. Lower your body into a seated position until your thighs are parallel to the floor, not beyond. (Going too low puts unnecessary strain on the knees.) When re turning to the standing position, stop just before the knees lock. (Locking your knees can lead to injury.) Keep your head up throughout the entire movement.
Hip Sled Lifting with the hip sled exercises the quadriceps, hamstrings, gluteus maximus, gastrocnemius, and soleus. I recommend the hip sled over the squat for beginners because it requires less skill to per form, thus reducing the chance of injury while working the same muscles. All hip sleds are different, so make sure you know how to operate the equipment before you begin.
Place your feet shoulder width apart. Push the weight up to the point just prior to your knees locking, then lower the weight until your knees are at a 90-degree angle to the floor. Don’t lower beyond 90 degrees.
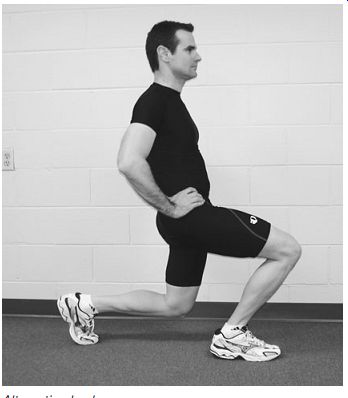
Lunge
The lunge involves the quadriceps, hamstrings, gluteus maximus, gastrocnemius, and soleus. You can do lunges in any of three positions: with a bar across your back (similar to the position for the squat), or while holding a dumbbell in each hand, or with no weight at all. I recommend starting with no weight and working your way up as your body adapts.
Stand with your feet about hip width apart.
Step forward with one leg, then lower your body until the thigh of the leading leg is parallel to the floor and the knee of the back leg is almost touching the floor. Return to the starting position and repeat with the other leg. Continue to alternate legs until you have reached the desired number of reps.
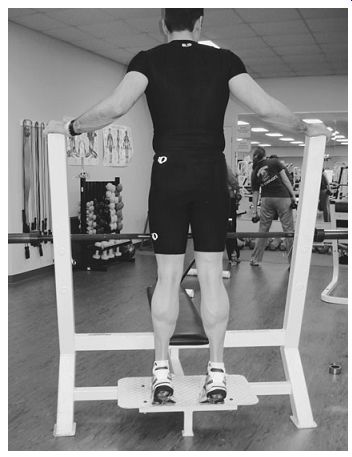
Standing Calf Raise
A standing calf raise, which works the gastrocnemius and the soleus, can be done with or with out weights. If using weights, you can place a bar across your shoulders, hold dumbbells in your hands, or use a machine designed for calf raises.
Although calf raises can be done on flat ground, they are usually done on a raised platform, which allows for a wider range of motion.
If conducting heel raises on the floor, stand flat footed, then rise up onto the balls of your feet and toes, then lower the heels back to the floor. If using a platform, stand with the back half of your feet off the platform. Rise up onto the balls of the feet and toes, then lower your body so the heels go just below the top of the platform.
Seated Calf Raise
The seated calf raise works the gastrocnemius and soleus. Because the knees are bent during this exercise, the gastrocnemius is put on slack, reducing its ability to fully contract and allowing you to concentrate more on the soleus. When Cycling, the knee is constantly bent and the soleus is brought into play.
Most gyms have a machine designed for seated calf raises. If a machine is not available, you can use a bench and weights. Place one or two 45 lb. weights on the floor in front of the bench.
Sit on the bench, place a barbell across your legs, and position your feet so the balls of your feet are on the weights with the back portion of your feet hanging off. Movement at the ankle is the same as for standing calf raises.
---------- Standing calf raise.

----Seated calf raise.
------- Down position of the leg extension. Up position of the leg extension.
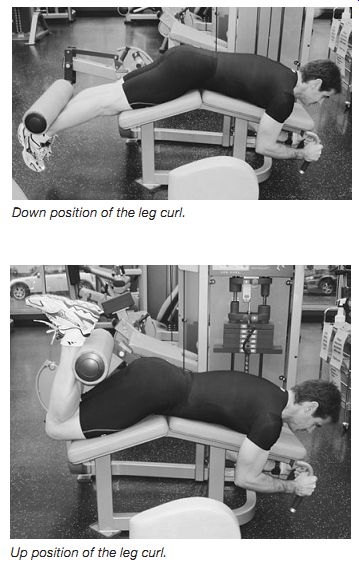
---------Down
position of the leg curl. Up position of the leg curl.
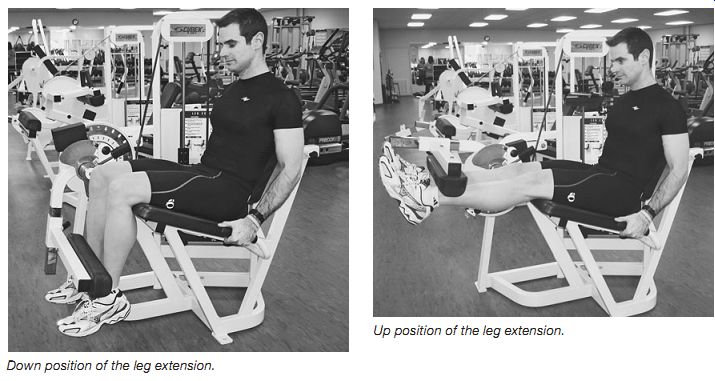
Leg Extension
Leg extensions work the quadriceps muscles. Ad just the bench seat so your lower legs just hang down, and adjust the bar so it goes across your lower legs at your ankles. Extend your lower legs, stopping just before they lock, then lower the weight back to the start position-just prior to the weights touching down on the remainder of the weights located on the stack.
Leg Curl
Leg curls work the hamstrings primarily but also the gastrocnemius. Most leg-curl machines require you to lie prone. Adjust the bar so it crosses your legs at about ankle level. Move your heels toward your gluteus maximus, then lower the weight to the start position-just prior to the weights touching down on the remainder of the weights located on the stack.
Working the Upper Body
The upper-body muscles support the weight of your torso during Cycling, are used to control the bicycle, and provide increased power when climbing or sprinting out of the saddle. Upper-body strength really comes into play if you do cyclo-cross, mountain biking, or anything similar to Paris-Roubaix, where you are riding over rough cobblestone roads. Upper-body strength can also be beneficial in a crash. The stronger the muscles are that surround a joint, the more stable that joint will be and therefore the less likely to dislocate.
Bench Press
The main muscles worked during the bench press are the pectoralis major and the triceps brachii.
The anterior deltoids, serratus anterior, and cora cobrachialis muscles are also used.
Lie flat on your back and grasp the bar with your hands about shoulder width apart. Lower the weight to about an inch from your chest, then push it back up to the start position. Keep the weight controlled throughout the movement, and don’t bounce the weight off your chest.
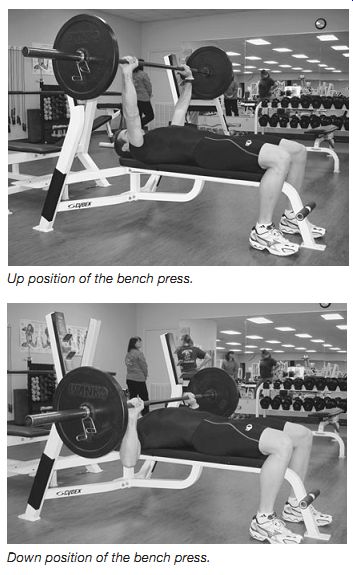
------- Up position of the bench press. - --Down position of the bench press.

----Up position of the lat pull-down.
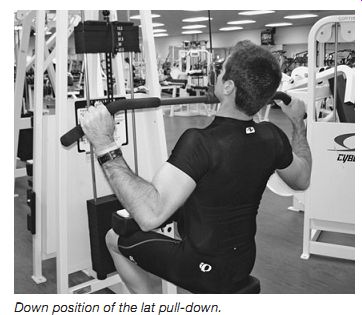
-----Down position of the lat pull-down.
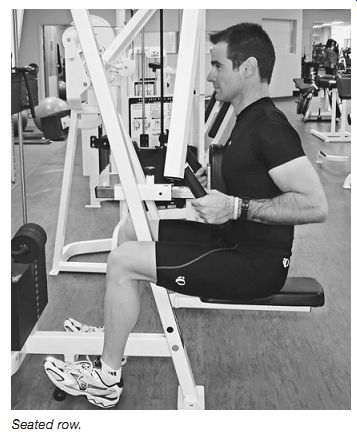
---- Seated row.
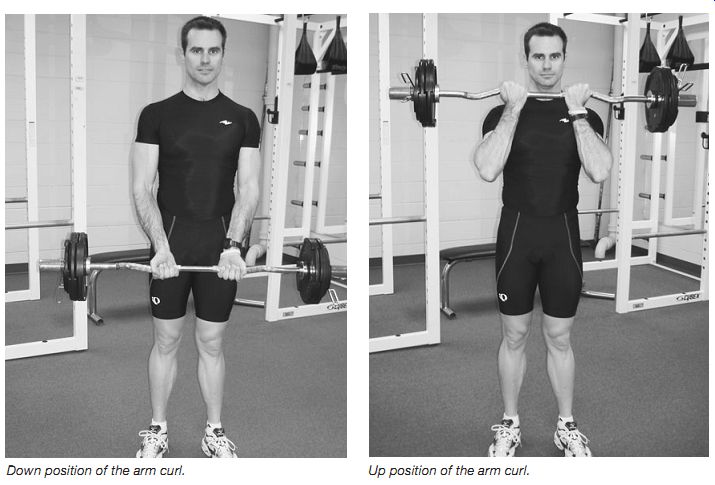
-----Up position of the arm curl.
---Down position of the arm curl.
Lat Pull-Down
This movement exercises the latissimus dorsi, teres major, and biceps brachii. Sit on a lat pull down machine with your legs placed under the padded bar and your hands grasping the bar more than shoulder width apart. Pull the bar down to ward your chest, then allow it to go back up. Don’t pull the bar behind your head; this can cause injury.
Seated Rows
Seated rows work many of the muscles in the back, including the latissimus dorsi, trapezius, rhomboid (major and minor), teres major, posterior deltoids, and biceps brachii. Sit with your arms extended and grip the bar of the seated rowing machine.
Keeping your back arched, bring the bar to your chest and squeeze your shoulder blades together, then return to the start.
Arm Curl
This movement exercises the biceps brachii. Grip the barbell with your hands shoulder width apart.
Keeping your back straight, curl the bar toward your upper body, then return to the start. Do not use your back to help lift the weight, and be careful not to "throw" the weight up: both actions can lead to injury.
Triceps Push-Down
This movement, which works the triceps brachii, can be done on a lat pull-down or similar machine.
Facing the bar, place your hands on it less than shoulder width apart. Start with the bar about chest level, then push down until your arms are straight. Return to the start position and repeat.
To focus on the triceps brachii, make sure to keep your elbows close to your body.
Overhead Press (Military Press)
This movement, which can be performed seated or standing, works the deltoid, pectoralis major (clavicular head only), and triceps. Conduct this exercise with the bar in front of your head. Performing this exercise with the bar behind the head places too much strain on the shoulder joint. Grasp the bar where your hands comfortably fall, a bit more than shoulder width apart. Start with the bar across your chest at the base of your neck. Push the bar up to full extension, then lower it back down.
Shrug
This exercise works the upper trapezius and the levator scapula, muscles used to help hold your head up as you ride. The more aerodynamic the position, the more you use these muscles. You can conduct this exercise using dumbbells, barbells, or a machine.
Stand with your feet shoulder width apart.
Grasp two dumbbells of the same weight, one in each hand, and let your arms hang at your sides.
Shrug your shoulders in an upward manner. Get a good contraction at the top of the shrug, then return to the start position.

---- Down position of the triceps push-down. ---- Up position of the triceps
push-down.
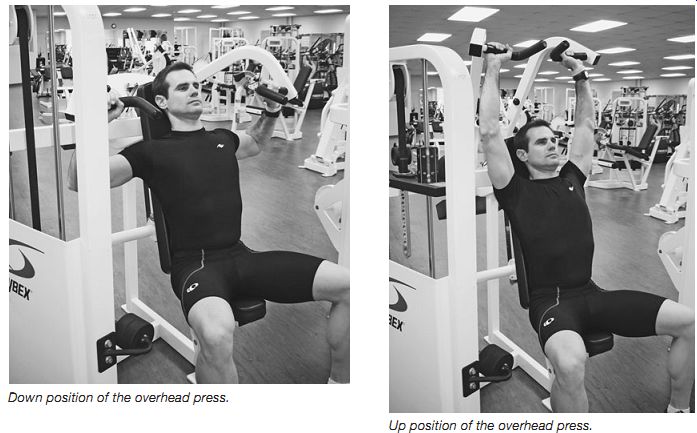
----Down position of the overhead press. -----Up position of the overhead press.

--------- Down position of the shrug. Up position of the shrug.
Core
Core muscles are important for almost all movements, but many times they are ignored. In cy cling they are important for maintaining up per-body posture while in the saddle and for stabilizing the pelvic region while pedaling. Weak core muscles can lead to a sore back due to their inability to support the spine, pelvis, and general thoracic region.
Don’t use weights or weighted machines when conducting core exercises; use body weight only. You don’t want to increase the strength or size of these muscles by increasing resistance (weight). The objective of core exercise work is to increase muscular endurance by increasing the number of repetitions.
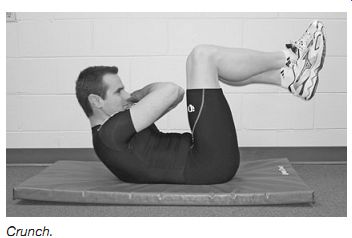
------------- Crunch.

-----------Leg raise.
Crunch
There are many different ways to do crunches, which strengthen the rectus abdominis and the oblique abdominals, but only one method is de scribed here. Regardless of the method you use, never pull on your head with your hands. I usually recommend crossing your arms in front of your chest and placing your hands on the opposite shoulders. This position greatly reduces the risk of neck injury. If you do place your hands behind your head, make sure you do not apply force with your arms.
Lie on the floor with your legs in the air with a 90-degree bend at the hips and knees. Cross your arms across your chest and raise your body until your elbows just touch your knees. Repeat for as many reps as possible.
Take a 10- to 20-second break, then put your left foot on the ground and place your right ankle on your left knee. Place your right arm straight alongside your body and your left hand on your left shoulder. Move up with a slight twist and touch your left elbow to your right knee, then re turn to the start position. Repeat this movement the same number of times as you did the first set.
Core
Core muscles are important for almost all movements, but many times they are ignored. In Cycling they are important for maintaining up per-body posture while in the saddle and for stabilizing the pelvic region while pedaling. Weak core muscles can lead to a sore back due to their inability to support the spine, pelvis, and general thoracic region.
Don’t use weights or weighted machines when conducting core exercises; use body weight only. You don’t want to increase the strength or size of these muscles by increasing resistance (weight). The objective of core exercise work is to increase muscular endurance by increasing the number of repetitions.
Crunch
There are many different ways to do crunches, which strengthen the rectus abdominis and the oblique abdominals, but only one method is de scribed here. Regardless of the method you use, never pull on your head with your hands. I usually recommend crossing your arms in front of your chest and placing your hands on the opposite shoulders. This position greatly reduces the risk of neck injury. If you do place your hands behind your head, make sure you do not apply force with your arms.
Lie on the floor with your legs in the air with a 90-degree bend at the hips and knees. Cross your arms across your chest and raise your body until your elbows just touch your knees. Repeat for as many reps as possible.
Take a 10- to 20-second break, then put your left foot on the ground and place your right ankle on your left knee. Place your right arm straight alongside your body and your left hand on your left shoulder. Move up with a slight twist and touch your left elbow to your right knee, then re turn to the start position. Repeat this movement the same number of times as you did the first set.
Take another 10- to 20-second break and repeat this movement on the opposite side.
Leg Raise
This movement is designed mainly to work the abdominal muscles, but it also works the rectus femoris and the tensor fasciae latae. You can per form this flat or on an incline bench.
Lie flat on your back with your arms alongside your body, your hands just beside or under your bottom, and your chin tucked to your chest. Start with your feet 6 inches off the ground, then raise your legs until they are just past vertical. To further work the abdominals, lift your hips off the floor.
Return to the start position with your feet 6 inches off the floor and repeat as many times as you can.
Back Extension
This exercise is designed primarily for the gluteus maximus and part of the hamstrings (semitendinosus and semimembranosus), but it is also good for working the muscles of the lower back (quadratus lumborum, iliocostalis lumborum, longissimus thoracis, and iliocostalis thoracis). Conduct the exercise using a machine built specifically for this purpose. With your lower body locked into position, lower your upper body toward the floor, then raise your upper body back to the start position.
On-the- Bicycle Resistance Training Resistance training on the bicycle is good for building strength specific to riding. Hill repeats, using a much harder gear ratio and a much slower cadence than normal, are one of the best ways to do this. For example, on a hill that you would normally climb using your 23-tooth gear in the back, drop to 18 or 15. This will force you to slow your cadence and put more power into each pedal stroke. Conduct most of your repetitions seated, but do some standing as well.
You can accomplish the same effect by riding large gears at low rpm on flat ground. When doing this, be careful not to put too much torque into the knees, which could lead to an overuse injury.
This method of pedaling is not economical, and you don’t want to race this way, but it helps build strength during the off-season.

--------- Back extension.
----------Over-geared hill repeats are a good way to conduct on the- bicycle
resistance training.
----------
STADIUM WORKOUT
Stadium workouts are good for increasing "explosive" strength-the kind you need when attacking. The type of training designed for this purpose is known as plyometrics.
This type of training must be started very slowly.
Heavy eccentric loading that occurs during plyometrics can lead to a severe case of DOMS. If you jump right into it, you'll be lucky if you can walk for the next three to seven days. As with weight training, however, the negative effects will decrease as your body adapts.
Go to a stadium or find a set of stairs where you can go up and down without hurting yourself or getting in people's way. Warm up by stretching and walking up and down the stairs a few times, then run up at a comfortable pace and come back down. Once you're warmed up, you're ready to start your sets. Each set should consist of the following:
1. Run up hitting every step, then walk back down at a safe pace.
2. Run up hitting every other step, then walk back down.
3. Slowly lunge, as mentioned earlier, up every other step, then walk back down.
4. Hop up every step on both legs at a time, then walk back down.
After you complete the sets, cool down and stretch. Start with no more than two or three sets during the first week. After that, slowly increase to the desired number of sets. Be careful; as you tire you increase the risk of making a mistake, which, if done on concrete stairs, can make for a very bad day. It may be a good idea to have a friend with you in case of an emergency.
----------