If one specific training program worked for everyone, there would be no need for more exercise physiologists, coaches, or books such as this one. But research has demonstrated that individuals respond differently to training.
Many collegiate and professional training pro grams, however, don’t individualize their training to each athlete, using instead a cookie-cutter approach involving extremely high-volume work outs. Unfortunately, this type of training results in chronic overtraining and overuse injuries and destroys many good athletes whose bodies need more time to recover than others.
Genetics play an important role in determining one's potential. Just like hair and eye color, our ultimate ability to perform well in endurance or power events is passed on from parent to child, determined largely by the percentage of slow twitch and fast-twitch muscle fibers. There are also genetic differences among individuals in the production of hormones, neuromuscular control, metabolism, and body fat percentage and distribution, to name just a few of many additional pertinent variables.
Good genetics, however, are far from a guar anteed ticket to the winner's podium. Lance Arm strong was most certainly born genetically gifted, but so are dozens of cyclists who compete in the Tour de France. Lance also trained as hard as, if not harder than, any of his competitors, using a training program that was ideally suited to his body and his racing objectives. It was the combination of genetics and training (plus attitude, organization, strategy, tactics, sponsorship, and a few other factors) that allowed him to win le Tour seven consecutive times.
We all have a genetic ceiling-the absolute physical limit of how well we can perform-and no matter how hard we train we will not be able to break through it. But the majority of athletes never reach it, and most do not even come close. You may not have the genetic background to win le Tour, but you can become a much better competitive cyclist through dedication to a well-designed training program.
OVERLOAD
Overload is one of the core principles of training.
You must regularly overload your body for adaptations to occur. Training breaks down the body, but, given proper recovery, the body builds itself back up stronger than before and better prepared for the next training session. As your body adapts, you gradually increase the stress, and your performance increases as well. If you do not increase the stress, you won't see improvements; if you increase the stress too much or do not permit adequate recovery, you may see a decline in performance due to overtraining.
You can increase stress by increasing duration (time), frequency (number of days), or intensity (speed). When starting a program, it's always better to increase duration and frequency before intensity, and the increase should be gradual. This reduces the risk of injury and overtraining. You must be able to handle the distance before you worry about speed.
RECOVERY
Recovery is one of the most overlooked principles of training. The body needs adequate time be tween training sessions in order to rebuild. Cyclists worry about whether they trained hard and long enough, but many don’t pay attention to how much sleep they get, whether they are fully recovered from their last workout, or whether they're receiving proper nutrition. As a coach, I never have a problem getting my athletes to train hard, but I do have problems getting them to go easy on their easy days.
Proper sleep is a key factor to recovery, and the harder you train, the more sleep you need. You should sleep at least seven hours a night, and as much as ten if you're training many hours a day almost every day. If you often feel drained during the day, you may not be getting enough sleep.
Nutrition is another key recovery factor; it's essential for rebuilding muscles and replenishing energy used during training. Nutrition is important before, during, and after training sessions and races. See Section 13 for details.
OVERTRAINING
Overtraining is a syndrome in which a cyclist's performance decreases over time. Everyone has a bad day now and then, which doesn't mean they're over-trained, but a persisting decline can be considered overtraining.
Overtraining may be physiological or psychological in nature, or both. Physiological causes are usually tied to inadequate recovery and/or are brought on by a sudden increase in the volume or intensity of training beyond the body's ability to cope.
When a cyclist says he feels "burned out," he is psychologically over-trained. Psychological overtraining may occur due to the monotony of training itself, or due to stress in everyday life.
Physical and psychological stress can impair the function of the immune system, leaving the body open to illness and decreasing its ability to heal quickly. The good news is that exercise is a good way to relieve psychological stress.
The overload principle affects the body's immune system. Immediately following hard exercise, the immune system is functioning lower than normal, making the athlete particularly susceptible to illness. But the immune system bounces back, and with repeated training it becomes stronger overall, which decreases the risk of illness.
With overtraining, however, you run the risk of chronically impairing your immune system and in creasing your overall risk of illness.
Here are the main signs of overtraining:
__prolonged decline in cycling performance
__constant fatigue
__chronic illness
__bad attitude toward practice
__resting heart rate persistently higher than normal
__abnormal sleeping patterns
__overuse injuries
__changes in body composition or eating habits
If overtraining is suspected, take a few days to a few weeks to recover. In most cases, you need not take off more than a couple of days, and reducing your training for a short period will be sufficient. If you experience severe fatigue and weight loss, it may be illness and not overtraining; see a physician to make sure.
Overtraining can be avoided easily if the proper precautions are taken:
__Ensure adequate recovery between training sessions.
__Increase training gradually, avoiding large jumps in frequency, intensity, or duration.
__After a layoff period, avoid jumping back in where you left off. Gradually work your way back to the volume and intensity of your previous training.
__Ensure that you receive adequate sleep and nutrition.
__Listen to your body and act accordingly.
The longer you train, the more adept you'll become at determining when something isn't right with your body. One saying that I repeat over and over to my students and athletes is, "It's much better to be 10 percent undertrained for an event or race than 1 percent over trained."
SPECIFICITY OF TRAINING
Specificity of training means training the way you would like your body to adapt. In other words, to become a better cyclist, you have to ride. The adaptations that occur during aerobic training are specific to the stress placed on particular muscles. With training, the muscles in your legs will learn to fire efficiently in the specific patterns used for pedaling.
Although swimming and running will increase your cardiovascular endurance, neither will help your legs adapt as they need to for Cycling. It's OK to do a little cross training during the off-season to maintain cardiovascular fitness, but you still need to spend most of your training time on the bicycle.
There is also specificity among different forms of cycling. Track cyclists cover short distances as quickly as possible, without concern for energy conservation. They should train to maximize anaerobic power, concentrating on short distances and sprinting. Stage cyclists should spend hours and hours riding to build a strong aerobic base of endurance.
There is also specificity to bicycle setup. Your body adapts to your bicycle's seat tube angle, saddle height and fore-and-aft position, top tube length, crank-arm length, and stem length. Riding a bicycle with a different setup can negatively affect performance and even lead to overuse injuries.
If you have to make changes to your setup, do so slowly over a period of time. It takes a few weeks for your body to adapt. If the changes are drastic, you may experience a drop in performance for a short period.
A cyclist who had chronic knee pain asked me to evaluate his setup. I found that his saddle was far too low, which increased pressure on his knees.
We raised his seat to obtain a 25-degree knee angle.
His knee pain was relieved, but his performance declined. I advised him to stay with it, and after three weeks he was riding stronger than ever.
My colleagues and I conducted a study at the University of Alabama that found there is specificity between training on upright and aero handlebars. Triathletes who always ride in the aero position were found to be more economical and powerful in that position, and less so in an upright position, whereas pure cyclists who always ride with upright bars were found to be more economical and powerful in that position.
DETRAINING
"Use it or lose it" succinctly defines the important training principle of detraining. All of the training adaptations discussed in Section 10 are reversed without adequate stimulus to keep them in place. It takes a long time to gain your current level of fitness, but detraining occurs relatively quickly.
Among the many physiological changes that occur during detraining are losses in the following:
__Muscle strength and endurance. Known as muscle atrophy, this affects the speed and power you can produce in a sprint.
__Cardio-respiratory endurance. You won't be able to put in the long miles that you could before a layoff.
__Agility and coordination. This may affect your bicycle-handling skills.
The length of time that a cyclist is unable to train determines the amount of detraining that occurs. On occasion, not training for a couple of days, or training at a lower workload for a week or so, may be beneficial, allowing the body to recover from months of rigorous training. But after about a week of no training, a cyclist will start feeling the effects.
Detraining also is affected by the level of activity during the layoff. If you're injured but can cross train, you may be able to limit the severity of detraining. If you're completely immobilized due to injury, however, changes will begin within a few days. It's not unusual for a broken limb to lose half its muscle mass by the time the cast is removed.
The duration of the layoff determines the length of time it will take to come back. You may be able to bounce back relatively quickly from a layoff of a few weeks, but one of a few months will take longer. Of course this also varies from individual to individual. In any such situation, do not attempt to resume where you left off. Build back gradually to avoid overtraining and overuse injury.
CONSISTENCY
It is important to train consistently to achieve your potential. Inconsistency leads to poor performance and possible injury. Establishing a rigid training schedule can be difficult because it involves changing many aspects of your home, work, and social routines, but once established it becomes part of your daily routine and is easy to maintain.
Once a routine is established, many cyclists feel guilty if they miss their workout.
As discussed in Section 9, writing down your training program will help you establish a routine and maintain consistency.
FREQUENCY
How many days a week should you train? You need to ride at least three days a week to see significant gains; greater frequency leads to greater gains. For most cyclists, three to five days a week is sufficient. The most successful competitive amateurs and virtually all professionals train six or seven days a week, with one or two of those days being "active recovery." It is important to slowly work your way up to the desired frequency and refrain from doing too much at once. Beginners should start with easy rides two or three days a week, with a recovery day between each ride.
DURATION
Duration is how long or how far you ride during each session; it is measured either in time or distance (miles or kilometers). Gradually increasing duration is known as "building a base." As an en durance sport, Cycling is built on an endurance base. You must be able to complete the mileage of a race comfortably before you can work at becoming competitive.
Duration and intensity are inversely related.
You can’t ride a 50-mile race at the same intensity as a 10-mile one. As distance goes up, intensity must go down. If intensity is increased before a strong base is established, cyclists leave them selves open to injury.
Duration should be increased gradually-no more than 5 to 10 percent per week. If your "long" ride is 30 miles and you want to increase it to 60 miles, add 5 to 10 percent to your distance each week until you reach your goal.
The appropriate duration of training varies with a cyclist's goals. For racers, follow the 25 percent rule: your training distance should be at least 25 percent longer than your longest race.
If your longest race is 60 miles, your long rides should be at least 75 miles. If your long rides are 100 miles instead of 75 miles, so much the better. On the other hand, if the longest race you will ever do is 30 miles, then 100-mile rides, although definitely beneficial, may be overkill. Your main concern is to ensure against having an inadequate base. Can you imagine competing in a 60-mile race when your longest ride during the season was 40 miles? Although you may be able to complete the distance, you're looking at a very bad day off the back of the pack.
For recreational cyclists who want to participate in charity rides, the 25 percent rule is recommended, although it may not be necessary. If you want to complete your first "official" century, the fact that you can do 100 miles without hurting yourself should be sufficient, provided you maintain the same pace during the ride and do not start feeling competitive. That said, if you can do 125 miles without trouble, the century will be that much easier and possibly more enjoyable. It's possible to complete a century when your longest ride has been 60 miles, but you'll be hurting severely when you do. By completing at least one 100-mile ride prior to your first century, you'll know that your body is physically ready, and you'll have the psychological boost of knowing that you can finish.
Intensity
Intensity is the "how hard" of training. As mentioned, you should establish a good endurance base before you work on intensity.
Physiologically, there are only three intensity levels: below, at, and above anaerobic threshold.
Training below threshold should consist of long slow distance (LSD) rides and recovery rides, to build and maintain your endurance base. An LSD ride for a beginner may be one to three hours; for a pro it may be six to eight hours. Recovery rides promote active recovery and should be short and easy. Do not use your largest chainring on recovery days; stay in your small ring (or middle ring if you have a triple) to ensure that you do not overdo it.
You should finish a recovery ride feeling as though you could have done twice the work.
Training at anaerobic threshold is also known as tempo or race-pace training. After a warm-up, you hold a steady pace right at threshold for the desired distance, similar to a time trial. In the absence of competition, it's difficult to accurately simulate a race pace in practice. This is why scheduling races as "training" is an ideal way to improve performance. It also gives you an opportunity to work on tactics.
Training above threshold, also known as interval training, involves periods of high intensity followed by periods of recovery--for example, high intensity for 5 minutes followed by 5 minutes of soft pedaling, repeated five to ten times. You can also do longer high-intensity intervals--for instance, hard cycling for 10 to 20 minutes followed by 5 to 10 minutes of soft pedaling, repeated three to five times.
These are examples of structured intervals, but you can also train with non-structured intervals, such as when answering attacks. A group rides at an easy pace, then a rider attacks by sprinting off the front of the group. The others respond by bringing the attacker back into the group. The attacks happen randomly throughout the ride. At the end of an interval session on a hard day, you should be pretty thoroughly exhausted.
Most of your training--90 to 95 percent of total volume--should be below threshold, with the majority of that being LSD. Too many cyclists train at threshold almost every day. They may become good racing at that intensity but will never become great without a balanced combination of LSD and interval training to raise their threshold. They become chronically tired and frustrated by their lack of improvement, and eventually their performance declines.
I once coached a mountain bicycler who trained hard every day. He consistently finished in the top three in the sport class but could not improve be yond that. For a year I tried to convince him that he was training too hard. When his performance began to decrease, he finally took my advice and, by the following year, he had moved up from sport to expert class and was consistently finishing in the top ten.
In general, cyclists should have no more than one or two "hard" days a week at or above thresh old. Beginners should not worry about hard days at all until they build a strong base. In the beginning, cyclists will see increases in speed without high-intensity workouts. Building a base strong enough to support a serious high-intensity pro gram may take one to two years. With specific periodization, professional cyclists can have three or more hard days a week, but average riders can’t handle that amount of intensity.
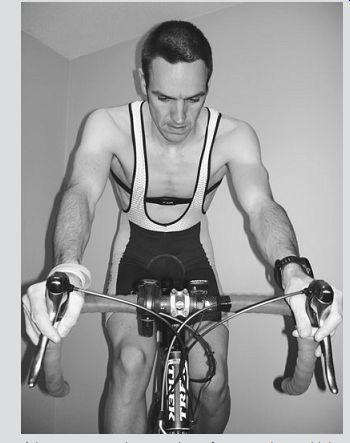
Determining Intensity Using Speed
Because intensity plays a key role in a training regimen, it's important to measure it. Four methods of measurement are common--using speed, heart rate, power, and "feel"--but only the latter three are really effective.
Speed is not an effective measure of intensity because it's so easily affected by wind and terrain. The intensity of a cyclist maintaining a given speed will be decreased by a strong tailwind or a downhill, and vice versa for headwinds and uphill.
Speed is also influenced by whether a cyclist is riding alone or sheltered in a group.
Speed can be used as a marker set by riding a familiar course at race pace, but this is a measure of performance, not intensity per se. To use speed as a marker, record the temperature, the wind speed and direction, the time it takes to complete the course, and the average speed. Given equivalent conditions, it should be easy to monitor improvements in performance. But do not try for a personal best every time you ride the course. Re member that most of your training should be at a slower pace.
Determining Intensity Using Heart Rate
Heart rate is a better indicator of intensity, but it must be measured accurately. It's possible to count your heart rate while riding by finding your pulse at the carotid artery (in your neck) or the radial artery (in your wrist), but this is difficult, possibly unsafe, and often inaccurate. And as intensity increases, these factors become even more problematic. Nonetheless, beginners who need only a rough guide may find it acceptable. Once you find your pulse, count for six seconds and multiply by ten to get your heart rate in beats per minute. If you miss just one beat while counting, you may be off by 10 to 20 beats per minute (bpm)--a large discrepancy.
Using a heart-rate monitor while riding is easier, safer, and much more accurate. Heart-rate monitors are available for as little as $40 at bicycle shops and general sports retailers and online. Get one that allows you to program in training zones, or pairs of upper and lower heart-rate limits. An alarm sounds when your heart rate is outside the zone you have selected.
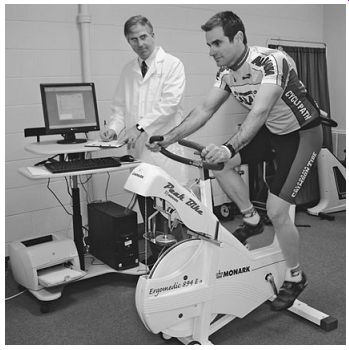
Determining Maximum Heart Rate
To use heart rate as a training tool, first you must know your maximum (max) heart rate. Several methods to find this are described below; all of them involve the use of a heart-rate monitor. In all methods, conduct the test when you're well rested and well hydrated, and be sure to spend 10 to 20 minutes warming up and 10 to 20 minutes cooling down. To capture your true max heart rate, you need to give everything you have during the test. It can be helpful to have friends along to encourage you.
__Indoor cycle ergometer. After your warm up, begin pedaling at your normal training cadence. Then increase resistance on the ergometer by 0.5 kp (kilopond; 1 kp represents the force applied by the mass of 1 kg) every three minutes while maintaining your pace. When you can no longer continue, you will have reached your max heart rate.
__Hill repeats. Find a hill a half mile to a mile long. After warming up, pedal up the hill as hard and fast as possible. Repeat three to five times with a two-minute break between each set. By the last climb you should have reached your max heart rate.
__Repeated sprints on flat ground. After a warm-up, complete three to five sprints at an all-out effort. The sprints should last two to three minutes. Watch your heart rate after completing the sprint because it may continue to rise before it begins to fall. By the last sprint you should have reached your max heart rate.
__Monitoring during a race. You had better believe that if you're sprinting to the finish line, you will know your true max heart rate.
Repeat these processes more than once to eliminate spurious readings. These methods are demanding, and beginners should approach them with caution. If you've been sedentary up to this point, it's best to get medical clearance prior to starting.
I mention one more method to determine your max heart rate simply because it's out there as "common knowledge": subtract your age from 220 (for example, 220-35 years = 185 bpm). I discourage the use of this method because sometimes it's not even in the ballpark. According to the equation, my max heart rate would be 184 bpm, but my actual max heart rate is 201 bpm: I've seen it there on numerous occasions.
Using a Heart-Rate Monitor
A simple but acceptable approach to establishing your training zones relies strictly on heart rate max. Set the heart-rate monitor's zones to be tween 50 and 65 percent of your heart rate max for recovery rides, and between 60 and 80 percent for LSD rides. (Beginners should stay closer to 60 percent during LSD.) If you know the heart rate that corresponds to your current anaerobic threshold, you can get even better results. Setting the bottom end of the zone at 60 percent of heart rate max and the top end at 10 percent below the heart rate that corresponds with your anaerobic threshold ensures that you stay below threshold on your easy days (LSD and recovery rides). Heart-rate monitors are useful on hard days as well. If you know your heart rate that corresponds to your anaerobic threshold, you can ensure against going too hard early in a tempo ride or a race. Keep in mind, though, that during a race you'll have to respond to attacks and hills regardless of heart rate.
The monitor is, therefore, more useful when competing in a self-paced event, such as a time trial. You need to know your corresponding heart rate for the given distance of the event. Heart-rate monitoring can also be useful during interval training by ensuring that you receive adequate recovery between sets, which will allow for a more potent training session.
But the best use of a heart-rate monitor is to keep you easy on your easy days. Every time the alarm sounds, you know you need to back off. The exception is when climbing a steep hill, where it's usually unrealistic to stay below your heart-rate limit for LSD and recovery rides.
It is better to train within zones rather than attempt to maintain one specific target heart rate because heart rate at any given level of intensity can be somewhat variable. It can vary on a daily basis due to various factors such as hydration levels, and even during a ride. This latter phenomenon, known as cardiac drift, is marked by a slow heart-rate increase throughout the ride even though intensity has not changed. As a ride progresses, the body loses water through sweat. This draws down the volume of plasma in the blood, leading to a reduced blood volume. To keep cardiac output the same, the heart rate must increase to compensate for the lower stroke volume. The longer the ride and the hotter the day, the more the heart rate will drift.
One of the hardest lessons to learn is to let your Cycling buddies go on ahead when they're riding harder than you should for that day. Too often, a ride that has been represented as an easy day turns into a hammer fest, involving easy riding for the first mile or two, followed by an increase to race pace, attacks on every hill, and a series of sprints thrown in for good measure. My definition of an easy ride is one that allows you to hold a conversation and enjoy the scenery. Keep in mind that "easy" is relative, and one rider's easy conversational ride at 18 mph may be another's threshold.
---------------
MORE ABOUT HEART-RATE MONITORS
Athletic heart-rate monitors consist of two components, a transmitter and a receiver. The transmitter, a strap that's worn around the chest, contains a sensor that detects heart rate and a wireless transmitter that sends a signal. This signal is received and displayed by the receiver, which is worn on the wrist like a watch. (Earlier models used a wire between the two.) It's best to avoid pulse meters, in which the transmitter attaches to the finger or earlobe, because they're not as accurate.
Entry-level heart-rate monitors cost about $35, but you should spend a bit more to obtain at least two additional features not present on the cheapest units.
The first feature, discussed above, is programmable training zones that trigger an audible beep when you stray outside the set range. This saves you the trouble of constantly looking at the receiver. The other feature is a coded analog or digital signal between the transmitter and the receiver. When you ride with a group, chances are that more than one person is wearing a heart-rate monitor. If the heart-rate monitors are not coded, they may "cross-talk," or interfere with other signals. Your readings may be sporadic, or you might even pick up someone else's heart rate on your display. Heart-rate monitors with coded analog or digital signals eliminate this problem, as well as interference from overhead power lines that occasionally disrupts uncoded signals.
Two other useful features include:
__Energy expenditure measurement. This feature helps you track calories used while riding and resting. Awareness of calories used can help you refuel adequately before your next bout, and assist in weight management. This measurement is only an estimate.
__Data downloads. Garmin and Polar offer cycle computers that allow you to download heart rate and other Cycling data, such as speed, duration, distance, and pace, for analysis on a home computer.
----------- A heart-rate monitor consists of a transmitter, which is worn
around the chest, and a display receiver, which is worn on the wrist or on
the handlebars.
---------------
Determining Intensity Using Power
Power is defined as force multiplied by distance and divided by time. In Cycling, power deals with the amount of force that the cyclist applies to the pedals. Power is a good way to determine intensity because it can directly measure the cyclist's work during training. With the proper equipment, a cyclist who wants to train at 250 watts (W) can monitor and maintain that power level to elicit the desired intensity regardless of headwinds or tail winds that may significantly affect speed.
A 30-second Wingate test is often used to determine a cyclist's peak and mean power. The resistance on the cycle ergometer is set at 7.5 percent of the rider's weight in kilograms. The cyclist warms up for 10 to 20 minutes, then sprints as hard as possible for 30 seconds. Both peak and mean power, represented in watts, are recorded and can be used to calculate a power-to-weight ratio.
For example, an 80 kilogram (176 pound) individual produces peak power of 1,364 W and mean power of 530 W during a Wingate test. This equates to peak power of 17.05 W/kg (7.75 W/lb.) and mean power of 6.62 W/kg (3.01 W/lb.). Although these numbers are often used to compare cyclists, they are better markers of individual performance. Monitor peak and mean power through out your training season; if you can increase them, you will ride faster.
Both variables in this equation can be manipulated to increase your numbers, and most beginning cyclists need to work on both. Many cyclists, however, devote too much effort to losing weight and not enough to increasing power production.
Power production can be increased through specialized training on the bicycle and weight training in the off-season (discussed in Section 12).
---A 30-second Wingate test is used in laboratories to determine a cyclist's
power-to-weight ratio.
Determining Intensity by Feel
Some cyclists prefer to train by feel. Although this is a viable approach, it's a little more complex than it sounds. Cyclists who have been training for a while are so in tune with their bodies that they know their limits by the way they feel. During a race they push right up to their threshold and not beyond. This method is hard for beginning cyclists who do not yet have the base of experience to make these judgments. Accurately adjusting pace based on how you feel can be learned only through trial and error.
Paying attention to your breathing can help you determine intensity. During recovery rides your breathing should allow you to carry on a conversation easily; if not, you're riding too hard. During LSD training you should still be able to hold a conversation with nothing more than slight problems during longer sentences. During tempo training you should be able to get only a few words out. If you can say more than one or two words during your intervals, you're definitely not pedaling hard enough.
You can also determine intensity by using a rating of perceived exertion (RPE) scale. The Borg scale, the most commonly used one, ranges from 6 to 20. A rating of 6 is equivalent to soft pedaling down a hill. At a rating of 13 to 15, you will be at your threshold. At a rating of 20, you would feel as though your legs were breaking off and you were about to puke and black out. Although it takes some time to be able to dial in this scale to your own intensity levels, research has demonstrated that, with practice, most people can reproduce the scale on command, as long as the conditions are the same. The best way to dial in the Borg scale is with a graded exercise test on a cycle ergometer, beginning at 6 or 8 and ending at 20.
-----------
POWER METERS
There are currently four methods of measuring power available to the consumer. All of them measure power on the bicycle and send the information to a handlebar mounted computer for interpretation and display:
__SRM crankset. Measures power through strain gauges in the crank arms.
__Power Tap hub. Relies on a strain gauge and replaces the regular rear-wheel hub.
__Ergomo Sport bottom bracket. Measures force applied to the bottom-bracket spindle.
__Polar Power System. Measures chain speed and tension, and can be used in conjunction with specific models of the company's heart-rate monitors. This appears to be the least accurate and reliable method of the four.
By the time this guide is in print, a new power system should be available from Micro-Sport Technologies.
The Revolution Power System measures power at the pedal/shoe interface. In theory this system should be relatively accurate, but the product had not yet been tested independently when this guide was being written.
For more details on setting intensity using power, read Training and Racing with a Power Meter, by Hunter Allen and Andrew Coggan. The authors explain the importance of measuring power for training, detail methods of measuring power, and suggest how to put the information to good use.
Using heart rate and power output in combination is probably the best method of monitoring intensity. Power Tap hubs and SRM cranks allow you to measure heart rate and power, and download the data to a PC. These units are somewhat costly, but if your goal is to reach your true genetic ceiling, I can think of no better tool.
Keep in mind, though, that these are all just tools to assist you in your training. They won't make you a better cyclist if you do not train. And if you do not use them to analyze your training and make adjustments accordingly, they are nothing more than expensive gadgets.
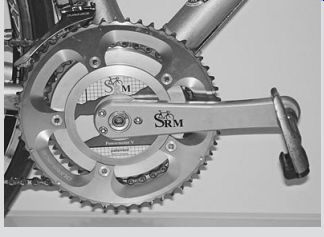
----- SRM cranksets are used to monitor power output while Cycling.
--------
FLEXIBILITY
Flexibility is the ability to move each joint through its full and proper range of motion-something that many cyclists overlook as an essential aspect of fitness. Lack of flexibility can’t only limit performance, but it can also lead to injury. A cyclist riding at a pace of 90 rpm makes 21,600 pedal strokes over four hours. Other than standing out of the saddle once in a while and shifting slightly fore or aft on the saddle, cyclists maintain a relatively fixed position with a relatively small range of motion over long periods. Without an active flexibility program to counteract this, cyclists inevitably lose flexibility.
Stop reading right now and see whether you can touch your toes without difficulty. How tight are your hamstrings? I'm willing to bet that most readers will not get even close. (It doesn't count if you bend your knees.) Following are the essential stretches you should do to improve your flexibility for Cycling.
When performing them, don’t stretch to the point of pain; that will lead to injury. (If you want to feel burning and pain in your legs, do intervals or hill repeats.) Instead, stretch until the muscle is tight and you feel mild discomfort. Hold it there for 15 to 30 seconds; relax, then repeat two to four times.
This is known as static stretching. Learn to relax into the stretch and let gravity do the work for you. Don’t use ballistic stretching, in which you bounce or otherwise use momentum to stretch further; this can lead to injury.
Quadriceps Stretch
One of the biggest mistakes people make when stretching the quadriceps (thigh muscles) is to push the heel of the foot into the gluteus maximus. This places too much pressure on the knee. Instead, while standing, hold your left ankle with your right hand and pull up and back. This stretches the quadricep muscles without putting excessive strain on the knee. Repeat with the opposite ankle and hand.
Hamstrings Stretch
This movement should be conducted seated. (If done standing, you risk becoming light-headed and falling on your face.) Sit on the floor with both legs stretched out in front of you. Relax, lean forward, and with both hands grasp as low as possible on your legs. This movement also stretches your back. If you can, grip your toes and pull back to stretch the calves as well.
Adductors Stretch
This movement stretches the adductors (muscles located on the inside of the leg). Sit on the floor and bend your knees so you can place the bottoms of your feet together in front of you. Pull your feet toward your body and push down on your knees with your elbows.
Calf Stretch
To stretch the gastrocnemius muscle (one of two muscles that make up the calf), stand on a low, stable platform and place the toes and ball of one foot on the edge of the platform with the heel hanging off. While keeping the knee straight, drop the heel of that foot downward until you feel a slight stretch. Repeat with the other leg. To stretch the soleus (the other muscle in the calf), put a slight bend in the knee. Do this exercise both ways to fully stretch the calves.
Hip Stretch
Sit on the floor with your right leg out straight in front of you and your left leg bent at 90 degrees.
Cross your left leg over your right leg, placing your left foot on the floor on the outside of your right knee. Place your right arm over your left knee and apply pressure to the left leg at the knee.
You should feel the stretch in your left hip. Repeat with the opposite side.
Here's a second method. While lying flat on your back, bend your right knee and place your hands on your right shin just below the knee. Bring your knee toward the chest and stretch. Leave your left leg extended. Repeat on the opposite side.

--------- Quadriceps stretch. Hamstring stretch. Adductors stretch. Calf
stretch.
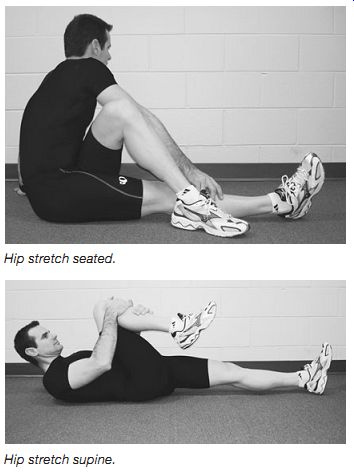
---- Hip
stretch seated. Hip stretch supine.
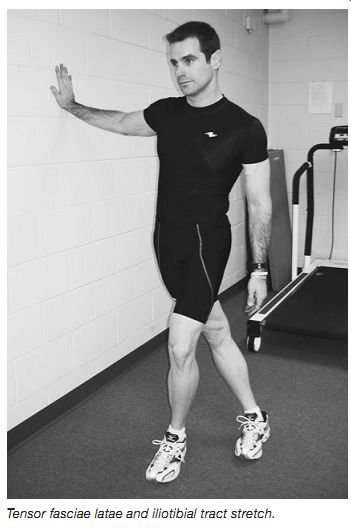
---Tensor fasciae latae and iliotibial tract stretch.
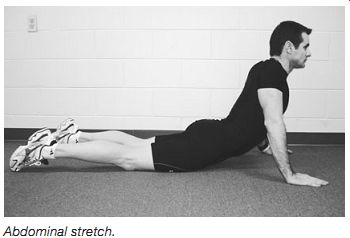
---Abdominal stretch.
Tensor Fasciae Latae and Iliotibial Tract Stretch
The tensor fasciae latae runs down the lateral aspect (outside) of the leg. This muscle is important in directing the leg forward and resisting external rotation as the hip is flexed. Cycling can cause this muscle to become tight, which can lead to biomechanical errors at the hip and knee.
To stretch this muscle, stand perpendicular to a wall a little less than an arm's length away. Cross the leg that's closest to the wall well behind the other leg, then extend your arm fully and push your hip toward the wall. You will need to adjust your position until you can feel a slight stretch along the outside of the back leg. Repeat with the other side.
Abdominal Stretch
Lie facedown on the floor and place your palms on the floor at shoulder level and shoulder width apart. Slowly push your upper body upward while leaving your lower body on the floor. Do this care fully; too much hyperextension can cause the spinous processes (boney protrusions of the vertebrae) to rub together and can lead to lower-back problems over time.
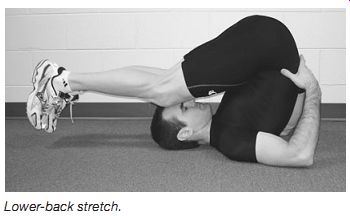
----- Lower-back stretch.
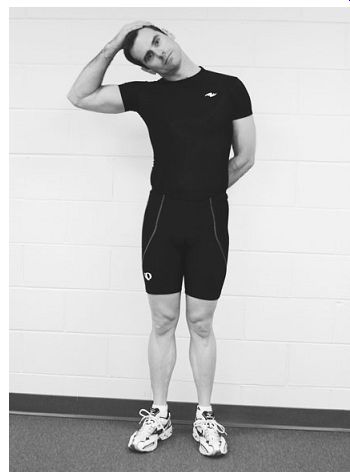
---- Neck stretch.
Lower-Back Stretch
Lower-back flexibility is important in cycling, especially when trying to achieve a comfortable aero position. For this stretch, lie on your back on the floor; bring up your legs and hips, and roll your body to shift your weight onto your shoulder blades. Continue to bring your lower body up and over your head until you feel a light stretch in your lower back. You can place your hands on your hips or keep them on the ground for support, whichever is more comfortable.
Neck Stretch
During cycling the neck remains in a slightly ex tended forward position, with little movement, for a prolonged period. This makes it extremely important to work on neck flexibility. Do all three of these stretches for three different ranges of movement:
1. Rotate your head to the left; hold for 15 to 30 seconds, then repeat to the right.
2. Flex your head toward your chest and hold for 15 to 30 seconds, then extend your head back and hold for the same amount of time.
3. Tilt your head to the left and hold for 15 to 30 seconds, then repeat to the right.
You can perform these stretches with no assistance, or you can use your hands, a towel, or a partner to assist. If you do use any assistance, be gentle and move slowly to prevent injury.