This is mostly a guide about bicycle maintenance. But proper care of the machine is far from the entire story of making bicycling enjoyable, safe, and useful.
Good bicycling involves the rider, not just the ma chine. The bicyclist is not only the driver but also the engine, and weighs four to ten times as much as the bicycle. A bicycle steers quickly but is smaller and usually slower than other vehicles on the road. Clearly, bicycling requires some special skills.
Yet these skills are infrequently taught; most people haven’t been exposed to them. Rather, people have been exposed to a long tradition of poor information.
From 1900 to 1950, as automobiles gained popularity, bicycling became almost entirely a children’s pas time in the United States. As a result, bicycling was “taught” to children by parents and teachers who had not ridden for many years.
This type of teaching is folklore—beginners’ advice, less and less accurate as it’s passed down from one generation to the next and anchored in parents’ fear for the safety of their children.
It’s right for beginners’ advice to consist mostly of cautions. We advise a child not to go into water over his head, but this would be useless and insulting advice for a Red Cross—trained swimmer or certified scuba diver.
Though much information is available about the athletic and mechanical sides of bicycling, even experienced bicyclists often have little knowledge of maneuvering skills or traffic tactics. It’s the purpose of this section to improve performance beginning with the rider.
The advice given here in condensed form is drawn from the tested and proven Effective Cycling program of instruction—the bicyclist’s equivalent of a Red Cross water safety course.
The Effective Cycling program equips its graduates to use the bicycle safely and confidently under almost any condition of terrain or traffic. Graduates have a proven accident rate one-fifth or less that of the aver age American adult bicyclist. For more details about the program, see the list of bicycling organizations later in this section.
GETTING STARTED
If you need to teach a child to balance and steer a bicycle, lower the saddle and remove the pedals. Have the child “scooter” down a slight grade. If the bike has handbrakes, the child can use them gently to slow and stop; otherwise he can drag his feet. Or you can teach the child to balance on a platform-type scooter. Scootering is easier than learning by falling off or with training wheels.
Once the child has learned to balance and steer, he can work on developing the most power for the least effort.
Efficient Riding Position
An efficient position on the bicycle, described in Section 2, divides the body’s weight evenly among the feet, hands, and rear end and positions the weight of the upper body to help the legs in pedaling.
At first you may wish to raise the handlebar stem slightly, but within a few weeks, the neck strengthens to hold the head up even on longer rides. The bolt upright “bulldozer operator” position favored by beginners sends road impact straight up the spine and makes you work twice as hard; you have to pull on the handlebars to push with your legs.
Efficient Pedaling
To many beginners, pedaling a bicycle feels like climbing stairs. Beginners often think they are getting good exercise by pushing hard—like weightlifting. They think that other bicyclists who pass them, feet spinning, are pushing even harder—super-athletes. This misconception prevents many beginners from developing as bicyclists.
Shift to a lower gear; pedal lightly and fast. The people with spinning feet are not working harder. They are working less.
When you walk, your legs swing like pendulums, at a marching beat of about 60 per minute. When you ride your bicycle, your legs are like the connecting rods in an engine, and can turn at any speed. By turning faster in a lower gear, your legs put out more power, without straining. You will go faster, while getting much better exercise for your lungs and heart. This will feel so good that you will want to ride farther. Work at 50 or 75 percent of maximum power output so you don’t over heat or tire out.
Save heavy pedal pressure for the few short bursts of acceleration you need during a ride. After all, you can lift a heavy barbell only a few times before you tire out; but you will turn the crank about 2,000 times in a 5-mile ride!
Having learned to pedal fast, anybody in normal good health can build up over a couple of months to ride 100 miles in a day and enjoy it.
Toeclips:
Use toeclips and straps, or a locking shoe-pedal system, to make fast pedaling easier by keeping your feet mated to the pedals. These also reduce the chance of an accident by preventing your feet from slipping off the pedals.
You must practice a few times to learn to get your feet into toeclips. Strap one foot in before you start, then step up to the saddle as described in Section 2. When your other foot is in position, flip the other pedal up with your toe to insert your foot. If it doesn’t flip up on the first try, ride along with the pedal upside down until you build up enough speed to coast and try again.
Beginners are afraid that they won’t be able to re move their feet from toeclips if they have to stop or dismount quickly. You must simply learn to pull your foot back instead of to the side. If your foot gets stuck, you will fall sideways—but this is rare and happens only at a very low speed. It’s more funny than painful. With locking shoe-pedal systems which substitute for toeclips and straps, inserting and removing your feet is even easier.
Shifting Gears:
Practice shifting gears until your feet always spin at the same speed with the same effort. Shift down before you come to a hilt and before you stop for a traffic light. If your bicycle doesn’t have gears low enough to master the hills where you ride, this guide has information on how to improve them.
Refueling:
With correct pedaling technique, bicycling is very easy on the muscles. A marathon runner is sore and exhausted after two hours, but with proper attention to food and water intake, a bicyclist can keep going until he must stop for sleep.
To ride more than an hour or two, you must refuel. If you don’t drink, you will become parched. If you don’t eat, you will suddenly become very hungry or else run out of energy and have to stop. But you must “meter” your supply of food and drink. If you eat a big meal or hard-to-digest, greasy foods during a ride, your legs will fight with your digestive system over the blood supply, arid you will get a bad stomachache.
Eat plenty the night before a long ride, but have a moderate breakfast. During the ride, eat before you are hungry and drink before you are thirsty. Sip from your frame-mounted water bottle and nibble small snacks of easy-to-digest unsalted sweet or starchy food; pas tries, Fig Newtons, fruit. Drink plain water—not soft drinks, milk, or other beverages which actually absorb water out of your system. Proper “in-flight refueling” will keep you going all day.
TRAFFIC SENSE
To ride a bicycle safely and enjoyably, you need to know how to maneuver on the road.
A bicycle on the road moves most smoothly and safely according to rules of traffic flow which are the same for all vehicles. But because a bicycle is narrow and comparatively slow, the details of applying these rules are different sometimes.
Where to Ride on the Road
Traffic on the road divides up according to its speed. Slow vehicles keep to the right, and faster ones pass on their left. A bicycle usually keeps more or less near the right side of the road, but your correct lane position also depends on whether the right lane is wide or narrow.
These words have a special, exact meaning for bicyclists. In a wide lane, a car can pass the bicyclist without swerving. In a narrow lane, a car must merge partway into the next lane to pass the bicyclist. The distinction between a wide and narrow lane depends to some degree on conditions such as the speed of traffic and the smoothness of the road surface.
In a wide lane, ride 3 or 4 feet to the right of where the cars go. Then they can pass you safely without having to merge into the next lane. A typical two-lane highway without shoulders is just wide enough for this.
If the lane becomes extra-wide, keep the same position just to the right of the cars. Don’t move all the way over to the curb just because there is extra room. A very common type of car-bike collision happens when a car overtakes a bicyclist from behind, then turns right. If you are way over at the curb, you won’t see the car until it’s broadside in front of you. If you are closer to the car, you will see it begin to turn. You can turn with it and avoid the accident.
Gauge your lane position on the left side of the lane, not the right side. The common “folklore” instruction is to ride as far to the right as possible. This is dangerous advice. A bicyclist who follows this advice wanders left and right with every pothole. It’s much safer to ride in a predictable straight line.
Be especially careful not to weave in and out be tween parked cars. As you duck in past a parked car, it hides you from drivers behind you. Then you pop out again. Surprise! Instead, keep a straight line 3 feet from parked cars, out of the reach of opening car doors. At normal bicycle speeds, you could not stop in time if someone opened a door— you would be forced to swerve out in front of a moving car or else hit the door.
Riding in a straight line also helps keep you clear of road-edge hazards such as potholes and trash. These can cause accidents and at the very least can give you lots of flat tires. The “gutter” style of riding is unsafe, even though the people who do it think they are doing the safe thing.
What if a lane is too narrow for a car to pass you? Then you must control the situation. Usually, This means that you must ride in the middle of the lane. Drivers of cars will then have to merge into the next lane to pass you safely, or else slow down and wait until there is room to pass.
This may seem like daring advice, but think about the opposite choice: You could ride all the way over at the right side, as many bicyclists do, inviting drivers to pass you even though it isn’t safe. This is how bicyclists get squeezed off the road, when motorists try to pass and then find that there isn’t room.
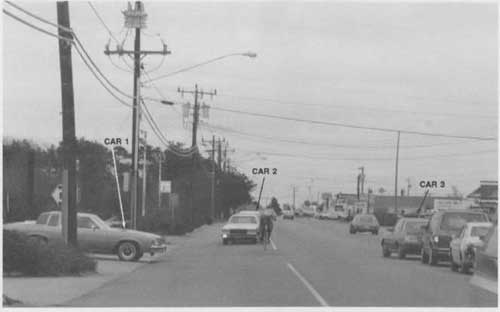
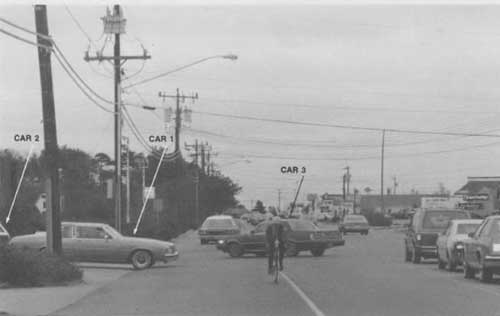
TRAFFIC SENSE: In an extra-wide lane, ride at the right side of the
through traffic—not all the way over at the curb. Car 1 noses out from a driveway
so the driver can see; but this car does not block the bicyclist. Car 2 passes
safely to the bicyclist’s right, instead of cutting him off. Car 3’s driver
can see the bicyclist and yields to him, since the bicyclist is in the normal
flow of traffic.
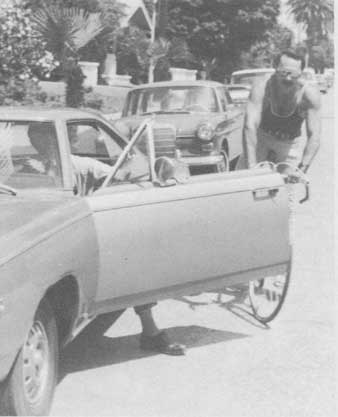
Don’t ride too close to parked cars, or your only choice may be to swerve
left into the path of an overtaking car.
You have a legal right to the road space you need for your safety. If cars have to wait behind you for a long time, courtesy and the law require that you pull aside when safe and let them pass—but you need to do this rarely, since your bicycle is narrow. Farm tractors and slow-climbing trucks have to pull aside more often, since they block the road more than a bicycle.
In traffic at normal city speeds, you will have to stay in the middle of a narrow right lane all of the time to hold your position in traffic. This isn’t as difficult or daring as it seems, because the motor traffic is only going 10 or 15 miles per hour faster than you.
On a multilane road, it’s especially important to claim a narrow right lane, since motorists are less careful about squeezing past you when they are not risking a head-on collision. If your position makes it clear that they must merge into the passing lane, they will treat you the same as a slow car in the right lane.
On a narrow two-lane rural road with lighter, faster traffic, there’s no need to ride in the middle of the right lane all of the time. By keeping farther to the right, you extend a courtesy, letting cars overtake you without having to swerve as far. But if cars are approaching from the front and rear at the same time, you must claim the lane, moving farther toward its center to prevent drivers behind you from overtaking you unsafely.
Curves and Hilltops
On a curve to the right which is blocked by a wall or bushes, you need to adjust your lane position so motorists can avoid you. If the lane is wide, keep well to the right so motorists will have plenty of room.
If the right lane at the blind curve is narrow, ride at its center or left, so motorists from behind can see you in time to slow and follow you. At a curve in a narrow lane, motorists behind you must slow and follow, in case another car is coming from the front. Keeping all the way to the right is the worst thing you could do, because it would guarantee that motorists behind you would see you too late to avoid you.
Even when the curve in a narrow road is to the left, you may need to claim the lane or make a slow signal (arm down, palm facing back) to a driver behind you, in case a car might be coming from the front. When notice that the road is clear around the curve, you may wave the driver past you.
Climbing slowly up a hill, you need less room to stop or swerve. Pull farther to the right, to let cars pass you. As you go over the hilltop, you will be hidden from drivers behind you. Keep to the right until you have gained speed and enough distance so that drivers behind you will see you in time to avoid you.
As Fast as the Cars
As you continue down the hill, you may soon be going as fast or nearly as fast as the cars. Now move to the middle of the right lane. At high speeds, you need more maneuvering room, and you have to be farther from the edge of the road to see and be seen in time.
It’s especially dangerous to ride along on the right side of a car which is traveling just as fast as you. You are in the driver’s right-side blind-spot. The driver could easily drift a few inches to the right, forcing you off the road at high speed. It’s much safer to take your position in the line of traffic. After all, you aren’t delaying the motorists. You are traveling as fast as a motorcycle, so ride the same way as a motorcyclist.
The same rule applies when cars are moving slowly— For example, on a crowded city street. Ride in the middle of the lane as long as you are keeping up with the car ahead of you. If it speeds up, return to your normal lane position. If it slows down, then you will pass it on the left as any other driver would.
The idea behind the lane positioning rules is to be as predictable and visible as possible, and to place your self out of range of hazards hidden in road-edge blind spots. Especially where the road is “walled in” by parked cars, bushes, or other objects, stay out of the road-edge strip where a pedestrian, car door, or car nosing out of a driveway could suddenly appear in front of you.
On rural roads, put yourself in the place of a driver a few hundred feet behind you; do what you must so this driver can see you and avoid you. This is especially important at hillcrests, on curves, and where lanes get narrower. The rules given above are a good starting point, but use your own good judgment in applying them.
Changing Lane Position:
When conditions require you to move farther into the lane, you must prepare in advance so that you can make the move safely.
Don’t wait until the last moment and then try to move over. Look ahead a few hundred feet for situations which require you to move farther into the lane— For example, a double-parked car. When you see one, glance back for traffic. If there’s no car in the lane, make your change in lane position. If a car is close and gaining on you fast, wait until it has gone by.
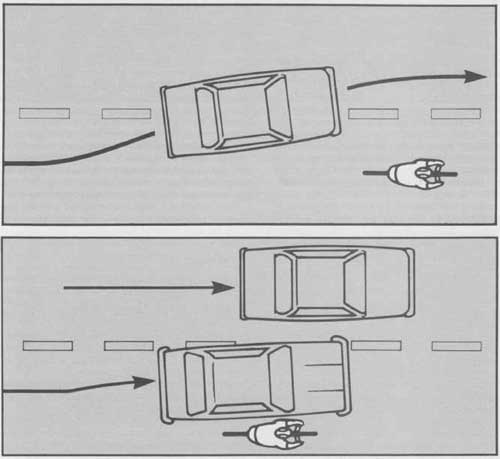
Ride in the middle of a narrow lane. As shown in the top drawing, motorists
will then overtake you in the next lane. Riding at the right side of a narrow
lane invites the “squeeze-out,” as shown in the lower drawing.
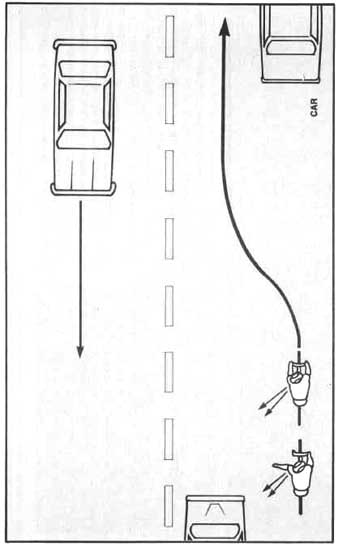
Well before you reach a parked car or other narrow spot in the road,
oak back and signal to a motorist behind you. Move left only after you have
checked that the motorist has made room for you.
When there’s a car far enough back for the driver to react, communicate with the driver. Put out your hand for a turn signal. Give the driver a couple of seconds to see your signal, then look back again. Most drivers will slow down or move to another lane to make room for you.
The hand signal is a question: “Will you let me into line?” Change your lane position only after you take a second look back and get the driver’s answer.
Most drivers will cooperate with you. If the driver behind you does not, it’s wiser to deal with someone in a better frame of mind. Wait till the car has passed and try again with the next driver. That’s why you started preparing the lane change extra-early.
This procedure for changing lane position is the only safe way. You establish your position in a predictable way, after checking that it’s safe. Compare the way many bicyclists approach a narrow spot in the road: staying “glued” to the right curb, then darting out at the last moment.
If you are not used to looking over your shoulder, practice it in an empty parking lot. Ride along a straight painted line while glancing back. Since your organs of balance are inside your ears, it takes a little practice to learn to turn your head without swerving. It helps to think about keeping the handlebars straight while turning your head.
Swiveling your head in an upright position is some thing of a neck stretch. Ducking your head sideways from a low handlebar position is easier, though it takes a little while to get used to the sideways view of the road behind you. Dropping your left arm from the handlebar makes it easier to turn around. Some riders glance under the arm when in dropped position.
Just make sure you look all the way behind you; the exact style doesn’t matter. Don’t rely on your hearing, or a rearview mirror. Wind noise can drown out a car, not to speak of a silent bicycle behind you, and any mirror has blindspots. The mirror can often tell you that it’s not safe to change lanes, but can’t tell you that it’s safe.
Intersections:
Where streets cross, traffic on one street must have right of way over traffic on the other, to prevent false starts, confusion, and accidents. Where heavily traveled streets cross, traffic signs or signals determine right of way.
Where there are no signs or signals, the traffic on the larger, more important street has the right of way. Yield when entering a road from a driveway, or a main road from a side street. When two vehicles reach an unsignalled intersection or four-way stop sign at the same time, the law makes the one on the left yield, since it has an extra half road-width to stop.
So far, these rules are the same for bicycles as for cars. The remaining instructions are a little bit different, because bicycles are narrower.
The key to smooth, safe travel through an intersection is to approach it in the correct lane position, de pending on which street you will take out of the intersection—right, left, or straight. To arrive at the correct position for the direction you want to go, you use your lane-changing technique. No matter which street you will take out of the intersection, you want to position yourself with the flow of traffic headed for that street.
A right turn is easy: Just stay at the right side of the street and go around the corner. Before you reach the intersection, look for pedestrians and for cross traffic. You must yield to them—they have the right of way, unless a traffic light or sign commands them to wait for you.
When you are going straight through an intersection, you usually should not keep all the way to the right of the road. Position yourself to the left of a right-turn lane. On a two-lane street, glance back, then pull slightly away from the right side so right-turning drivers will pass on your right.
A very common mistake is to ride along the right curb, then head straight out across the intersection into the path of a right-turning car. Bicyclists who make this mistake give themselves away by complaining that cars cut them off as they try to ride across inter sections.
Left turns take the most preparation, because you must cross the most lanes. Make your left turn from the right side of a special left-turn lane, or the left side of a left-and-through lane. If there is no special left-turn lane, make your turn from near the center of the street.
To reach the left-turn position, cross each lane in two steps. One step gets you across the lane in which you are riding, so you are at its left side. The next step gets you just across the lane line, to the right side of the new lane. Waiting to move across the lane line gives you a chance to look back into the new lane before entering it. At each step, look back, signal, and look back again to make sure that the driver behind you has made room for you.
This procedure works in city or suburban traffic, where cars travel up to 15 miles an hour faster than you. On high-speed highways, you may have to wait for a gap in the traffic and move across all of the lanes at once.
The secret of a left turn is all in the preparation. Once you have changed lanes to reach the correct starting point, the rest is easy. You move to the center of the street to deal with all of the traffic behind you before you reach the intersection. From the left-turn-lane position, you can then concentrate on traffic ahead and to the sides.
If you are not sure of your lane changing, it’s fine to walk a left turn. But be sure to come to a complete stop at the far right corner of the intersection. If you try to follow the right-hand crosswalks to make a left turn without stopping, you are asking for trouble. At the far right corner, you have to check for traffic in every direction at once. You don’t have 360-degree vision like a rabbit, so it’s not very safe. Besides, the left turn from the center of the street is easier and faster— you have to cross only half as many lanes of traffic.
The principles for making a left turn apply to other situations in which you must change lanes. Think them through as you approach each one. An example: A traffic circle is a two-lane, one-way road that swallowed its tail. It has several streets going off to the right and none to the left, so the right lane is a continuous right-turn lane. Ride around in the inner lane if you are going past the first exit, then change lanes back to the outside before you leave. You can handle other odd intersections by planning your lane changes in advance, this same way.
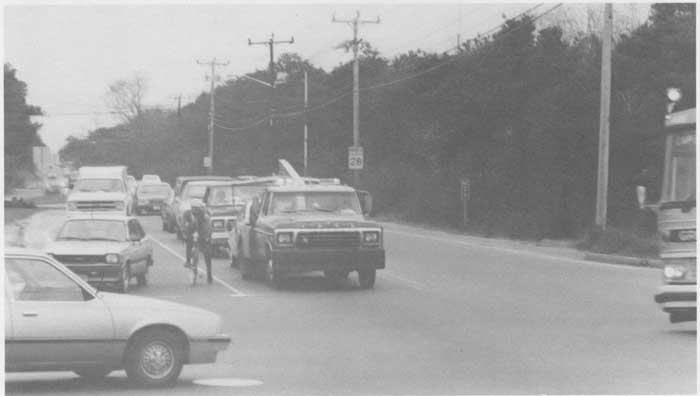
As you approach an intersection, keep to the left of a right-turn lane
to avoid conflicts with right-turning traffic.
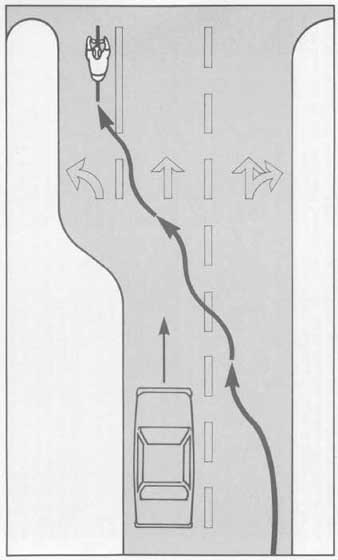
Move across each lane in two steps: one to cross the lane and another
to enter the new lane. As shown, turn left from the right side of a special
left-turn lane.
How to Pass Cars, Trucks, and Buses
Bicycles are sometimes faster than cars. Where a row of cars is waiting to make a right turn, or where a bus or truck pulls to the curb, you may have to pass.
Pass on the left, like other vehicles. This can be done safely and easily. Look back, and make your lane change well in advance, just as when you prepare for a left turn. Give yourself plenty of room.
Once you have passed, you may need to make a right-turn signal to indicate that you want to return to your normal lane position. Use your right hand—the left-hand-over-head right-turn signal makes sense only for people cooped up in cars.
A common mistake in passing a bus is to sneak along close to its left side, with the idea that it provides some sort of shelter—as if the serious danger is from cars coming from behind. It isn’t. As you pass the front end of a bus, a pedestrian could walk out into your path. Also, you are too close to the bus to be seen in the bus driver’s rearview mirror; and if the bus starts moving, it could begin to merge to the left, into you.
The solution is to pass in the next lane, at least five feet to the left of a long truck, bus, or any moving vehicle. At this distance, you are far enough away to avoid a pedestrian crossing in front of the truck or bus. You are where a passing car would be—where the driver of the truck or bus will look for you when preparing a merge left. If the truck or bus does start to move, you have time to slow down and fall back.
In a traffic jam in which cars are completely stopped, you may move up cautiously on the right or between lanes—but go very slowly. Remember, a car door could open at anytime, or a pedestrian could appear in front of you without warning. If there is an open lane, use it; and if the traffic starts moving, pull into line between cars even if This means that you must slow down.
It’s very foolish to pass a bus or long truck on the right, next to the curb. A passenger getting off the bus could land on your handlebars, or the bus could make a right turn and roll over you.
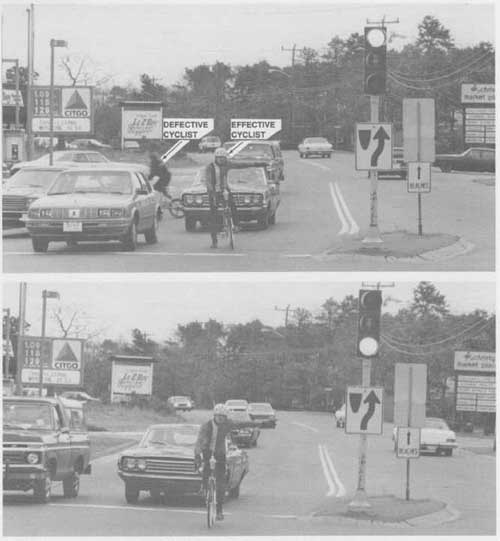
Make a left turn from near the center of the road. Then, as shown, you
avoid conflicts with through traffic. The bicyclist in the background of the
upper photo is weaving between cars in a way only too common.
For the same reason, never pass the first car waiting in line at an intersection. Wait behind that car, so that it cannot turn toward you as it starts up. If you are farther back in line, also wait between cars; then the car in front of you is no threat, and the driver behind notice you. Never wait beside a car, in the driver’s blind spot.
Anticipating Accident Situations:
The best way to avoid an accident is to prevent it—by correct maneuvering, and by testing that drivers have seen you. For example, as you approach an intersection where the cross street has a stop sign, look into the driver’s window of the first car in the cross street. A driver who is looking at you has almost certainly seen you. Also look to see that the car is slowing or stopping to let you by.
At night, wigwag your handlebars a little to flash your headlight at the driver, and watch for the car to Stop. Don’t go through the intersection until you have attracted that driver’s attention. Call out, look for the face in the window to turn toward you, watch for the car to stop.
Sometimes an aggressive motorist will try to out-bluff you by inching forward at a stop sign. Keep moving and keep pedaling——and 999 times out of 1,000, the motorist will stop and grant you your legal right of way. The 1,000th time, you can easily get out of the way of an accident. The necessary quick-stop and turn techniques are described a little later in this section.
The Basic Approach:
By now, the basic approach of the advice here should be clear: Be as courteous as you can, but give yourself room and space you need. Recognize that you have rights as well as responsibilities under the traffic law— you have the right to use the road, and the responsibility to be predictable and obey the law. Rights and responsibilities go together.
Most untrained bicyclists know the traffic law, but they have not learned the special bicycle maneuvers needed to ride correctly. They sneak along, weaving right and left at the edge of the road to stay in “shelter’ from the cars behind them as much as possible. It’s exactly this behavior which makes overtaking traffic dangerous. To avoid this danger, wear bright-colored clothing, use lights and reflectors at night, ride in a visible, predictable straight line, and check with the drivers behind you before changing lane position. This way, you also avoid the hazards of turning and crossing traffic ahead of you.
Sidewalks, Bike Paths, and Bike Lanes:
It may sometimes seem safer to ride on a sidewalk, to avoid traffic. But watch out! Sidewalks are too narrow for safe bicycle travel. Pedestrians can walk out in front of you from behind walls and bushes; there is too little room to avoid them.
Car-bike collisions are actually more common for a bicyclist on a sidewalk; a car driver in a side street or driveway will look only for slow pedestrian traffic, then cross the sidewalk. For bicyclists traveling on the left sidewalk, accidents are about ten times as common as when riding properly on the road. Most of these accidents happen when cars pull out of side streets.
If you must ride on a sidewalk—and sometimes you must—go slowly. Pedestrians can suddenly change direction, so get the attention of every pedestrian be fore you pass. Be aware of all blind-spots from which a car, pedestrian, or other bicyclist could enter your path.
Even “difficult” traffic patterns like a rotary intersection sort themselves out when you take the correct lane positions. The bicyclist is going around in the inner lane to avoid conflicts with entering and exiting traffic such as the cars just behind him.
A bike path can be pleasant if it takes you away from roads, into a quiet, scenic area where you could not otherwise ride. But many bike paths are no wider than sidewalks, and pedestrians use them—so they present the same problems as sidewalks. Also, untrained, unpredictable bicyclists ride more often on bike paths.
A bike path which parallels a street like a sidewalk is dangerous no matter how wide, because it creates the same conflicts with crossing and turning traffic as a sidewalk. Every accident study shows that this type of bike path is more dangerous than riding on the road.
Bike lanes painted on the street have been shown to have little overall effect on bicyclists’ safety—however, they do encourage bicyclists and motorists to make incorrect turns. Untrained bicyclists tend to make left turns from a bike lane without merging left, and motorists often make a right turn across a bike lane. If the correct maneuver requires you to change lanes out of the bike lane, then leave it. Painted stripes don’t change what you have to do for safety.
The reason for these problems is that very few high way engineers are bicyclists. Many highway engineers still think of the bicycle as a sidewalk toy. A meaningful program to improve bicycling would spend much less money on bike lanes and bike paths and much more on law enforcement and on bicyclist and motorist education.
AVOIDING HAZARDS—STEERING, BRAKING, JUMPING
Even with the best traffic tactics, people make mis takes sometimes—and you might find yourself headed for an accident. To be ready to avoid an accident, you must learn some basics about how your bicycle steers and brakes, and then practice until the maneuvers are second nature. Accident-avoidance maneuvers are not hard to learn—though most bicyclists have never heard of them!
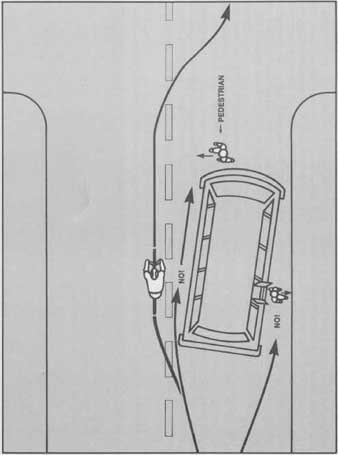
Give a bus lots of clearance, moving far enough away that the driver
can see you in the rearview mirror and that you will see a pedestrian coming
around the front of the bus. Never sneak along either side of a bus or any
vehicle.
Avoiding Bad Drivers: The Instant Turn
When you want to make a quick right turn in a car, you turn the steering wheel to the right. A bicycle is the same, isn’t it?
It isn’t. If you turn the handlebars quickly to the right, the bicycle will steer to the right and you will fall to the left. The car would also fall over if it had only two wheels.
But then how do you steer a bicycle at all? Maybe you guessed. If you want to turn right, you momentarily steer to the left. The bike goes left under you, and then you are leaning to the right. You whip the handlebars to the right to keep your balance, and presto, there is your right turn.
Normally, you don’t notice this; you use the bicycle’s normal slight weave to start a normal gentle turn. But in an emergency, you may need to force a turn.
Practice the instant turn, yanking the handlebars to one side, then recovering to turn the other way. At higher speeds, you need to turn the handlebars less, so practice carefully until you can quickly develop a lean of 35 to 40 degrees at any speed. This is near the limit of traction on clean, dry pavement. Remember to lift the inside pedal so that it doesn’t scrape on the road.
The instant turn is useful to avoid a car which makes an unexpected move. If a car coming toward you be gins a left turn, turn right to pass in front of it. If a car overtakes you from behind and then turns right, turn right with it. If a car pulls out in front of you from a side street, turn right into the side street.
A variation on the instant turn can help you if you find yourself going too fast on a downhill turn. Your instincts are to steer straight, to keep your balance. You must do exactly the opposite: Turn your front wheel slightly toward the outside of the turn, then back to deepen your lean and turn more sharply. Usually, your tires have enough traction to get you around the turn. If they let go, you will slide out on your side. That hurts, but it’s much better than going off the road headfirst.
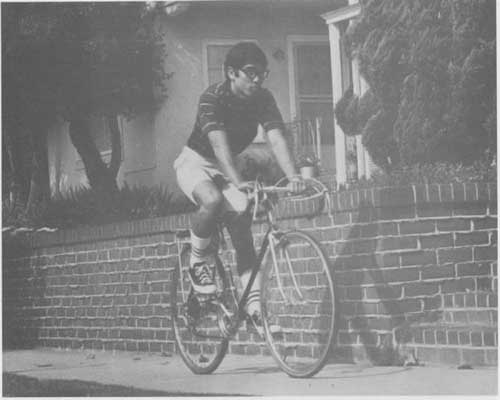
Blind intersections on a sidewalk require that you ride very slowly.
A small child or animal could step out unseen from the stairs at the right.
The young man would be safer riding properly in the street—and wearing a helmet.
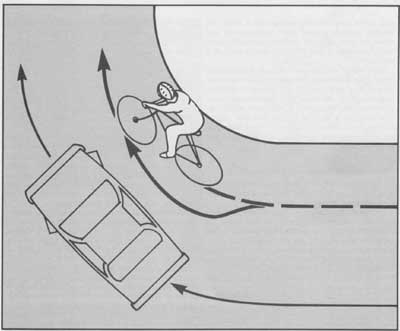
To make an instant turn, you must first turn toward the hazard you want
to avoid. The bicyclist yanks the handlebars to the left to avoid the right-turning
car.
Avoiding Road-surface Hazards: The Rock Dodge
Small bumps in the road are no serious problem. The bicycle’s air-filled tires will “swallow” bumps which are too small to crush the tires flat against the rims. Hold the pedals level, rise off the saddle, and flex your arms and legs to cushion the ride.
You must scan the road surface for hazards which could cause a fall or damage your bicycle. If a bump is high enough to reach the rim, you must avoid it by dodging, jumping, or in an extreme case, getting off and carrying the bike.
Suppose that you see a rock on the pavement just in front of you—but you can’t change direction to avoid it:
You would go off the road or in front of a car. Then you must use the rock dodge, a maneuver related to the instant turn.
You start the rock dodge just as you do the instant turn, by yanking the handlebars to one side. The bicycle steers around the rock, but it’s off balance. You then quickly over-steer in the opposite direction, farther than with the instant turn, so that you recover balance and direction. In a well-done rock dodge, your bicycle weaves quickly to one side and then to the other, but your body continues to travel in a straight line. With the rock dodge, like the instant turn, practice makes perfect.
Railroad Tracks and Storm Grates
A crack or step in the pavement nearly parallel to your line of travel is more serious than a bump. For example, diagonal railroad tracks can steer your front wheel out from under you and drop you to the pavement. Look behind for traffic, then turn to cross at a right angle.
Even worse than railroad tracks is a parallel-bar sewer grate or bridge expansion joint. Your wheel can fall right in. A steel-grating bridge is very treacherous; when wet it can steer you as if you were on tracks, preventing you from balancing. Wet leaves, a wet man hole cover, or a patch of oil can drop you; as you approach such a hazard, slow down, ride straight with out braking or pedaling, and be prepared to put a foot to the pavement.
Braking—The Emergency Stop
To understand bicycle brakes, try a little experiment. Walk next to your bicycle with your hands on the brake levers, rolling it forward.
Then apply the rear brake. The rear wheel will lock and skid. Apply the front brake. The front wheel will lock and the rear wheel will lift off the pavement. The same can happen while you are riding.
When you apply either brake, weight transfers to the front wheel, making the rear wheel skid easily but keeping the front wheel from skidding. For this reason, the front brake is much more effective than the rear brake. But because of a bicycle’s high center of gravity, applying the front brake too hard could pitch you over the handlebars.
For an emergency stop on a bicycle, you must apply the front brake as hard as possible without pitch-over. There’s a trick to this.
Squeeze the front brake lever three times as hard as the rear brake lever. Increase braking force until the rear wheel just begins to skid. The skidding is your signal that there isn’t much weight on the rear wheel, so reduce front brake force slightly. Continue to adjust front brake force up and down to keep the rear wheel just on the edge of skidding.
This braking technique eliminates the risk of pitch- over, and will stop you in two-thirds the distance you would need using both brake levers equally. Because the usual, incorrect advice leads to a lot of skidding, and fear of the front brake, most bicyclists never learn a proper emergency stop. The most common braking error is overuse of the rear brake, causing excess skidding, loss of control, and tire wear.
When you ride on a slippery or bumpy surface or when turning, your traction is reduced, so you cannot use the brakes as hard. Then, use mostly the rear brake—and use it lightly. Keep your speed down so you won’t need to brake hard. Slow down before you come to a curve.
Practice braking techniques, so you will know them when you need them. In an empty parking lot, practice the emergency stop until you have mastered it.
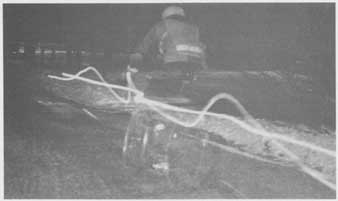
This time exposure shows a rock dodge: The up-and-down curve is from
a leg light, and the flatter S-curve is from a steady taillight. The camera’s
flash catches the bicyclist at the moment of turning his front wheel to the
right to correct his balance. Note that his body has hardly changed its line
of travel, while his wheels are well to the left to avoid the rock.
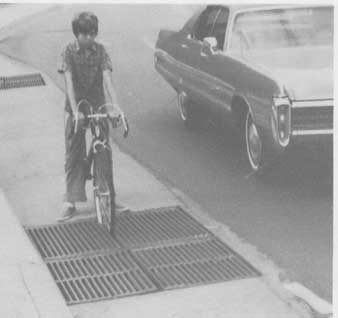
A grating or railroad tracks can steer the bicycle out from under the
rider, while an expansion joint or storm grate like this can swallow a wheel.
On this street, the bicyclist should ride out of range of this hazard, just
inside the traffic lane.
Many bicyclists panic and grab the brakes harder as soon as the bicycle begins to go out of control. If the rear wheel leaves the pavement, you must make it second nature to release the brakes so you regain control. At a very low speed, practice by applying the front brake so hard that the rear wheel actually lifts off the pavement. As soon as it lifts, instantly release the brakes. Also release them whenever your bike begins to skid out of control.
For an emergency maneuver to avoid an accident, brake or turn, or else brake then turn. If you do both at once you will lay the bicycle down on its side—actually the best way to keep from going headfirst into a wall or a ditch.
Jumping
Suppose you see a big pothole ahead of you: too wide to dodge, too late to stop. If you ride into it, you’ll dent your rims. With practice, you can jump over it.
First crouch down, with the crank horizontal. Then, as you reach the bump, yank up on the handlebars. This gets the front wheel over. As the rear wheel reaches the bump, jump up straight and draw your legs up under you. With toeclips and straps, this will lift the rear wheel over. If you don’t have toeclips and straps, lifting the wheel is a bit more difficult—but BMX riders do it anyway; they call it the “bunny hop.” They rotate the handlebars away to lift the rear of the bike.
Jumping is easiest on an unloaded bike. It can’t be done with heavy baggage, on a recumbent, or—except with superb teamwork—on a tandem.
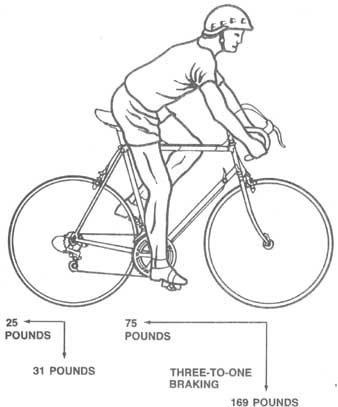
An emergency stop uses the front brake three times as hard as the rear
brake, and achieves 100 pounds of drag for this 200-pound bike and rider. When
the rear wheel skids, it’s a signal to release the front brake slightly. A
rear brake alone achieves only 60 pounds of drag.
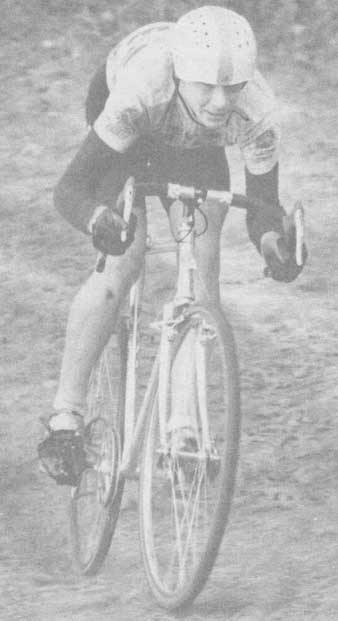
This cyclocross rider is poised for shock absorption or for a jump:
pedals level, arms and legs flexed, slightly up off the saddle.
RIDING WITH OTHER BICYCLISTS
Bicyclists often ride together, for companionship or in competition. Riding in a group makes it possible for bicyclists to look out for each other; in this way it can be safer than riding alone. Riding in a group also makes it more likely that bicyclists will collide with each other, so there are some special cautions to observe.
The Informal Group
Normally, ride single-file. In an extra-wide lane, every second bicyclist may ride slightly farther to the right. Then each bicyclist can see farther ahead. In an informal group, keep your distance behind the rider in front of you; if you run your front wheel up against the side of another rider’s rear wheel, you won’t be able to balance, and your bike will be thrown out from under you.
Pass other bicyclists in an informal group only on the left. Passing is your responsibility. Don’t sneak by on the right and force another member of your group farther into the road. Just as when passing a car, check behind for traffic before you move left to pass. Warn the bicyclist you are passing, by saying, “On your left.” Give three feet of clearance—don’t pass elbow-to- elbow. Bicycles are not as wide as cars, but they can turn to the side just as fast, so they need as much passing clearance.
When riding in a group, don’t swerve even slightly unless you have looked back first. When you hear someone say “On your left,” don’t turn to see who’s there— you might swerve. Ride predictably, in a straight line.
Riding side by side is necessary in order to talk with another bicyclist while riding. Side-by-side riding is legal in all but a few states. It’s OK on a straight, flat road, but don’t ride double-file on a crowded street or on a winding, hilly road where drivers behind you couldn’t see you in time.
Don’t pull up on the left of another rider unless you are sure that you can check for overtaking cars. A rearview mirror makes this easier. Courtesy requires that you pull back into a single line before an overtaking driver would have to slow and wait.
In a group, every rider is on his or her own lookout. Don’t “follow the leader.” It’s not safe for you to change lane position or cross an intersection just because it’s safe for the rider ahead of you.
When changing lanes, a line of bicyclists should “snake” across, each in turn, each looking back for traffic. This always gives an overtaking motorist a safe course of travel through the group. Stay in a neat single line or double file as you wait at an intersection—don’t pile up. It’s discourteous, dangerous, and illegal to swarm around cars and block their path.
The lead rider in a group should call attention to hazards ahead, calling out— For example—”Dog left,” “Car up,” “Glass.” The first rider also points to glass and other road-surface hazards, and signals turns for the following members of the group.
The last, or “sweep,” rider should be alert to overtaking traffic, and warns the group with calls of “Car back.” The sweep also signals to overtaking motorists: slow signal, turn signal, or wave-by, as necessary.
An informal, unstructured group requires special attention from every member, because anyone may drift into position as lead or sweep.
Pacelines:
Racers and fast tourists often draft one another in a structured group called a paceline. This is a single or double file in which each rider follows very closely behind the one in front. The following riders are sheltered from air drag by the leader, and don’t have to work as hard. Every few hundred feet, the leader drops back along the side of the group, and the next rider “takes a pull.”
Pacelines are fast, but there is always the risk of tangling wheels with the rider in front of you and being thrown to the ground. Draft or let yourself be drafted only if you can pay close attention and ride at a steady speed. Let the rider in front of you know when you want to draft. This rider has the right to refuse permission. If someone is drafting you, avoid using the brakes. Be especially careful to call out road hazards and to announce maneuvers— For example, saying “Slowing.”
A REVIEW
Now that you have read the material on riding techniques, here is a list of common “folklore” sayings about bicycling. CAUTION: The following statements are completely or partly incorrect, If they seem to make sense to you, go back and read this section!
The “racing” riding position is an uncomfortable contortion.
Always give the right of way to cars.
Ride as if you were invisible.
Push the pedals hard for good exercise.
Don’t use the front brake harder than the rear brake.
Signal all stops and turns.
Toeclips make you more likely to fall and have an accident.
Always ride as far right as possible.
Always ride single-file.
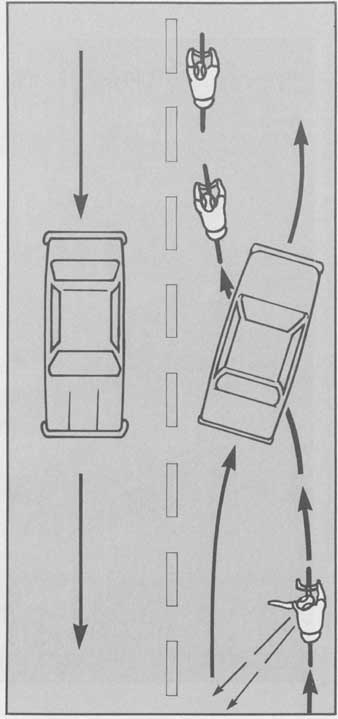
A string of bicyclists should change lanes in turn, so as to leave a
car a safe path.
Watch out for the doors of parked cars and be ready to stop.
Walk across intersections.
Ride on the left so notice what is coming.
It’s impossible to ride safely on a four-lane road.
It’s crazy to ride in city traffic.
Bicycling is very dangerous.
If we build bike paths and bike lanes, bicycling will be much safer.
After reading this section, you should be able to see the mistakes in advice of this type. If you practice and use the techniques described in this section, you should be able to get started in any type of bicycling. The usefulness and enjoyment of bicycling will develop rapidly for you, and your accident rate should be low— with correct riding techniques and a helmet, the lifetime risk exposure is about the same as for driving in a car.
BICYCLING HORIZONS
There are many ways to use a bicycle—for touring, racing, or commuting or just for fun and exercise. Your enjoyment of bicycling, and your progress in the sport, can be greatly increased by joining in group rides and other activities. Most urban areas of any size will have a bicyclists’ organization, and in many places there are several clubs from which to choose. Different clubs emphasize recreational riding, commuting, touring, racing, and off-road riding.
To find out about local bicycle clubs, check the bulletin boards of bicycle shops. If you have already done a lot of riding on your own, you probably have a good idea what type of club might interest you. If the first club you try isn’t to your liking, try another. Most will be more than happy to allow nonmembers to participate in their rides, except for sanctioned races.
If you are a beginner, take care to find a club which is interested in working with you at your level. Some clubs, even non-racing clubs, are made up almost entirely of people who like to ride fast. You will be frustrated on their rides, struggling to keep up with the group. Other clubs have a training program, or a selection of rides to suit all abilities.
Many bicycle clubs are affiliated with national organizations, which organize regional and national bicycling events and provide a framework for activities in each type of bicycling. Here’s a list of national bicycling organizations:
BICYCLE USA (LEAGUE OF AMERICAN WHEELMEN)
During the early years of the bicycle, riders of the high-wheeled “ordinaries” were dubbed “wheelmen.” It was only natural, therefore, that when a small band of about 120 hardy wheelmen gathered at Newport, Rhode Island, in the spring of 1880 to unite as an effective working organization, they simply called themselves the League of American Wheelmen.
The chosen name identified their membership as bicycle riders and gave an indication of their purpose.
Webster defines “league” to mean “an association of persons, parties, or countries formed to help one another” and that was exactly why the L.A.W. formed and was able to function continuously to the present. This fact enables it now to claim the distinction of being the oldest cycling club in America.
In its own words, the original purpose of the League was to “promote the general interests of bicycling; ascertain, defend and protect the rights of wheelmen; and encourage and facilitate touring.”
In the early 1880s, the League established a touring bureau to furnish information relative to routes, maps, accommodations, etc. Each state division gathered in formation and many divisions published road books covering conditions in their area. Hotels granting reduced rates to League members were listed, in addition to railroads which permitted bicycles to be carried as luggage.
The Wheelmen’s growth kept abreast of the expanding bicycle boom and by 1889 the League boasted a phenomenal membership of 102,636 cyclists. A host of famous Americans whose names have become a part of our nation’s history were members of the League, including Orville and Wilbur Wright, Commodore Vanderbilt, and Diamond Jim Brady.
The League’s powerful legislative efforts were responsible for the paving of streets and roads throughout the United States, before the introduction of the automobile.
Following the introduction of the mass-produced “horseless carriage,” the roster of the Wheelmen dwindled to about 9.000 in 1902 and to less than 1,000 after World War II. Still this stalwart organization continued to function. In 1955, what was thought to be its last convention was held in St. Charles, Illinois, and during the following nine years the L.A.W. existed almost in name only.
A new birth through reorganization in October 1964 caused the League of American Wheelmen to spring back to life with renewed vigor and determination. Monthly, its numbers increased, and by 1985, more than 20,000 modern cyclists had rallied to its call. Members now hail from all fifty states. Many local bicycle clubs are affiliated with the League.
In the early days, the case of the individual cyclist or affiliated club was defended by the League in court and at lawmaking sessions. Today, as then, the L.A.W. continues to champion the cause of the cyclist by encouraging favorable legislation at all levels of government; acquainting bicyclists with their neighbors who share similar interests in the joys of cycling; distributing information of interest to individuals and organizations; assisting in planning and conducting cycling programs; informing the cyclist in correct riding techniques to enhance his riding enjoyment; and aiding in establishing modern bicycle facilities.
In 1984, the League adopted the trade name Bicycle USA, by vote of its directors, who felt that the original name had become confusing. Along with the name change came a shift in emphasis toward promoting bicycling rather than taking a strong stand on bicyclists’ legal rights. Every year, Bicycle USA conducts three or more major rallies in various parts of the country. Here, 1,000 or more bicyclists will spend a long weekend at a college campus or other convenient accommodation, riding every day over a selection of routes ranging from a few miles to over 100, and participating in other activities which include workshops on all aspects of bicycling as well as social gatherings.
---44 At the pro-ride announcements of a bike club outing, the leaders describe the route and welcome newcomers.
The League trains Effective Cycling instructors, has an excellent illustrated monthly publication, Bicycle USA, distributes detailed information on cycling events and activities, and provides special embroidered patches which may be sewn onto the cyclist’s clothing to commemorate participation in particular rides or rallies.
For information, write Bicycle USA, 6707 Whitestone Road, Baltimore, MD 21207; telephone 301-944-3399.
AMERICAN YOUTH HOSTELS
Today, thousands of cyclists crisscross many countries around the world each year traveling individually, in pairs, as a family, or in groups large and small, safely and comfortably. Some join organized groups, such as the International Youth Hostel Federation, founded in Germany by Richard Schirrmann. From the single hostel he established in 1909, the number in the network has increased into the thousands. Hostels provide dormitory-style sleeping quarters, as well as cooking facilities, making it possible to travel by bicycle on a low budget, but without carrying camping gear. Facilities are located in dozens of countries in Europe, North and South America, Asia, and Africa. Total membership of all participating segments of the federation has now passed the 2 million mark.
American Youth Hostels (AVH) is the U.S. affiliate of the International Youth Hostel Federation. Membership and use of the facilities are open to people of all ages. Besides its hostels, AYH organizes group bicycle and hiking tours ranging from day trips to summer-long excursions in the United States and many foreign countries.
AYH serves individuals and organizations, such as Scouts, churches, colleges, high schools, recreation departments, and outing clubs. It’s a unique world of travel, taking advantage of low-cost hostels, camps, lodges, huts, and camping areas.
In the U.S.A. and Canada, a hostel may be a school, camp, church, student house, mountain lodge, com munity center, farmhouse, or specially built facility for overnight accommodations. Some overseas hostels are found in picturesque old castles, villas, or even retired sailing ships.
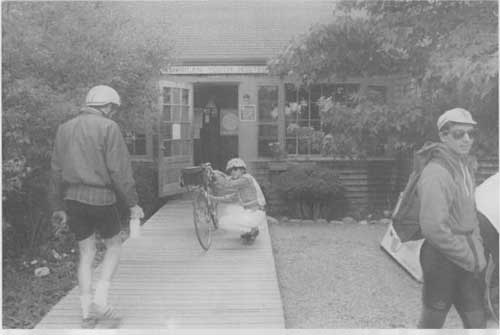
A youth hostel such as this one on Martha’s Vineyard Island in Massachusetts
provides low-cost accommodations for individual bicyclists and touring groups.
Some hostels are sponsored by local organizations or committees of townspeople. They are chartered by the national headquarters of AYH. They meet standards set by AYH and are inspected by field staff members. At these hostels, “house parents,” usually retired couples, receive the traveler when he arrives. They have dorms and washrooms, a common kitchen where hostelers may cook their meals, and, usually, a recreation room. Bunks, blankets, cooking utensils, and cleaning equipment are provided, but all services are on a do-it-yourself basis.
There are hostels in the New England, Middle Atlantic, Great Lakes, and West Coast states, usually in scenic, historic, and recreational areas, with some located in cities. Often they are within a day’s bike ride of each other. Smoking is not permitted in bunkrooms; alcoholic beverages and illegal drugs are not per mitted.
If your budget requires careful accounting of dimes and dollars, then the hostelling program may be for you. It’s nonprofit, nonsectarian, nonpolitical—a corporation organized “exclusively for charitable and educational purposes.”
For information about American Youth Hostels, con tact a hostel, a regional office, or the national office at P.O. Box 37613, Washington, DC 2001 3-7613; telephone 202-783-6161.
BIKECENTENNIAL
Bikecentennial is a nonprofit organization founded in the mid-1970s to plan a coast-to-coast bicycle tour celebrating the bicentennial of the American Revolution. It has continued since then, developing a coast-to- coast route, the Transamerica Trail, as well as several other long-distance touring routes which use scenic back roads wherever possible. Bikecentennial publishes a magazine, BikeReport, as well as providing maps of its routes, selling touring equipment and books, and organizing frequent group tours. For in formation about membership, contact Bikecentennial, P.O. Box 8308, Missoula, MT 59807; telephone 406-721-1776.
EFFECTIVE CYCLING LEAGUE
Following the Bicycle USA name change, the ECL was formed by cyclists who felt that another organization was needed to maintain a stronger position on bicyclist education and legal rights. The Effective Cy cling League champions Effective Cycling instruction, and is especially willing to help advise bicyclists who feel that governmental actions—such as unreasonable bans on bicycle use on certain roads—need to be challenged to improve conditions for bicycling.
For information, contact the Effective Cycling League, 726 Madrone Avenue, Sunnyvale, CA 94086; telephone 408-734-9426.
BICYCLE FEDERATION OF AMERICA
The Bicycle Federation is an organization mainly of bicycle specialists and planners working in government at the local, state, and federal level. It publishes a newsletter, Pro-Bike News, is developing bicycle-education materials, and organizes conferences which bring together planners, researchers, journalists, and representatives of many bicyclists’ organizations. For information, contact the Bicycle Federation of America, 1818 R Street N.W., Washington, DC 20009; telephone 202-332-6986.
NATIONAL ASSOCIATION OF BICYCLE COMMUTERS
The purpose is clear from the name. NABC publishes a newsletter full of ideas on commuting equipment and tactics. The address is 2904 Westmoreland Drive, Nashville, TN 37212.
TANDEM CLUB OF AMERICA
The Tandem Club publishes a newsletter and holds yearly rallies at which tandemists gather, ride together, and compare notes. For information, contact Peter Hutchinson, Route 1, Box 276, Esperance, NY 12066.
THE WHEELMEN
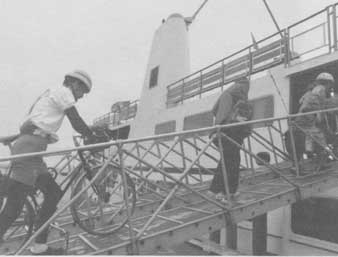
Up the gangplank! These bicycle tourists rode from Boston to the end
of Cape Cod, and are now taking the boat back home. Most ferryboat services
provide roll-on bicycle service. Airlines, railroads, and buses often require
bikes to be boxed—phone for information.
An organization of antique bicycle collectors and riders, the Wheelmen split off from the League of American Wheelmen many years ago when interests began to diverge. Not only do Wheelmen restore old bicycles, they also hold colorful rallies and participate in parades, where they ride in costume to demonstrate the bicycles of earlier times. For information, contact Marge Fuehrer, 1708 School House Lane, Ambler, PA 19002; telephone 215-699-3187.
Commercial Bicycle Touring Organizations
In recent years, large numbers of commercial bicycle touring companies have sprung up, serving the needs of people who want a preplanned trip. The first, Vermont Bicycle Touring, was founded in 1973. It’s typical of many others. Bicyclists finish each day of a tour at a country inn. Meals and rooms are provided at the inn; ride leaders and a following van with a good stock of spare parts help take care of any difficulty on the road.
Some touring companies specialize in off-road tours and others in overseas tours; some plan routes for experienced bicyclists who want to travel without a leader, while others make bicycle touring as easy as possible for the beginner. Bicycle touring companies serve a very useful purpose for the bicyclist who must plan a vacation tightly, and who is willing to spend somewhat more money than the independent bicycle camper or hosteller. Listings of bicycle touring companies may be found in the classified advertisement pages of bicycle magazines.
Racing Organizations
Several national organizations sanction competition in each of the major areas of bicycle racing.
UNITED STATES CYCLING FEDERATION
The USCF coordinates the activities of local clubs which organize traditional road races and velodrome (oval-track) races, ranging from local competitions up to national championship races, and United States participation in yearly world championships and the Olympics. Every person who wishes to participate in regional and nationwide competition of this type must be a USCF member.
The USCF maintains a national office and publishes a monthly magazine, Cycling USA. For more information, contact USCF, 1750 East Boulder St. #4, Colorado Springs, CO 80909.
NATIONAL OFF-ROAD BICYCLE ORGANIZATION
If you are interested in all-terrain bike competition and rallies, this is the organization for you. NORBA sanctions races, holds regional and national rallies, and works to defend the rights of off-road bicyclists to travel on trails in publicly and privately owned lands.
A “pack” of racers speeds by spectators in a USCF-.sanctioned road race. Average speed in such a race is usually over 25 miles per hour. The road is closed to normal traffic to allow the racers to maneuver freely.
For information, contact NORBA, P.O. Box 1901, Chandler, AZ 85244; telephone 714-681-1135.
TRIATHLON FEDERATION USA
Triathlons—races involving more than one sport, usually swim-bike-run—are popular with athletes who want more well-rounded training and competition than they can get from a single sport. The Triathlon Federation is the sanctioning organization. It’s affiliated with numerous local triathlon clubs.
For information, contact Triathlon Federation USA, 646 Elmwood Drive, Davis, CA 95616; telephone 916-753-2831.
INTERNATIONAL HUMAN-POWERED VEHICLE ASSOCIATION
The IHPVA organizes races for new and different types of bicycles, as well as human-powered airplanes and boats. Streamlined human-powered vehicles have beaten every type of bicycle speed record, and the thinking behind them is having an increasing effect on other types of bicycling. For example, IHPVA members’ research led to the spoke-less wheels and stream lined helmets used by United States Olympic track racers.
If you might be interested in building or racing an HPV or attending a race, contact IHPVA, P.O. Box 2068, Seal Beach, CA 90740; telephone 714-987-8003
BICYCLE MOTOCROSS
Two organizations, the American Bicycle Association and the National Bicycle League, sanction competition in bicycle motocross (short races on dirt tracks)— mostly a teenagers’ sport.
A racer changes from swimming to bicycling clothes at the transition area of a sanctioned triathlon. In the background, another racer leaves on his bicycle.
For information, contact the American Bicycle Association, P.O. Box 718, Chandler, AZ 85224; telephone 602-961-1903; or the National Bicycle League, 84 Park Avenue, Flemington, NJ 08822; telephone 201-788-3800.
BICYCLE MAGAZINES
Besides the magazines mentioned above published by bicyclists’ organizations, there are many in dependent magazines that serve bicyclists’ needs. Magazines keep you up to date with bicycling news and new products. They provide useful “how-to” articles on many aspects of bicycling. Find magazines at a bike shop or a newsstand or by inquiring at the ad dresses given below.
General-interest Magazines:
Bicycle Guide. P.O. Box 2325, Boulder, CO 80322.
Bicycling. Rodale Press, 33 East Minor St., Emmaus, PA 18049.
Cyclist. 20916 Higgins Court, Torrance, CA 90501.
Specialty Magazines
Bicycle Forum. Magazine relating to governmental planning, bicyclist education, and law enforcement. P.O. Box 8311, Missoula, MT 59307.
Bicycle Rider. Touring emphasis. TL Enterprises, 29901 Agoura Road, Agoura, CA 91301.
Bike Tech. Publishes articles on scientific research related to bicycling. Rodale Press, 33 East Minor St., Emmaus, PA 18049.
Fat Tire Flyer. All-terrain bike magazine. P.O. Box 757, Fairfax, CA 90501.
Tri-Athlete. 6660 Banning Drive, Oakland, CA 94611.
Triathlon. 8641 Warner Drive, Culver City, CA 90230.
Velo-News. Bicycle-racing newspaper, giving race results and articles of interest to racers. P.O. Box 1257, Brattleboro, VT 05301.
Winning: Bicycle Racing Illustrated. Monthly magazine on bicycle racing, with extensive coverage of European races. 1127 Hamilton St., Allentown, PA 18102.
BOOKS
There are many books about bicycling. Here is a list of a few important ones containing information outside the scope of the guide you are reading now.
How-to Books
The Bicycling Book, edited by John and Vera Kraus (New York: Dial Press, 1982). A big smorgasbord of articles about all types of bicycling—informative and fun.
Effective Cycling, by John Forester (Cambridge, MA: MIT Press, 1984). This guide contains a very thorough description of traffic riding techniques, be sides extensive how-to information on other bicycling subjects.
The Mountain Bike Book, by Rob van der Plas (New York: Velo Press, 1984). A how-to guide for all- terrain bike riders.
Beginning Bicycle Racing, by Fred Matheny (Brattleboro, VT: Velo-News, 1983). A guide for the person interested in road or track racing.
The Bicycle Touring Book, by Tim and Glenda Wilhelm (Emmaus, PA: Rodale Press, 1980). How-to for long-distance bicycle travel including bicycle camping.
Multi-Fitness, by John Howard, Albert Gross, and Christian Paul (New York: Macmillan, 1985). A guide which applies fitness goals to any type of exercise; Howard is the inventor of the triathlon.
Designing and Building Your Own Frameset, by Richard P. Talbot (Babson Park, MA: Manet Guild, 1984). Besides showing how to make a bicycle frame for yourself, this guide has invaluable back ground material on frame fitting, maintenance, and design and construction principles.
Background Reading
Bicycle Transportation, by John Forester (Cambridge, MA: MIT Press, 1983). The essential text on transportation planning for bicycling; no government program related to bicycling should be undertaken without reference to this book.
Sutherland’s Handbook for Bicycle Mechanics, by Howard Sutherland et al., fourth edition (Sutherland’s, P.O. Box 9061, Berkeley, CA 94709). The bible of parts interchangeability, a must item for every professional mechanic or bike shop.
Guide for the Development of New Bicycle Facilities— 198 1. $3.75 from the American Association of State Highway and Transportation Officials (AASHTO), 444 N. Capitol St., N.W., Suite 225, Washington, DC 20001. A federally sanctioned handbook on bicycle facilities and programs, largely based on suggestions from bicyclists.
Bicycle Facilities Planning and Design Manual, 1982. $6.65 from the Florida Department of Transportation, 605 Suwanee St., Tallahassee, FL 32301. The information is based on the AASHTO guide, above, but also includes a description of the bicycle planning process.
Bicycle Parking. $4.95 from Ellen Fletcher, 777-108 San Antonio Road, Palo Alto, CA 94303.
Bicycling Science, by Frank Rowland Whitt and David Gordon Wilson, second edition (Cambridge, MA: MIT Press, 1981). The essential source guide on the scientific principles of bicycle design, construction, propulsion, and maneuvering. Very read able—not an engineering text!