Careful attention to fitting your bike can bring about a tremendous improvement in your riding style, comfort, and control. And, to your advantage, most of the dimensions that affect fit are easily changed—not set forever when you buy a bicycle. Some parts may have to be exchanged, but many bicycle shops offer parts exchange on new bicycles free or at a reduced cost. The following sequence of tests and adjustments is given in the order you’d carry them out when choosing and setting up a bike. Run through this list before buying a bike or when checking one over.
BASIC MEASUREMENTS
Consider having yourself measured using a system such as the Fit Kit, available at bicycle shops. This will help zero in on the correct adjustments and will provide a written record helpful in setting up another bicycle in the future.
Frame Height
You should be able to stand over the bicycle’s top tube with about an inch of clearance. An oversize frame is unacceptable; a frame an inch or two under size is no serious problem.
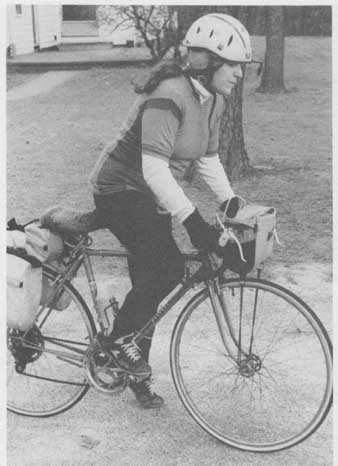
Next, run a preliminary test of top-tube length. Place the back of your elbow at the front of the saddle. Your fingers should reach the handlebars, give or take an inch. This crude measurement will indicate whether the top-tube length is wildly incorrect.
To avoid difficulty reaching the handlebars, short people—particularly short women—need to be especially careful about top-tube length, maybe even buying a bike with smaller-than-usual wheels.
Crank Length
Check crank length when purchasing a bicycle. The length is usually marked on the inside face of the crankarms. Common lengths on new bikes are 165mm and 170mm. If you’re much over 6 feet tall, 170mm may not be enough. If you’re short, 165mm is long for you, but this is not as much of a problem. More detail on crank length later.
You must be able to stand over the frame with an inch of clearance.


For a rough test of handlebar distance, place your elbow on the front
of the saddle. Your fingertips should reach the handlebars. This frame is too
long for the rider.
Handlebars:
Handlebars are available in a variety of widths, and should be about as wide as your shoulders. Dropped handlebars, offering the widest variety of hand positions, are best for long-distance riding. People who are used to them will likely prefer them for urban riding too. The straight, flat handlebars on all-terrain bikes are well-suited to their purpose. These need to be extra- wide for leverage in tough off-road riding.
The upward-and-backward-curved handlebars used on British three-speeds are too close and too high for efficient riding, unless turned upside down. Sitting completely upright wastes much of the power of the leg-straightening gluteus muscles, since your legs are already close to straight at the hip joints. The increase in available power when leaning 45 degrees forward is dramatic. In addition, lower handlebars put more of your weight over the bicycle’s front wheel, giving better road-holding and steering control.

An average woman has more of her height in the legs than a man. Ideal
for a woman under 5 feet 3 inches, this bicycle has a smaller front wheel that
decreases distance to the handlebars.
Leaning forward does involve some compromise in comfort. The head no longer balances on the neck; the muscles at the back of the neck have to hold it up. These muscles will strengthen after a couple weeks of riding. However, if you ride too little to condition your neck muscles, you may never be comfortable in the deeply crouched position and will want a higher position and flat handlebars.
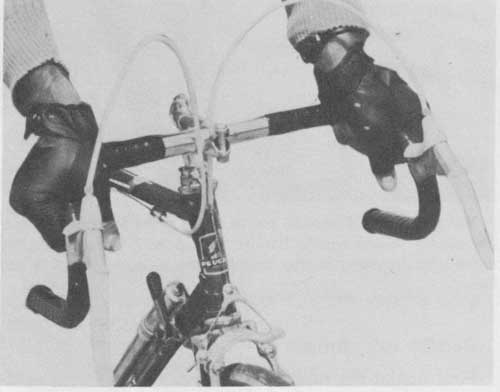
Switch handlebar positions so one set of arm and back muscles can rest
while another takes the load. The top position is best to stretch your back,
or for leisurely riding.
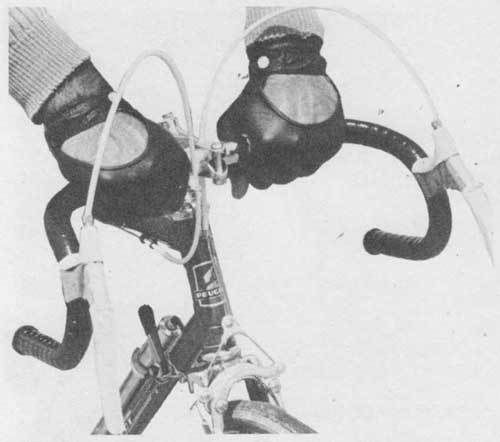
The position with hands on the tops of the brake levers is ideal for
pedaling while standing off the saddle. Moderate braking is possible over the
hoods of the levers.
This position is comfortable and places the hands within easy reach
of the brake levers.
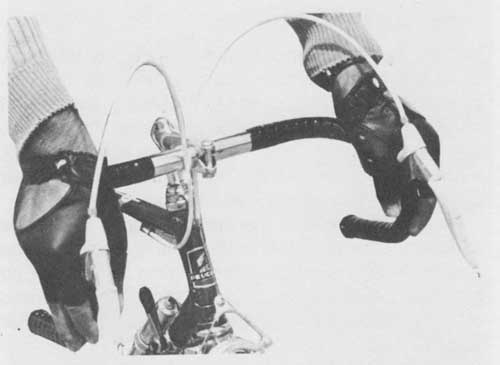
With the hands below the brake-lever hoods, the rider is prepared for
rapid or prolonged braking. This position is best for fast downhill runs or
when approaching an intersection in traffic.

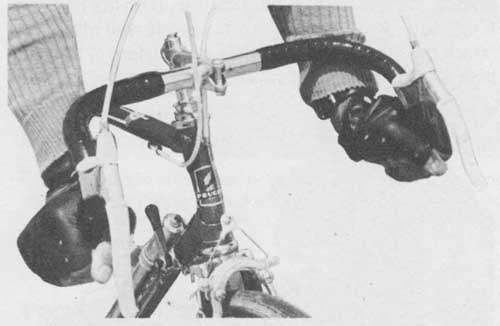
The lowest position on the handlebars offers the least wind resistance
and is best for speed runs or when bucking a strong headwind.
The Saddle
If the saddle on your bike doesn’t agree with you, replace it as you would replace shoes that don’t fit. Women have wider-spaced pelvic bones than men and often find a narrow saddle uncomfortable. Fortunately, well-designed “anatomic” saddles have become widely available in recent years. You may have to try a few different saddles before you find your favorite.
Having chosen and installed a saddle, check the saddle tilt. This adjusts with the bolts at the seat clamp directly under the saddle. Start with the saddle level so that your weight won’t slide you forward or backward off the saddle. You may wish to make corrections after you have ridden the bicycle.
ADJUSTMENTS
You must mount the bicycle to test further adjustments. By leaning one hip against a wall or post and holding the handbrakes, you can sit up on the bike and backpedal. A mirror against an opposite wall will let you check the adjustments. Or use an assistant to hold the bike and observe your position.
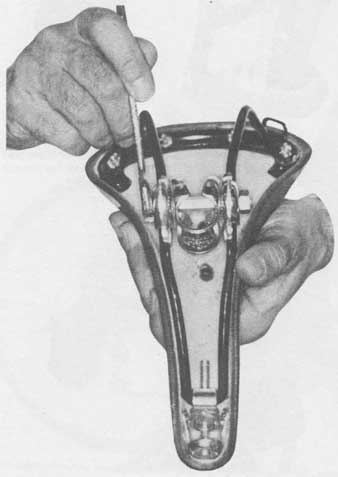
This least expensive type of seat clamp can be flipped completely over
to position the saddle farther forward.
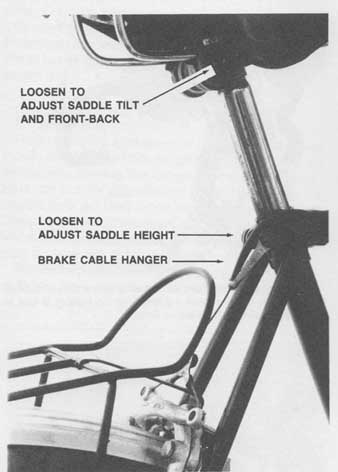
Saddle front-back position and tilt adjust at the seat clamp, under
the saddle. A brake-cable hanger must point directly toward the brake after
adjusting saddle height at the seatpost clamp on the frame. LOOSEN TO ADJUST
SADDLE TILT AND FRONT-BACK; LOOSEN TO ADJUST SADDLE HEIGHT; BRAKE CABLE HANGER
Saddle Adjustment
First adjust the height. In the normal pedaling position with the ball of the foot on the pedal, the leg should be slightly bent when relaxed at the bottom of the stroke. The knee should rest perhaps 10cm forward of its locked position. Many riders place the saddle too low because they try to climb onto the saddle first, instead of using the pedal as a step.
Before raising the saddle, pull the seatpost all the way out of the bike. Make sure that at least 2 inches will be inside the bike. If less, get a longer seatpost.
Set the saddle’s forward-back position. This is adjusted at the seat clamp along with saddle tilt. Typically, the tibial tuberosity (the bump in the bone just below the knee) should be over the pedal spindle when the crank is facing directly forward.
Seat clamps allow a considerable range of front-to- back adjustment. Inexpensive steel clamps allow the greatest adjustment of all; they can be flipped over to allow the saddle to move forward another inch, often necessary with a short rider. If you raise or lower your saddle very far or change crank length, you will have to readjust saddle front-back position too.
Handlebar Adjustment
First adjust the forward-back position. We’ve already checked that the frame’s top tube length will allow this adjustment to be correct.
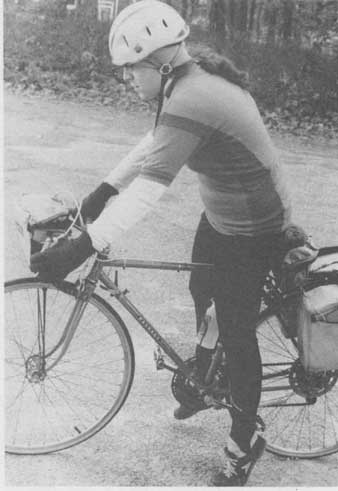
For an accurate test of handlebar distance, sit on the bicycle. With dropped handlebars, place your hands on the drops. A plumb line from the end of your nose should fall about 2cm behind the centerline of the handlebars at the top. If the handlebars are too close, you will feel cramped, and if they’re too far away, your shoulders and arms will get sore.
With flat handlebars, crouch down as if you were in dropped-handlebar position. The center of the handle bars should be in approximately the same position or perhaps 2cm farther forward.
The handlebar distance is corrected by choosing a different handlebar stem—the L-shaped part which grips the center of the handlebars. Stems are available with a forward extension of from 4cm to 14cm. If a bicycle frame is too long with dropped handlebars, it may still be usable with flat handlebars.
Now adjust the height of the handlebars. The height range depends on the type of handlebars, but the stem allows a few centimeters of adjustment. Typically, the handlebar center is as high as the top of the saddle, or a few centimeters lower.
If you are out of shape, you may want your handle bars higher. Like the seatpost, the handlebar stem should be pulled completely out of the bike so you are sure there will be at least 2 inches inside after you have positioned it.
To free the stem for height adjustment, loosen the bolt at the top rear of the handlebar stem a couple of turns, then tap on this bolt head with a wooden mallet (or hammer and wood block).
Now set the handlebar angle. Choose this so your wrists are straight and the wrist muscles won’t have to strain to support your weight. Generally, the lower part of dropped handlebars should point to the rear dropouts. With flat handlebars, too, the grips should always tilt down toward you. The
How to get onto a bicycle. Stand ahead of the saddle and push down
on one pedal. As the push starts you moving, it raises you to the saddle.
With the saddle at its proper height, you cannot reach the ground with
both feet. People often position the saddle too low, having become accustomed
as children to sitting on a tricycle with both feet on the ground.
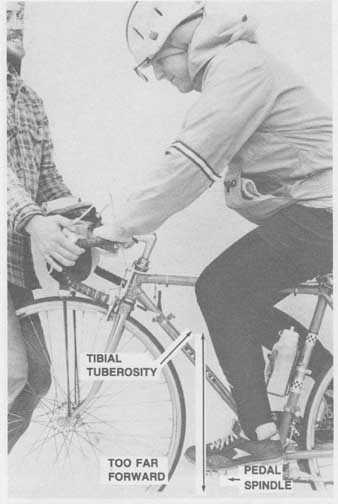
With the crank facing forward, the pedal spindle should be directly
under the tibial tuberosity (bump below the knee). The saddle on this bike
places the rider too far forward.
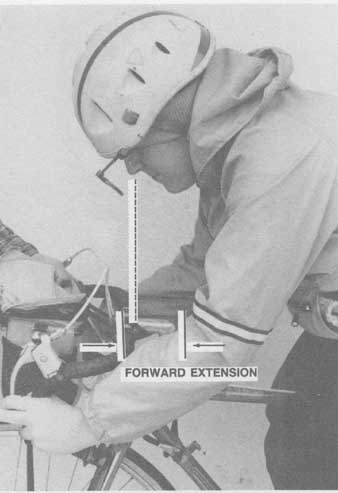
With the hands below the brake levers, the tip of the nose should
be about an inch behind the handlebars. Handlebar distance is changed by using
a stem with a different forward extension.

Handlebar angle is adjusted after loosening the bolt under the front
of the stem.

To adjust handlebar height, loosen the stem bolt two or three turns
and tap it down with a mallet to release the clamp inside, then reposition
the stem.
Positioning Control Levers
Brake levers should fall comfortably under your fingers. The tops of brake levers on dropped handlebars should tilt up about 35 degrees. It’s then possible to use them as handrests, and to brake lightly from the tops, even without extension levers. Rubber brake hoods increase comfort.
Extension levers (“safety levers”) at the tops of dropped handlebars prevent you from installing rubber hoods, and they are poor for emergency stops—they are too flexible, and the hand position reduces steering control while braking. If you feel that you must use extension levers, you may need a shorter handlebar stem, or the brake levers may be too big. Small brake levers are available for small hands as a special-order item.
Brake levers for flat handlebars should not face directly downward, but should be splayed outward so they fall under the fingers.
On flat handlebars, the trigger control for a three- speed hub can be placed just inboard of the brake lever so you can operate both at once. Place a trigger control at the end of dropped bars.
The most convenient derailleur shifters for flat bars are the handlebar-mounted “thumb shifters” commonly used on all-terrain bikes. For dropped bars, handlebar end shifters are the most convenient, but downtube shifters work well—the reach to the levers is a clean, single stroke, and both levers can be operated at once with one hand.

The handlebar stem should be approximately level with the saddle; it
can be an inch or two lower once you become comfortable with the dropped position.

The handlebar drops should angle more or less toward the rear hub,
so the hands are comfortable. Brake levers on dropped bars should tilt upward
somewhat, allowing you to brake over the tops.
Handlebar-stem shifters, at the center of the handle bars, look convenient, but you have to fold up your arm, with nothing to brace it against, and every little jolt from the road interferes with your attempt to shift. Stem shifters can also be hazardous in an accident.
Crank Choices:
With more leverage per stroke, long cranks give the same power output at lower rpm—advantageous for the standup style of pedaling needed on rough ground. Short crank arms allow the feet to spin faster and give more cornering clearance: They are preferred by track racers.
If you are of average height, the crank that came with your bike will probably work fine for you. If you are short, the crank arms may be too long in proportion to your legs and you will be apt to pedal slower; short cranks may suit you better. Lengths from 150mm to 180mm (5.9 to 7.1 inches) are available on special order.
If you are tall, longer cranks will probably give you more power—at a cost in cornering clearance. (The expensive way around this problem is to buy a custom frame; the cheap way is to use 27-inch wheels on a frame made for 26-inch wheels.)

This “thumb shifter’ is very convenient with flat handlebars, as are
handlebar-end shifters with dropped bars. Downtube-mounted shifters are acceptable.
Shifters at the center of the handlebars look convenient but are actually clumsy
to use.
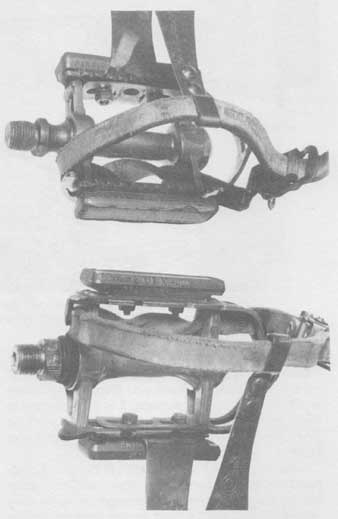
Two pedals of very similar design, one narrow, the other wide. The
nonstandard off-center toeclip position on the wide pedal was needed …
Pedal and Toeclip Choices:
Pedals are sold in two basic types: one-sided and two-sided. If you won’t be using toeclips, make sure your pedals are made to be used either side up.
Extra-wide pedals will drag in corners, and if you use toeclips, they won’t position your feet as positively as narrower pedals.
But be sure that the pedals are wide enough to allow your feet to rest at their natural angle. Most feet toe outward slightly. If narrow pedals force them to toe in, knee damage will eventually result. This is true with or without toeclips or cleats. Pedals are available in a great variety of widths.
Toeclips increase efficiency and are a good idea except for very slippery or rough conditions. At speeds too low to balance, toeclips may cause a relatively harmless fall for an inexperienced rider who hasn’t yet learned to pull the foot back to release it.
At higher speeds, toeclips prevent serious falls by keeping the feet from slipping off the pedals. Un fortunately, many riders overemphasize the minor early risk of toeclips and are unaware of the benefits.
Be sure toeclips are the right length. Those supplied with your bicycle may not fit you any more than a randomly chosen pair of shoes would. It helps to get toeclips a bit on the large side, so you can pull the straps behind the widest part of the shoes to hold them more securely.
Proper threading of toe-straps makes them easy to adjust. Thread them from outside to inside of the pedal. Twist the strap under the pedal so it won’t slip. Don’t tuck the end of the strap into the little slot at the bottom of the buckle. Then you can pull on the strap end to tighten it, and push on the buckle with your thumb to loosen it.
If you use cleated shoes, as racers and many tourists do, you must be especially careful about cleat angle to avoid leg strain. The Rotational Adjustment Device included in the Fit Kit will allow the dealer to set the angle on your shoes.
EXPERIMENTATION
With pedals and toeclips, we come to the end of the main adjustments and equipment choices which determine rider position and comfort.
If you go through the sequence given here, you’ll get the adjustments nearly right; but be prepared to read just your saddle position and handlebar height. By continued experimentation you will find the adjustments which suit you best, and equally valuably, you’ll learn how a bike feels when the adjustments are slightly incorrect. Then adjustments will go faster next time and you’ll be better able to help other people adjust their bikes, too.
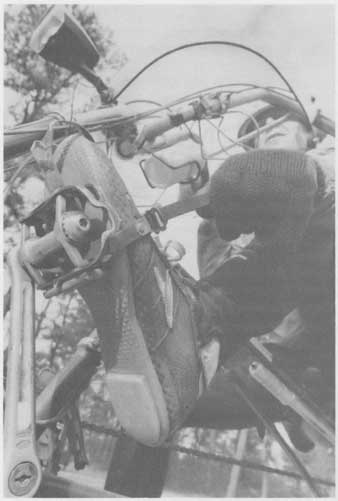
Don’t put the end of the toe-strap through the lower slot in the buckle.
If the end hangs loose, the strap can be tightened and loosened easily without
looking down.