While it is very difficult to "coach" a rider with out being familiar with his or her individual style, there are some basic rules of thumb which generally have universal application.
Gear Selection
Countless pages have been written about gear selection: for mountains, the flats, racing, training; but in the final analysis, the "correct gear" depends on the specific anatomy and style of the rider. Stocky, heavily muscled individuals tend to pedal larger gears at lower rpm's than slim, lightly muscled persons. But, what is the correct gear for you? Generally, a rider should attempt to pedal between 80 to 100 rpm's on a tubular-tired, lightweight bicycle and 60 to 80 rpm's on a clincher tire bicycle. The recommended rpm's vary because of the difference in the revolving weight of the wheels which affects your pedaling speed. Variations within that range will reflect individual anatomy, conditioning, and how much practice at pedaling the rider has had. The argument in support of high pedal rpm's with a "low" gear is simple-the rider will be able to ride longer. Let's look at an exaggerated analogy to clarify this point.
Which exercise could you best perform: lifting a 2-pound weight with one hand over your head 50 times, or lifting 100 pounds with one hand over your head once? This analogy is not perfect since it does not take the time expended into account. It does, however, demonstrate the point that a muscle is only capable of exerting a limited amount of force and, most importantly, the muscle can be conditioned to perform a large number of light repetitions in a shorter period of time than it takes to condition the muscle to double or triple the amount of force exerted. Accepting the fact that "high rpm's" are desirable, we arrive at the problem of defining "how high is high?"
Rule of thumb: If the gear you have selected is too high, your legs will fatigue before your lungs. If the selected gear is too low, your lungs will fatigue first.
This rule can easily be verified by performing two test rides.
First, select the lowest gear on your bicycle. Pedal as fast as you can and maintain that pace for 15 seconds. You will notice that your legs will not be tired, however, your lungs will be "burning." After resting, perform the second test. Select the highest gear on your bike and again pedal as fast as you can for 15 seconds. Your lungs will not be "burning," instead, your legs will feel "tight." Practice using this rule of thumb to maximize your output whenever you ride. If you experience abnormal fatigue in your legs, reduce the gear you are riding. If you find yourself breathing too hard, increase the gear. Proper attention to your gear ratio will result in the optimum relationship between energy expended and the speed maintained.
Riding Position
The three basic positions of the hands on the handlebars are reviewed in figures 22-1A to 22-4 on pages 232-36. Let's continue our analysis of positions to include the proper use of the body while riding the bicycle.
Maintaining a relaxed position is one of the key elements in cycling. Many people ride with their hands gripping the handlebars as if someone were trying to wrench the bars from their grip. Although you must maintain a grip on the bars, remember that the bicycle is designed to ride in a straight line without any effort except pedaling. If the bicycle requires your attention to ride in a straight line, something is probably misaligned. ( Section 21 reviews the steps to insure that the frame is tracking correctly.) You should not be expending energy on the bicycle unless it benefits your pedaling. Imagine how tired you would be just sitting in your living room if you had a "death grip" on a pair of handlebars for two hours. All of your energy should be aimed at making the bicycle go faster; don't allow your energy to "run out" through your handlebars.
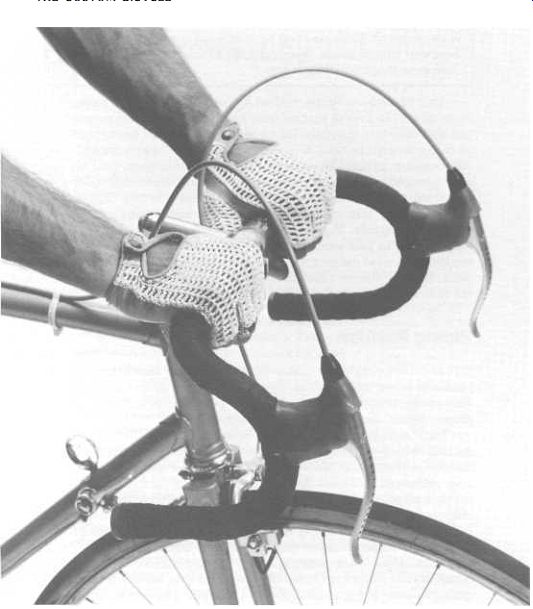
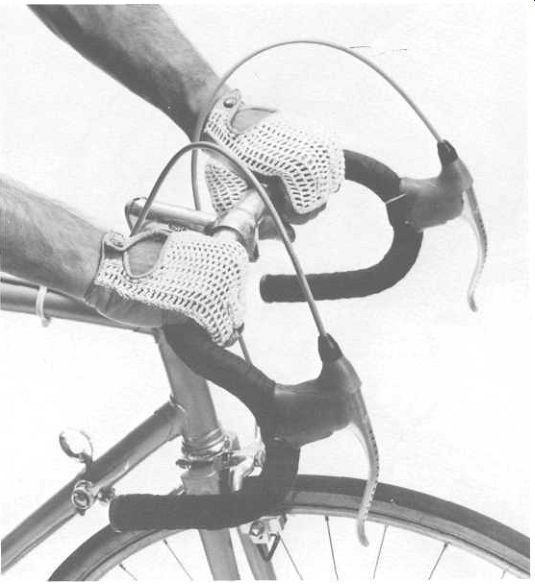
Figures 22-1A, 22-1B: Handlebar Position 1. (A) The hands are placed on
the "tops" of the handlebars. Always keep one hand in this position
when riding one-handed-this position provides the greatest stability. (B)
Variation on above position with hands a little further apart.

Figure 22-2: Handlebar Position 2. The hands are placed on the "tops" of
the bars, behind the brake levers. This photograph demonstrates a variation
of the position that is comfortable but does not permit the rider to reach
the brake levers.
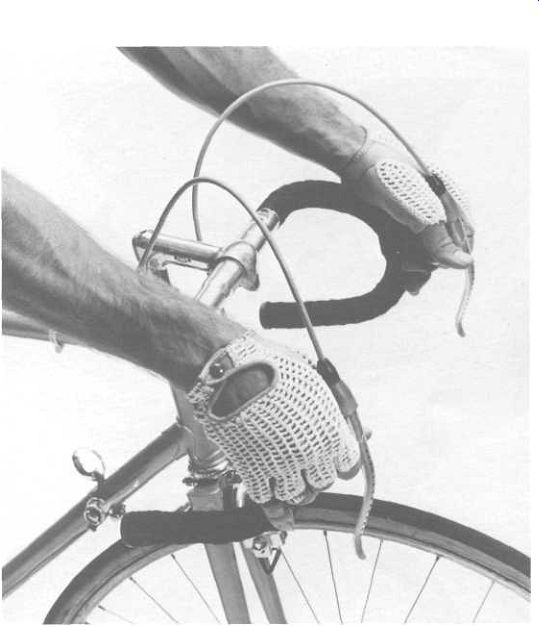
Figure 22-3: Handlebar Position 2A. Again, the hands are on the "tops," behind
the brakes. However, this variation utilizes the top of the brake lever
as a rest. All good-quality hand brakes include a rubber hood to insulate
the hands against road shock. This position allows use of the brake by
merely extending the fingers.
This position is recommended for climbing when out of the saddle. This position is very stable, allows free breathing, and the levers can be used to increase pedal pressure when hill climbing.
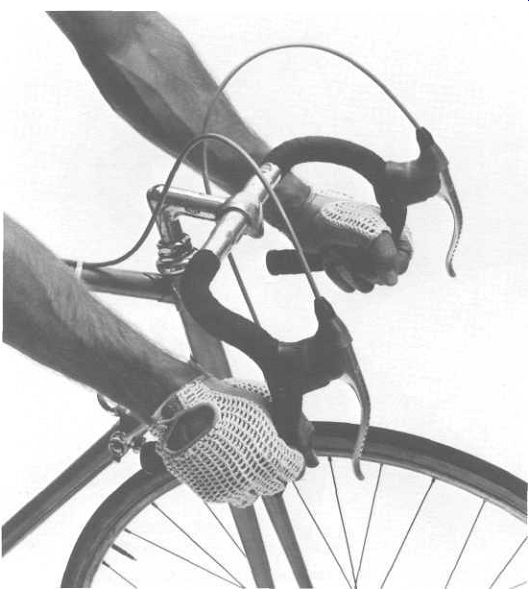
Figure 22-4: Handlebar Position 3. Proper placement of the hands in this
position varies according to the physique of the rider.
There is one rule of thumb: The wrist should be straight. If you hold your wrist straight before you touch the bars and then grasp the bar at the spot where your wrist is straight, you have found the "correct" position.
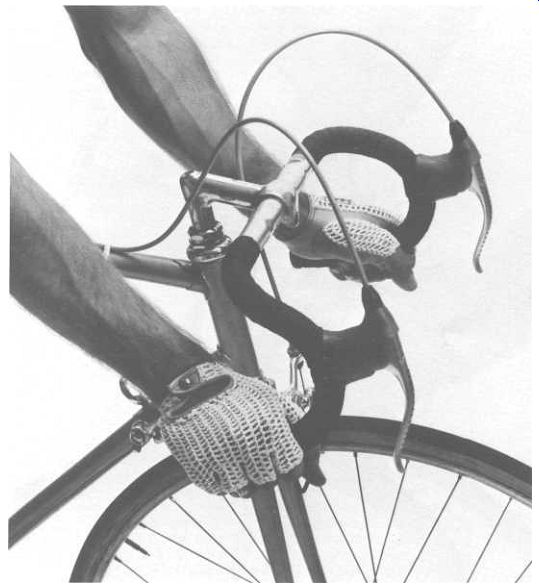
Figure 22-5: Incorrect Position 3. The wrist is not straight and the hand
is too close to the end of the handlebar. This position drastically reduces
your control of the bicycle. Check for yourself.
Try weaving back and forth with your hands in this position. Now try the same test with your hands correctly placed. The increase in stability should be immediately obvious.

Figure 22-6: Incorrect Position 3. Again the wrists are not straight;
however, this time they are flexed the opposite direction as in figure
22-5. Although this position is fairly stable, it does not allow efficient
use of the arm and shoulder muscles.
In all three handlebar positions (on the tops, behind the brake levers, and on the drops), the rider should have bent elbows. One of the prime reasons that some riders find this uncomfortable is because the bicycle setup is incorrect. If you are experiencing difficulty in riding with your elbows bent (or you have specific neck or back pains when riding), review the portion of section 20 that details proper setup.
Rule of thumb: If you want to go faster or apply more force to the pedals, increase the amount of bend in your elbows.
As outlined in section 20, the reason is simple-the powerful gluteus maximus comes into use as the back is bent below 45 degrees. There are two additional reasons why the elbows should be bent:
1. Bent elbows act as shock absorbers for your body. This shock absorber effect results in less abuse to the rider and to the bicycle. It reduces "pounding" on the elbow and shoulder joints and also relieves much of the strain that wheels are subjected to when crossing railroad tracks or hitting bumps.
2. Bent elbows provide a "safety buffer" in situations where a rider is bumped from the side by another rider. If a rider is riding with "locked" elbows and is bumped, the forks will react vio lently and increase the possibility of a spill. If the elbows are relaxed, any sideward force will be absorbed by the elbow and arm, not the bicycle.
Rule of thumb: The wrist should be straight when using the drops of the handlebars.
Since the use of the bottom of the handlebars results in such a drastic body position, the drops should only be used under conditions of maximum output. Therefore, the arms should be using the handlebars to increase leverage and pedal pressure. In this situation, the only practical position to be able to pull effectively is when the wrist is straight. A useful analogy is the position of the arm and hand when lifting a barbell. It is obviously very difficult to lift with the wrist bent.
Normally, the hand will be located in the curve of the handlebars when the wrist is straight. Riding with the hand located at the back part of the bottom of the bar usually indicates that the rider is resting his weight on the bars. If the rider is resting his weight on the bars because it is the most comfortable position for the back, the same position of the upper body can be maintained if the hands are moved to Position 2 and the amount of bend in the elbows is increased. Position 2 will also provide the shock absorber effect without any loss of efficiency.
Many riders unconsciously perform miniature "push-ups" as they ride. This is an indication that the rider is not using the arms properly and it actually tires the rider more than if the upper body is kept relatively still. Imagine, for instance, how many of these miniature push-ups are performed during a two-hour ride. Now imagine sitting at home with your hands on a table performing the same push-ups for two hours. None of that energy expended was used to make the bicycle go faster. The push-ups are usually performed unconsciously by the rider, but they should be eliminated because they result in an energy loss without any increase in efficiency.
Pedaling
Strictly speaking, intentional "ankling" is incorrect in spite of the many books and magazine articles that tell of its benefits. None of the dozens of coaches that we have spoken to about pedaling advocate ankling. A review of the many good European cycling books will reveal that there is no mention of ankling as a benefit to cycling. The motion that has often been incorrectly described as ankling, is an exaggeration (or misunderstanding) of the motions used in walking. Let's review the motion of a person's foot during a single step before we discuss proper pedaling technique.
1. As the foot is lifted, the heel naturally precedes the toe in the upward motion of the leg. No one makes a conscious effort to raise the heel first. It moves first because the muscles controlling the foot are relaxed and the lifting motion of the leg is done by the muscles in the upper leg.
2. As the foot descends, the heel begins to lead the toe, in readiness to make contact with the ground, since the heel will touch the ground first-not the toe.
3. The heel touches the ground first and as the body moves forward the weight is transferred to the ball of the foot and the process continues. If one is to believe the proponents of ankling, the rider should move the toes of the foot down at the bottom of the pedal stroke. This is no more correct than it is to recommend the same motion when walking. Our muscles have functioned in a relatively fixed manner since we initially learned to walk-the most efficient pedal stroke utilizes the natural motion of the foot.
The proponents of ankling are usually not cycling coaches.
Instead, they are persons who have attempted to analyze the motions of the foot in the pedal stroke of the expert cyclist. It is easy to become misled when looking at the motions of a foot during the pedal stroke because, when a high rpm is maintained, the toe will precede the heel at the bottom of the stroke. It does not precede the heel because the rider consciously "pushes" the toe through first; it occurs because the centrifugal force of the high rpm's does not allow the full drop of the heel. The opposite is true in the use of a high gear at low rpm's-the heel will often be as low as the toes.
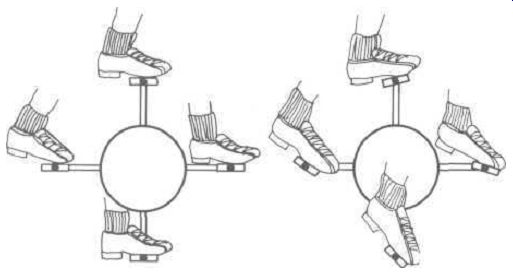
Figure 22-7: On the left, a more normal position of the foot through pedal
arc. On the right, an exaggerated idea of the foot position on the pedal,
which is held by many cyclists.
There is one foolproof method to determine if a rider is ankling or if his lower leg is operating properly-that is to watch the calf muscles expand and contract during the pedal stroke.
Watching from behind, check to see when the calf is under pressure (tight). It should occur only on the down portion of the stroke. If the calf is tight on the up part of the stroke, the rider is still pushing with his toes instead of concentrating on pulling his whole foot up. Muscles "rest" by receiving fresh supplies of oxygenated blood; therefore, the rest period is greatest during the relaxed position of the muscle. Obviously, a muscle that is under tension during twice as much of the stroke will tire faster than a muscle that is given more opportunity to rest.
Although all serious cyclists have toe clips and straps on their pedals, most riders do not use them to their full advantage. You can prove this to yourself by watching the pedaling stroke of the average cyclist. Imagine the circle scribed by the cyclist's foot is the face of a clock. Most riders do not actually apply pressure to the pedals for more than three "hours" {from four to seven o'clock when the rider is viewed riding from left to right). It is impossible to assist individual riders with their pedal stroke in a book-that is the job of the coach. Understanding and being able to analyze the theory of efficient pedaling will hopefully benefit all riders who do not have a coach available.
Cornering
Although many riders have no intention of racing, learning how to corner at speed is important to reduce accidents.
The tourist often requires these skills when descending mountains. There are two basic techniques for high-speed cornering- pedaling through the corner and coasting through the corner.
Before a rider attempts to negotiate coasting through a corner at high speed, the method of efficiently pedaling through the corner should be mastered.
Pedaling through a corner
This method is important to master because it is necessary to achieve the proper position and confidence before attempting to learn the fastest way around a corner which is coasting. When pedaling around a right hand corner, the rider should attempt to keep the bicycle as upright as possible to reduce the possibility of hitting the pedal on the ground. To best accomplish this, the rider should bend the elbows slightly more than usual and move the upper body to the right until the rider's nose is approximately over the right hand. On left hand corners, the procedure is re versed. The body should lean to the left with the rider's nose over the left hand.
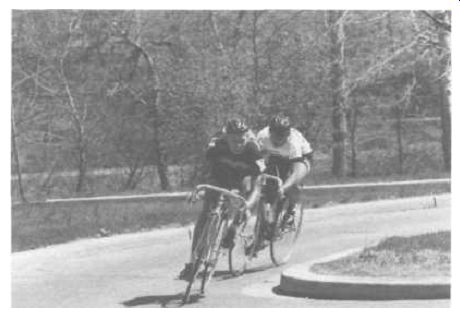
Figure 22-8: Coasting through a corner at high speed requires a low center
of gravity. Notice how both riders have shifted their weight to the outside
crank which is positioned at the bottom of the stroke. The upper body of
the rider is then moved slightly to the inside by aligning the rider's
nose over the inside hand.
Coasting through a corner
To better understand why the recommended position is so effective, let's look at the two primary factors that act on the bicycle when cornering at speed-the center of gravity of the bicycle and the traction of the tires. The weight of the rider is primarily resting at the level of the bicycle seat. The amount of weight on the seat decreases, of course, as the rider increases pressure on the pedals. The traction of the tires is affected by the tire construction, road surface, weight of the bicycle and rider, and the centrifugal force caused by going through the turn. To increase cornering speed, the center of gravity of the bicycle must be lowered. That is best accomplished by placing the majority of the rider's weight on the pedals.
Specifically, a right-hand turn should be accomplished as follows:
• Rider's nose over right hand. (This means that if a plumb line were to be dropped from your nose, it should fall just over the right hand.)
• Inside crank (right foot is in uppermost position) should be in the up position.
• Outside crank (left foot is in lowest position) will be in the down position.
• Rider should concentrate his weight on the outside leg- effectively lowering the center of gravity as much as possible.
A left-hand corner is negotiated similarly:
• Rider's nose over left hand.
• Inside crank should be up.
• Outside crank should be down.
• Weight on outside leg.
Some riders prefer to allow the inside knee to drop from its normal position near the top tube for improved balance, however it is not required.
Crossing railroad tracks or large bumps
The rider should absorb the majority of shock transmitted by large bumps. To do this without rider discomfort, the hands should firmly grip the handlebars, the elbows should be well flexed, and the rider's weight should be concentrated on the pedals which are held stationary in a position parallel to the ground. This position reduces the deadweight that causes bent rims. It also lowers the center of gravity of the bicycle, and, similar to the technique used in motorcycle scrambles, the bicycle moves around freely under the rider with a minimum loss of control.
Riding with One Hand
Frequently the rider is required to remove one hand from the handlebars, whether it is to reach for a water bottle or signal for a turn. This can result in a potentially dangerous lack of control of the bicycle if not handled properly. The preferred method of one-handed riding can best be demonstrated by the riders in a six-day bicycle race. When the rider pushes his teammate into the race, he always has his hand on the top of the handlebar adjacent to the stem. With the hand near the center of the handlebars, the weight of the rider is as equally distributed on the handlebars as possible. To prove the benefits of this position, perform the following test: Ride one handed with your hand in Position 3 (at the bottom of the handlebars). Attempt a few swerves to the left and the right. Next, perform the same test with one hand in Position 2 on the handlebars. Finally, perform the swerve test with one hand in Position 1 on the handlebars. The difference in control between the three positions should be immediately obvious.