This section covers "how to" correctly set up the bicycle; it does not include adjustments required to maximize the benefits of an individual's "style." Fine tuning is covered in section 21.
The basic design of the bicycle has remained unchanged for the last 75 years because it has been refined to the point that it maximizes the use of the human body. Although there have been many experiments involving alternative positions (reclining), the standard "bent over" position remains the most efficient. Let's take a look at why the bicycle is designed the way it is, and more importantly, how to set up the bicycle so that it most efficiently complements your particular physique.
Why the bent over position on a 10-speed? Most people will answer, "reduced wind resistance." While that statement is correct, it is not the only reason. If it were, the recumbent bicycle would be the "best" design. The primary reason for the "bent over" design can best be demonstrated using a bathroom scale. If you were to place one foot on the scale and press down with all your effort, how much weight would the scale register? Probably not more than 50 to 75 percent of your body weight. Now try the same experiment with the scale next to a wall. Attach a pair of handlebars to the wall, three feet from the floor. Grab the handlebars with your hands and press down on the scales with your foot. The increased leverage gained by using the combined strength of your hands, arms, back, and shoulder muscles will cause the scales to read in excess of your body weight. Since bulk power is not the sole factor governing cycling efficiency, the designs over the years modified the bicycle to best utilize the advantages of leverage while also considering the factors of fatigue, comfort, and wind resistance.
Do not vary from the following unless you have ridden ac cording to the recommended setup for a considerable time and feel that a minor change will better fit your individual style or anatomy.
Adjusting the Bicycle Saddle
STEP 1-Adjust the saddle for proper horizontal angle Use a yardstick (figure 20-1) and adjust the saddle angle so that the front of the seat is slightly higher than the rear of the seat.
Although it seems that the adjustment would be uncomfortable, this position will tend to keep the rider from sliding forward on the saddle. A saddle that is tilted downward in front will cause increased wrist, arm, and shoulder fatigue due to the need for constant pressure to maintain the position in the saddle. In some situations, a female rider may find this position uncomfortable. If the discomfort persists after 200 to 300 miles of riding, the tip of the saddle should be lowered until it is level or tilted slightly downward. After 500 to 1,000 miles of additional riding, muscles will develop which should enable her to tilt the saddle upward to its correct position.
STEP 2-Saddle height
Correct saddle height is an area of considerable dispute; however, most experts generally agree upon the correct starting point. The correct height is determined by sitting on the bicycle with both heels on the pedals (have someone hold you up). The seat is at the correct height when there is a slight bend in the knee (figure 20-2) at the bottom of the stroke. It is recommended that both heels be on the pedals during this adjustment because of the normal tendency to "favor" the leg that is extended. This usually results in the rider leaning to that side during the adjustment and consequently setting the saddle position too high. As a check, pedal backwards (both heels still on the pedals). Your hips should not sway. If they do, the saddle is too high.

Figure 20-1: Setting saddle angle. The front of the saddle should be slightly
higher than the back of the saddle. Placing a yardstick on the saddle makes
this critical adjustment easier to set. Never allow the tip of the saddle
to be lower than the back of the saddle.
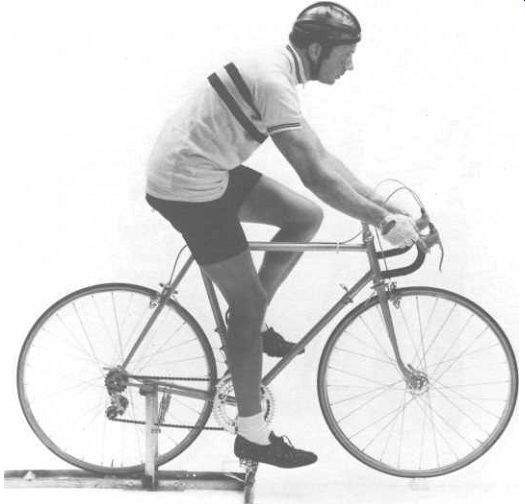
Figure 20-2: Setting saddle height. The saddle height should be adjusted
with the rider on the bicycle with both heels on the pedals. Adjust the
height of the saddle to allow for a slight bend in the knee at the bottom
of the stroke.
Quick Check: Pedal back wards with both heels on the pedals. If the hips sway, the saddle is too high.
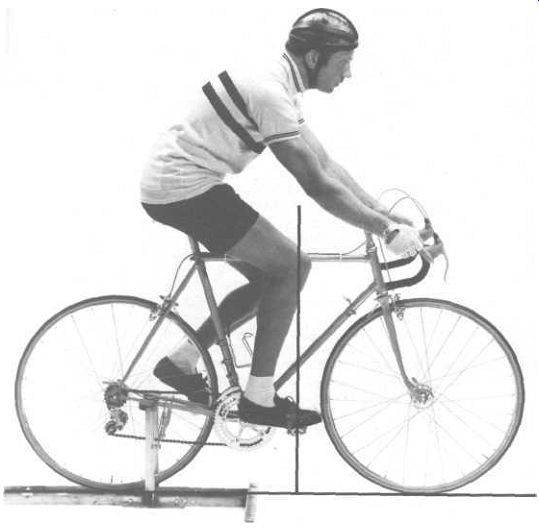
Figure 20-3: Horizontal adjustment of the saddle. The saddle position
from front to back is adjustable to compensate for individual variances
in upper leg length and riding style. To correctly adjust the saddle, sit
on the bicycle with both feet in the toe clips. The saddle is correctly
adjusted when a plumb line from the center of the knee falls through the
pedal axle of the foot when it is in the forward position with the crank
parallel to the ground.
The saddle height adjustment recommended here is set up for optimum pedaling performance. During our interviews with many experienced cycling coaches we found no one who felt that a formula based on leg length should determine the proper seat height. Proper pedaling techniques are discussed in section 22 and the saddle height modifications required by varying pedaling styles are also covered. In the majority of cases, however, this method will be correct. As a further guide, the tip of the saddle will generally be approximately 6 inches from the top of the top tube if the frame has been sized properly. That will increase slightly for very tall persons and decrease slightly for short persons.
STEP 3-Horizontal saddle adjustment (front and rear)
This adjustment is one of the least understood in cycling. It is not used to correct for differences in top tube length or to make up for a handlebar stem that is too long or too short. The horizontal saddle adjustment is designed to accommodate varying styles of riding (dealt with in section 22) and differences in individual variance in thigh length. The height of the saddle corresponds to the overall length of the rider's leg-the horizontal saddle adjustment corresponds to the size of the rider's thigh. Some people have very long thighs and correspondingly short shins while others have very long shins and short thighs. In other words, the horizontal saddle adjustment is used to insure the proper angle of thrust of the leg.
To set up the horizontal saddle position, sit on the bicycle with both feet in the toe clips. Rotate the cranks until they are parallel to the ground. Have a helper drop a plumb line from the center of your knee of the forward leg. The plumb line should extend through the pedal axle.
Toe Clips
The length of the toe clip is determined by the length of the foot. Usually toe clips come in three sizes: small, medium, and large. You can identify the size of the Christophe toe clip by the engraving on the top. The small toe clip is marked Christophe D; the medium is marked Christophe; and the large is marked
Christophe Special. A rough guide (variations are discussed in section 22) is:
Men's Shoe Size
5-7 8-10 11-13
Toe Clip Size
small medium large
Generally, the toe clip is the correct size if the ball of the foot is directly over the pedal axle. Men's sizes are the only ones listed here since bicycle pedals are one of the many bicycle components that are not designed for women. If the rule of placing the ball of the foot is maintained on the smaller woman's foot (ladies' shoe size 6.5 or smaller), a small toe clip would be too big! The disadvantages are not immediately obvious; however, they are discussed in section 22.
When the toe clip is attached to the pedal (and the shoe cleat attached to the shoe), it should be adjusted so that the rider is pedaling slightly pigeon-toed. This results in a natural tendency to keep the knees close to the top tube which results in the most efficient pedaling motion and the least wind resistance. The reason for the pigeon-toed adjustment can be best demonstrated of f the bike. Stand with both feet parallel, 8 inches apart, with the knees bent. In this position the knees will be slightly apart. If the toes are moved outward (figure 20-4B), the distance between the knees will increase. If the toes are pointed inward, the knees will come together. Obviously the feet should not be severely angled.
If the toe clips are positioned too far out on the pedals, the rider's ankles will frequently hit the crankarms.
When the toe clips are inserted on the pedals, make sure that the buckle end is on the bottom so that the buckle does not rest on the side of the foot. Make sure that the strap has been twisted through the pedal (figure 20-5). This twisting eliminates strap movement each time the strap is tightened.

Figure 20-4A: This position does not encourage the "knees to the
bar" aerodynamic position. Figure 20-4B: If the feet of a rider are
pointed out, the knees will also point out. Obviously incorrect.

Figure 20-4C: If the feet are pointed in, the knees will point in.
Figure 20-4: Positioning shoe cleats and toe clips. The proper position
for shoe cleat placement is best illustrated away from the bicycle. The
cleats and toe clips should be mounted in such a way that the rider's knees
remain close to the top tube when pedaling. If the feet of a rider are
pointed straight ahead, the knees will also point straight ahead (figure
20-4A).
Although this is an exaggeration of the correct position, the cleats should be mounted to position the foot with the toes pointed slightly inward. The cycling shoe should not make actual contact with the front of the toe clip. It should be positioned .25 inch behind the clip.
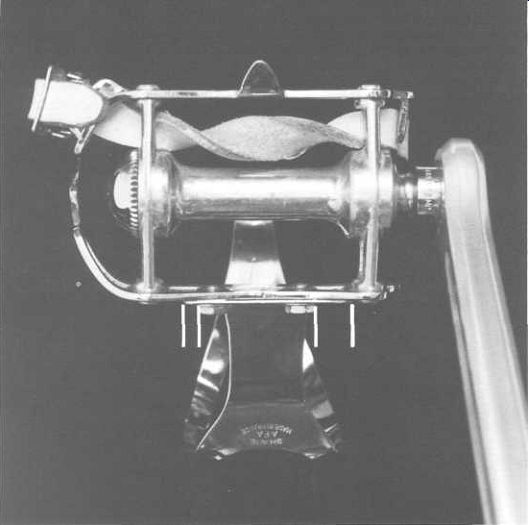
Figure 20-5: Positioning the toe clip and strap. The toe clip should be
adjusted so that the toe of the shoe fits between the large opening in
the front of the toe clip. If the cleats are mounted properly, the toe
clip will be toward the inside of the pedal (note the adjustment slots
where the clip attaches to the pedal). To eliminate toe strap slippage
when tightening the strap, twist the strap through the pedal.
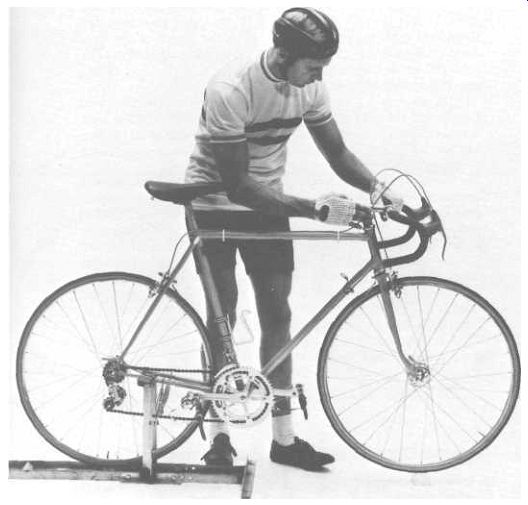
Figure 20-6: Determining stem length. Some people believe that the length
of a handlebar stem can be determined by placing the elbow on the tip of
the saddle with the fingers extended .. . . This is not true. This measurement
does not consider the overall length of the arm and body combined.
Handlebar Stem (Extension)
The height of the handlebars is adjusted with the handlebar stem. Unless an "adjustable" stem is used (not recommended since they tend to slip under hard use), the length of the stem must be determined prior to its purchase and installation. The stem length is the variable corresponding to individual differences in upper body measurements.
Do not buy a stem based on the relationship of your arm length and the distance from the tip of the saddle to the handlebars (figure 20-6). While this is a good starting point, it does not take into account the individual differences in forearm length versus overall arm length or length of the upper body.
Determine the proper stem length by raising the handlebars to approximately 1 inch lower than the saddle (exception-racing position for short-distance events). With the hands on the handlebars (figure 20-7), and the elbows bent slightly, the rider’s nose should be approximately 1 inch behind the handlebars. Make sure you are sitting in a normal position on the saddle. This should be checked by someone who is standing away from the bicycle as explained in the saddle adjustment. If the plumb line from the nose is more than 1 inch behind the handlebars, the stem is too long. If the nose is ahead of the handlebars, the stem is too short.
The handlebars should be adjusted so that the lower portion of the bar is slanting down slightly at the rear.
Now the bicycle is probably set up properly. But how do you check to make sure?
How to Check for Proper Positioning
Use an impartial observer to examine your position on the bicycle to see that the following rules apply to the way you are sitting on the bicycle.
Does the back have a smooth bend in the three basic handlebar positions (figures 20-7, 20-8, 20-9)? In no position should there be an acute bend in any area of the back. This sharp bend will usually result in back pain which can be virtually eliminated if the position is correct. Have your helper check each position while you keep your eyes looking ahead as if you were riding.
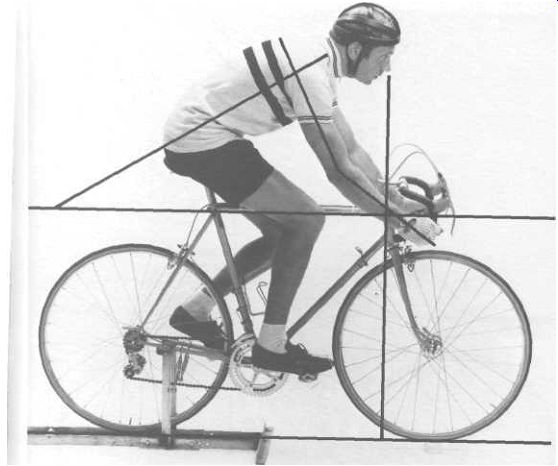
Figure 20-7: Determining length of the stem (handlebar Position 3). The
stem is correctly sized if a plumb line from the nose drops approximately
1 inch behind the handlebars in Position 3. The elbows should be slightly
bent. Notice that the back is lower than 45 degrees in Position 3. The
rider's weight is comfortably divided-45 percent front, 55 percent rear.
The arms are relaxed and the rider's weight is supported by the arms and
shoulders combined. There are no acute bends in the back. (Note: The handlebar
positions are numbered in anticipation of a more detailed discussion of
the subject in section 22.)
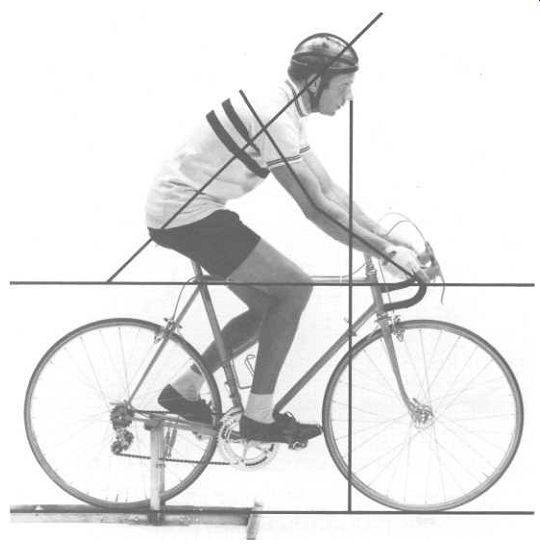
Figure 20-8: Determining length of the stem (handlebar Position 2). A
plumb line from the nose drops slightly further behind the handlebars.
Again the weight is smoothly divided and there are no radical bends in
the back. In handlebar Position 2, the back should be at or slightly below
45 degrees and the rider should be in a position to breathe efficiently.

Figure 20-9: Determining the length of the stem (handlebar Position 1).
The rider's weight should again be comfortably divided.
There should be no critical bends in the back and the rider should be able to breathe comfortably. The back should be above 45 degrees in handlebar Position 1.
Check Position 1 (figure 20-9). The back should have a smooth curve and should be above 45 degrees. No one is racing 100 percent all the time and therefore you should have a position that is efficient and comfortable. This position should be used for normal riding. If the back is not above 45 degrees, check to see if the saddle has been adjusted too far back, and check to see if the handlebar stem is too long. It may be possible that the top tube is too long.
Check Position 2 (figure 20-8). Again, the back should have a smooth curve. Your nose is approximately 1 inch behind the handlebars, and the angle of the back should be at, or below, 45 degrees. This is very important and many times does not occur if the frame has a top tube that is too short or a stem that isn't long enough. The importance of the 45-degree angle is simple but not universally understood-unless the back is below 45 degrees, the largest muscle in your body, the gluteus maximus or "rear end," is not fully utilized. This can be best demonstrated of f the bicycle.
Place one hand on your rear end and walk a few steps. You will notice that the muscle does not flex with each step-the majority of the muscle is not being used. Now bend over so that your back is less than 45 degrees and again walk with your hand on one "cheek." This time you will see that the whole muscle flexes with each step.
Check Position 3 (figure 20-7). The back should still have a smooth bend and the head should not have to be held up too high in order to see. Figures 20-10 to 20-13 demonstrate in exaggerated form the problems to avoid.
Having the bicycle properly adjusted is only part of sitting comfortably and efficiently on the bicycle. The following are general rules of good cycling "posture":
1. The rider should always keep his elbows slightly bent when riding. There are two reasons for this.
a. Bent elbows act as shock absorbers over bumps. This results in less strain on the joints in the wrist, elbow, and shoulder, and less strain on the neck. It also reduces the tendency to "push" the bicycle into a bump or hole that cannot be avoided. The shock absorber effect will greatly reduce stress on the tires, wheels, and frame.
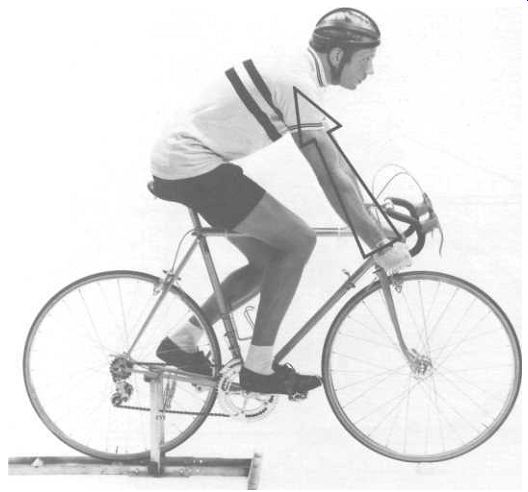
Figure 20-10: Incorrect handlebar position. The hands are located too
far toward the ends of the handlebars and the arms are stiff. All road
shock is transmitted directly into the rider's body from the wrist to the
shoulder. The arm is not acting as a shock absorber.
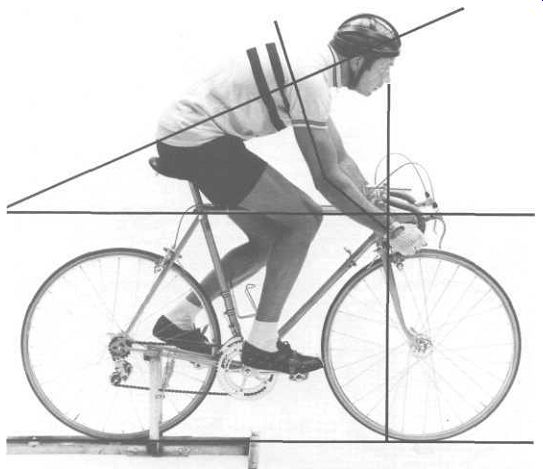
Figure 20-11: Incorrect handlebar position (short stem. Position 3). The
rider's nose is ahead of the handlebars and too much weight is concentrated
on the front wheel. The chest is constricted making breathing difficult.
The rider has to spend a great deal of energy holding his head up to see
where he is going because of the "bunched-up" position of his
body.
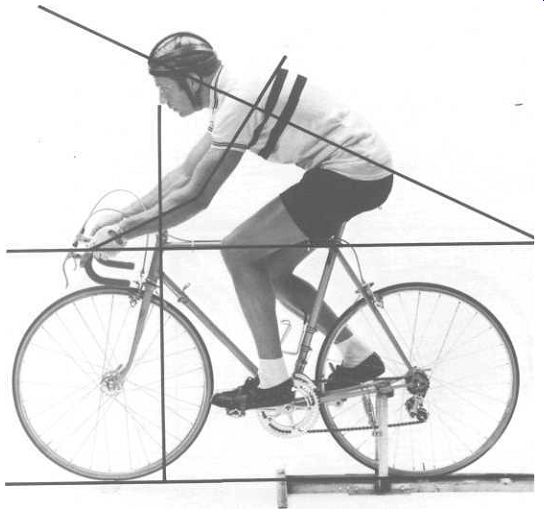
Figure 20-12: Incorrect handlebar position (long stem, Position 2). The
rider's weight is too spread out. Too much weight is placed on the front
wheel. The rider supports himself without the help of his shoulders.

Figure 20-13: Incorrect handlebar position (long stem, Position 3). Again
the rider is too stretched out and has too much weight over the front wheel.
The rider's nose is 2 inches behind the handlebars. The arms are not used
to assist the leg muscles-they are supporting the rider. The shoulders
are not used effectively.
b. If the rider is ever bumped by another rider, the elbow can be flexed and the effect of the bump minimized. If the elbows are unyielding, the front wheel will swerve. To repeat, the elbows should be bent in all three handlebar positions. As you can see in figure 20-11, when the elbows are bent in Position 3 the rider is extremely low. This position should only be used for racing under extreme stress and/or riding against a stiff head wind. Frequently, riders who have frames that are too big use Position 3 all the time and ride with stiff elbows. This does not allow the benefits of the use of the arm, chest, and shoulder muscles nor does it provide the "over 45 degree" and "under 45 degree" differences covered in figures 20-7 to 20-9.
2. When using Position 3, the wrist should be held straight.
This usually results in the hand being located near the curve in the handlebars. The reason for the straight wrist can best be explained by analogy. When a weight lifter picks up a heavy weight he adjusts his hand position so that the wrist is straight, providing the maximization of the strength of the joint. To place great stress on a bent wrist requires effort to keep the wrist bent-thereby reducing the effective use of strength. The use of the arm and shoulder in increasing efficiency is discussed in the beginning of this section.
If you are experiencing a problem in position, or simply want to double-check the setup of your bicycle, have a helper take a side-view picture of you on the bicycle in each of the three handlebar positions. Check the previously mentioned guides against your position.
Further assistance can be utilized from the pictures found in the bicycling magazines. Remember, however, that like any sport, many riders tend toward "fads," e.g., low handlebars, high handlebars, big frames, small frames. Don't look at a sprint position and wonder why it's different than your road position.
You should look for riders who share your build. Then you can analyze how they sit on the bicycle. This sounds easier than it actually is since we have never seen captions for pictures that include the rider's height, weight, leg length, foot size, or arm length. This can be overcome, however, by using transparent graph paper.
Since we can be sure that the rider is using 27-inch wheels, all you have to do is determine a scale using the number of grids you have on the graph paper. It is a fairly simple matter to approximate all the important measurements. Also when the graph paper is laid over the picture, relationships such as nose over the handlebars, angle of arms reaching for the handlebars, angle of head, relationship of saddle adjustment, and angle of the back become very obvious. Does your position have the same relation ships? Remember that the professional bicycle racer probably is more supple and consequently looks more relaxed. The graph paper is merely another means of taking the experience of a "master" and generalizing to your individual needs.
To double-check that all adjustments are correct, you should perform the following test. Before you begin the analysis you will need a bathroom scale and a stack of books that are equal in thickness to the height of the scale. Fill in the blanks of the chart as follows:
Place the front wheel of your bicycle on the bath room scale. Place some books that have been stacked to the same height as the bathroom scale under the rear wheel. Take readings of the combined weight of you and your bicycle at the front and rear wheels. This process should be completed for each of the three handlebar positions. Make sure that you are sitting on the saddle in exactly the same position that you would normally sit when riding.
The percentage of weight on the front wheel will increase from handlebar Position 1 to Position 3. Conversely, the percent age of weight on the rear wheel will decrease from handlebar Position 1 to Position 3. Your overall weight distribution should be approximately 45 percent front to 55 percent rear in handlebar Position 3 if your bicycle is properly adjusted.
---------------
Weight Distribution Analysis
(Guide: 45 percent front to 55 percent rear)
A B C D E
Position of hands
Weight recorded at
Weight recorded at
Total weight % of weight on % of weight on on handlebars front wheel rear wheel A plus B front wheel A + C rear-wheel B^C
Position 1 lbs. lbs. lbs.
Position 2 lbs. lbs. lbs.
Position 3 lbs. lbs. lbs. % %
To determine the percentage of weight on each wheel (D) and (E), take the weight recorded at the front wheel (A) and add it to the weight recorded at the rear wheel (B). Next, divide the weight at the front wheel (A) by the combined weight (C) which will result in the % of weight on the front wheel (D). To calculate the % of weight on the rear wheel, divide the weight on the rear wheel (B) by the total weight (C) which will result in the % of weight on the rear wheel (E).
-----------------

Figure 20-14: Correct handlebar stem adjustment. The handlebar stem should
be placed far into the steering tube. If the stem is too high, the expander
bolt will be located near the threaded section of the steering column.
The normal stress on the stem will adversely affect the top of the steering
column and it can break! The repair cost is substantial since a whole new
fork would be required.
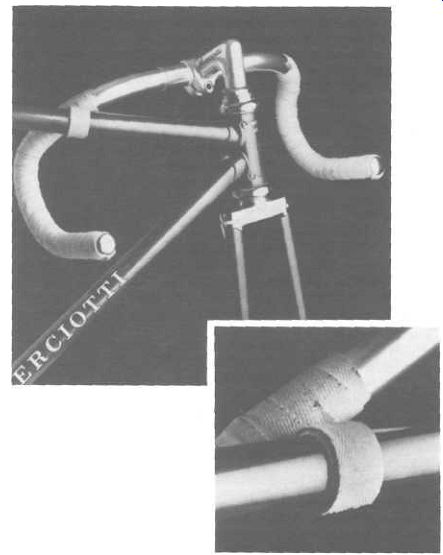
Figures 20-15, 20-16: The tape should be affixed to the top tube at the
point where the handlebar touches the tube if the wheel is allowed to turn
to its side-wards limit. The tape is useful for preventing paint damage
while carrying the bicycle and, more importantly, it minimizes the possibility
of denting (and weakening) the top tube in the event of a crash.
Fitting the Shorter Rider
The setup relationships described in this section will hold true for almost everyone. Although a person over 6'5" is limited to a 25-inch or 26-inch frame (because most builders will not build a larger size), a suitable handlebar stem and seatpost can be obtained that will allow an efficient cycling position. Even basketball star Bill Walton, has been properly fitted for a bicycle.
For several reasons, proper sizing of the bicycle becomes a serious problem when the rider is shorter than 5'2".
The first and most important obstacle in accommodating the short person is faced in the physical limitations of designing a frame that is small enough. Stock frames rarely are found in less than the 19.5-inch size because the top tube and down tube practically touch at the point where they join on the head tube. It is obvious, therefore, that the builder can only marginally reduce the frame size under 19 1/2 inches. Some custom builders have gone to great lengths to join the top tube and down tube in an attempt to accommodate the small rider. Many times, however, it is impossible to design, or build, a "standard" frame that will allow proper cycling position for the short rider. A secondary problem in fitting small persons is the lack of components designed for the short person. This is because most bicycles and components are designed for the "average" male physique. Until recently, cycling has been a predominantly male sport and the cycling accessories have been designed accordingly. It is not entirely uncommon, however, to see a woman riding an all Campagnolo lightweight bicycle in this country.
Let's take a look at the specific problems encountered by the short rider and review possible solutions to these problems.
Frame The short rider finds it much more difficult to find a standard frame that will be comfortable (or even ridable in some cases) if the rider has disproportionately long or short legs. If the rider has very long legs, the reach to the handlebars will be too great. On the other hand, if the rider has a disproportionately long torso, the lowest saddle position may still be too high. A change in handlebars or saddle will have no effect since the frame tubes cannot be built any shorter. What next? We suggest talking to some of the custom builders who can design a frame that uses 24-inch wheels.
Most people react negatively when first presented with the idea because they feel that no quality equipment is available for the 24-inch-wheel bicycle and that they are forced to ride a "child's" bicycle. If you are too short for a 19-inch frame and you are interested in a quality 10-speed, you owe it to yourself to examine some of the equipment that is available. We will concede that the equipment isn't readily available, but it does exist. For starters, try Paris Sport Cycle in Ridgefield Park, New Jersey. Their resident frame builder, Francisco Cuevas, builds top-quality lightweight frames in both standard and small sizes and the store carries 24-inch rims and tubular tires. They also carry most of the components necessary to complete a quality 24-inch-wheel 10 speed. Don't eliminate the 24-inch-wheel bicycle until you have looked at the "good" equipment. If you are a short rider that can "get by" on a 19-inch frame with a short handlebar stem and the saddle resting on the top tube, optimum cycling position may be improved with careful selection of the frame components.
Handlebars
A handlebar is considered to be the correct size if it is as wide as the rider's shoulders. If the bars are too narrow, breathing is restricted; if the bars are too wide (normally the situation for the small rider), the arms are inefficiently supporting the rider and causing increased wind resistance. The drop and reach of the handlebars may be too great for the small rider. Many riders are unaware that some handlebars come in various widths and bends.
Measure the width of the handlebars before you purchase them; Cinelli handlebars, for instance, are available in 38-cm., 40-cm., and 42-cm. widths. If you are very small, you may want to investigate the good-quality alloy handlebars that have been designed for a bicycle with 24-inch wheels. With the correct width handlebars combined with a small stem, the short rider should be able to set up the bicycle for comfortable and efficient cycling.
Brake Levers
Similar to most quality cycling accessories, the brake levers are designed for the average male hand. This is an area that causes even more problems than oversize handlebars, since the potential for an accident is increased if the rider cannot easily manipulate the brake levers. There is a small amount of variation between the reach of most standard brake levers, so the search for a "small" reach lever may be unnecessary. There are two ways to attack this problem. The first is to increase the strength of your hands so that the brake lever can be used with only two or three fingers. Even riders with very small hands (women's glove size 5-6) can operate most levers after practice and exercise. The best and least expensive method to increase hand and finger strength is to regularly practice squeezing a tennis ball. If you are a rider whose hands are too small for brake retention with two or three fingers, you should contact a builder who carries 24-inch wheels and tires since he should be able to supply small brake levers that will fi t the junior-size handlebars.
In most cases, going to the smaller, scaled-down equipment may not be entirely necessary. For instance, it may be necessary to use a 24-inch-wheel frame because of height and leg measure ment, but narrow handlebars may not be necessary if the individual is broad shouldered. Equally true, smaller brake levers may not be necessary for someone who may need a 24-inch-wheel bicycle but who has large hands. Obviously, the equipment should match the rider's physical needs.
Saddle
Proper selection of a saddle may permit use of a 19-inch frame in the situation where the rider has very short legs, but adequate torso length to fit the standard-size frame. Generally, the plastic saddles (Cinelli Unica Nitor, for instance) have less height than the traditional leather saddle. Before you purchase the saddle, check the distance from the saddle's frame support rails to the top of the saddle itself. Often the plastic saddles are much shallower than their leather counterparts. The shallow saddle can effectively reduce the distance from the top of the saddle to the pedal by as much as an inch.
Careful selection of handlebars, stem, and saddle can increase comfort and efficiency, but one problem remains-how do we compensate for the rider's shorter legs and smaller foot size and their effect on pedaling efficiency?
Cranks
A very short person should consider cranks which are shorter than the standard 170 mm. How short? Unfortunately, we cannot provide a rule of thumb. In fact, in our discussion with Eddie Borysewicz, national cycling coach, he indicated that no one can unequivocally provide an answer. Because so little is known about optimum crank length, Eddie has considered devoting two or three years and his doctoral dissertation to the relationship between crank length and leg length! Small cranksets are avail able to those with very short legs, but only use the short cranks if you feel they are absolutely necessary since the accompanying chainwheels are usually too small to provide adequate gear ratios for the adult. We recommend that you do not vary crank length without the advice of a competent coach. Presuming that standard-size cranks will be used, let's turn our attention to one last item that must be utilized to assist in efficiently transmitting your energy into motion-pedals.
Pedals
Just like all other cycling components, pedals have been designed to fit the average male foot. Unfortunately, the adverse effect of an oversize pedal is much greater than a pair of han dlebars that are too large. If the handlebars are too big, the rider will endure some discomfort; if the pedals are too big, the rider's pedaling motion will be very seriously affected. An analysis of one of the fine points of coaching should help clarify this point.
There are two basic extremes in pedaling style-the pusher (the rider that uses relatively high gears at low rpm's) and the pedaler (the rider who uses relatively low gears at relatively high rpm's). Generally, the pusher is a heavily muscled individual who utilizes brute strength instead of finesse. The inverse is true of the pedaler, who is usually of slight build and uses high pedal rpm's to maintain overall cycling speed. To maximize the effects of either of the two pedal styles, the toe clips and shoe cleats should be carefully adjusted. As a general rule, the pusher should have his foot deeper into the toe clip than the pedaler. That is, the ball of the foot of the pusher may be as much as 1/4 to 3/8 inch ahead of the pedal axle. The pedaler should have his foot as much as 1/4 to 3/8 inch behind the pedal axle.
Unfortunately, it logically follows that if the rider's foot is very small, the ball of the foot will always be ahead of the pedal axle even with a short toe clip! Use of the short Christophe toe clip on a standard-size pedal will not allow proper placement of a shoe smaller than a ladies' size 7. Therefore, without choice, the rider with small feet is forced to pedal like a pusher, regardless of his or her appropriate style. You should remember this analysis when buying pedals for your bicycle; most people are amazed at the amount of increased pedaling efficiency resulting from proper foot placement.
We have attempted to briefly cover the major obstacles encountered by the short person-the list is not all inclusive. We hope that these guidelines will help encourage the short rider to spend a little extra time in search of components that will provide optimal use of his or her individual physique.
Bicycle Setup for Touring
The basic features of a touring bike should be obvious to everyone who has read this far. So let's take a look at how to set up the bicycle to go touring.
The relationships of seat height, handlebar height, and stem length remain unchanged. The important difference between the problems encountered by the tourist versus the racer is the additional equipment that the tourist carries with him. The handling of the bicycle can be drastically affected by improper mounting of packs.
Although there are a large number of well-made lightweight packs made specifically for the cyclist, few of the designs consider the effects of the load on the operation of the bicycle. To understand the features necessary in a set of touring packs, let's look at the problems encountered with the addition of the packs to the bicycle.
If a bicycle is designed properly, it will be stable up to very high speeds. The frame design complements the suggested weight distribution of the rider (45 percent front-55 percent rear). In fact, the bicycle rolls easier and handles better when the weight is distributed 45 percent front-55 percent rear. It follows, therefore, that any equipment that is added to the bicycle should be distributed so that it complements the design criteria of the bicycle. For that reason, a bicycle will handle considerably better with 27 pounds of equipment over the front wheel and 33 pounds of equipment over the back wheel than it will with the same total weight (60 pounds) over the back wheel alone. In addition to the unbalanced condition, the rear tire, rim, and spokes will take much greater punishment if ail of the weight is over the rear wheel of the bicycle.
The problem of stability is not totally solved by distributing the weight over the bicycle, however. Loosely mounted packs create unexpected forces on the bicycle that can lead to a serious crash. This is most evident in the situation where a loosely secured handlebar pack contains a heavy object-it is virtually impossible to steer the bicycle without overcorrecting. The problem of weight transfer is caused by two situations. First, a heavy object is packed without surrounding materials that will limit its ability to move, and second, by packs that do not have the means to be anchored securely to the bicycle.
While we feel that it's not appropriate to single out any manufacturers to illustrate the essentials to look for in touring equipment, we have included pictures of the unique Eclipse line of cycle touring bags.
Panniers
The panniers should be loaded with the heaviest items at the bottom. When equipment is packed it should be arranged so that routine cycling motions do not allow the contents to move. One way to reduce movement is to use a pannier that is not cut square on the bottom. A triangular bottom allows easy, solid placement of heavy objects. Remember, as in high-speed cornering, it is essential to keep the center of gravity of the bicycle as low as possible. The panniers should be supported by more than one or two stress points to reduce the potential for equipment failure.
The mounting system should be adjustable to insure freedom of movement of the leg and optimum weight distribution.
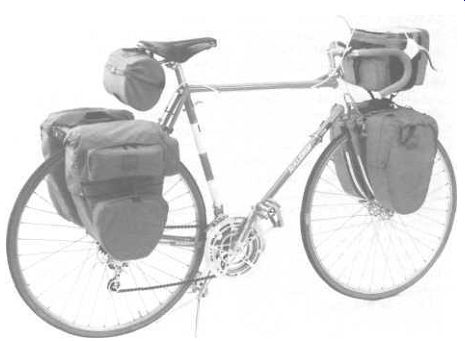
Figure 20-17: Proper frame loading for touring requires proportionate
weight distribution and a system that minimizes the tendency of the packed
materials to move.
Handlebar Packs
The pack should be solidly attached to the handlebars with the greatest possible amount of support for the bag. Few accidents are more serious than ones caused by loss of control of the steering or when a solid object becomes wedged in the front wheel.
Presuming the bag is packed correctly, the most important consideration is anchoring the bag securely to eliminate movement.
The Eclipse bag uses a unique shock cord arrangement that virtually eliminates movement. The importance of the proper attachment of a handlebar pack cannot be overemphasized-it is extremely difficult to control the bicycle under ideal conditions with a poorly mounted bag. In emergency situations, a marginally designed bag can drastically reduce the chances of escaping a crash.
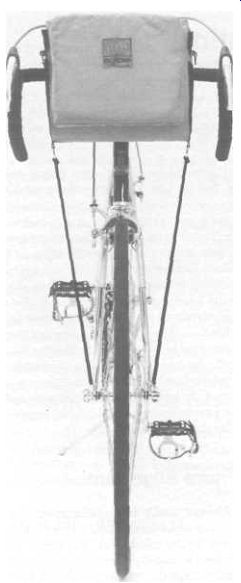
Figure 20-18: Eclipse has designed a handlebar pack that is held virtually motionless by its two shock cord mounts.