Bicycle touring differs from recreational riding in the distances involved and in the amount of gear carried along. How to carry gear is one of the most complicated elements of successful touring because you must make decisions regarding relatively expensive equipment beforehand, based on experience that you most likely don’t have.
You can always “just get by” like the fellow we met in Washington, D.C., at the end of our cross-country trip. He was heading for Texas for the winter and had stuffed all of his gear into a huge backpack strapped to his back. He had neither toured before nor read anything about it, but he figured that bikepacking couldn’t be all that much different from backpacking — “except maybe a little easier.” He assured us he had everything under control and would be just fine as soon as his neck muscles got used to the load. He had been on the road eight days and was still expecting a muscular miracle. All we could do was wish him well and hope that the Good Bicycle Fairy who watches over such as he would give him special attention.
Carrying gear in a backpack is definitely not the way to go on long trips. Or any trip. The load is dangerously high, making it difficult to balance. A rapid shift of weight can send the bicycle out of control. It places added strain on the neck and shoulders, and the extra weight puts unnecessary stress on the buttocks, exactly where you want the least-possible pressure. Finally, a large pack should be used with a waist belt — a highly uncomfortable prospect as it cinches just where your body bends the most on a bicycle. If no waist belt is worn, you risk dislodging the pack up or sideways in a quick stop or evasive action, causing entanglement that can have severe consequences. (If you use a light guide bag for short trips of a day or less, use a belt or tie to hold the pack securely to the lower part of your back.) Besides these dangers, consider wind resistance and the heat generated on your back by a large backpack. There are far more efficient ways to carry a load on a bicycle.
An experienced long-distance tourer carries gear distributed over the bicycle in such a way that he or she is totally unencumbered; the bicycle handles almost as well as when unloaded. At first glance it’s difficult to tell where the bicycle leaves off and the baggage begins. It’s a picture of function in motion with a place for everything and everything in its place.
A lot of bicycle-touring gear is sold on form alone with little regard for function. It’s your job to know the function you desire and to let that determine your choice of form. We assume you are reading this guide to supplement your own experience or even to substitute for it until you get some. We’re not going to present you outright with extensive lists of suggested equipment and recommendations, although it would be easier. We hope that you will develop your own reasoning behind choices. Everybody is different with different goals, expectations and desires. We will point out things to be aware of when selecting gear so you don’t learn the hard and expensive trial-and-error way. Listen to what we and others have to say; consider your own values, needs and ideas; then make your decisions.
How you plan to use the racks and packs should determine your choice more than any other factor. What do you, not the salesperson or the writer of the slick brochure, need them for? Wait a minute, you say, all anyone needs is to carry stuff, right? Basically, yes. But sales pitches are made far and wide of this assumed function. Consider the pair of panniers now on the market whose major advertising gimmick is that the packs can be securely snapped together to form a single piece of lug gage. They also have flat bottoms to keep the panniers sitting up whenever off the bike. That’s just wonderful if you plan to do most of your cycling with your panniers snapped together and sit ting on the ground somewhere. Better yet, use suitcases. On the other hand, if you plan to tour the four main islands of Hawaii where you are flying between is lands, loading and unloading your panniers for carrying onto the airplane or checking separately, then connecting panniers with flat bottoms would be a distinct advantage.
You will likely be touring a number of places; don’t restrict yourself with packs that have built-in limitations. If the feature is in addition to convenience and efficiency in carrying your gear, fine. Make sure though that it’s not in stead of convenience and efficiency. Never lose track of the function for which a product is designed. Look beyond form, style, popularity and Madison Avenue packaging.
Racks
If you plan to carry gear for long- distance touring, you will need secure racks to support the load. The load must be evenly distributed and not interfere with the working of the bicycle or the rider. There are dozens of racks from which to choose. What are the basic requirements? Most important are rigidity and strength. Without these a rack won’t be functional for long. The rear rack will be carrying up to 80 percent of your total baggage load. Both strength and stability are determined by the number of struts (legs) the rack has and by how it attaches to the bike.
Single-Strut Racks
The single-strut rack will suffice for loads not exceeding around 15 pounds, depending on the thickness of the strut and how it’s attached to the main body of the rack. When overloaded, this type has a tendency to sway from side to side (fishtail) when the bike is under heavy pressure as in hill climbing. At high speeds or on rough roads, the load itself sometimes initiates a fishtailing action, making the bicycle much harder to control.
Frequently, the single-strut rack simply is not strong enough to support a heavy load. It usually breaks where the strut is attached to the main part of the rack. You have real trouble if this hap pens out in the desert somewhere or, worse yet, going downhill at high speed.
On some single-strut racks it’s hard to keep the panniers out of the spokes. A strong gust of wind or a sudden maneuver on the bike can turn them into the wheel and really ruin your ride. Make sure the pannier attachment is firm and sufficiently sturdy enough to prevent this.
Better single-strut racks include the Pletscher, Eclipse Nomad, Esge and Caleisure; just remember their limitations — light loads on a casual basis. Prices range from $6 to $15. If you plan to stay in motels and carry a minimum of gear, these racks will function well; don’t load them down with 35 pounds of camping gear.
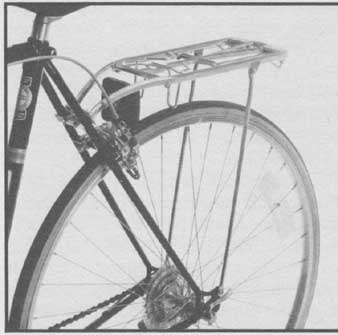
(above) Pletscher rack with support plate.
Many of the single-strut racks mount onto the upper part of the bike by a plate that goes across both seatstays. This has been a problem as a loaded rack sometimes slides down the stays until it comes to rest on the rear brake, taking the paint with it. There are now two or three varieties of aluminum or vinyl-covered steel support plates that connect to the brake-mounting bolt, then to the rack-mounting bolt. These keep the rack in place and save the stays. It’s worth the $1 investment if you use a single-strut rack.
Multiple-Strut Racks
Some racks, including the Karrimor and Claude Butler, use a double-strut support system; others, like the Eclipse and Blackburn, use triple struts. Any of these provide adequate support for heavy loads. Your choice will depend on other variables such as the material used in construction. Aluminum alloy and steel are the two basic types. Your intended use and what features are more important to you will determine which is best.
Alloy racks are lighter than steel. Two of the newest and best available, the Eclipse and the Blackburn (both made in the United States), are alloy with triple-strut construction; Eclipse has enlarged one of the stays for added strength. Both are excellent in design and workmanship. Disadvantages are cost ( Blackburn — $20, Eclipse — $25), and if you crash or otherwise bend your rack, they are difficult to fix. Alloy is very light and strong but it cannot be bent in one direction, then bent back without the risk of snapping. Chances are you will never bend your rack so severely that the straightening process might break it, but it’s a possibility and some thing to consider if you are planning to tour in isolated or Third World nations where replacements are not available. Baggage handlers may be rough on an alloy rack.
Steel racks are heavier than alloy and will rust when the chrome or vinyl wears off. They can, however, be bent back to their original shape if necessary with little difficulty or danger of breaking. The Karrimor and the Claude Butler (both made in England) are steel, costing about $12 each.
Method of Attachment: All racks, except some custom models, attach to the eyelet on the rear dropout (at the junction of the rearstays). All bicycles designed for touring should have this eyelet, or even two, on each front and rear dropout. Many are threaded (metric) to take the proper bolt through the bottom of the rack struts. Leave enough of the bolt extending through the eyelets so a lockwasher and locknut can be attached to insure that the bolt doesn’t work loose, or use a small amount of Loc-Tite on the bolt so a nut is not needed.
The rack also attaches to the bicycle at the top in front of the platform, but methods vary according to the model of the rack. One of two basic types is a two-arm bracket that extends from the rack platform and is secured to the seatstays with a vinyl-covered clamp. On custom touring bikes there is some times a braze-on eyelet to which a rack can be attached without using a clamp. This two-arm attachment is the strongest of the types normally used, but it may be necessary to bend the arms of the rack somewhat to get a proper fit. The Eclipse rack has adjustable arms although modification is still sometimes necessary. Karrimor uses the double- arm attachment as does one model made by Blackburn.
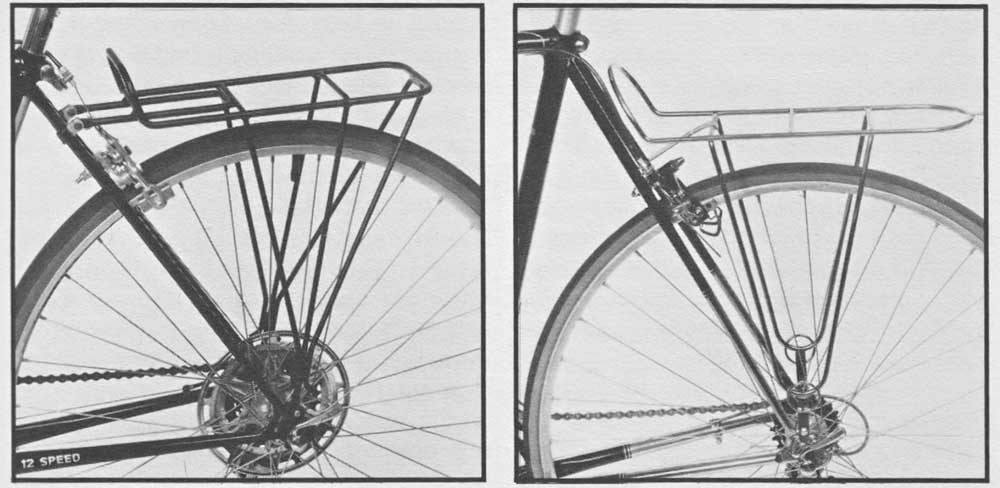
(left) Blackburn rear rack with double arms attached to the seatstay. (right)
Claude Butler rear rack. Note mounting tang on rear brake bolt.
The other type is a bendable or adjustable tang (metal protrusion) that ex tends from the front of the rack platform to the brake-mounting bolt. This is not as rigid as the two-arm method but is easier to fit on the bicycle initially. The Claude Butler and one Blackburn model use this method.
Mount the rack on your bicycle using the best hardware and greatest care. Adjust the rack to be as level, as possible. Make sure that no part of the rack interferes with the brake mechanism; this may be difficult as centerpull brakes may require a longer or shorter transverse (yoke) cable to insure proper brake operation. Don’t settle for less than a perfect job as the rack is an integral part of your touring system.
Special Features: Some racks have a protective shield on the front of the platform just behind the brake. This keeps baggage from creeping forward into the brake cable, especially with centerpull brakes. The Eclipse, Black burn and Butler racks have this safety feature, Karrimor doesn’t.
Another feature you might want is a means of hooking a rear reflector to the rack. The Butler and Karrimor have an integral mount for this, the Eclipse and Blackburn don’t. Blackburn markets a clamp to be used for this purpose, how ever. This same clamp — with a 3/ wooden dowel as a spacer — can be used on the Eclipse rack.
Some racks are made to carry a specific make and model of panniers. You don’t have to purchase the matching set; simply be aware that such things exist and know why you do or don’t want the combination.
Front—Load Carrier
When loading a touring bike, approximately 20 to 30 percent of the bag gage weight should be over the front wheel. About 60 percent of your body weight is already concentrated over the rear wheel; if your entire equipment load is on the rear wheel as well, the handling properties of the bike are going to suffer. A bicycle overloaded in the rear is hard to steady just standing still, let alone on the road. The more weight that is placed on the rear wheel, the more stress there is placed on the spokes and the more potential there is for spoke breakage.
The solution is to apportion part of your touring weight to the front. The general practice is to do this with a handlebar bag. This is fine if your total weight is less than approximately 35 pounds (your handlebar bag would then be carrying about 10 pounds). More than that puts too much stress on the arm, shoulder and neck muscles and adversely affects the handling characteristics of the bike.
Front panniers let you put the weight right down over the axle where it belongs. This improves the handling and is easier on the rider’s upper body muscles. You can also carry bulkier gear up front in panniers than in a handlebar bag. Front panniers were rare in this country until a few years ago, but now they are more common and several manufacturers make them.
Front pannier racks should exhibit most of the properties of the rear racks that we have covered. There are two readily available in this country; Karrimor makes one of steel and Blackburn has an alloy model. Both are excellent. However, a front rack takes some of the spring out of the fork since it attaches to an eyelet on the dropout and to the front brake bolt above. This makes for a stiffer ride. The Blackburn is definitely stiffer than the Karrimor. We personally dislike this aspect of using front panniers and you should consider it when deciding whether to use them yourself.
Some of Karrimor’s front racks have a flange at the front for mounting a light. Most British lamps, including the Berec, fit perfectly into this excellent position right over the wheel.
Mounting a front rack can be more difficult than mounting a rear rack. This is caused by differing fork rakes on various brands of bicycles. A little bending and the drilling of a new hole for the eyelet bolt (on the Karrimor) solves the problem.
Which Is Best?
Each rack has advantages and disadvantages, the choice depends on what is important to you. Eclipse is more rigid; Blackburn is lightest; Claude Butler with its chrome finish and smooth line is the most attractive; both Karrimor and Butler are least expensive and easiest to repair. All are good choices. We have used each of them with satisfaction of our particular needs at the time.
- Panniers -
Many experienced tourers will tell you that choosing panniers carefully is almost as important as choosing a bicycle carefully.
Size
This is the most difficult factor for inexperienced tourers to understand; the assumption is usually “the bigger the better.” To the contrary, the size of the pannier should reflect the type of touring you plan to do. Whereas staying in motels on a weekend excursion re quires a minimum of gear, a two-month camping tour could require the maxi mum (see sect. A for a list of equipment for trips of various lengths). Our experience leading tours and teaching cycle touring at the college level indicates that people fill up whatever space they have, whether they are going 15 miles or 500.
Analyze your touring style. Do you hate camping of any sort? Are a shower and soft bed pure luxuries to you or absolute necessities? Will you end up eating out no matter what cooking gear you have with you? Do back roads and near-wilderness attract you or will most of your touring be to and among urban attractions? If your policy is cash in stead of carry, then you will need a small-capacity pannier set, or perhaps only a stuff bag or handlebar pack. Look for the right capacity to hold your kit rather than at the last minute packing into your bags anything that will fit.
= = =
The following is a general guide to matching your pack outfit to the type of touring you will be doing:
Weekend Touring (motels):
- Small rear panniers of approximately 900 cubic inches or A 10 x 20-inch stuff bag that can be strapped on the rear rack; or:
- A large seat bag; or: Handlebar bag (optional)
Weekend Tour Camping:
- Medium rear panniers of approximately 1,500-2,000 cubic inches
- Handlebar bag
Extended Tour Camping:
- Large rear panniers of more than 2,000 cubic inches
- Handlebar bag or Front panniers
Expedition Touring (long periods in isolated areas):
- Large rear panniers of more than 2,000 cubic inches
- Front panniers
- Handlebar bag
= = =
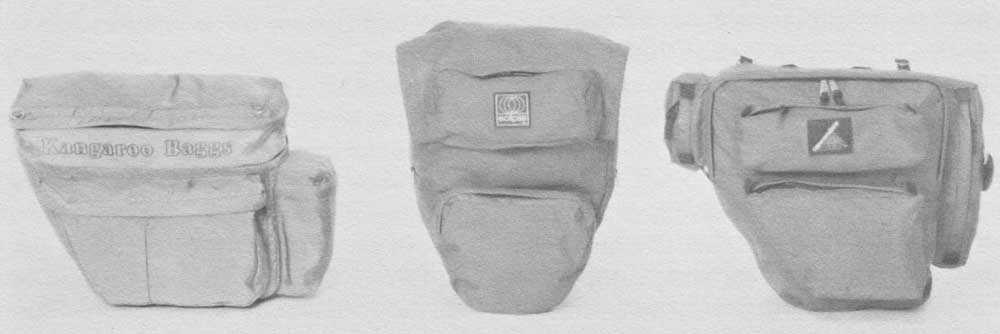
Left to right, Kangaroo rear, Eclipse Transcontinental rear, and large
Cannondale rear panniers.
Material
Since almost all American-made panniers are of nylon, most people assume that nylon is the only material worth having. Many excellent European panniers are made of high-grade cotton canvas. Europeans know from experience that canvas wears well, holds its shape better than nylon, won’t leak as much because the material expands when wet and is less expensive. They are seldom found in the United States but if you should happen onto a good set of canvas panniers, give them careful consideration.
Nylon panniers come in differing types and weights. The strongest material that is most resistant to abrasion is eight-ounce Cordura nylon. This cloth has a coarser texture on the outside and is generally used on most top-of- the-line products. The majority of pan- fliers are either six-, seven- or eight- ounce pack nylon that is smoother than Cordura; hence slightly less resistant to abrasion. All else being equal, the lighter the material, the less rugged the final product.
All of these nylons have a water proof or water-repellent coating. Many salespeople will tell you the pannier is waterproof. Not so. The material is Waterproof or water repellent, but not along seams where a sewing machine has punched thousands of holes. Neither are zippers waterproof. Hold one under a faucet if you don’t believe it. So how do you protect your gear in a not so pack? You can (1) hope it won’t rain that much, (2) coat all the seams with sealant, (3) buy or make waterproof covers like those Eclipse sells, or (4) put everything you value into plastic bags inside the panniers. We do (4), have (3), have done (2) and always hope for (1).
Construction
Are the seams straight and professionally sewn? Is there enough seam allowance so they won’t pull out? Is the stitching tight and evenly spaced? How many stitches per inch are there? (We consider any less than six per inch to be too few.) Are there double stitching and reinforcements in areas of stress? Are the seams accessible so they can be re-stitched if they pull out on the road? All of these factors determine the quality of construction; check them out.
Closures
The trend in pannier closures is definitely toward zippers. They are tidy, fast, relatively tight (not waterproof), and convenient. They also restrict the quantity of stuff that can be squeezed into a given space. Sometimes, how ever, it’s nice or even necessary to be able to extend your pannier capacity to take on an unaccustomed but consumable load such as a loaf of bread, a jug of wine or who knows what else. An ex tension of material with a drawstring can save the day. If there is a top flap held down by a buckled strap that is also expandable, so much the better.
Zippers can also be a pain on very small pockets, especially on the back of some handlebar bags when you try to close them with one hand while cycling. Velcro on an overlapping flap comes into its own in such situations. Zippers can and do fail, and sometimes simple repairs are not so simple in touring situations, especially if you have lost the metal slider. Straps and buckles are more dependable, though their flaps may gap and let in water thrown up from the road.
Just because you select the “best” and most expensive gear, don’t think it will be immune to failure or accident. Things have a tendency to go wrong at the wrong moment, especially if the item is so specialized or complicated that you cannot fix it yourself. Opt for simplicity instead of complication. Think function instead of style.
Mounting on the Rack
Whatever the method, it must be foolproof. Many touring accidents are attributed to bikepacking gear getting tangled up with moving parts of the bike. If a pannier comes loose or shifts into the spokes, you could be in for an asphalt encounter of the worst kind. Make sure the method of attaching the pannier is simple and secure.
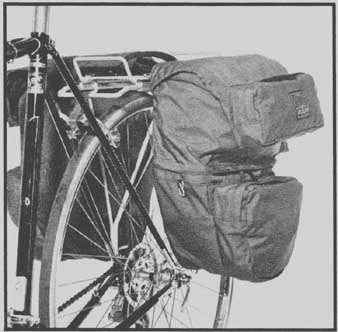
Eclipse rack with the panniers attached. Note new-style tang attachment.
Some panniers are designed to fit specific racks. Be sure you are aware of this as it can influence the final unit price considerably. The best example of this type of union is the Eclipse line. De signed as a system, the racks and panniers are matched specifically to one another, providing a very secure, convenient attachment. The total package is clean, functional and innovative, well worth the investment if the Eclipse panniers appeal to you. Eclipse does market an adapter plate ($5) so their panniers can be used on other racks; this is a necessity for the front panniers since there is no Eclipse front rack.
Karrimor panniers are also de signed to fit their own rack best as the clips are spaced exactly so there is no forward or backward sliding. They do fit most other racks without a special adapter.
A factor in how well panniers attach to the rack is how easily they are re moved. Imagine standing in the rain trying to undo semi-permanent attachments so you can move your gear into the tent. We had that type on our cross- country trip and usually ended up scooping all of our gear out in one untidy heap rather than try to get the pan- fliers off. Fortunately, the manufacturer has changed the design.
Design and Shape
The primary idea with any load-carrying system on a bicycle should be to get the weight as low and as centered over the axles as possible. The higher the weight, or the more it extends be hind the bicycle, the more top-heavy the bicycle becomes. That is why panniers were designed in the first place. Otherwise you could simply stack suit cases on your rack and pedal off. Many people, especially in Third World countries, do just that or something similar, but it’s not recommended for long distances and efficient cycling. To the opposite extreme are the systems used by experienced cyclists in Europe and Japan where specially designed racks ex tend from below the top of the wheel down to within six to ten inches of the ground. With panniers attached they have a very stable riding experience with no sway or top-heaviness. This is the system to have if money were no object. The rest of us must make do with mass-produced systems.
As you examine your potential pan- fliers, determine how low they are carried on the rack. Most square or rectangular panniers look neat and roomy, but don’t offer the air-flow ad vantages of the tapered panniers and carry most of the weight too high. They are easier to pack but we don’t believe that ease of packing should be valued ahead of handling characteristics on the bicycle.
Many such panniers extend above the top of the rack. This really doesn’t make much sense when you look at the way it limits the load-carrying capacity of the rack. A sleeping bag can be strapped lengthwise on the rack be tween two panniers, but this space must usually also hold a sleeping pad and a tent. There are definite problems with stability and getting it all tied down if you try to stack it all on top of the lengthwise bag. The answer is to put everything on sideways, but then you discover why you don’t want panniers that extend above the level of the rack. If you manage to get everything on and tightened down, it’s almost impossible to get anything out of your panniers without undoing the entire package. This is especially hard to do if you have zippered openings on your panniers, unless the zippers extend well down the sides. Insist on panniers that are flush with the top of the rack; the weight is lower, as it should be, and the openings should be accessible even when every thing else is mounted on the rack.
Another advantage of tapered over rectangular panniers is heel clearance as you pedal; this is greatly appreciated if you happen to wear a size-11 1/2 shoe as Tim does. You can always move rectangular panniers back if this is a problem, but then you are putting the weight back into that zone of instability behind the center of the wheel. Tapered pan- fliers put the weight right where it should be, over the axle.
Another design feature is the pocket. Many cyclists say that you can’t have too many; to a certain extent we agree. But each pocket adds to the cost of the product. They are useful and convenient, but how many do you really need for your type of touring? We like at least one good-size outside pocket for those frequently needed items, which eliminates having to dig through the en tire main compartment. The best arrangement we have seen is the Eclipse Transcontinental with three well- thought-out exterior pockets, all with convenient two-way zippers. There is another zipper in the middle of the main compartment, which allows access to the bottom portion without digging from the top. A final touch of class is the zip- out divider separating the main compartment, giving the option of two smaller units or one large one. How ever, the cyclist pays dearly for such conveniences, so consider your needs carefully.
Backing Material
Most panniers have some sort of permanent or removable, rigid or semi rigid material to keep the backside of the pannier flat and out of the spokes. This is an essential safety feature. Common materials are hardboard, aluminum, corrugated plastic, stiff foam or nylon. All of these do an adequate job if the system of attachment to the rack is adequate. The only time we had a problem along these tines was with a set of panniers with a soft foam liner. When not fully loaded they would turn into the spokes in a side wind, not only because of too soft a backing but also due to an inadequate tie-down system on the struts. Take your bike with you when pannier shopping (if you already have a rack) and try them on before making your purchase.
Off-Bike Handling of Panniers
If you foresee much traveling by public transportation where you are separated from your bike for fairly long periods you will want to carry your panniers with you or check them separately as baggage. Most can be tied together at the tops and bottoms with short pieces of nylon cord, or even strapped together. But some sort of carrying handle is mandatory. Carrying bulky panniers under your arms as you rush for a plane or train is not the way to go. Some panniers have an optional single or double shoulder strap (backpack type) arrangement. The latter usually is de signed to carry only one pannier with any degree of comfort; since you are apt to have your handlebar bag suspended from a shoulder as well, you might find this as awkward as we do. The first time you strip your bike for a trip by public transport you may decide that nothing is so important as a decent off-bike carrying system. Remember, however, that the majority of the time your baggage will be on your bike, not on you.
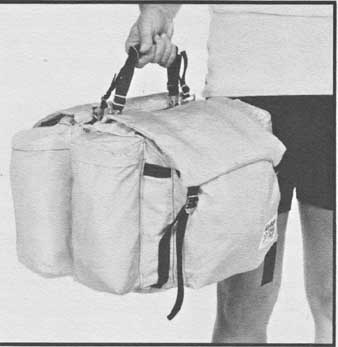
Kirtland rear panniers filled, snapped together and being carried by
their handle.
Color
Logically, the only consideration here is safety. Panniers should be as bright and easy to see as possible. But most of us are not logical creatures so we choose what is pleasing to our senses or matches our bike. Try for safety and color coordination. Most brands of panniers come in red, blue, orange, yellow or sometimes green. (Karrimor has a black, cotton canvas model although it’s next to impossible to get in the United States.)
Handlebar Bags
Most of what we have said about panniers applies to handlebar bags with a few specific differences.
Attachments
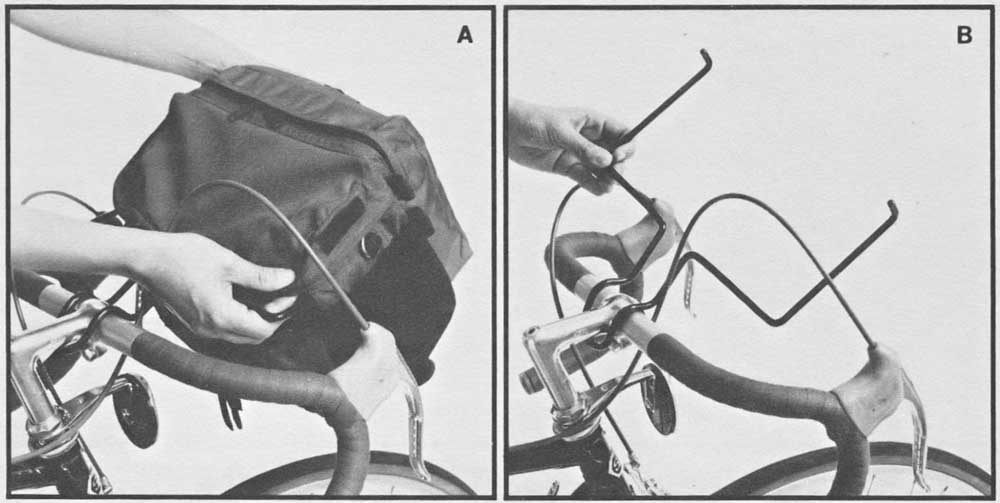
Make sure the handlebar bag won’t interfere with your brakes or limit the places you can put your hands on the bars. The better bags use a twin metal fork that hooks around the handlebar stem and extends toward the front of the bike to support the bag liter ally free of the bars. This system is far superior to any that attaches the bag directly to the bars. The only problem is that there is more muscle strain in steering with the weight of the bag so ex tended, with a slight reduction in stability. The only way to get away from this is the arrangement used by many European tourists where a small rack to support the bag extends out from the front brake just slightly above the wheel. This is better but is difficult to fit on a wide variety of bicycles.
If you choose a bag without a rack, you can sometimes use one of the other racks available (like the Eclipse or Kirtland) or purchase a Park Tool Company front-bag support. Insist on the steel model instead of the alloy if you expect to carry more than a few pounds. All other handlebar racks are of steel. Since you will be taking the bag off a number of times a day, look for an attachment method that is simple but sturdy.
Left to right, Cannondale Trestle, Eclipse Professional and Kirtland
S/T Elite bag.
If the bag is suspended by the rack alone, most models have a tendency to jump around on rough roads or when going over bumps. Some manufacturers use elastic stretch cords that extend from the bottom of the bag to the front forks where they hook to the eyelet, rack or fender stay. These work well, but we don’t like the potential for breaking or becoming unhooked and getting wrapped up in the front wheel. Others use a short elastic cord that wraps around the head tube.
Pockets
Like panniers, handlebar bags are greatly enhanced by pockets. They add to the cost, of course, but they also aid your sanity as you try to find some item while cycling. Your handlebar bag is somewhat like a desk where all sorts of handy and necessary gadgets can be stored at your fingertips. Pockets and dividers keep things organized, but they must be large enough to be useful yet small enough to separate. On many bags the rear pockets are so small as to be almost impossible to get into; with zippers they are impossible to get into safely while pedaling.
Two-way zippers are handiest, but we also prefer the main compartment to have a flap and Velcro closure as we leave the zippers unzipped most of the time for easy access. You need plenty of flap over the zippers to keep rain out. It’s most convenient if the main compartment opens toward the rider, both for ease of access and for protection against rain.

Eclipse front-mounting rack for handlebar bag (A). Note how rack is
mounted on stem and how bag fits on support rack (B).
Lining
Many riders carry their camera gear in the handlebar bag. You need some sort of stiff foam or plastic liner for this and to give the bag shape. Some of the better bags make such excellent cam era bags that we use ours continually even when not on tour. If you are serious about photography, then give special attention to your choice of handlebar bags. Many bags come with detachable shoulder straps, but you can always make or buy one if not.
Map Case
This is by now a standard feature on most bags. It’s usually a built-in clear plastic cover under which you slide your map so you can, in theory, read the map as you ride along. In reality that is a good way to end up in a ditch, down a grating, or wrapped around some car’s fender. Besides you can’t read it anyway because the road is either too bumpy or you’ve stuck it in upside down.
Map reading is for the side of the road, preferably while sprawled under some shady tree sipping orange juice. If you don’t want to remove your entire handlebar bag for this, look for a map case that is detachable. Years ago we made our own out of soft plastic pencil holder envelopes using Velcro patches glued to the bag and the map case. They worked great. A detachable case can be replaced after the sun and weather have rendered it opaque.
Size
Handlebar bags range from 400 to 700 cubic inches; the size you buy should reflect how much you plan to carry. Consider weight as well as the volume of your gear. How much will you put in it? How heavy is your gear? Will you be using front panniers too? Do you plan to use it as a tote bag when not touring? Will it safely hold your camera gear plus other essentials you want at your fingertips?
We began touring with very large handlebar bags and are now using smaller ones. Tim is getting away from using a handlebar bag at all when not touring; he uses small or front panniers mounted on his rear rack for day rides and errand running. Don prefers riding with the handlebar bag since she uses it as a purse while shopping. Handlebar bags definitely affect the steering and handling of a bicycle; buy only what you think you need, not what you think you can fill.
Miscellaneous Packs and Gear
Although panniers and handlebar bags are the accepted standard for most bicycle tourers, there are a number of specialized items that can some times be used to fill a particular need. Eclipse has several innovative mini- packs on the market. One is their Omni Pack ($10), which is about two inches high and fits on their handlebar bags where the map case attaches. This mini-purse or large wallet keeps all your valuables in one small place and can be quickly removed for shopping or carrying with you. It can also attach directly to your handlebars or belt with two Velcro straps.
Eclipse also makes a Rac-Pac ($13.50) that attaches with Velcro to the rear rack. It’s a rounded rectangle and will hold 380 cubic inches of stuff, about equivalent to a quart of milk, a dozen eggs and a loaf of bread.
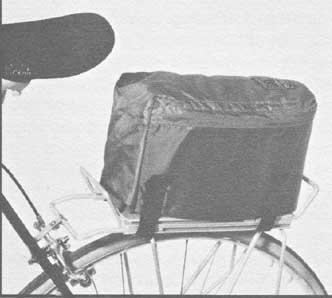
Eclipse Rac-Pac in Eclipse rear rack.
You can carry your handlebar bag on the rear with Eclipse’s clever alloy post. It attaches to the seatpost and accepts a standard handlebar bag rack. You have all the advantages of the handlebar bag without the detrimental effect on your steering. This interesting device is called the Seat Post Thing and sells for $10. It can be used on frames that are 21 inches or larger.
You sometimes see riders with a narrow pack hanging from the top tube to fill the space between the main tube triangle of the frame. It looks neat but has definite drawbacks. You are, of course, limited to carrying very thin things in the pack to prevent rubbing against your knees as you pedal. It takes the brunt of any crosswind, and it uses up the space you need for mounting a water bottle. It might work nicely for artists or architects who need to transport sketch pads, but its uses are limited for cycle touring. A Midframe Bag model is available from R.E.I. (Recreational Equipment, Inc.) for $12.
R.E.I.’s Pannier Extension ($9) does have great possibilities for touring. It’s a rectangular nylon bag, 4 x 12 x 15 inches, which snaps onto the top of one of their pannier sets. It’s designed to carry a sleeping bag, tent, sleeping pad or whatever else you want in there. It’s a good idea if these particular items hap pen to fit into that amount of space. If you are handy with a sewing machine, however, you could make your own to custom-fit your gear and simply strap it onto the rack. For light load carrying, such a solitary stuff bag might be all you want or need.
A common minipack is the seatbag ranging in price from $3.50 to $35, de pending on size and complexity. Most are used as utility bags to carry tools, locks, lunches or such on day rides. They can be used on tour although the sleeping bag is usually taking up that space. For motel touring with limited gear a seatbag could be a worthwhile investment, especially if you leave most of your stuff in the motel while sightseeing. The seatbag will hold your essentials for the day so you can ride unencumbered. If you want a very small seatbag only for tools and lock, the Keithley Nylon Tool Bag is available from Third Hand for $3.50.
In Europe, especially in England, seatbags come in large sizes and are used by tourists to carry all their gear for staying in hostels or hotels. The behind-the-saddle location is excellent but we have had problems keeping these large bags in place and out of the way of the brakes. Karrimor makes three very nice, large seatbags but we have yet to be able to get one mounted right. We ended up adding Velcro to each corner so the bag could be mounted lengthwise on the rear rack like Eclipse’s Rac-Pac. Mounted in this manner, Karrimor’s large seatbag has ample room for all the gear necessary for weekend motel touring.
When selecting a seatbag in the normal 100- to 300-cubic-inch capacity, check for a shape-retaining liner and a two-way zipper that wraps around three sides for easy access. Better bags are priced in the vicinity of $10.
Modifications: Doing It Yourself
Many bikepacking items, especially the less-expensive models, can be and sometimes must be modified to suit your needs. People and bicycles vary widely; don’t feel restricted by what you buy. Modify factory gear to satisfy any peculiarities you have. By the time we finished changing and adding to our first handlebar bags, they bore little re semblance to the original articles. Most of the better gear today is of excellent and thoughtful design, but go ahead with any changes you need to do to make a good piece of gear better.
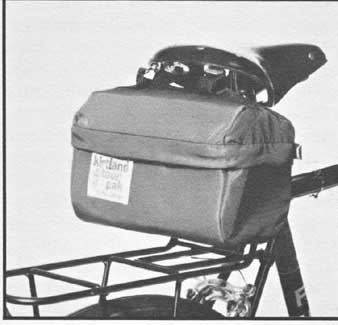
Kirtland Century 100 seat-bag. Seat-bag loops are available if saddle
is without them.
If you really enjoy doing your own thing, or finances dictate that you must, make all your own packs. The materials you need are readily available through such mail-order houses as R.E.I. and EMS (Eastern Mountain Sports, Inc.). With a little ingenuity and patience you can end up with really superior products. Our next set of expedition panniers is going to be homemade so we can put some of our ideas and experience into practice with no compromises. When making it yourself you are only restricted by your capability and imagination; you need not worry about whether it will sell.
If tackling the entire thing from the ground up is too scary, there are a number of kits available with complete instructions for sewing your own bags and panniers. The quality is generally good but the designs are somewhat limited. You are, however, free to make modifications as you go along.
Recommendations
“OK, but what do you recommend?” Inevitably at the end of the lecture, or after a long pitch in the bike shop, this is the question. The choice is yours, but what if you can’t decide even after looking at the selection in view of all the above considerations?
We hesitate to make outright recommendations, partly due to the huge variety of bikepacking equipment avail able. Sometimes it seems that everyone in Boulder, Colorado, with access to a sewing machine is turning out panniers. It’s impossible for us to have seen, let alone have used, everything on the market. Tim has spent considerable time, aside from his research and teaching, with Two Wheel Transit Authority, possibly the most fully equipped bicycle-touring shop in the West, so he is familiar with most major brands of touring equipment. Yet we firmly believe that final selection is highly personal, and should be based on individual needs, desires, values and finances. We rarely use the same gear on each tour, varying our choice according to the type of tour and its particular set of circumstances. But we are fortunate in having a large selection from which to choose.
If you insist on recommendations, the following is as close as we can come. Use it only as a guide, not as an edict. As you know by now, bikepacking gear is not cheap. Shop carefully for equipment that meets your needs, is of good quality and is durable. With care it should last your whole cycling career. You can be pessimistic and dwell on the fact that everything costs much more now than several years ago; or you can be optimistic and realize that everything is much less now than what it will likely be in the future. As always, the choice is yours.
-Shopping Guide-
Top-Quality Manufacturers:
A.Y.H.
Cannondale
Carrying Gear
Eclipse
Preferred All-Around Front Pannier
Kangaroo
Eclipse Superlite ($40)
Karrimor
Kirtland
Best Overall Value (Panniers) R.E.I. Pannier II ($42)
Touring Cyclist A.Y.H. ($32)
Karrimor ($45)
Preferred All-Around Pannier Set
Best Overall Value (Handlebar Bag)
Eclipse Transcontinental ($85)
Cannondale Casey ($15)
Preferred All-Around Handlebar Bag
Eclipse Professional ($46)
Best Overall Value (Front Pannier)
Karrimor ($20)