Assuming you are progressing through this guide section by section, you have now chosen a touring bicycle, fitted it exactly to your body specifications, and are acquainted with or have modified your gearing range to suit your particular style of riding. We will now consider basic safety and auxiliary equipment as well as how to hold onto your investment.
Helmets
Aside from the bicycle itself, your most important piece of equipment is what is on your head in addition to what is in your head. You may think a helmet is not very important, or perhaps even detrimental, to your touring pleasure. We find life on a bicycle preferable to life in a hospital bed, or no life at all. Jim would have lost a number of friends — which he claims he can hardly afford — and in fact would be a widower with two small children were it not for bicycle helmets.
Accidents don’t always happen to someone else. If one happens to you, most of your parts can be pinned, stitched or taped back together. How ever, you’ve got real trouble if you spill any of that gray matter inside your skull. If the $35 or more cost deters you, consider that you couldn’t even see a neurosurgeon’s receptionist for that price. From the neck up is no place to economize.
Some cyclists object to the extra weight of a helmet. The better ones weigh just over a pound. Our daughter wore one almost every day for more than two months when she was nine years old and never once complained about the weight. Your neck will man age to hold your head and your helmet up without much additional effort.
Another argument against helmets is that they are hot. We have crossed the Mojave Desert in July when temperatures exceeded 110°F, and toured in both Hawaii and the eastern states when temperatures and humidity were in the upper 80s. Our experience is that wearing one of the better helmets is cooler than wearing no helmet at all. The bright shell reflects the sun’s rays and holes allow air to pass through creating an evaporative cooling effect on the perspiration occurring inside.
As you have figured out by now, we are real helmet fans. There is admittedly one major drawback that involves the ego. What are people going to think when you are out there riding around with half an eggshell on your head? If you ride with a club or group, chances are that many of them ride with helmets. You feel like one of the “in” group when you have numbers on your side. It can get rather touchy if you ride alone or as a family, especially if people in the area are not used to such sights. The only advice we can give you is that, like seat belts in automobiles, helmets have been proven to save lives again and again. By wearing one you are showing intelligence, good common sense, and that you value your life. Drivers will see that you are serious about your cycling and will be more apt to share the road. You are also helping to educate people by familiarizing them to the sight. If these arguments don’t totally convince you, keep in mind that by the time you are fully outfitted and packed up for a long tour you will look something like a traveling circus anyway; what difference in your appearance does a little thing like a helmet make?
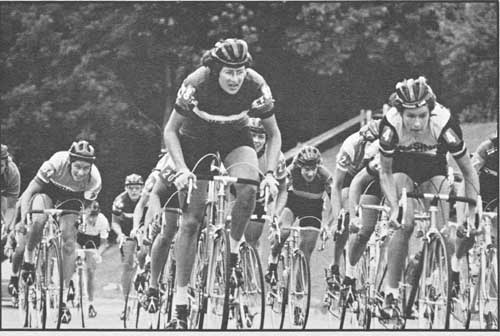
ABOVE: Racers in action wearing strip helmets.
There are a number of helmets available but only a few function. Don’t attempt to save dollars or cut corners when it comes to your head. First, let’s talk about the leather- or plastic-strip headgear, the one that looks like you have an octopus wrapped around your head. These were the first on the block and are still popular with the racing crowd due to their light weight. Fortunately, however, racers are beginning to want more protection than that offered by the strip helmets, which is practically nil. If you ride only on a smooth, wooden racing track with no rocks, curbs, trees or posts, they might be of some help. In the real world there are too many objects that can do serious damage to your skull between or even through the open, thin padding of the strip helmet. It might hold your head together, however, until you get to the hospital.
Next on the scene was the hockey helmet. This has a hard plastic shell with thin foam padding inside. Up until the early 1970s it was the best thing around, mostly because there wasn’t much else available. But this helmet is generally very hot, uncomfortable and offers little protection against impact at high speeds given the distance from the ground of the falling object (your head). The hockey helmet has had a place among children as some can be adjusted to a small size, but specially made children’s helmets are now entering the market. With a knit hat or two as padding, the hockey helmet can be worn by infants. For an adult, there isn’t enough protection to warrant its use.
In the past few years a number of specially designed bicycle helmets in a wide variety of styles have come on the market. Some have undergone extensive testing and are excellent; others seem only to fill a void with no testing or evaluation. As usual, the buyer must be ware; insist on proven quality.
There are only two helmets we feel confident in using; one is the MSR, the other the Bell. Both products have been thoroughly tested with the companies standing firmly behind their products. Both are light, cool, comfortable and offer the best protection available to cyclists. Do yourself or a loved one a favor — invest in a good helmet.
Aids to Visibility
Once your head is protected, look out for the rest of your body. Bright clothing is the best guarantee that you will be seen out there in the jungle. We go into greater detail about clothing types and materials in section six, but we mention it here as a prime component of safety while riding or touring.
Other products that aid your effort toward visibility are bike flags, bright vests and safety patches. Bike flags are the subject of much controversy in the bicycling world. Many cyclists feel that flags are amateurish and in fact slow you down. As to their lack of professionalism, it’s true that you don’t see many Tour de France racers with bike flags flapping in the breeze. However, they are not worried about lumber trucks and semis either. As to being a drag, Chester Kyle permanently put that argument to rest in the March 1976 issue of Bicycling. In a series of tests, Kyle determined that a bike safety flag offers no more air resistance than a frame- mounted water bottle. The touring cyclist should be at least as concerned with safety as with dehydration. If flags have any serious drawback it’s the gymnastics required of the rider when mounting or dismounting. If you choose to use one, you soon become accustomed to it.
We believe in bike flags for several reasons. They greatly increase your visibility because they are continually moving, thereby better attracting the attention of motorists than relatively stationary bright clothing or bike packs.
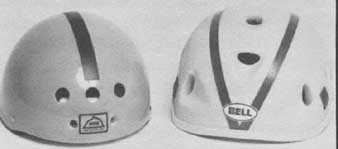
MSR and Bell helmets.
Also, they extend into the air above the height of the rider. This is especially helpful in crowded, urban situations.
There is no longer the choice among bike flags that there used to be both due to the crash of the bike boom and their disfavor among so-called serious cyclists. Those that are on the market are generally sad items, at best. We use and prefer those made by Schwinn. Since they cost more you might have to special-order from the factory through your local Schwinn shop. Schwinn flags are superior because they are tapered like a fishing pole. This gives a lot more action at the tip where it counts and the amount of action is not dependent on your speed. They have a small ball on the upper end to protect your eyes when the pole is bent. Pull that off and reattach it with good glue as it’s prone to disappearing.
Flags usually come in international orange or bright yellow. Yellow is more visible in green, wooded areas such as the eastern United States, but orange is best in the dry West and the central states. One flag will survive a cross country trip, but you will probably have to replace the pennant for cycling be yond that. We have had good success with red and orange rip-stop nylon re placements Susan sews on the sewing machine.
If flags don’t appeal to you, or you want to double your protection, try the safety vests you see highway-repair people wearing. They are a good idea if you don’t mind looking a bit like an orange-breasted fly catcher. Choose one made of material that can breathe or make your own.
A popular item, especially with American Youth Hostel, Inc., (AYH) touring groups, is a bright orange or red triangle of material worn on the lower back or on the bike packs; This is the standard symbol for slow vehicles and is readily recognized as such by most motorists. We’re for anything that improves your chances of being seen. Take your pick or use them all.
Rearview Mirrors
As important as being seen is to see for yourself. For that the rearview mirror is a critically important piece of equipment. We don’t mean one that attaches to your handlebars, rather the small dental-type mirror that fits onto the temple of your glasses or to the rim of your helmet. Most cyclists are paranoid about being attacked from the rear by a Detroit gas guzzler. It rarely does any good to point to statistics, which prove that few cyclists are hit from be hind; they understandably don’t want to be one of them.
Without a mirror you must turn your head to look behind. Not only do you lose sight of what is ahead, but there is a natural tendency to drift to the left as you twist around. It’s small comfort to learn that you have drifted directly into the path of a Peterbilt truck instead of the Greyhound bus that you thought you were turning around to see. A rear- view mirror attached to your glasses or helmet keeps you aware of yet out of the traffic with a simple movement of the eyes. You should, of course, be wearing glasses while you cycle whether you normally wear them or not. Glasses, regular or tinted, protect your eyes from flying insects, stones and other roadside miscellany.
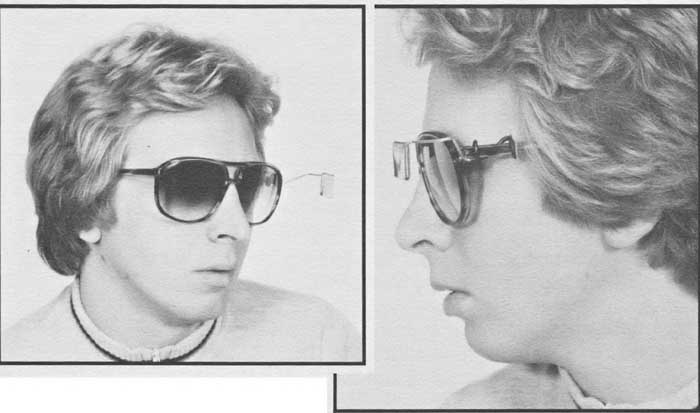
ABOVE:
Cyclist wearing simple wire-style rearview mirror attached to regular
glasses or sunglasses.
Rearview mirrors, like the proverbial mousetrap, are always being improved. We like the original style made of stiff wire that slips on the temple of your glasses. Susan tried a plastic model while crossing the Mojave Desert; four days of extreme heat and rough shoulder riding rendered it useless. The fewer joints, clips and plastic parts, the better. You want that mirror to fasten in the exact same position every time you use it and you want it to stay there no matter what road conditions are. If you can’t depend on it, you are better off without one.
They come in two or three styles to fit different-size glasses and cost $3-$5. The mirror itself may be square, rectangular or circular; pick the one that shapes the world as you like it.
Once you have your mirror, do the basic adjustments while standing with both feet firmly on the ground. Bend it so you can just see the edge of the center portion of your left ear (naturally you wear the mirror on the left side where the traffic is). That should be fairly close to where you want it. Now, get on your bike to try it out. If you find it’s not quite right, STOP to make your final adjustments. This may take awhile, but once it’s right you should not have to adjust it again — unless you sit on it.
Hand Protectors
Another item that we consider part of auxiliary safety equipment is some sort of padding between you and the handlebars. As mentioned in section three, many cyclists experience numb or tingling fingers when cycling for long periods of time. There are three approaches to dealing with this problem; use of randonneur handlebars that pro vide a variety of hand positions (as discussed in section two), use of riding gloves that pad the palm, and use of some sort of padding on the handlebars themselves. If a person is particularly sensitive, it can take all three.
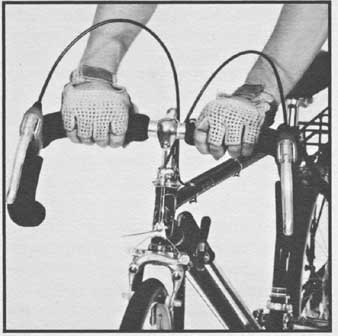
ABOVE: Rider wearing cycling gloves with hands on padded randonneur handlebars.
Riding gloves look like golf gloves with cutoff fingers, an open-weave knit top and a leather, padded palm and fingers on the underside. The padding not only protects the ulnar nerve from being pinched but offers some protection against road shock by making it generally more comfortable to grip the bars. Road shock can really take its toll. On our cross-country trip Kirsten wore through the leather-padded palms of her gloves in about 2,500.miles. Gloves also offer some protection it you ever make that infamous trip over the handlebars with a scream on your lips and your hands extended in front of you. Such a maneuver is hard on your palms and on emergency-room personnel who hate all the work it takes to remove the gravel. Riding gloves help.
There are only a few varieties of gloves available and most are good quality. They cost $1O-$15. One way to preserve your investment is to wash them occasionally in cool water with hand soap. Allow them to line dry a little, then put them on to finish drying. This insures a good fit by preventing the cot ton-knit backing from shrinking.
Aside from protection, other serious cyclists will recognize you as one of them by the little round patches of tanned skin on the backs of your hands. That alone should be worth the money.
If you need still more padding, you will have to add it to your handlebars. Most production bikes come with cotton cloth tape wrapped on the bars. Al though far superior to plastic tape, cloth tape offers little protection to the hands from road shock or pressure on the palms. If you have never been troubled with ulnar nerve problems and your tours are generally short, you can probably do without handlebar padding, especially if you wear riding gloves. However, for long tours some sort of padding would be a wise investment, even if you have not had problems to date.
We have tried many of the handle bar padding tapes available. Until recently we always used Bailey III tape ($4). It’s a rubberlike product with tapered edges that can be wrapped on the bars like regular cloth tape. It’s rather sticky and attracts dirt, so we put a layer of cloth tape ($1 per roll, two required) over the Bailey Ill. The cloth not only feels better and stays cleaner, but protects the padded tape from wear and tear. When this outer cloth tape begins to wear, we simply wrap another layer over it.
If you prefer very heavy padding on your handlebars, you might try a product called Grab-On ($8). Tim has been using it recently with good results. It’s a black foam-rubber tubing about ¼-inch thick that looks like it might have been designed as refrigeration pipe insulation. Depending on the model, it either slips on the bare handlebars in one piece, or is split down one side to be placed over the bars and glued together. Buy the solid variety as the other has difficulty staying glued together. Both come so that one section is placed above the brake lever, one below. Tim doesn’t use the lower section because of the way it feels as the brakes are applied. Many people use it there and don’t see it as a problem. We don’t think the Grab-On will last as long as Bailey Ill with cloth over it, but it certainly pro vides a smooth, comfortable ride over even the roughest road.
The best piece of bicycle-touring safety equipment cannot be purchased at any price, It’s common sense. Even if you are fortunate enough to have it, it’s a good investment on your part to add the few items we have just discussed. Everything we advocate to this point, including the helmet, costs about $60- $70. That is pretty inexpensive insurance against injury.
Tire Pumps
Some other touring equipment items are not necessarily safety related but can be important for your comfort and convenience. At the head of the list is the frame-mounted tire pump. If you live in a metropolitan area it’s some times hard to imagine that there are miles of country out there without gas stations at every corner. Even if you won’t be touring in open country, gas station air hoses are notoriously hard on bicycle tires. The scenario usually goes like this: “Hey, lady, let me help you with those tires.” BLAM! “Wow, you must have had a bad tire there. Here, let me do the other one.” BLAM! “Imagine that, lady, two bad tires. You better get those fixed.”
If you insist on inflating your tires at gas stations, do it yourself, slowly. Those air hoses have in excess of 100 pounds of pressure and it comes out fast because they are designed for very large-volume automobile tires, not small-volume bike tires. Keep your fingers pressed on the tire to monitor the inflation rate and use short, quick blasts of air. Don’t trust the gauge on the hose as it surely has been dropped and probably has been run over a few times. Take your own along to use. Better yet, avoid the entire process by carrying your own pump with you, neatly attached to the frame out of the way on your bicycle.
Only a few of the many pumps on the market are dependable. If you ride with tubular tires or have Presta-valve clincher tires, the Silca pump is a tried and true companion. A new model is now available to fit Schrader valves. It comes in colors to match your bike and in varying lengths (frame mounted) to fit between the bottom bracket and the top tube.
We consider the Zefal pump best for touring with clincher tires and Schrader valve stems. It has a quick, thumb-lock device, which attaches to the valve stem so that it goes on and off without significant loss of air. Avoid any pump with a screw-on valve fitting; you are apt to lose more air getting it off than you put into the tire.
The Zefal comes in three models; the Zefal hp made of lightweight silver metal that fastens to your frame with an umbrella clip; another hp made of plastic that fits on the frame like the Silca; and the hp like the plastic hp but with a built-in gauge to allow you to set the de sired pressure, so the air automatically bypasses the valve when that pressure is reached. All models come with a con version unit for Presta valves.
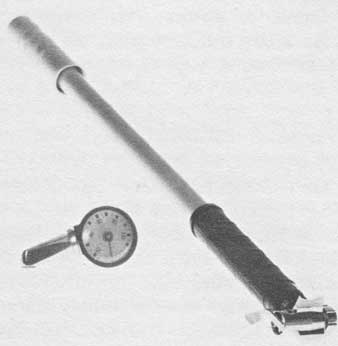
ABOVE: Zefal high-pressure (hp) pump alongside of Pressograph pressure gauge.
Any one of these pumps will give you years of service and is capable of inflating your tire to over 100 pounds, depending on the strength of your arm. Prices range from $10-$20; the built-in- gauge model is the most expensive.
You should have a good, reliable gauge in your equipment if you don’t have one on your pump. Be sure the gauge you buy is for bicycles, not auto mobiles. Car gauges usually don’t register high enough for bike tires and are not designed to attach tightly to the valve stem. A good bicycle gauge will have a spring-loaded gasket inside the stem that makes complete contact with the top of the tire valve stem before al lowing air to pass from the tube into the gauge.
We use and recommend the Pressograph dial-type gauge. It’s accurate, reliable (if not dropped), and registers up to 115 pounds of pressure. It sells for over $6 and is available for either Presta or Schrader valves. The pencil-type gauge made by Dunlop is less expensive but also very good.
Water Bottles
As devastating on tour as not being able to put air into your tires is not being able to put water into your body. Dehydration is a serious problem that we will discuss later, but even for short rides you should have a water supply literally at your fingertips. The quickest and easiest solution is the frame-mounted water bottle or bottles. You could carry your water supply in your handlebar bag or rear saddlebags (panniers), but that requires stopping to drink. With the bottle(s) attached to your frame in plain view, it’s easy to remember to fill them and with a little practice you can use them adeptly while riding. Water-bottle holders (cages) can be attached to the down tube, the seat tube or even to your handlebars. Most riders prefer the tube locations.
Your bicycle pump will already occupy one of the tubes, probably the front of the seat tube, so you might mount your water bottle on the down tube as close to the bottom bracket as possible. It will be within easy reach while pedaling after you become accustomed to its location.
Cage types include those that attach directly to the frame with small bolts (if your bike has braze-on attachments), those with a permanently affixed clamp that attaches to any tube, and those with a removable clamp that fits either way. They are made of chrome-plated steel or aluminum alloy in either silver or black. Prices range from $2.50-$10. The TA alloy cage is more expensive; the cheaper steel weighs more and will eventually rust. Higher price usually means that the method of construction is more lasting and secure as well.
As for the water bottle itself, look for TA, Maraplast, REG or A.L.E. They all give good service and cost from $2- $3 each. If a plastic taste prevails when the bottle is new, put in ¼ cup of vinegar and fill with warm water. Let that sit overnight; don’t forget to drain and refill with fresh water before you use it.
Lights
Most touring bicyclists prefer and plan not to ride after dark. However, it may sometimes be necessary; that is no time to realize you don’t have a light. On our cross-country trip, we rode through the western deserts in July. It was far too hot to be on the road after the noon hour, so if we had a long stretch to cover before the next camp (water), we had to get up to be on the road as much as an hour before day light. We never rode at night, yet we sometimes rode in the dark. On tour you never know when an emergency or an entertainment may delay your arrival at an expected place until after dark; it’s best to be prepared for the possibility.
There are two main types of bike lights — generator powered and battery powered. If you do a good deal of riding after dark, either on tour or around the neighborhood, the generator light may be best for you. It has a relatively high output of light and you don’t have to buy batteries or a battery charger. The disadvantages are high cost, the drag it places on the bike tire and its somewhat delicate nature. We personally dislike the fact that it goes off when the bicycle is stopped. Intersections are the most dangerous places for bike riders, yet the generator light leaves you without illumination when you need it most.
If you decide that the generator light best suits your needs, we recommend the Soubitez and Union models at $10-$15. Find a bike shop that stocks the rubber cap that fits over the generator wheel; it helps preserve the side wall of your tire where the generator wheel rubs.
The battery light also has disadvantages. Some don’t provide much illumination and batteries are expensive. But it’s light in weight, dependable (as long as your batteries hold out), re mains on no matter what the bicycle is doing, and — perhaps its greatest ad vantage while touring — it can be re moved and used around camp. If you plan to camp out you will need a light anyway. Why not have one that serves two purposes?
For bicycle touring a battery light must be bright, legal, lightweight, reliable and it must fit your bike when the bike is outfitted with racks, packs and panniers. These requirements negate a lot of lights, including the arm/leg light; it’s not legal in many states when used by itself because it’s not bright enough. As for the popular Wonder Head Lite, you will frequently be wondering where you can buy another battery.
For a long time Tom used a chrome lantern ($4) that used two D cell batteries and had a swivel head. It served its purpose but offered little illumination. He has since discovered the Berec ($6), made in England. It’s plastic, uses two D batteries, which can be found even in Hanksville, Utah, and comes with a mounting bracket for the handlebars. It’s of superior construction and has a fine, specially formed tough plastic lens. He has yet to find a light of comparable weight that is as good. Berec makes an excellent red rear light ($4) that uses two D batteries and we have heard good reports on the CEV 181 ($5) powered by two C cells.
Whatever kind of light you choose, there are some tricks to using one. The light not only lets other vehicles see you, but it shows the condition of the road immediately ahead of you. Always assume there is a huge chuckhole or dead muffler just beyond it waiting for you; keep your speed down and your attention sharp.
Be sure that your light will stay together and on your bike when you hit rough roads or bumps. Tape over the battery compartment if necessary (it is with the Berec rear light), and reinforce the mounting system. Try to mount the light low so you can better see the road. Tim used a front reflector mount that fit onto and extended in front of his front brake, but now uses a hard-to-find English light bracket that is held in place by the quick-release mechanism on the front wheel.
Always carry an extra bulb; unusual ones can be hard enough to find but when one goes out in the dark, any stores around are likely to be closed. On some models the extra bulb can be taped inside the light. Use heavy-duty alkaline batteries for obvious reasons. Finally, when it’s not in use, either re verse the batteries or tape the switch in the off position. It won’t do any good to have well-lit pannier interiors all day and no light at night.
Whether you plan to do any night riding at all, or if you simply want to be legal, you must have a full complement of reflectors. That means a red one to the rear, a white one to the front, amber ones on both sides of the pedals, an amber or white one on the front wheel, and a red or white one on the rear wheel. If you have a choice use white on the wheels as it reflects better than either red or amber. If you swear you will never ride at night and you don’t care what the law says, at least have a red reflector to the rear. It may give a driver a few seconds of reaction time before he plows into you on that one time when you just couldn’t help being out there after dark.
Kickstands
A kickstand is a piece of auxiliary equipment that we feel is very helpful to the cyclist. Most “serious” cyclists wouldn’t be caught dead with one but we are more concerned with practicality than style and highly recommend one. Without a kickstand you must lean your bike against some sort of support. Many times the support doesn’t do the job so your bike is on the ground with a few more scratches in the paint and maybe worse damage elsewhere. If there is no support handy, the bike gets put down on its side, packs and all. This is just too hard on everything and not practical be sides.
There are two real objections to kickstands. First, they are heavy. They add some extra weight to your bike but it’s relative to other important considerations mentioned above. Second, they can damage the chainstays if clamped on too tight. So, don’t tighten them down too much. Use a small wrench and just get the bolt firm, don’t see how far you can turn it. We use kickstands on all our bikes, including some with very thin tubes, and have never had any problems.
If you do use a kickstand, make sure the end is on firm footing. Hot asphalt, soft mud or grass won’t do the job. Always turn your handlebars in whatever direction will give the bike the best support when the kickstand is in use. Make sure the kickstand fits the bike properly so that it leans over about eight to ten degrees when the stand is in use. Cut it to the proper length and angle with a hacksaw if necessary. Finally, buy a quality kickstand; the Esge ($4) is the only one we use.
Fenders
Fenders (mudguards) are another controversial item. Some tourists wouldn’t use a set even in pouring rain, while others wouldn’t ride across the desert without them. Fenders not only keep you drier by stopping the wheels from spraying water on you in the rain or on wet pavement, but they also keep your bike about 75 percent cleaner in dry weather by keeping dirt and dust. from being thrown by the wheels onto your bike.
On the minus side, fenders add wind resistance and definitely slow you down a bit. They make it harder to ser vice your bike, and they are useless under some really muddy conditions. Thick mud jams up between the fender and the wheel, making it impossible to move. All in all, they are just one more thing to hassle with. We have ambivalent feelings about them but use them on both our town and touring bikes. We think the protection is worth the negative aspects. Better fender sets are made by Bluemel and Esge ($8-$12).
Time/Distance Instruments
Many touring cyclists enjoy using a speedometer and odometer; the first clocks your speed, the second your distance. It’s fun to know how fast or far you have gone at the end of a long touring day. We have used both and now don’t use either.
We bought a very expensive English odometer to use on our daughter, Kirsten’s, bike as we began our cross-country tour; it lasted 14 miles. Tim tried another variety later but the clicking on the spokes of the little metal stud that strikes the star wheel attached to the odometer, just about drove him nuts. He has a low threshold for such things. He also worried about protrusions that could catch on something and cause trouble.
A recent newcomer to the market is the Huret Multito Cyclometer ($10). This device fits on the front axle and is driven by a belt instead of the usual pin- and-star-wheel arrangement. It’s silent, compact and looks like the best odometer to come along. The Multito just may make us believers again.
Speedometer/odometer combinations are now usually made with a wheel that runs along the side of the tire, turning a cable that is attached to the main body of the device; it registers both the speed and the distance traveled. These little gadgets are great fun to use, but are relatively fragile. Costs range from $10-$15. We used one on our Hawaii tour but found it inoperable after an overly exuberant baggage clerk bent it while loading the bike for an interisland flight. From that point on we decided to let the road map tell us how far we had traveled. As for how fast (or slow) we are going, sometimes it’s better not to know.
Child Seats
If you have a family and want your cycling pleasures now, you will need to acquire some rather specialized equipment. Let’s first cover the child seat that mounts over the rear wheel of the adult bicycle. We’re ambivalent about it. On the one hand, we want to encourage as much family participation in bicycling as possible, especially family long-distance touring. On the other hand, we are well aware of the danger of trans porting a small child on the back of a bike; if the bike goes down, so does the child. We used one when our son, Erik, was between 14 and 18 months. Prior to 14 months he rode, well padded with blankets and knit cap in a Gerry carrier, on Susan’s back. We don’t recommend it; we simply did it without mishap.
Shop for a child seat of the tough plastic, wraparound high-backed type with a built-in foot area. Make sure it has, and that you use, a safety belt and a spoke protector. It should mount well forward so the weight is centered over the rear axle. There are several on the market now that are improvements on what was available when we needed one. Check them carefully for durability, construction and lack of protrusions.
More important than the seat itself, perhaps, is putting some sort of hard- shell helmet on the child. We eagerly watch the developing market in children’s bicycling helmets for one com parable to those now available for adults; but until that happens, use something even if you have to pad it with knit hats to make it fit snugly. Up to two years of age, we used an adjustable hockey helmet for Erik, which only required one thick knit hat and that more for shock absorption than sizing. For the cross-country trip we used the smallest adult Bell helmet, fitted with their thickest sizing pads glued to a Styrofoam spacer inside. Bell, Inc., does not recommend or guarantee it, but we decided it was certainly better than nothing.
Bike Trailers
It has been our experience that once the child is over 20-25 pounds, depending on the pedaling parent, he simply becomes too mobile and tipsy to use a child seat. It’s time, then, to consider a bike trailer.
There are several bike trailers on the market, but the only one with which we are familiar is the Bugger made by Cannondale Corporation. The Bugger is a two-wheeled trailer framed with steel tubing, which incorporates a nylon sling between the wheels to support the load. An option is a child seat made of durable black plastic, which fits directly onto the Bugger frame. It has a safety belt, will hold two children, and has a capacity of about 85 pounds. It attaches to the bicycle with a semi-flexible hitch at the seatpost, which allows the bike to tilt to either side, independent of the trailer. The Bugger tracks beautifully and its approximately 25-30 pounds of drag don’t affect the handling qualities of the bike. In fact, Susan reports that it has a stabilizing effect when the bike is being knocked about by truck turbulence.
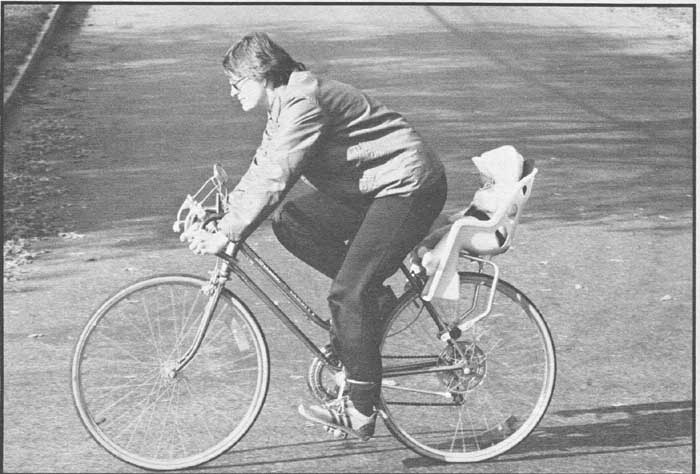
ABOVE: Mother and child on bike with child strapped in well-designed bike seat
positioned over rear wheel. Of course, helmets are desirable.
The Bugger transforms a bicycle into a really practical utility vehicle. That is enough to make a lot of cycling purists cringe, but most parents are reconciled to station wagons over sports cars anyway. Things that you would never be able to carry on a bike can be easily handled with a trailer. When Erik was small, Susan found the Bugger actually promoted her use of the bicycle be cause she could haul library books, dry cleaning and groceries, in addition to Erik. She appreciated being able to pedal right up to front doors with no parking hassle. With the child carrier in place, she could carry Erik plus four or five regular-size grocery bags. Of course it’s nice to live downhill from town for the loaded return trip.
Even though the Bugger, including child seat, now costs in excess of $180, it’s worth the price considering its versatility and potential for long-term use. We first got our Bugger when it became too risky to carry Erik on the rear of the bike — brought home by an incident on a lonely stretch of road where Susan had her hands full of bike and baby. He then weighed about 20 pounds. Almost five years later, at about 50 pounds, he is getting a little heavy for either of us to haul around for fun. Luckily, he can now pedal his own small bike up to ten miles. The Bugger, however, still serves as the family errand runner.
We’re convinced that a trailer is a good deal safer than the bike-mounted carrier primarily because the Bugger re mains upright in the event of a fall, something we have unintentionally proven. Also, the child is much more comfortable because there is room to move around or even to lie down for a nap within the confines of the safety belt.
If you plan to use a Bugger, there are some modifications you might make. First, install thin, 3 wood fenders on the side of the child carrier to keep small hands out of the spokes. Second, put on both an upright and a horizontal bike flag. The horizontal one should extend 12-15 inches on the left (highway) side to act as a warning for passing motorists to keep their distance. The flags can be attached by drilling small holes and wiring them to the frame. We also attached a water bottle to the arm portion of the child carrier so we wouldn’t have to stop every time Erik got thirsty. It has been a good investment.
For long-distance touring with small children, you can do as we did and use two Buggers — one for the child and miscellaneous gear, the other without a child carrier for camping gear.
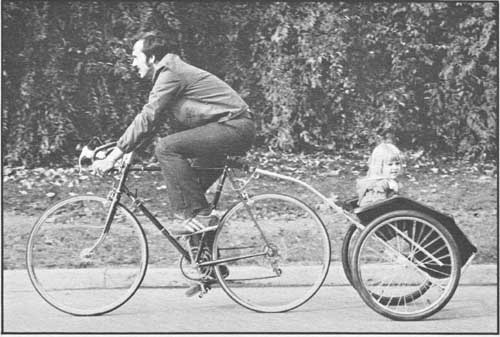
ABOVE: Adult pulling child in a trailer with a child seat.
It’s still cheaper than hiring a babysitter for several months, even if you could find one. Be prepared to pay the price in energy for the weight you will be pulling. It’s a good pace equalizer, how ever, if you have other children on small bikes along with you.
Protecting Your Bike
Now that you have finalized your in vestment in your touring bicycle with the necessary and nice in safety and auxiliary equipment, how do you hang onto it all in the face of constant bike thefts? Over 75 percent of bicycles stolen are left unlocked. No matter what lock you choose, if you always use it the odds are in your favor.
As to the type of security you need, your decision will rest to a great extent on where you live and where you are going to be parking your bike. In Wolf Hole, Arizona, you wouldn’t even need a rubber band through the spokes, but in New York City a Brinks armored truck might not do the job.
The most popular form of bike locking device is a self-coiling, plastic- coated wire cable. These range in thickness from about 3/16 - 7/16 inch (this does not include the coating). Most are 6 feet long. This is perhaps the handiest bike security system when combined with a good padlock whose hasp is at least as thick as the cable. In low-crime areas, the A cable is a good deterrent to spontaneous rip-off. It’s cheap, easy to use and light in weight. If the bike is to be left unattended for a long period of time, the heavier 3/8- inch cable with comparable lock might be a better idea. Be forewarned, how ever, that all of these cables can be easily cut with rather small wire snips and bolt cutters. The thickness of the cable does not make all that much difference. On tour we use 3 cable simply for its light weight and compactness. But when Tim used to leave his com muter bike unattended all day at the bus stop, he used a 3/8-inch cable. How ever, that was in a low-crime area.
Chains are also available for bike security, but their disadvantages include bulk, shortness, cost and ease of cutting with bolt cutters. Since 85 per cent of stolen locked bikes have had bolt cutters used in the process, a chain does not represent much of an advantage over a cable; each will readily separate with a 24-inch pair of bolt cutters. With the more-resistant, case- hardened, four-foot-long, 3/8-inch-diameter chains and a heavy-duty pad lock to match, you are talking of an investment of over $25 and a weight of over 6’/2 pounds. That is a lot to haul around and it can still be cut with 48-inch bolt cutters.
The ultimate in bicycle security are the Kryptonite and Citadel bike locks. These locks are so secure that they are guaranteed against theft when properly used, even on the streets of New York. They look like oversize horseshoes, cost in the vicinity of $25, and weigh about two pounds.
No matter the system you choose, it’s worthless if you don’t use it correctly every single time you leave your bike. A cable or chain should be extended through the front wheel, around the frame, through the rear wheel, then around or through a solid, permanently fixed object. It does little good to lock your front wheel to a bike rack unless the front wheel is the only thing you value.
ABOVE: To secure your bike, lock it to a solid object with cable running through
front and rear wheels, through frame and around solid object.
Park your bike in open, public view. Don’t hide it around the back of a store where no one will see it except the thief who will be well protected from view as he works on your cable or lock. When touring, it’s especially important to keep your bike in sight at all times, even if locked, because on it are all your worldly possessions with only a zipper or Velcro tab to slow down a thief. We generally leave one person with the bikes while the others are off shopping or, if we are eating out, we park them near the restaurant window and then ask the waitress for a seat where we can see the bikes. At tourist attractions or when everyone has to go at once, we lock everything securely together in one big tangle of wheels, then try to find a friendly ticket taker or shopkeeper to leave the baggage with or just to watch it for us. That is in theory; in practice we have been known in some quiet, rural areas to totally forget to lock anything as we sip sodas at some back-of-the- drugstore counter.
While camping at night on tour we remove all gear from the bikes and lock them together to a solid object such as a picnic table. The gear goes into the tent with us. In over 30 years of camping and touring in many countries of the world, we have only suffered the loss of one pair of cycling shoes; right out of our tent as we slept at a campground in Hawaii. If we’re staying at a motel, we take everything, including bikes and Buggers, into the room with us. That has been rather interesting in some of the smaller places we have stayed.
Your security consciousness should not stop when you are at home. In our garage we hang all our bikes by one wheel on J hooks along the rafters, putting the most expensive bikes at the ends. A Kryptonite lock goes through the bike at one end, a Citadel through the other (we try not to show favoritism) and a heavy cable runs through the middle bikes to connect everything to the superlocks. A really good lock goes on the outside of the garage door. We haven’t lost a bike yet, although a friend’s was taken out of our front yard once when she dropped in for a visit.
It’s a good idea to engrave your state driver’s license number into the bottom bracket of your bike. Don’t use your Social Security number as it’s al most impossible for law-enforcement agencies to trace. With your driver’s license number all they do when they catch a thief or find an abandoned bike is run a computer check; in a matter of seconds they know who the bike be longs to. In California, the ID engraving would look like this: CA D.L. 4
Keep a record of that number (in case you move to another state) and also of the serial number along with a good, clear photograph of your bike. That way you will have something to show the police and your insurance company if it’s stolen. You will also have something to remember it by.