. Self-sufficiency and independence are real pleasures of bicycle touring. You are free to travel almost without restriction and independent of our overly developed industrial complex. If you are camping as well, the only limitations are those you place on yourself coupled with your ability to take care of both yourself and your machine.
Many cyclists find the bicycle itself is the biggest stumbling block to total self-sufficiency. Although it’s easy to ride, they feel inadequate in the maintenance and repair of their trusty steed. We won’t say — as many writers do — that bicycle maintenance is a snap. It isn’t, but we do believe that anyone with the time and motivation can master basic repair procedures and preventive maintenance.
The bicycle is a “simple” machine, but that is a relative statement. It’s simple compared with automobiles and motorcycles, but is certainly more complicated than a rowboat or canoe. Its components are manufactured with close tolerances for minimum weight and efficiency of form. Precise adjustments are required. So the design is simple but adjustments must be exact.
Time is a key element in learning about and working on bikes. We’re al ways surprised at how long it takes to perform the most basic repair and maintenance procedures. This might partially explain why there are so few really good bicycle shops in this country; to do the job right would price shops right out of business. Only those shops with highly skilled and fast repair personnel can give first-rate service at an affordable price. The majority of shops must perform mediocre repairs within the price structure or charge exorbitant rates for a time-consuming job.
This is where you come in with knowledge and skill in maintenance. You take the time to do the job right be cause it’s your own bicycle. It seems a truism that the more dedicated the cyclists, the higher the maintenance level of their machines and the greater the likelihood that they do their own work.
OK. But you’re all thumbs and don’t have any desire to take up wrench and screwdriver? You are not alone. There are many serious riders who never get seriously involved in maintenance. But there is also a price paid in downtime while the bike is at a shop and in pocket guide trauma when retrieving it. It’s possible to tour long distances without knowing how to fix a flat tire, but you are then of necessity dependent on others to transport you and your bike to a re pair facility. Although it can mean long, expensive delays many tourers are willing to pay the price for the privilege of cycling without tools or the know-how to use them.
But why limit yourself? Anyone can master the emergency repairs we discuss in this section given the desire to do so, the patience to read for under standing and a bicycle for hands-on practice. If you wish more than an elementary understanding of repairs to get you back on the road, there are a number of excellent books available. We cannot possibly and don’t want to make this section a comprehensive repair manual. We do want you to come through it with good, basic skills in repairing problems that develop on the road and in preventing many of these problems from happening through adequate and knowledgeable preventive maintenance.
Get Acquainted with Your Bike
There is no substitute for intimate knowledge of your bicycle’s parts and how they function. Basic to any educational process is mastery of vocabulary; this is no different in bicycle repair. Learn the name of each part of your bi cycle so you recognize it and under stand its use in repair terminology. Learn to call things by their correct name so you can talk with and listen to others without confusion. You should have picked up a great deal of ‘bike talk” by now through the various sections of this guide. If you want to refresh your memory, sit down in front of your bicycle with this guide open to the parts diagram. Find each part, study it, and learn its name.
As you identify each component, study it to understand how it works. What really happens as you squeeze the brake levers? What holds the forks to the rest of the frame? What keeps the chain from going too far and falling off the chainwheel when you shift? Ask yourself questions, then find the answers even if they are not obvious at first. Use other books if necessary to help you understand the working of your bicycle, or get an interested friend to help you with this process. Get several friends together and go over your bicycles using the proper terminology. At some point you will come to under stand how your bicycle propels you and your gear down the road, climbs hills and stops at stopping places. There are no shortcuts, but you should only have to do it once.
Keeping your bicycle clean is a great help in this learning process. Not only does it give you pride of owner ship, but it prolongs the life of your bicycle and requires you to look closely at and handle each of the various components. As you gain experience, you will recognize when something isn’t quite right. A frayed brake cable, a bent derailleur, or a worn brake pad cannot be ignored when you periodically go over your bike with the cleaning rag. You can then correct the problem before serious malfunction brings you to a halt somewhere out on the road. Many potential emergency road repairs are found and corrected in the comfort of a touring cyclist’s garage or living room because of a regular, cleaning reconnaissance.
The amount of maintenance you actually perform is up to you. Many riders do just enough to get by, leaving major repairs and overhauls to the bike shop. Others are not happy unless they personally perform every normal and many intricate repairs. Where you fit in this spectrum depends on your access to tools and work space, and on your desire for self-reliance, but most of all it depends on whether you enjoy working on your bike.
The best way to master your ma chine for total confidence on tour is to completely dismantle and put it back together again. Yes, we mean the whole thing. With a good repair manual at your side, strip the frame of all components, take the crankset apart, remove the cluster from the rear wheel, dismantle the brakes, derailleurs, freewheel and everything else until it lies in an organized, but extensive panorama before you. With time, patience, your trusty manual, and perhaps some coaching from a friendly bike shop, you should be able to get it all back together. In the process you should have gained a thorough understanding of your bicycle.
Tim has done this at least once to each of our bikes and he does it prior to any really extensive tour. Susan is going to do it this winter with our daughter, Kirsten, so they will feel confident when touring alone or away from the family bike mechanic (Tim).
Dismantling your bike requires a modest expenditure on tools but once you have the right ones, future maintenance and repair expenses will involve only replacement parts. If you are serious about biking, your investment in tools will be far cheaper in the long run than having maintenance done for you.
Preventive Maintenance and Safety Checks
Few problems on bicycles are due to simple, spontaneous component failure. Damage through accident, improper handling or neglect is the usual cause of parts’ breaking or wearing out. Many repairs are avoided simply by treating the bicycle with care and respect. It’s a fragile machine that takes incredible punishment while in operation but will cave in to neglect or care less handling when stopped, stored or transported.
Derailleurs get most of the stationary damage. Never lay a bicycle down on the derailleur side. If you don’t use a kickstand, lean your bike against buildings or large, solid objects on the same side as the derailleur, so that if the bike falls that mechanism won’t be dam aged. When transporting your bike on its side inside a car, keep the derailleur side up. If two or more bikes are stacked on top of one another, put a piece of cardboard or other padding between them. Always shift the derailleurs to the inside (low gear) position so they are as protected as possible. Transporting bikes on rear-mounted car racks or inside vehicles takes a major toll on bike finish, derailleurs, cables and brakes. Always pack your bike carefully. The more you work on it, the more you will handle it gently.
Give your bike a safety check whenever you transport it and before every ride. Even if it’s sequestered in your garage, things can happen to it. Small children have busy, curious hands and can do the oddest things to your bike — like flipping the quick-re leases on your wheels. You can live a long time without surprises like that on a ride. A good garage storage method is to hang the bikes by one or both wheels from J hooks on the rafters, well out of harm’s way.
A pre-ride safety check does not have to be an elaborate, preflight shakedown. Once the habit is formed, it takes a minute or less. You are simply trying to find out if the vehicle is safe to ride. At first this check-over will require careful thought; you might even post a check list or keep one in your handle bar pack on a three-by-five-inch card. After a while, it becomes automatic and you are able to set off on a ride feeling confident about of your bicycle and its condition. A simple, quick routine check can prevent an accident or breakdown by revealing a problem area.
• Pre-ride safety check:
• Press the tires with your thumb or use a gauge to check proper inflation.
• Squeeze the brake levers for adequate leverage and see if the brake-release mechanism is closed.
• Look at the brake blocks to insure that they meet the rim and are aligned. They should be evenly spaced from the rim when the lever is released.
• Check the front and rear wheel quick-releases to make sure they are tight and see that the wheels are centered in the frame.
• Spin each wheel to insure that nothing is catching in the spokes and that the tire casings are in good condition.
• Additional daily checks when touring:
• Squeeze each spoke using two hands around each wheel to squeeze two spokes at a time for uniform spoke tension and to be sure none are broken.
• Spin the wheels and sight be tween the brake blocks and the rims to make sure they don’t wobble (out of true).
• Check racks for tightness.
• Make sure panniers and baggage are secure with no loose straps, cords, springs, or pieces of equipment that might become entangled in the wheel or chain.
Another preventive step is to listen to your bike while underway. Your bike usually indicates that things are going wrong by making unusual sounds. Be sure you know what your bike sounds like when it’s working normally; when an uncommon sound appears, it’s time to investigate. Sometime when you are near a well-traveled bike trail sit down beside it to listen for a few minutes. You will hear a variety of sounds from the well-tuned clicking of a freewheel to the clamor of bent derailleurs rubbing on chains, pedals hitting kickstands, chains squeaking for lack of oil, and various other sounds of undetermined but likely soon-to-be-discovered (by the owner) origin. Know how your bike sounds when in its best condition, then you have an edge on sounds that can mean trouble.
When an unusual sound occurs, try to isolate its origin. Does it stop when you stop pedaling? Then it’s probably in the running gear — chain, crankset, cluster or pedals. Does it stop when you move the derailleurs slightly? It may have been only an offsetting of the derailleur when you shifted, or it could be a problem with the derailleur itself or the cable. Shift your weight around on the saddle or pull back hard on the handlebars to see if it’s in the seatpost or handlebar stem. If the sound is steady, check your wheels for rubbing stays, rack bolts, fenders or other add-ons.
Once you have located the origin of the sound, you can do something about it if you feel confident in that aspect of repair, or you can take it to a qualified bike mechanic. You will be able to save his or her time, thus your money, by pointing out the area of the problem. Unusual sounds, especially in the running gear, frequently indicate a need for lubrication or overhaul of the complaining component. Don’t put off the problem; small ones tend to grow into big ones that cause irreparable damage to costly parts. A little prevention goes a long way toward avoiding the need for massive cure.
Tools
The bicycle is a highly specialized machine requiring its own assortment of tools. Many general tools you already have or can easily get meet some requirements, tools such as adjustable wrenches, screwdrivers and pliers. For the most part, however, certain jobs can only be performed with certain tools. Tools are expensive, but cheaper in the tong run than paying someone else to do the job for you. Many jobs can be done with a bare minimum of tools, but the more specialized your tools the faster and easier a particular task usually is. It seems one never has enough tools. Just ask Susan! For every specialized tool in his workroom, Tim laments over two others he doesn’t have.
It’s no savings to purchase tools that are cheap or of poor quality. For safety’s sake and in the interest of long-term economy, when you invest in a tool make it the best you can buy. Price is usually a good indicator if you have a difficult time recognizing quality. Most generalized tools are available at hard-ware and department stores, but special bicycle tools are found only in bike shops or mail-order houses that advertise in cycling publications. The Third Hand mail-order firm is the best single source of all types of bicycle tools. The address is in PART C. Their catalog leads you gently and long into the world of bicycle tools.
Don’t purchase a preassembled tool kit if you are serious about doing your own repairs. See what you need as you go along to insure that the tool you buy is appropriate for the job at hand. The tool must fit the component on your bicycle; anything else is a total waste of money. Many bicycles use components of many other brands that require their own specialized tools. Always check the component carefully to make sure you are getting the right tool; take it to the shop with you if necessary. A complete tool list is found in PART B.
Flat Tires
Fixing flat tires is the most common road repair made by touring cyclists. Contrary to popular opinion, flats don’t occur as punishment for deeply hidden sins, If you look at the conditions over which we run our light and tiny bicycle tires, it’s surprising that there are not many more flats than there are. The curse of the American road is the bro ken, nonreturnable bottle, but we bring tire problems on ourselves with poor riding habits, lack of attention to the road surface, poor judgment when buying tires and neglect in keeping them properly inflated. If you continually have flat tires, look on the probable causes as a message to change your ways.
Some of the better bicycle tires have a potential for 3,000-5,000 miles or more. The Schwinn Le Tour tires we used on our cross-country tour were finally replaced after 5,000 miles. On the trip itself, using normal tubes, none of the Le Tours flattened. Our daughter crossed the country on a set of 24-inch wheels with Michelin Fifties tires that lasted 2,000 miles; she had two flats until we temporarily put in thorn-resistant tubes in Kansas, none thereafter.
Good tires (Schrader valve, clincher tires) make the difference when it comes to downtime for fiats, longevity and good handling qualities on a loaded touring bicycle; many cycle tourists are undershod. For standard, paved roads we recommend 27 x 1 ¼-inch Schwinn Le Tours or Michelin High Speeds; Michelin Sports for heavy-duty wear and dirt or gravel roads; on excel lent road surfaces with lighter loads you can get by on Specialized Bicycle Imports Touring Tires and Michelin Fifties among others.
Try to do without thorn-resistant tubes due to the deadening effect that their almost doubled weight has on wheel resilience. When necessary, don’t hesitate to use them. Don’t add one of those liquid solutions to the tube, either as a patch or as flat prevention. Some of these products work, at least on small holes, but the stuff won’t hold when a patch does become necessary. They also gum up a good tire gauge pretty fast if any gets inside.
Regularly check the pressure in your tires. High-pressure bicycle tires lose air naturally and rapidly compared with larger-volume automobile tires. Get into the habit of checking them every other day or so at home, every day on tour. This also alerts you to slow leaks. If there is a more than normal loss of pressure (a slow leak), check the valve core first (the spring-loaded device in side the valve stem that allows air to be inserted without loss). The valve core screws into the stem and sometimes works itself loose or malfunctions, al lowing air to leak out.
Check your valve core by putting some spit on top of the stem. If a bubble appears or the spit is moved around, you have a leaky valve. Tighten the valve core with a valve core remover. If that doesn’t stop the leak, replace it. Valve cores are available at bike shops, tire stores or gas stations. Always check the valve core first when you have a seemingly mysterious leak to save you r self the frustration of needlessly removing the entire tire.
If the valve core is not at fault, check the tire itself. Turn the wheel slowly looking for nails, pieces of glass, thorns, worn spots or torn casings that expose the tube. If you find something, don’t remove it until you mark the spot with a pen, pencil or chalk. At this point you must decide whether you want to patch the tube by pulling it out from the rim at that point only with the wheel left on the bike, or whether you want to re move the wheel to take the tire and tube completely off the rim. We usually do the latter out of habit and because it lets us check the condition of the tire, tube, rim strip, rim and interior spoke ends. Practice both ways so you will have a real choice. Get your bike and perform the following procedure even if you don’t have a flat. To do a partial removal, modify the steps accordingly.
When you can’t find the source of the puncture or leak you must remove the entire wheel, tire and tube to search for it. Since an inflated tire is wider than the rim and the opening between the brake pads, first release the brakes to get the wheel and tire off. Locate and loosen the brake-release mechanism (found on most higher-priced bikes) either on the brake lever itself, on the brake-cable hanger, or on the brake arms. This loosens the brake cable so that the brake blocks move apart to let the wheel out. If the tire is completely flat, or you wish to flatten it, you need not release the brakes; but don’t pump the tire up when you replace the wheel.
To remove the wheel, release the quick-release levers or loosen the axle nuts. This lets you drop the front wheel away from the forks and proceed with the repair. The rear wheel is a little more complicated. First make sure the chain is on the smallest cog, then grasp the main body of the rear derailleur, pulling it back out of the way, so the wheel can fall from the dropouts. Once the wheel (either front or rear) is free, support the bike so it won’t fall, or gently lay it out of the field of action. Don’t lay the derailleur, chain or crankset in the dirt.
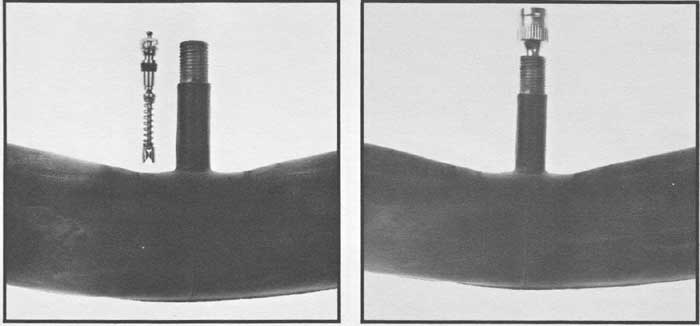
Schrader valve stem with core removed. Valve core remover in place
on the valve core.
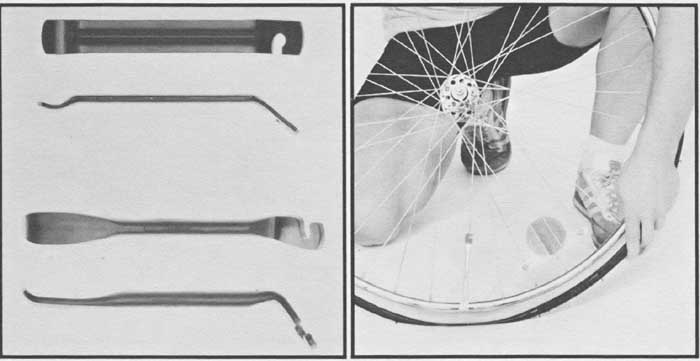
You need tire irons to remove the tire from the wheel rim. These come in sets of two or three (under $2) and are made of steel or aluminum. They are inserted between the rim and tire to lift or pry the bead (lower edge of the tire) up and over the rim. When you buy a set, remove any rough or sharp edges left by the manufacturing process with a fine file or sandpaper. Don’t use screw drivers or other tools to remove tires; it’s hard enough to keep from pinching holes in tubes using tire irons, let alone using anything not specifically designed for the task.
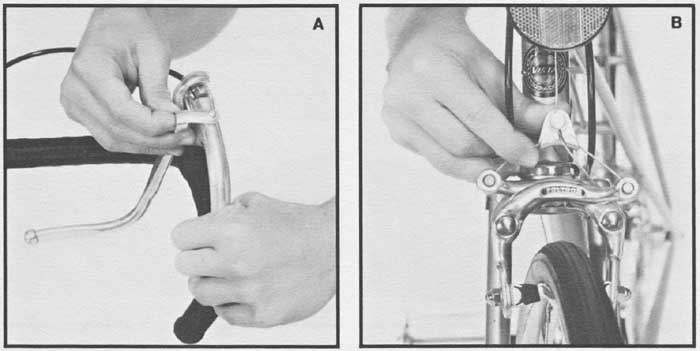
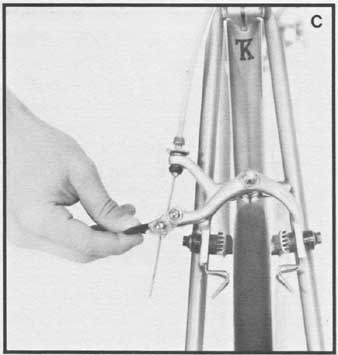
(abc) Three types of brake-release mechanisms: brake lever (A),
cable hanger (B), and brake arms (C).
Expel all air from the tube, then pinch the tire with your fingers around the entire wheel so that it drops down into the deeper center section of the rim — this allows more slack for working with the tire. Insert one tire iron under one side of the tire, opposite from the valve stem, and lift the edge of the tire above and over the rim. You must put pressure on the iron to accomplish this, but once done the tire iron can be hooked to a spoke to hold it in place. There is a small groove at the end of the tire iron to hook onto the spoke. Place the second tire iron under the tire bead about four to six inches from the first, pulling it over the rim; then hook that iron to a spoke also. Now slide the first tire iron — after unhooking it — away from the second, prying the bead over the rim as you go. In most cases the bead will pop over the rim all the way around. If not, you will have to use a third iron as you did the first two, then move it around until the one side of the tire pops off.
Once one side of the tire is off the rim, the other side can usually be rolled off with the hands. Be sure to start re moving the tire on the side opposite the valve stem so it doesn’t get bent or cut in the removal process. If you can’t force the second side off with your hands, use a tire iron to get it started. Be careful not to pinch the tube with the tire iron or you will have one more patch job to perform.
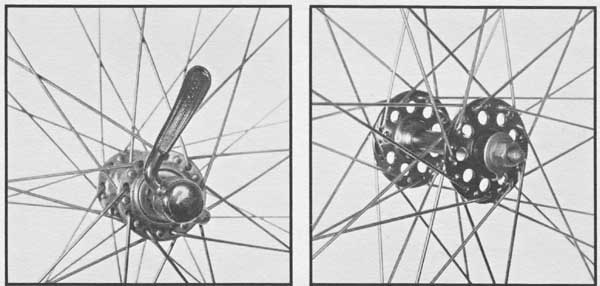
Quick-release lever on front wheel. Solid axle and nut on front
wheel.
To facilitate removal of the rear wheel, pull rear derailleur back out of the way.
Two types of common tire irons (full and side views). (right) Removing a tire from the rim: Put the first tire iron in place under the bead of the tire and hook on a spoke (opposite valve stem).
Push the valve stem through the hole in the rim being careful not to tear the rim strip (ribbon-like strip of material covering the spoke ends around the rim). You now have a tire/tube combi nation and can lay the wheel aside out of the dirt. If you marked the puncture, find that spot and remove the tube to expose the hole, marking it also. If not, inflate the tube slightly larger than life size, then pass it through your hands near your face and ear so you can hear or feel a leak. If this doesn’t locate the leak, immerse the tube in a puddle or pan of water. As you rotate the tube watch for a rising string of bubbles coming from the puncture. Once you find the hole, mark it so you don’t lose it. Check around the entire tube near the puncture; whatever punctured it might have gone through both layers, puncturing more than once. This might save considerable frustration later.
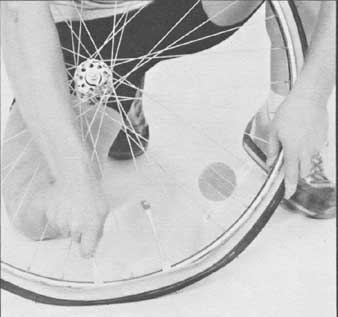
Put the second tire iron in place four to six inches from the
first while using first to slide around the rim lifting the tire over rim.
You are now ready to patch. Patch kits come in a wide variety of shapes and sizes; most will do the job. We like the German-made Tip-Top. It comes in two sizes, a smaller one for optimists, a larger one with more glue and patches for pessimists. The patches are very thin, sized just right for bike tubes, and have easily removed protective backings. The kit has a useless steel scraping device that you should replace with a piece of emery cloth or sandpaper, and the directions are in German. But one reads the directions only when all else fails anyway.
With your patch kit close by sit down with the tube wrapped around your knee and foot so there is slight tension on the portion of the tube over your knee with the hole centered and facing up. With your sandpaper gently scrape an area around the puncture a little larger than the patch will be. Don’t touch the sanded area with your fingers; you sanded it to remove all traces of dirt and oil and to roughen the surface. Carefully get the backing started off the patch (don’t remove it yet) being sure not to touch the face of it. Puncture the tip of your glue tube if it’s a new one; at this point you might discover that your tube of glue has mysteriously lost its contents; this can happen even with new tubes. The tiniest hole allows the highly unstable glue to evaporate. We always carry a spare tube, sometimes two, available at better bike stores. Keep them inside the patch kit for maximum protection.

A variety of tire patch kits.
Place a dab of glue on the sanded area, smearing it evenly with the tip of your finger. Here is where the road forks; some cyclists allow the first coat to dry completely, add a second coat, then peel the backing off the patch and apply it (they are usually the ones with the larger patch kit too). Others put on a single coat of glue, allow it to almost dry (it gets an even, dull color), then apply the patch to the puncture area. Either way, there should be a little extra glue showing all the way around the edge of the patch.
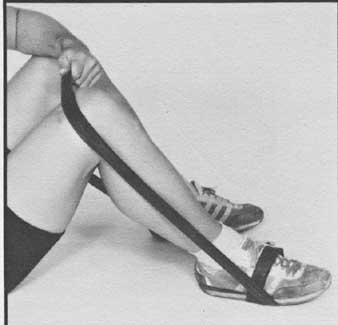
To maintain tension while patching a tube, sit on the ground
with the inner tube wrapped around your foot and over the kneecap where
the patch will be placed on the tube.
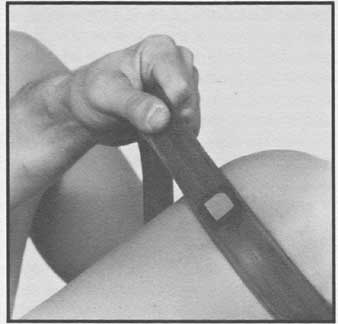
Here the patch is attached to the tube.
A small area of glue should be visible around the entire edge of the patch. If you use too much glue as in the photograph, cover the area with talc.
Once the patch is on, rub hard with a smooth section of your tire iron or other tool to remove any air bubbles and insure good adhesion. Tip-Top patches have a transparent, plastic-skin covering the back of the patch. This can be removed but we leave it to act as a shield between exposed glue and the tire casing. If you remove it or are using another type of patch, dust any exposed glue with road dust or talc (baby powder useful for patches, seating tires and tiring seats carried in a 35 mm film canister). This keeps the new patch from sticking to the inner casing of the tire so the next time you remove the tube, the patch will stay on the tube rather than come off with the tire.
A patch should set up in a minute or two, depending on the weather; then you can unwind yourself from the tube. We usually wait three to five minutes more before putting everything back together to make sure the patch has set. Take the time to make sure as it will save you trouble in the long run.
While you are waiting for the patch to set up, check over your rim for sharp edges especially where it’s pieced together opposite the valve stem hole. (Do this as you practice at home — new rims can have surprisingly sharp protrusions.) Look also for protruding or nearly protruding spokes. During wheel truing spokes might be drawn up to the point where the end extends beyond the nipple head, spelling trouble for your tube unless corrected. On tour we carry a four-inch extra-slim tapered file (available at Sears) for filing spoke ends and rough edges that develop along the way.
Check the condition of the rim strip; make a note to buy a new one if it seems very worn. This strip protects your tube from spoke ends and nipple holes in box-design rims. Made of rubber or cloth tape, it can be replaced in an emergency with adhesive tape from your first-aid kit or even your handlebar tape.
After checking the rim, look over the tire to see if you can find what caused the puncture if you don’t al ready know. Spread the tire sides and check the inner surface for protrusions or damage. Remove anything obvious, then run a rag around the inside of the tire to insure that you didn’t miss any thing; this will catch on small slivers of glass or nearly invisible thorns that you cannot see. You can do this with your fingers but make sure the first-aid kit is handy.
By now the patch should be dry. Pump up the tube just enough to give it some shape; don’t blow it up big to “see if the patch will hold.” It won’t. Without the pressure of the tire on it, it will most likely peel off as the tube stretches be yond normal bounds. Put the tube in the tire and work the valve stem through the hole in the rim. Just start it through, making sure it has a straight shot. Don’t tug on it. Put one side of the tire onto the rim, working around both sides be ginning at the valve stem. Do the same for the second side. If you have trouble with this, put a little talc around the bead of the tire prior to slipping it over the rim. A bar of soap rubbed on the bead will do the same thing. Try to roll the tire on using the palms of your hands and a firm grip, If you can’t possibly get it on, you will have to use a tire iron. Be careful not to pinch the tube between the iron and the rim. Some tires are difficult to fit on their rims; take your time, get tough and you’ll make it.
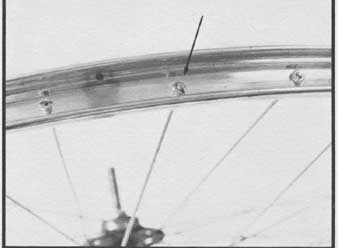
View of a rim with rim strip removed showing a spoke extending
through the nipple that needs filing down.
Once the tire is on the rim, make sure the valve stem is straight in its hole before pumping to full inflation. Don’t pull on it; as long as it’s straight it will seat right. Inflate the tire to about 30 pounds, using a gauge until experience tells you how much air that is. Take off the pump and carefully sight around the edge of the tire on both sides next to the rim. Many tires have a rubber protrusion indicating where the tire should seat on the rim. Others might be sighted in by using a reference point on the tire. The object is to make sure the tire settles evenly into the rim on both sides. With only 30 pounds of pressure you can still work the tire with your hands if it’s off at any point, using your thumbs and palms to even it up. Some tires pop right into place, others are difficult the first few times, others are damn hard every time. When you know everything is going properly, finish inflating the tire to its correct pressure.
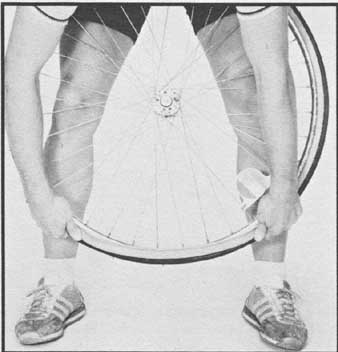
Use the palms of your hands to roll the last section of
the tire over the rim.
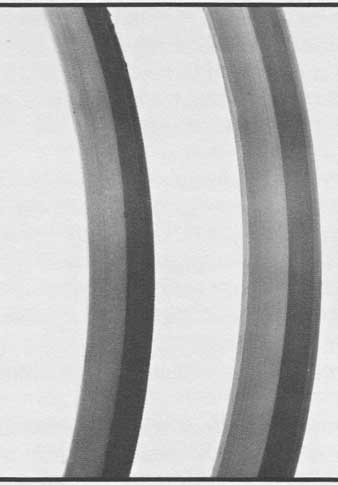
Two tires: the one on the right has a
molded-in protrusion that guides the placement of the tire on the rim for correct
alignment; the left tire does not have the molded-in guide. Without this,
be careful to align tire properly on rim.
Check the seating again. Some tires only seat under high pressure; if it didn’t at 30 pounds, it might as maxi mum pressure is reached. If it still doesn’t seat at full pressure, let the air out, apply talc around the entire bead on both sides and try again. If you know ahead of time that your tires are difficult to seat, put the talc on to start with. If after all of this it still doesn’t seat, your only choice is to ride slowly until you get to an air hose. Usually short, quick (careful!) blasts from a high-pressure hose will pop the bead into place.
Dealing with the front wheel is simply a matter of aligning the axle in the dropouts on the fork and tightening the quick-release or axle nut. On the rear wheel you have to contend with the chain and derailleur. Place the wheel in the rear triangle and put the chain on the outside (small) cog. Pull the derailleur out of the way to the rear and slip the axle into the dropouts. Make sure the tire fits between the brake blocks (released to allow the inflated tire through). If your bike has spring-loaded alignment screws in the dropouts, pull the wheel back until the axle bottoms out on the screws. If you don’t have these, pull the wheel back until it reaches the end of the dropouts. With the wheel in place the bike will support itself (if you have a kickstand) but you aren’t finished yet.
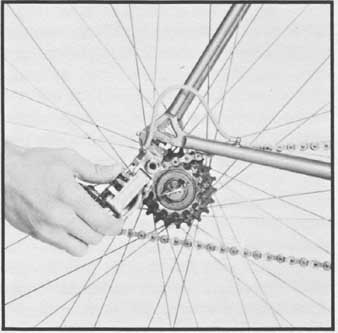
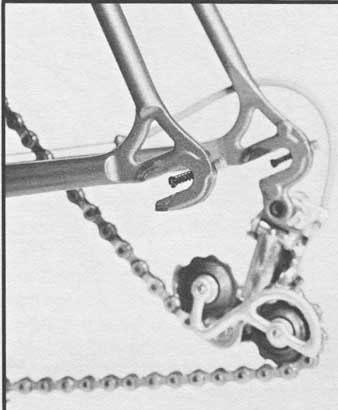
Wheel in rear triangle, chain on small cog, derailleur pulled
back out of the way, and ready to place axle into dropouts. Spring-loaded
alignment (adjustment) screws on rear derailleur allow proper positioning.
You must be sure the wheel, front or rear, is centered. First, turn the adjuster nut (on the opposite end of the quick-release) until you feel pressure on it with the quick-release open all the way. You want to be able to close the quick-release lever without feeling pressure until it’s about two-thirds closed. When you have the proper adjustment on the adjuster nut and before closing the quick-release all the way, center the wheel in the forks (front) or between the chainstays (rear). Pull back firmly on the rear wheel, or pull up firmly on the front wheel to make sure you are in the drop outs all the way. Eye the wheel for centering before tightening the nut or the quick-release mechanism. For an exact fit, measure the distance between each side of the rim and the fork blades or chainstays with a small ruler, turning the adjuster nut until you have it right. Then grab the fork or chainstay with your fingertips to close the quick-release the rest of the way, using the palm of your hands on the lever. Once closed, the position of the lever is not critical, but most cyclists have a preference. We like the lever parallel with the front fork or, in the rear, pointing up between the seatstay and the rack strut for as protected a position as possible. Experiment to see where you prefer yours.
Adjuster nut on skewer, opposite quick-release lever on front
wheel.
Finally, tighten the brake release or you might be in for a real thrill on the next hill. There now, wasn’t that easy? Murder to read about, even worse to write up, the actual process is quite simple once you have done it yourself.
Practice it in the privacy of your home rather than having to do it for the first time under road conditions. Take your time, read the directions step by step, and practice until you can do it without the guide. It’s the only way you will gain mastery and have confidence when the inevitable happens out there on your tour.
You can save yourself half the hassle and time if you carry a spare tube and leave the patching until later. A spare tube also saves your day if your tube develops irreparable damage. Make sure, however, that you check both the rim and the tire for the cause of the original puncture before inserting your spare tube.
Spoke Failure
Spoke breakage is second only to flats in frequency and is just as disabling to the touring cyclist. You might not break a spoke in thousands of miles of recreational riding but, under the stress of gear loaded on your bike for a tour, spokes are likely to protest by breaking. Replacing a broken spoke is not difficult if you take the time to learn the fundamentals before you have to do it cold turkey somewhere out on the road. Your best insurance is to remove a spoke from your bike according to the following directions, take it to a bike shop for some identical spares, then re place the spoke and always carry the spares with you on your bike. Once you have done this at home under ideal conditions, it no longer will be an insurmountable problem if you break a spoke on tour.
No matter how good the quality, spokes don’t last forever. Their varied life spans depend on original quality, the precision used in lacing them onto the rim, the load carried on the bicycle, the riding skill of the cyclist, and the care taken to keep the wheel true through maintaining proper tension on the spokes. The latter is your best assurance of long life in your spokes, especially on factory wheels, which are marginal at best.
Wheel building is as much an art as it’s a science. It takes a special knack and desire to do a good job. Don’t trust your wheels to just anyone who says they can true or build them. If your wheels have been on your bike for several years, or if you regularly break spokes, it would be a good idea to have a new set built up before an extended tour. Never cut corners where your wheels are concerned. Find an experienced builder and use top-quality spokes and rims (see section two). Especially with new wheels, put some miles on with the load you plan to carry on your bike before starting out on tour.
Always have extra spokes on hand for emergencies whenever you ride. Tape them to your rear rack strut or somewhere on the frame out of the way. Even though we haven’t broken a spoke since Tim has been building our wheels, we always carry at least five extras. Crossing the country Tim broke about a dozen spokes on his bike alone riding on factory-built wheels. After that we always have extras on hand even though we don’t need them now.
You sometimes hear a sharp, metallic twang when a spoke breaks. You may notice a decided wobble in your wheel or find a broken spoke in your periodic safety check as you squeeze them together. If you do find one, don’t continue to ride. You will pull the wheel farther and farther out of true, possibly ruining the whole wheel. Stop and re place the broken spoke immediately.
If the broken spoke is on the front wheel or on the non-cluster side of the rear wheel, you needn’t remove the wheel to replace the spoke. However, if it’s on the cluster side of the rear wheel, the process is more complicated. Let’s deal with the easy ones first. If you have the right length of spoke with identical nipple threads (this is why you need identical spares) you don’t have to remove the tire. If the spoke threads are rusted into the nipple, the nipple threads are stripped, the nipple is rounded off so it won’t accept the spoke wrench, or the replacement spoke is too long the tire, tube and rim strip must be removed to perform the repair. A spoke that is too long has to be clipped off and filed down where it protrudes through the rim so it won’t dam age the tube.
Most spokes break at the curved “head” near the hub flange. To remove a broken spoke loosen the nipple with a clockwise motion (it seems backward but isn’t). If this is impossible by hand, hold the spoke with pliers while loosening the nipple with the spoke wrench. Spoke wrenches come in many shapes and sizes so be sure you have the proper wrench before you need it. Most 10-speeds use Japanese or European spokes; the Japanese type requires a slightly larger wrench. Some wrenches work on both but you run the risk of rounding off the nipples with an ill-fitting wrench. Prices run from 50 to $3.50; the more expensive Park model is the best of the lot. Keep away from combi nation types unless you have many different kinds of spoked vehicles and need one tool to fit all.

Spoke lying flat with nipple almost touching threaded end. Spare
spoke thread must match threading of your wheel nipple for easy replacement.
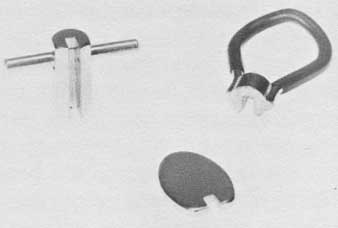
A variety of spoke wrenches.
The head of the broken spoke (in the hub flange) will probably have dropped out; if not, pull it out. Note which side of the flange the head is on. If it’s missing you can determine this by the neighboring spokes. They are staggered with heads on alternating sides. Put the new spoke into the flange hole on the correct side. This is tricky and may require bending the spoke a little. Don’t worry, bending it a little won’t hurt.
Once the spoke is in the hub, lace it in a corresponding pattern to the nipple in the rim. You can determine the pat tern by looking closely at the other spokes. Each spoke crosses another either three or four times on the trip from the hub to the rim. On the final crossing the spoke is usually laced just the opposite of the previous crossings; for example, if the spoke passes under the first two or three spokes, it will pass over the last spoke. If you are not checking this as you read, look at the spoke pattern on your wheel now to make sure that you understand what we are saying.
When you reach the rim, catch the new spoke in the nipple turning it counterclockwise to tighten. Start the tightening with your fingers, then increase the tension with your spoke wrench. Continue tightening until it feels similar to neighboring spokes. Squeeze pairs of spokes with your fingers to determine the correct tension.
Quick! Before you lose sight of the one you replaced, mark the sidewall of your tire by it with a pen or pencil so you can find it later — even after 20 dirty miles. You need to keep checking for wheel trueness and spoke tension, more easily done if you know which spoke is the new one.
When you have the right tension, spin the wheel while sighting between the rim and the brake blocks to see what happens when the new spoke passes through. Does the rim stay in the same position relative to the blocks? If so, you are in good shape. If your wheel was originally in true and you did not ride on it after breaking the spoke, your wheel will likely remain true if you put equal tension on the new spoke.
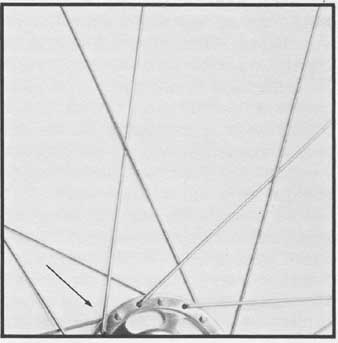
Arrow indicates first
spoke crossing.
 Hub
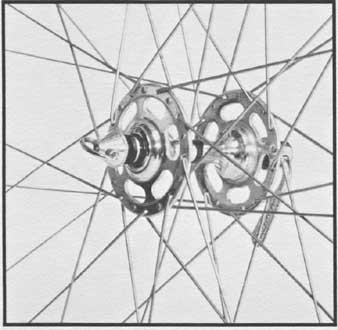
showing staggered pattern of spoke heads. Spokes crossing one another on
trip from hub to rim.
Note that this spoke crosses over the other spoke and also crosses over the next spoke, but crosses under the third spoke on trip from hub to rim.
On the other hand, if your rim jumps to one side as it passes through the blocks you have some adjusting to do. It’s important here not to get in a rush. You might end up doing more harm than good. Spokes must be worked in pairs. The wheel is in a state of balanced tension held true by the pull of opposing spokes. Tightening or loosening the spokes on only one side of the wheel interferes with that balance. If you want to move the rim to the right, loosen the spokes to the left of the affected area, then tighten the spokes on the right by the same amount. Work cautiously and slowly; generally a quarter- to a half-turn on the nipple is enough to produce results. To monitor your progress sight on the rim between the brake pads and spin the wheel as you perform each adjustment. You should at least be able to bring the wheel close enough to true that you can ride it to a bike shop for final adjustment. This type of adjustment is only necessary when your wheel has moved out of true for some reason; it’s not usually necessary for a simple on-the- road spoke replacement.
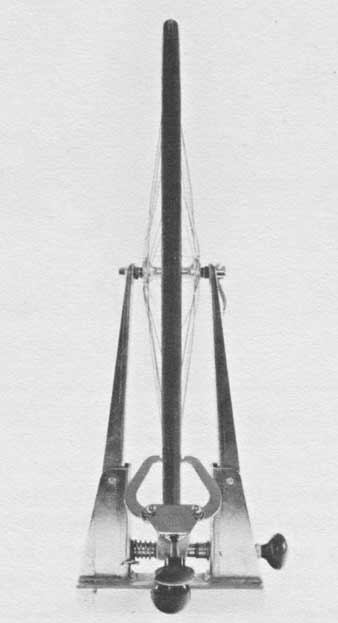
Truing stand helps considerably, but is not necessary for minimum
wheel truing.
Once you have replaced a spoke you will see that it’s not particularly difficult. But we have been talking only about broken spokes on the front wheel or on the non-cluster side of the rear wheel. If you want to shake up touring cyclists, just tell them they broke a spoke on the cluster side of the rear wheel. Actually, fixing the spoke is as easy as we have described; the difficulty is in getting to it.
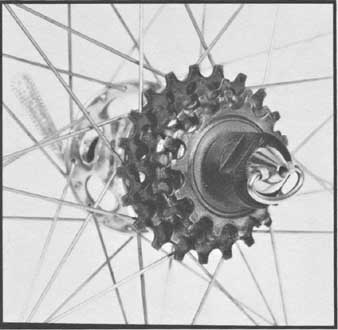
Look at your rear wheel where the spokes meet the hub flange on the cluster side. The rear cogs (cluster) extend beyond the flange, preventing the lacing of a spoke through the hub without removing the cluster first. Therein lies the problem. As you pedal the chain exerts constant pull on the cluster, tightening the freewheel onto the rear hub. Because of this, removing the freewheel with the attached cluster takes a good deal of leverage, more than is possible with tools normally carried by a cyclist.
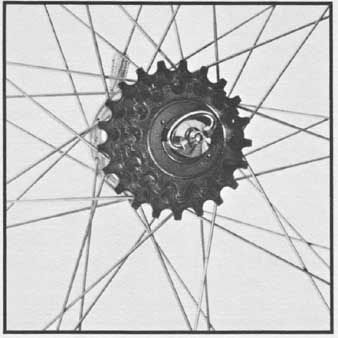
You cannot replace a spoke on the cluster side of the rear
wheel without removing cluster from hub
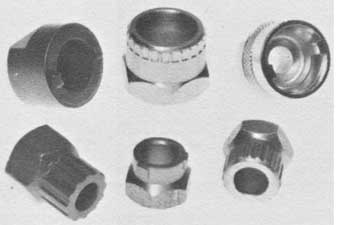
A variety of freewheel-remover tools.
But you can be sure that someday you will break a spoke on the cluster side, so practice the repair now and get rid of the fear that always accompanies the unknown. First, you need a free- wheel-remover tool. Be sure you have the right one since each brand of free- wheel has its own special tool. Prices are reasonable ($1.25-$5.00) and the tool is small enough to carry in your kit. The difficulty is in how to grip the free- wheel-remover tool so you can exert the leverage needed to turn it. Your choices are a small hand tool light enough to carry on tour, a 12-inch or larger adjustable wrench, or a bench vise. These last two are too big to carry on tour but are available at most gas stations or farms. We made do with these sources until recently. Now we carry a Bendix 7 cone adjustment tool, which Tim enlarged (23 mm) to fit the Sun Tour (Maeda 888) freewheel-re mover tool. Other tree-wheels require other tools but the Phil Wood Atom- style remover takes the 7 Bendix without modification. The Bendix is relatively short and light enough to be packed along; in most instances it readily removes the freewheel, although sometimes a rock used a hammer on the Bendix handle is needed to break things loose at the start. The Bendix is an emergency tool; we opt for a 12-inch wrench or vise when available.
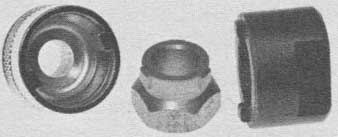
Notched-type freewheel removers.
To remove your freewheel, first remove the rear wheel as explained in the section on flat tires. At the same time remove the quick-release skewer if you have one. For the notched-type of free- wheel-remover tool (Sun Tour, Old Regina, Cyclo, Simplex, Mailiard and others), insert the quick-release skewer back through the axle, position the free- wheel-remover tool on the freewheel, then put the adjusting nut on the skewer. Turn the nut snug against the freewheel tool but not tight. This holds the tool in the notches of the freewheel. If you have the splined-type of free- wheel (Shimano, Atom, Zeus, Schwinn Approved, Normandy and others), you won’t need to use the quick-release to hold the freewheel tool.
Put the flat sides of the freewheel tool with your attached wheel into a vise or grab the wheel with an adjustable wrench or your modified Bendix tool. If you are using a vise, twist the tire and rim counterclockwise. If you are using a wrench or the Bendix tool carefully turn counterclockwise, being sure to keep the wrench parallel to the wheel as you apply pressure. Don’t give up, you will be amazed at how much pressure it takes to break things loose. This is especially true if the manufacturer or bike shop that originally assembled your bike did not grease the freewheel and hub threads.
Notched-type freewheel remover being held against freewheel
with quick-release mechanism.
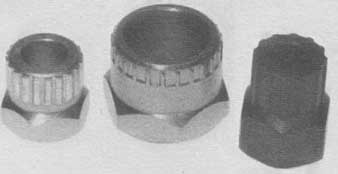
Splined-type freewheel removers don’t require use of quick-release
to hold in place.
As soon as the freewheel breaks loose, STOP. You must remove the quick-release if you have one. Loosen the adjusting nut or just remove the skewer so the freewheel can be spun off the hub. Now the cluster is out of the way and you have clear access to the spoke holes on the cluster side of the rear hub.
This procedure is only necessary if you break a spoke on the cluster side, but unfortunately many breaks occur there due to the almost 40 percent greater tension on the spokes because of the wheel dish (offsetting of the hub on the rear wheel to make room for the freewheel yet allowing the tire to run centered in the frame). Your best preparations are to have done a cluster-side spoke replacement at least once and to grease your freewheel and hub threads to ease future removals.
An alternative method for replacing spokes on the cluster side without removal of the freewheel is to remove each cog from the cluster. Ian Hibbel, the world’s greatest cycle tourer, carries a brass punch that he uses with a rock to loosen the cogs to unscrew them from the freewheel. Another variation is to carry six to eight inches of chain and a small pair of Vise-Grip pliers (a commercial chain-type cog re mover is available but is too large and heavy for touring); you wrap the chain around the cog and pull with the Vise- Grips to twist the cog off. You may only have to unscrew the first two cogs, the rest may slip off depending on the make of freewheel. Some require unscrewing of all five. Both methods require that the wheel be left on the bicycle and a crankarm strapped securely to the seat tube with a toe strap until the cogs are broken loose. If you meet this emergency in Upper Volta and the nearest freewheel remover is in Egypt, Hibbel’s trick would come in handy. There is no harm in knowing the various methods and even trying them — it can only boost your confidence.
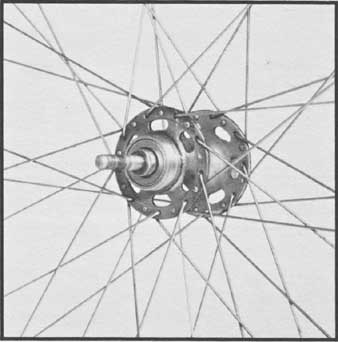
Rear hub with cluster removed allowing access to spokes.
As a last-ditch effort, the broken spoke could be replaced with a hybrid. Using an extra-long spoke, cut off the head, then bend that same end to form a J hook. Hook this through the spoke hole in the hub flange, lace to the rim in the proper pattern, and proceed on your way. This is suitable only in an emergency; it’s better to do the job right in the first place so you can get on with enjoying your tour.
