Replacing brake cable inners and housings is a job that should be done fairly often on a mountain bike—about once every six to 12 months. They also need replacing if they start fraying and become worn. The hybrid bike in this sequence has V-brakes, but some mountain bikes are equipped with cantilever brakes. Fitting cables is similar for both.
Brake cables also require regular cleaning and lubricating, especially if the bike has been ridden consistently in wet weather. All brake levers that fit onto a straight or riser handlebar require a cable with a barrel nipple.
Regardless of the manufacturer, the barrel nipple fits into the brake lever in the same way. Remember to use ferrules on both ends of every length of new cable housing. Put a cable crimp on the end of the cable once everything is secure and working as it should.
In these steps, the tire is removed from the wheel to show clearly what is happening.
Tools needed:
- Needle-nose pliers
- Cable cutters
- Allen key multi-tool
- Cable pullers
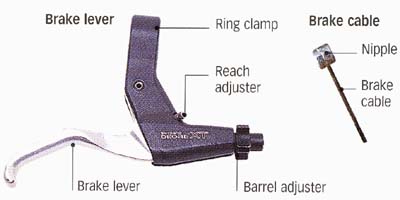
Parts of a Brake Lever and a Brake Cable
Image (right) shows:
Brake lever, Brake cable, Nipple, Brake cable, Brake lever, Barrel adjuster


Replacing V-brake cables on a Hybrid Bicycle
1. Undo the cable-clamp bolt on the brake. Note where the nipple sits in the cradle that is part of the lever and remove the cable from inside the brake lever by pulling it out with needle-nose pliers.
- Check the cable housings. If they are not worn, you can use them again. Flush them out with degreaser and dribble oil into them.

2. Cut new cable housings to the same length as the housings you removed, or measure them on your bike and trim as needed. Buy cable housing either in a roll or in precut lengths with inners in a cable kit. The precut lengths may be too long for your bike, so you may still have to cut to fit.
- Dribble oil into each cable housing and push a metal ferrule onto each end.

3. Grease the new inner and thread it into the brake lever. When it shows through the barrel adjuster, pull it from this side of the lever until the nipple is seated in the lever cradle.
- Thread the cable through the lengths of cable housing and seat the cable housings in the cable guides of the frame.

4. Attach the cable to the brake arm by inserting it into the cable guide tube and then pull it through the cable-clamp bolt.
- Keep the cable under tension and make sure each length of cable housing is properly seated in the cable guides.
- Pull the cable to bring the brake pads closer to the rim. Tighten the clamp bolt when the pads are about 2mm from the rim.

5. Pull the brake lever until the brake is fully applied. This ensures that all cable housings are bedded in and all bolts are tight.
- Undo the cable-clamp bolt and repeat Step 4 if the cable slips through the clamp bolt or a ferrule is not seated properly.

6 . Leave about 1 /2in (4cm) of free cable after the cable-clamp bolt.
- Put a cable crimp on the end of the cable to prevent it from fraying.
- Cut off any excess cable once the cables are bedded in.