Quick-release mechanisms help to remove and replace a wheel more quickly than ever before. The tires are the component that make contact with the ground. Match the tires on your bike to the prevailing riding conditions and always be ready to replace worn-out tires.
Quick-release wheels
- Tire levers
- Crayon
- Sandpaper
- Chalk
- Patch adhesive
- Repair patches (or: Patch Kit)
When you are out on a ride, it is much easier to replace a punctured inner tube with an intact tube rather than painstakingly mend the puncture. At home, you can repair the punctured tube with adhesive and a patch. It is still a good idea to carry a repair kit on every ride, because you might be unlucky enough to get a second puncture and be forced to repair the tube outdoors.
The main point to remember about mending a puncture is not to rush any of the stages. If you patiently give the glue time to dry, closely examine the inside of the tire, and carefully refit the tube, then you will be rewarded with a successful repair. If you miss anything or pinch the inner tube, you may get another puncture.
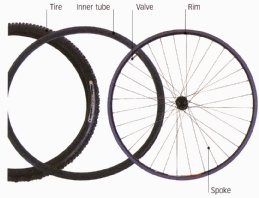
Parts of a wheel
Repairing a punctured inner tube
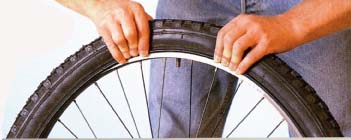
1. Take the wheel out of the bike. Place one tire lever under the tire bead and lift it off the rim. Hook this lever around one of the spokes.
- Insert another lever under the tire near the hooked lever. Push the second lever forward and run it around the whole circumference of the rim to remove one side of the tire.
- Remove the inner tube from the rim.
2. Inflate the tube a little and listen for the sound of escaping air. Locate the hole, mark it with a crayon, and let the air out of the tube.
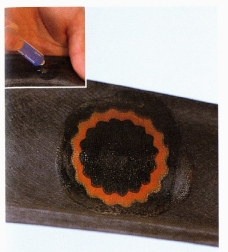
- Spread a thin layer of adhesive over and around the hole (inset Allow time for it to become tacky.
- Peel the foil from the patch. Press the patch firmly onto the adhesive for over a minute. Make sure the edges are flat.
3. Use a small piece of sandpaper to dust some chalk over the patch to prevent excess adhesive from sticking to the inside of the tire.
- Leave the tube for a few minutes to make sure that the adhesive has dried.
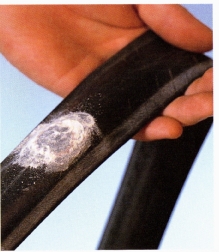
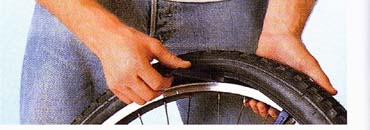
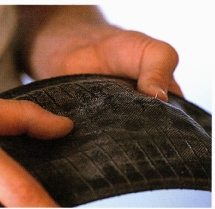
4. Take the tire off the wheel , turn it inside out, and thoroughly check the inner surface.
Remove anything that is sticking through the fire by pulling it out from the outside of the tire.
5. Put one side of the tire all the way back onto the rim. Slightly inflate the tube, insert the valve into the hole in the rim, and work the tube back inside the tire.
- Put the other side of the tire in place by pushing the valve upward, then lifting the section of tire next to the valve over the rim. Work the tire back around the rim.
- Check that the tire has not pinched the tube underneath it before fully inflating the tube. To do this, squeeze the tire together and look around the whole circumference of the wheel.