No matter how much money you put into your bike and how refined its componentry, if its gearing system is not well thought out or well suited to your riding style, the bike won’t be a pleasure to ride. This figure tells you how to get the right gears on your bicycle: the right number of chainwheels on the front, each with the right number of teeth, and the right number of freewheel sprockets on the rear, each with the right number of teeth. It tells you how to select the highest gear, the lowest gear, and the in-between gears to precisely match your needs. Later figures will cover selection of the ironmongery — cranksets, freewheels, derailleurs, and the like — to accomplish the desired gearing results.
There’s a lot of meat in this figure. So take the time to read it and understand it. Once you have a good understanding of gearing and gear pattern design, you will be ready to benefit from the next five figures, which tell you all about gear-train hardware. Taken as a whole, these six figures will help you to upgrade the gears on your bicycle so that they exactly match your riding needs.
I’m a gear fanatic. I’m convinced that many beginners give up bicycling because they can’t pedal up hills, whereas a change of gearing would make all the difference. It’s actually quite pleasant to pedal a bicycle that’s geared to suit your particular level of strength. And if you learn to use your ‘ho-horsepower engine efficiently, eventually it will become a ¼-horsepower engine.
Your present bicycle probably has the wrong gearing for your specific needs. There are two exceptions to that bold statement: (1) you may have lucked out when you bought your bicycle, or (2) you know enough about gearing that you have already revised the gearing that came with your bike.
The bicycle maker has a basic problem. He can only put one set of gears on each model of bicycle. He must select compromise gearing because his bicycles will be sold in both flat Ohio and hilly Colorado and to both weak beginners and strong, serious cyclists. So he tries to choose a gearing system that will be appropriate for the “average” rider and the “average” terrain. Unfortunately, many makers do a poor job of devising compromise gearing and they end up with poorly spaced gears and duplicates. There’s really no excuse for a maker to put “dumb” gearing on a bicycle because the right intermediate freewheel sprockets cost exactly the same as the wrong ones.
In theory, bicycle stores could customize the gearing of each bicycle they sell. In practice, bicycle stores sell low-profit items in a competitive market place. You have to do the customizing yourself, or at least tell your bicycle shop what you want done. This fig. will tell you how to determine your gearing needs and how to convert those needs into a practical gear train.
___________ Thinking in Gear Inches ___________
Before you can properly design a gear system for your bike, you have to understand the numbers used to describe gearing. If you’re already familiar with gear inches, just skip to the end of this section. Otherwise, keep reading.
The gear inch numbers have a colorful history. During the first bicycle boom in the late 1800s, ordinaries (a.k.a. high-wheelers or penny-farthings) were specified by the diameter of the front wheel. A child might ride an ordinary with a 36-inch front wheel, whereas the average adult might ride a 45-inch model. Tall adults with long legs could just about reach the pedals on a 52-inch ordinary. Since the pedals were connected directly to the front wheel without gearing (or the ability to coast), the bigger “wheels” went farther for each pedal revolution. They were faster on the level but harder to pedal up hills. (A typical high-wheeler is shown in figure 1.)
Ordinaries were truly unsafe at any speed. (It’s a good thing that bicycles were invented before trial lawyers took cases on contingency). You had to stop very carefully or you sailed over the handlebars. In the 1900s, the geared safety bicycle was invented to overcome the safety problems inherent with the older bikes. A 1900 safety looked very much like today’s diamond-framed 10-speed.
The bicycle buyer was used to thinking in wheel diameters so the new safeties were advertised with a “gear number” that was the wheel diameter of an equivalent ordinary. This practice continues to this day. Thus, a bicycle with a 52-tooth chainwheel, a 13-tooth freewheel sprocket, and a 27-inch-diameter rear wheel has a gear of 108 inches (52/13 X 27). It’s equivalent to an ordinary with a nine-foot-diameter front wheel except that you can reach the pedals. Both bicycles go the same distance with one turn of the pedals.
Because the literature uses gear inches, the numbers are meaningful to experienced readers. One hundred inches is a “tall” gear that enables you to go downhill at 25 mph. Eighty inches is a nice, level cruising gear. Forty inches is for climbing medium hills. Twenty inches is for climbing steep hills with a touring load, and so on.
In place of gear inches, the Europeans refer to “development” — the number of meters traveled in one turn of the pedals. This is a more logical system because it allows you to directly relate the number of your pedal revolutions to the distance you are traveling, but we’re used to thinking in terms of gear inches.
While we’re talking terminology, I should point out that I number bike gears like gears on an automobile. On a 10-speed, “first” is Low, the lowest gear, and “tenth” is High, the highest gear. You “downshift” to a lower gear for hill climbing and you “upshift” to a higher gear for level cruising.

Above: Fig. 1: A typical high- wheeler.
_______ Designing Your Own Gear Train _______
There are four essential steps to follow when designing a gearing system r your bike:
• Pick your ideal high gear.
• Pick your ideal low gear.
• Pick a shift pattern that you understand and will properly use.
• Select chainwheels and freewheel sprockets you need to produce the desired pattern and range of gears.
If you’re doing an economy upgrade, you may not be able to pick the optimums. You may have to compromise the gear selection to match the capacity of your present components.
_________ How High the High? _______
Selecting your highest gear is a reasonably straightforward process. The ergonomics of cycling narrows the options; even a very well-tuned bicycle engine can only put out about 1/2 horsepower (HP) on a sustained basis.
Within a limited range, human horsepower capabilities can vary consider ably. An out-of-shape beginner pedaling along at 14 mph only puts out about 1/10 HP. By contrast, Freddy Markham put out 1 HP for a whole minute when he went 65.5 mph for 200 meters in a human-powered vehicle (HPV) in 1986.
Although Markham put out ten times as much horsepower during his short ride as the beginner does while traveling 14 mph, he didn’t go ten times as fast. In fact, if his HPV hadn’t been completely streamlined, Freddy would have gone only about 35 mph. That’s because most of the bicycle pedaling effort goes toward overcoming wind resistance.
Wind resistance absorbs 67 percent of your pedaling effort at 15 mph and 85 percent at 25 mph. Wind resistance increases with the cube of the speed, so it takes eight times as much horsepower to go twice as fast.
Finally, almost everyone pedals between 60 and 100 rpm. Pedal rpm is called “cadence.” A cadence of 80 with a 100-inch gear equals 24 mph, which requires about 1/3 HP in a crouched position. Most bicycles have a 52-tooth large chainwheel and a 14-tooth small sprocket, a combination that produces a 100- inch nigh. That’s about the highest gear that most cyclists have the strength to use at a reasonable cadence.
There are exceptions. Strong racers sometimes use 110- or even 115-inch gears for drafting the pack on the level or for sprinting downhill. Time trialists push very tall gears in their all-out races against the clock. Tourists with 40 pounds of luggage may be quite happy with a High of 85 or 90 inches.
Tall, long-legged riders with long (175mm or 180mm) cranks and a slower cadence might prefer a 1 10-inch high gear, especially for barreling down hills. Short-legged riders with short (160mm or 165mm) cranks often develop a faster cadence and they might prefer a 90-inch high.
The second highest gear affects the selection of High. With a nice 85- to 90- inch Ninth for level cruising, you can afford to carry an “overdrive” Tenth for pedaling downhill. If your Ninth is 75 to 80 inches, you’ll probably be happier with a 90- to 95-inch Tenth.
If you think your High is too low, ask yourself if you are really ready for higher gears. Competitive racers who use 110-inch Highs spent years spinning in low 60-inch gears to develop their leg strength. Many macho cyclists buy extra-high gears, then find that the only thing that speeds up is knee deterioration.
To sum up, most cyclists are well served with the standard 100-inch High. If your own pedaling experience indicates that this is too high or too low, change it, but keep the changes within a narrow range.
The easy way to modify high gear is to change the small freewheel sprocket. The standard 52-tooth chainwheel X 14-tooth sprocket gives a High of 100 inches. A 13-tooth sprocket raises High to 108 inches. A 15-tooth sprocket lowers High to 93 inches. If those changes are too great, keep the 14-tooth sprocket and change the big chainwheel to 54 teeth for 104 inches or 50 teeth for 96 inches. But in deciding how to alter your gearing, keep in mind that chainwheels cost much more than freewheel sprockets.
Finally, I may be accused of falling into the “do as I say, not as I do” syndrome, since I have a 120-inch gear on my sport touring bicycle (48-tooth chainwheel X 11-tooth sprocket). I have that tall gear because I love to pedal down hills at 40 mph.
I’ve been working for the past five years to get my cadence up to 80. The Avocet Cyclometer has helped this program. It has shown me that when my cadence drops much below 80, I can go faster by shifting to a lower gear and speeding up my cadence. I assure you I’m very careful of my knees when using the 120-inch gear. As soon as the hill levels out and my speed drops below 30 mph, I shift out of the 11-tooth sprocket. I can afford to carry 2 extra downhill gears on the sport tourer because it’s an 18-speed with 15 useful gears.
This is a nuts and bolts guide, not a diet and exercise guide, but I urge you to work on increasing your cadence. Bicycling avoids most of the physical pitfalls of other sports. So don’t put gears on your bicycle that damage your knees.
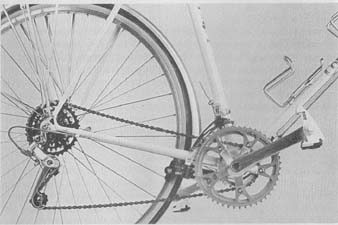
Image 1
______ How Low the Low? ______
If selecting High is straightforward, selecting Low is more personal, more controversial, and more expensive. Your lowest gear is used to climb the Steepest hills. You’re only in Low for a small fraction of your mileage. It’s easy to convince yourself (or let yourself be convinced) that you should struggle on with your present gearing until you get stronger. That’s bad reasoning if the hassle of hill climbing causes you to limit your cycling. The idea is to get stronger first and then raise your low gear.
There’s a macho image associated with big chainwheels and little freewheel sprockets. The slightly derisory term “granny gear,” used to describe very low gears, is part of the macho syndrome. I’ve been on a reverse ego trip for ten years. I flaunt the most anemic granny available (24-tooth chainwheel X 34-tooth freewheel). I don’t use the 19-inch Low that often, but it’s nice to have when I want it.
On a loaded tour, with 30 or 40 pounds of luggage, you need the lowest gear that you can get. If you average 15 mph on your fun training rides without any load, you’re putting out something under ¼-HP. With 40 pounds of luggage, that horsepower will take you up a 6 percent hill at 4 mph. Sit down and figure it out for yourself. One horsepower raises 550 pounds 1 foot per second.
If your loaded touring bike has a 19-inch Low like mine, you can climb that 6 percent hill at a cadence of 70. If it has a 27-inch Low, your cadence will be about 50 because you are horsepower limited. You can’t convert oatmeal to glycogen fast enough. At a cadence of 50, your bike will slow down each time you go through the dead centers. As you sway back and forth, your knees will tell you that you’re pushing 1½ times as hard.
As the hills get steeper, your speed and cadence become that much slower. Al some point, you get off and walk. It’s both faster and more efficient to pedal up hills. You know that. That’s why you bought a bicycle. I suspect that there’s a Low that’s too low for loaded touring, but I haven’t found it yet.
A Low of 19 inches certainly isn’t the ergonomic limit, but it’s the practical mechanical limit of today’s equipment. On my bicycle tour of England, when I got off and walked up the one-in-five hills (that’s a 20 percent grade, folks), the cyclometer said 2½ mph. I can easily balance a loaded touring bicycle at 2½ mph, but I can’t push hard enough at 40 rpm in a 19-inch gear.
Fifteen years ago, cyclists avoided very low gears because of the lousy derailleurs that were available at the time. There was only one decent-shifting rear derailleur, the Campagnolo Record, and it didn’t have the capacity to handle wide-range gearing. The Huret and Simplex wide-range rear derailleurs were fragile mechanical disasters. The old Campagnolo Gran Turismo was hell hr-stout, but it was arguably the worst-shifting rear derailleur ever made.
In 1970, wide-range touring gearing, even with 28-tooth freewheels, involved a significant sacrifice in shifting ease. You put up with narrow gearing in order to get good shifting.
Shimano and SunTour ended all that in the early 1970s with their GS and GT rear derailleurs. (Somebody ought to build a monument to the SunTour VGT.) To show that they were serious, the Japanese introduced 34-tooth free wheel sprockets. The Europeans still dispute the need for very low gears. You can’t buy a 34-tooth sprocket for a European freewheel. But today, thanks to the Japanese, you can pick from dozens of good-shifting, wide-range rear derailleurs, freewheels, and cranksets.
The front derailleur situation was worse. Fifteen years ago, the common front derailleurs were the Campagnolo Gran Sport and the Simplex Prestige. They shifted poorly on doubles and worse on triples. In 1970, “alpine” gearing used 52/40 chainwheels and the front derailleurs were overwhelmed at that level. Good-shifting, wide-range front derailleurs are a recent development. Mountain bikes have provided the testing ground for most recent front derailleur improvements.
Today’s wide-range front and rear derailleurs can comfortably handle low gears as low as you want to install, yet the old macho mythology persists. Ask yourself: how you feel about your present bicycle. Are you straining and suffering going up hills or are you avoiding hilly rides? If so, then get a lower Low and smile as you slowly ride up your steepest hill.
Conversely, are you so strong that you never use your Low because you sprint up hills in second or third? Then rearrange your gearing around a higher Low and get easier shifting and closer steps between your level cruising gears.
I pedal in hilly country and my cycling companions are not very competitive. With this admitted bias, I see ten over-geared bikes for every one that’s geared too low. Based on many letters and conversations, I’ve developed table 1, which gives my arbitrary low-gear recommendations. In later figures I’ll tell you about the equipment decisions and compromises that are involved as you plumb the low-gear depths.
--Logical Gearing Arrangements--
At this point, you’ve tentatively selected your highest gear (High) and your lowest gear (Low). Now you have to convert the numbers into ironmongery. You must pick the big chainwheel-little sprocket combination that gives you High and the little chainwheel-big sprocket combination that gives you Low. In the process of picking these combinations, you will have selected two chainwheels and the smallest and largest freewheel sprockets.
Now things begin to get complicated. First, you have to decide on the number of “speeds” for your bike. Do you want one, two, or three chainwheels on your crankset; do you want five, six, or seven sprockets on your freewheel? These decisions will determine whether your bike becomes a 5-, 6-, 7-, 10-, 12-, 14-, 15-, 18-, or 21-speed.
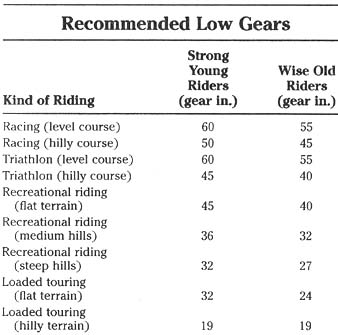
TABLE 1. ---Recommended Low Gears
Kind of Riding | Strong Young Riders (gear In.) | Wise Old Riders (gear in.)
- Racing (level course)
- Racing (hilly course)
- Triathlon (level course)
- Triathlon (hilly course)
- Recreational riding (flat terrain)
- Recreational riding (medium hills)
- Recreational riding (steep hills)
- Loaded touring (flat terrain)
- Loaded touring (hilly terrain)
Time-out for terminology. A bicycle with three chainwheels and five sprockets is called a “15-speed,” even if two of the speeds are unusable and three of the speeds are exact duplicates. Cranksets with three chainwheels are called “triples.”
When you’ve selected High and Low and you’ve established the number of speeds, you’re ready to pick the intermediate gears between High and Low. Bear in mind that when you choose the intermediate sprockets (and the middle chainwheel on a triple), you’re also choosing the shifting pattern for your bicycle. Actually, it’s easier to decide on the shifting pattern first and then choose the chainwheels and freewheel sprockets that fit the pattern.
So welcome to “Gear-town”. I’ll try to make your visit as pleasant and productive as possible. I will get right to the point by saying, I believe that there are just five logical and practical shift patterns to be considered. They’re listed in table 2. The table shows typical high and low gears and the chainwheel and freewheel combinations often used to create these basic gearing systems.
There are many other less practical and less convenient gearing patterns, and I’ll talk briefly about them at the end of this fig.. But first, let’s look at the five basic patterns one at a time.

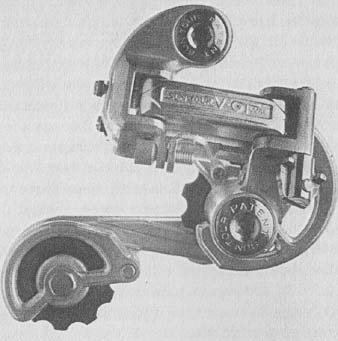
----Image 2a, 2b: SunTour VGT rear derailleur.
____ Crossover ____
Crossover is the pattern for racers, tri-athletes, and anyone riding on level terrain. It’s very straightforward. You have one set of gears on the big chainwheel for level roads and a second set of gears on the little chainwheel for hills. You make most of your shifts with the rear derailleur. Racers like this because rear shifts are faster and more reliable than front shifts. When you run out of lower gears on the big chainwheel, you shift to the little chainwheel. When you run out of higher gears on the little chainwheel, you shift back to the big chainwheel.
It isn’t quite that simple, because you don’t normally use the two cross- chain gears—the big chainwheel with the biggest freewheel sprocket or the little chainwheel with the smallest freewheel sprocket. You avoid these “forbid den” cross-chain gears so that the chain doesn’t have to deflect at extreme angles. Of course they’re not really forbidden. But if you use them, your chain will be noisy, less efficient, and it will wear faster. Racers don’t use the cross- chain gears because they put so much tension on the chain that it can pull off the chainwheels. (Chain deflection is most severe on racing bicycles with short chainstays.) It’s not a big deal to avoid the forbidden gears. You just switch to the other chainwheel one gear earlier.
Crossover gearing wastes gears. You give up the two cross-chain gears and there are often duplicates between the big and the little chainwheel gears. A typical 12-speed crossover system has seven or eight useful gears. Wasted gears aren’t a problem for racers because in a typical race they normally use only five or six gears. Moreover, today’s racers use six- or seven-sprocket freewheels to get more useful gears. They want a maximum number of one- tooth steps between adjacent sprockets because that gives them small, 7 percent changes.
== ==

TABLE 2. Logical Shift Patterns
Pattern Name; High Gear; Low Gear; Chain-wheels; Freewheel Sprockets; Double Shifting; Shift Sequence
Crossover plus granny
Half-step plus granny
Alpine
== ==
Racers sometimes change sprockets before each race to customize the gearing to the course. On a level course, they use a “corncob” or “straight- block” freewheel (12-13-14-15.16-1 7-18) with one-tooth steps between sprockets. On a hilly stage, they use something like 13-14-15-16-18-20-23.
In the half-step and alpine patterns, there’s a rigorous relationship between the gears on the two chainwheels. In a crossover system, there isn’t a similar relationship so you can arrange the sprockets any way you please.
There’s nothing magic about the 52/42 chainwheels either. When Campagnolo introduced the Record front derailleur in the late 1960s, it could reliably handle a 10-tooth chainwheel difference. Shortly afterward, Campagnolo revised the Record crankset so that it would take a 42-tooth minimum chainwheel. Shortly after that, most racers were using 52/42 chainwheels. To day, it’s usually 53/42.
In the 1960s and 1970s, the smallest freewheel sprocket was a 13-tooth, and extra-strong racers had to use 54- or 56-tooth chainwheels to get extra-high gears. Today’s racers can use 12-tooth sprockets and smaller inner and outer chainwheels. The latest generation of cranksets can handle 39-tooth chainwheels. Today’s racers could use 50-tooth outer chainwheels instead of 53s or 54s, but most of them don’t. In theory, racers could change chainwheels .. each race, but they don’t. They just install the smallest inner chainwheel that fits the crankset (39 or 42 teeth) and leave it alone.
The crossover shift sequence is very simple. As you approach a hill, you shift down with the rear derailleur until you get to the second largest rear sprocket. Then you “cross over” to the small chainwheel. That’s the reason for the name.
Crossover works best as a narrow-range pattern for racers or for mere mortals in level country It’s less pleasant if there’s more than two-tooth steps between the small sprockets or three-tooth steps between the larger sprockets, because large tooth steps result in 15 percent or larger steps between gears. Crossover is also a pattern best adapted to six- or seven-sprocket freewheels.
Though I have just described crossover as a narrow-range pattern, I think that a properly arranged wide-range crossover with seven or eight useful gears is more pleasant than alpine for many riders. Over the years I’ve often recommended wide-range crossovers to poor souls whose top-of-the-line “touring” bicycle came equipped with a racing crankset and a 42-tooth inner chainwheel.
Combining the 42-tooth chainwheel with a 14-16-18-21-26-34 freewheel gives a 34-inch Low and an acceptable shifting pattern.
-- Half-Step --
Half-step gearing is an old favorite of mine, but you rarely see it these days. Half-step was the standard racing pattern in the 1960s, with something like a 13-24 five-sprocket freewheel and a 52/49 crankset. Campagnolo Record derailleurs and six-sprocket freewheels ended half-step gearing and double shifting for racers.
With both half-step and alpine, the rules are rigid. The freewheel sprockets must be selected to give even percentage steps between gears. The “perfect” freewheel is 13-16-20-25-31, which provides uniform 24 percent steps between sprockets. The chainwheel step must be 12 percent, half of the freewheel step, hence the name.
Half-steps have three advantages: evenly spaced gears, an easy shift sequence, and easy front shifts. They also have three companion disadvantages: a Low that isn’t very low, the need for wide-range freewheels and rear derailleurs, and the need to double shift to use the half-steps.
The half-step shift sequence is easy to remember. You get full steps with the right lever and half steps with the left. If the front derailleur is on the “wrong” chainwheel, you shift half a step in the “wrong” direction on the front and a full step in the “right” direction on the rear. That’s called a “double shift.”
The half-step pattern works very nicely to modify an alpine-geared bicycle for level country. If your alpine gearing is too low for you, replace the inner chainwheel with the appropriate half-step chainwheel.
In spite of all of my evangelizing, I have to admit that the most useful half- step application is the triple half-step plus granny pattern.
-- Alpine (aka: One-and-a-Halt-Step) --
The majority of today’s bicycles have alpine gearing or something that would have been alpine gearing if the designer understood gearing. Ten years ago, half of the bicycles sold had 10-speed alpine gearing with 52/40 chainwheels and a 14-1 7-20-24-28 freewheel. When SunTour introduced the narrow-spaced six-sprocket freewheel in 1978, there ceased to be a standard pattern.
Terminology time. A narrow-spaced freewheel has narrow spacers between the sprockets so that six sprockets can be crammed into the same width as five wide-spaced sprockets. A narrow-range freewheel has small tooth differences between the sprockets.
The macho experts put down alpine gearing because it’s used on so many inexpensive bicycles. However, alpine has some major advantages, which is why it’s so widely used. It’s a compromise that takes maximum advantage of inexpensive, medium-capacity components. The 12-tooth chainwheel difference is about the largest front shift that can be handled by a novice with an inexpensive front derailleur. The 14-28 freewheel was about the limit of the old Huret Allvit and Simplex Prestige rear derailleurs.
A 10-speed alpine has ten useful gears with a big step on either end and half-steps between the eight intermediate gears. You normally use the forbid little-little-little gear with an alpine.
The main disadvantage of alpine gearing is the bizarre shift sequence, which is hard to remember and hard to perform. The double shifting drill—left lever forward, right lever forward two steps; left lever back, right lever back one step—isn’t easy, even with good-shifting derailleurs. Most beginners never figure out how to properly shift their alpines, and they end up with six rather poorly arranged gears.
The second disadvantage of alpine gearing is that the step between High mid Ninth is too big. Once you’ve pedaled a 90-inch gear, you won’t be happy with alpine’s 83-inch Ninth. Especially worse off are cyclists with SunTour’s old 14—34 five-sprocket freewheel. Its fourth sprocket has 18 teeth instead of 17, giving a 79-inch Ninth. This trivial change dooms the cyclist to a hopeless hunting the missing 90-inch gear. SunTour’s current Perfect and Pro-Compe freewheels use 14-17-21-26-34 sprockets and I like to think that my articles nagged SunTour into making the change. (Gear freaks get their jollies in strange ways.)
The rules for alpines are rigid, just like those for half-steps. The freewheel must have even percentage steps and the chainwheel step must be one-and-a-half freewheel steps, which is why alpine is often called “one-and-a-half-step” gearing. Many bicycle designers don’t understand these rules and many alpines have less than the best sprocket arrangements.
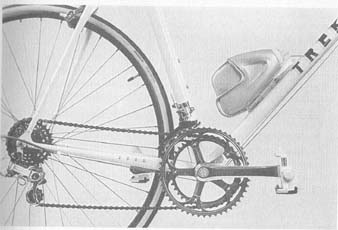
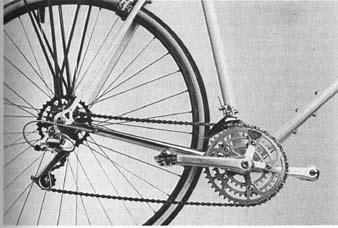
---Image 3: Alpine gearing on a Trek 2000 racing bicycle.
Summing up, rats can be trained to navigate mazes and cyclists can train themselves to shift alpines. It takes the same kind of low animal cunning. If you can put up with the shifting sequence, alpines make sense for Lows between 30 and 40 inches, especially for 10-speeds.
The gearing on my Trek 2000 is closet alpine with 5 1/39 chainwheels and a 12-14-1 7-20-24-28 freewheel. That’s the lowest Low I can get with the Dura-Ace EX crankset and the Dura-Ace/SIS rear derailleur. I double shift surreptitiously so my gear freak friends won’t know.
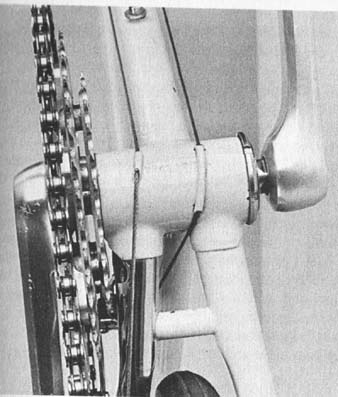
---Image 4: Closely mounted inner chainwheel on a triple crankset.
_______ Doubles versus Triples _______
There’s a major difference between bicycles with two chainwheels (doubles) and bicycles with three chainwheels (triples). Therefore, I want to make some observations about triple systems in general, before describing the two common gearing arrangements that make use of three chainwheels: the half step plus granny and the crossover plus granny.
If you want a really low Low, you need three chainwheels. The purpose of adding a third chainwheel is not to create 14 narrow steps between gears rather than 9 wide steps. Instead, the third chainwheel lets you put all of your hill- climbing gears onto an inner, granny chainwheel so that you can use the outer two chainwheels to provide a pleasant pattern for riding on level terrain.
In short, triple cranksets offer the following advantages:
• Really low gears (below 25 inches).
• Lots of nicely spaced, level cruising gears and an easy shift sequence.
• Five or six usable gears on the middle chainwheel with less chain deflection, because the middle chainwheel really is in the middle.
• However, triples also have a couple of disadvantages:
• Higher cost.
• Fussier shifting onto the middle chainwheel. ( You have to look down and center the front derailleur whenever you shift onto the middle chainwheel.)
Here are some basic ground rules to observe when designing a triple chainwheel gearing system:
• Triples should have a Low lower than 27 Inches. Don’t put up with the problems and the expense of a triple unless you need a really low Low.
• The inner chainwheel should have 28 or fewer teeth. This is an extension of the first item. I don’t think that cranksets that have 36-, 34-, or 32-tooth minimum sprockets are suitable for triples. You can get the same Low with a double.
• The inner chainwheel should be the smallest one that fits the crankset. If you don’t want the lowest possible Low, use something less than the largest inner sprocket on your freewheel. The smaller inner chainwheel and smaller freewheel sprocket weigh less and make for easier rear shifts. If you decide later that you need a lower Low, you can change sprockets inexpensively.
• Triples shouldn’t use narrow-spaced freewheels. Narrow-spaced free- wheels and narrow chains shift adequately on racing freewheels with one- or two-tooth differences between sprockets. Narrow-spaced, wide- range, touring freewheels shift poorly, regardless of chain or rear derailleur. (I’ll talk more about this in fig. 6 on freewheels.) On a triple, you’re much better off with a wide-spaced five-sprocket freewheel than with a narrow-spaced six-sprocket freewheel.
• Triples should be mounted with the inner chainwheel as close as possible to the chainstay. You don’t use the inner chainwheel with the small sprockets so don’t provide a chain-line for the unused gears. With the inner chainwheel just clearing the chainstay, the middle chainwheel will be in the middle, and you can use all five (or six) gears. The front shifts will be easier because the front derailleur doesn’t have to reach out so far. I’ve set up more than 20 triples and most of them have used spindles designed for doubles rather than triples. Phil Wood and SunTour sealed-bearing bottom bracket sets allow you to adjust the chain-line to set the inner chainwheel right next to the chainstay.
• Triples shouldn’t be limited by the chain wrap-up capacity of the rear derailleur since you don’t use the inner chainwheel with the small free- wheel sprockets. With a proper chain length (two extra links in the big chainwheel-big sprocket gear), the chain will probably hang loose in the little chainwheel-little sprocket gears. So what? The bicycle makers can’t exceed derailleur capacity because of trial lawyers and product liability, but you can. Forget about the wrap-up capacity of the rear derailleur and set up your triple with the Low that you really want.
___ Halt-Step plus Granny ___
Now, let’s talk about the difference between half-step plus granny triples and crossover plus granny triples. I prefer the half-step plus granny combination. A 15-speed has five gears on the middle chainwheel, each 24 percent apart. It has four more usable gears on the outer chainwheel, each 12 percent higher. I don’t usually use the big chainwheel-big sprocket gear, but I have on occasion.
Front derailleur shifts are easier with a half-step plus granny, especially the upshift from the inner to the middle chainwheel. That sounds odd, doesn’t it. (It’s explained in fig. 8 on front derailleurs.) The main liability with this system is that the lowest gear on the middle chainwheel is around 35 or 40 inches, so you use the inner chainwheel more often.
Half-step plus granny triples are for dedicated gear freaks who appreciate 12 or 13 useful gears, each 12 percent apart, and who are willing to double shift to get them.
_____ Crossover plus Granny _______
The crossover plus granny is the ideal pattern for mountain bikes. You have street gears on the outer chainwheel, off-road gears on the middle chainwheel, and mountain-climbing gears on the inner chainwheel. Almost all of the shifts are made with the rear derailleur, which is a major advantage in the hills. The smaller middle chainwheel gives a lower gear, so you don’t have to use the Inner chainwheel as often.
Many loaded tourists prefer the crossover plus granny shift pattern. The late Dr. Clifford Graves, the founder of the International Bicycle Touring Society, was a strong supporter. You’re in the middle chainwheel most of the time. The steps between gears are larger, but a loaded bicycle slows down in a hurry so that’s less of a disadvantage. The typical crossover plus granny has two tailwind or downhill gears on the outer chainwheel, six level gears on the middle chainwheel, and two steep-hill gears on the inner chainwheel.
The main drawback with this pattern is that it provides only ten useful gears with an 18-speed. Crossovers waste gears, and because of this, the pattern works better with a six-sprocket freewheel. If you have to use a narrow-spaced six-sprocket freewheel to get an 18-speed, you are probably better off with two fewer gears and a wide-spaced five-sprocket freewheel.
Crossover chainwheel combinations like 52/38/24 are a torture test for front derailleurs. The new mountain bike front derailleurs with deep inner cages can handle this kind of gearing, but the upshift from the 24 to the 38 is a bear. The smaller the difference between the middle and outer chainwheels, the better the shifts. I recommend a ten-tooth maximum difference.
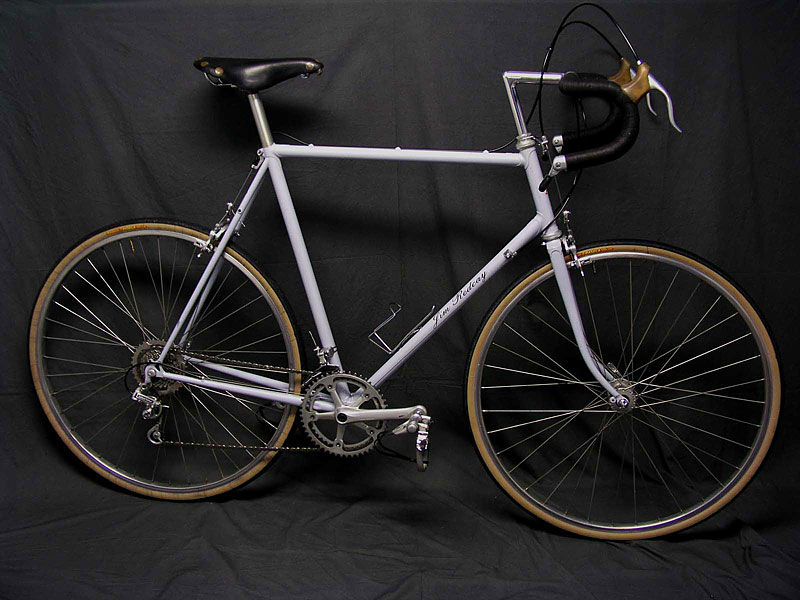
---Image 5a, 5b: Crossover plus granny gearing on a Redcay sport tourer.
In this system, you arrange the freewheel sprockets to suit your needs. There are no rigid rules. I usually provide smaller differences between the small level-pedaling sprockets and larger differences between the large hill-climbing sprockets. When you shift down on a hill, you want a significantly lower gear.
___ Plotting Gear Patterns Graphically ____
Though I have just attempted to explain five popular gear patterns in words, I think that it’s easier to explain gear arrangements with graphs. A graph of gearing consists of a series of dots, each dot representing the gear formed by one chainwheel-sprocket combination. The dots are arranged in horizontal rows, each row representing the gears formed on one chainwheel. In the graphs created for this fig., the row that represents the outer chainwheel in each system is placed on top, the one for the middle chainwheel in the middle, and the one for the inner chainwheel on the bottom. Solid horizontal lines have been placed between rows for clarity.
The dots in these gearing graphs are laid out on logarithmic graph paper. You don’t need to understand logarithms to appreciate logarithmic gear plots. They are valuable because they show the actual percentage relationship between gears and thus the way a change in gears will actually feel through the pedals. By looking at the dots, you can tell several other things about your gearing arrangement. For example, if one dot is on top of another, you have duplicate gears. This waste of gears is inevitable with gearing patterns like crossover. Conversely, if there’s a wide gap on the graph between two dots, then there’s a gap between those two gears, and when you’re pedaling them, you’ll shift back and forth looking for the “missing” gear. The dots also show you the relationship between the little chainwheel gears and the big chainwheel gears. Notice what happens when you shift from one chainwheel to the other.
To understand how to read logarithmic graphs, look ahead to figure 3. There you will see a variety of different gearing patterns graphed out. Look at the graph of the wide-range alpine. Suppose you’re lugging along at 18mph at a cadence of 60 in the 100-inch High (52-tooth chainwheel X 14-tooth sprocket). This feels a bit slow, and you’re pushing too hard on the pedals. So you downshift one step on the rear derailleur to the 83-inch gear (52-tooth chainwheel X 17-tooth sprocket). This moves you to the left on the graph to the next dot. This is a 21 percent change (17/14). At the instant that you shift, your cadence speeds up 21 percent to 73 rpm, and the pressure on the pedals is reduced by 21 percent.
Suppose another time that you’re pedaling up a hill at 6.5 mph and at a cadence of 60 in the 39-inch gear (40-tooth chainwheel X 28-tooth sprocket), and you downshift on the rear to your Low, the 34-tooth sprocket. That’s also a 21 percent change (34/28). This also moves you to the left on the graph to the next dot. The two 21 percent changes feel the same to your legs and they plot the same on the logarithmic chart. That’s why I use logarithmic graph paper.
Figure 2 shows a logarithmic gear plot with the gear inches labeled for different speeds and conditions. Figure 3-3 shows seven different gear patterns plotted on logarithmic paper.
____ How Many Speeds: 10, 12, 14, 15, 18? ____
When you modify the gearing on your bicycle, first decide on the High, the Low, and the gear pattern. Then the number of speeds will usually drop into place. Crossover patterns work best as 12- or 14-speeds because they need the extra gears to make up for the duplicates. Half-steps and alpines usually work best as 10-speeds. When six- and seven-sprocket freewheels became common, the gear freaks found that there weren’t many really uniform equal-percentage six- or seven-sprocket freewheels (except those with 11-tooth small sprockets.)
The first derailleur bicycles had three-sprocket freewheels, probably to compete with 3-speed, Sturmey-Archer internally-geared hubs. As time passed, Incredulous mechanical engineers watched in awe as four-, five-, six-, and then seven-sprocket freewheels were developed and chains were deflected at ever more painful angles. All mechanical engineers were taught in ME-I00 that chain drives require perfectly aligned sprockets.
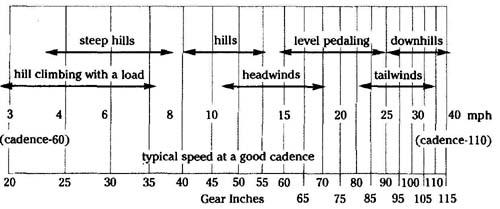
Above: Fig. 2 Gears for different speeds and conditions. steep hills –
hills -- level pedaling -- hill climbing with a load; cadence headwinds;
typical speed at a good cadence.
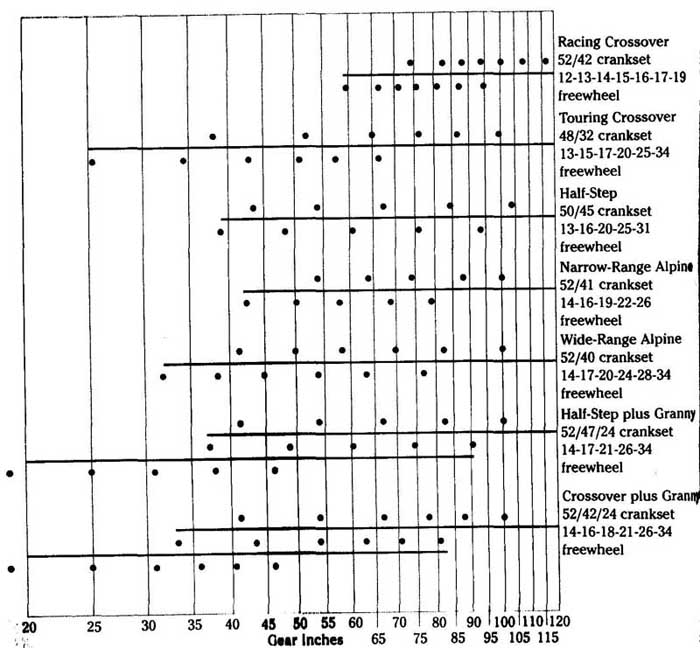
Above: Fig. 3 Seven basic gearing patterns.
The five-sprocket freewheel was, and still is, a good compromise between the advantage of more gears and the accompanying disadvantages of chain deflection, weaker rear wheels (because of excessive dishing), and weaker, wider rear axles.
— Narrow-Spaced 6-Speeds versus Wide-Spaced 5-Speeds —
Six-sprocket freewheels were racing specialties until Fuji and SunTour introduced the narrow-spaced Ultra-6 freewheel in 1978. It was a marketing and a practical failure, Prom an advertising standpoint, a 12-speed bicycle was 20 percent better than a 10-speed, but narrow-spaced freewheels shift worse than wide-spaced freewheels.
On low-priced bicycles, the extra two gears were a minor improvement because the High and Low were usually the same as they were on the previous 10-speed. Narrow-spaced freewheels shift worse than wide-spaced freewheels on the rear and narrow chains shift worse than standard chains on the front. I kept waiting for a “miracle” narrow chain to solve the shifting problems, but it didn’t come along and the narrow-spaced touring freewheel finally died in 1989.
Nearly all of today’s racers use narrow-spaced freewheels and narrow Sedisport chains. The shifting penalty is minor because there’s only a one- or two-tooth difference between the sprockets on racing freewheels. Mountain bikes have gone in a different direction—toward wider rear axles so that they can use wide-spaced six-sprocket freewheels. That’s where the racers were in 1978.
______ Unusual Gear Patterns ______
Now that we have looked at the most common and sensible gearing pat terns, we will take a brief look at some unusual and less practical patterns.
__ Wide-Step __
The basic idea behind the wide-step pattern is to combine a narrow-range freewheel with wide-range double chainwheels. In my very first gearing article In 1975, 1 talked about “three-steps,” “four-steps,” and “five-steps.” Now I just call them “wide-steps” and I don’t recommend them.
My disenchantment with wide-step patterns came when Sakae sent me a crankset with a complete set of chainwheels from 28 to 54 teeth. This allowed me to build and pedal some of the unusual gear trains that I had been writing about.
Wide-steps look pretty on graph paper but they are unpleasant to pedal, without exception. The problem is the double shifts. You shift on the front derailleur and then you have to shift four or five gears on the rear derailleur. By the time you find the right gear, your bicycle has slowed down so much that you have to shift back to where you started.
The beauty of a crossover pattern is the overlap between the high and the low ranges. This lets you stay on whatever chainwheel you’re in until you run out of gears. Then you shift on the front. You don’t have to make the front shift very often because there are duplicate or near duplicate gears on both ranges. A 1 pattern has less overlap, so it requires more frequent front shifting.
The six-sprocket freewheel version with a three-three split is called “cha cha” gearing. Both of these patterns are for people who just love to double shift and who have very mathematical memories.
Figure 4 plots these patterns. Just remember, they plot better than they pedal.
______ 14 Best Gears _____
I have created table 3, which shows my 14 favorite gear patterns. They will take care of 90 percent of your needs.
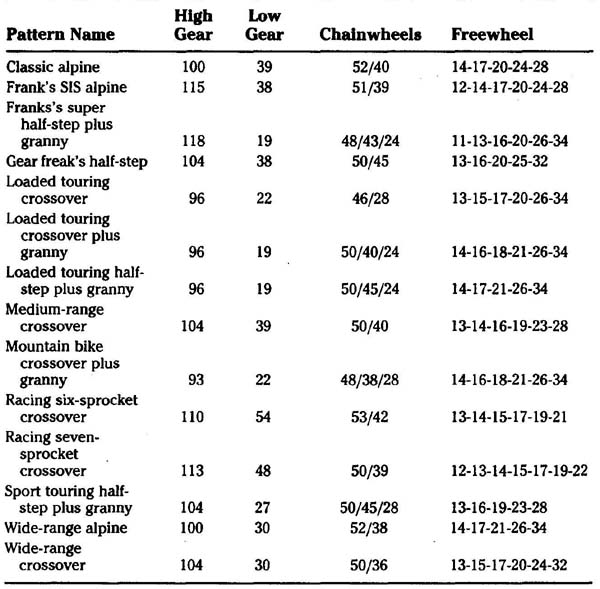
TABLE 3. Fourteen Favorite Gear Patterns
______ Wide-Step Triple __________
The wide-step triple is an expansion of the basic wide-step pattern. The veteran racer finds that he can’t muscle up the steep hills any more, but he has learned to love his corncob freewheel. So he adds a 28-tooth inner chainwheel to his racing crankset. The problem is that he loses the quick, easy front shifts onto the middle chainwheel. Now he has to look down every time he makes a front shift to center the derailleur and the Low of 40 inches or so isn’t very low. You have the complication of a triple without the benefit.
______ Rhumba Gear ______
In the exotic pattern I call rhumba, the freewheel provides three closely spaced small sprockets, then a big gap, then the two large sprockets. The chainwheel difference is ingeniously selected so that when you shift from the big to the little chainwheel, the three little chainwheel gears just fill the gap. From High to Low, the shift sequence is as follows:
• Big chainwheel — one, two, three on the rear.
• Shift to the little chainwheel, shift down two gears on the rear — then four, five, six on the rear.
• Shift to the big chainwheel—seven, eight on the rear.
• Shift to the little chainwheel, shift down one gear on the rear — nine, ten.
One, two, three, one, two, three, one, two, one, two. Shall we dance?
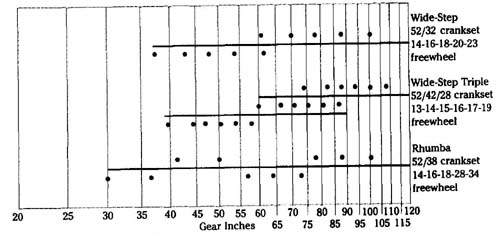
Above: Fig. 4 Unusual gear patterns.