.Over the past five years, most of the action in bicycle brake design has taken place in the mountain bike arena. Nearly all the bicycle makers have now adopted cantilever brakes, or similar types with the pivots brazed on to the forks or the stays, as the standard for mountain bikes. You can’t install cantilever brakes on your 10-speed without brazing on the mounting studs, which is a major expense. However, some of the mountain bike technology has rubbed off onto racing and touring brakes. We’ve learned that good braking requires rigid calipers, high mechanical advantage, strong cables, stiff casings, large pads made of suitable material, and minimum friction.
I especially like two new features found on many of the new brake models: aerodynamic levers that have the cables coming out the back and lever return springs that produce a lighter lever action. With few exceptions, all of the latest 10-speed brakes are sidepulls. The centerpull brake has become obsolete, so I won’t lead you through a long centerpull versus sidepull discussion.
Terminology time. The word brake can mean either the whole lever- caliper-cable-casing assembly or it can mean just the calipers. The word brake-set means the whole front and rear assembly. Similarly, the word cable can mean the combined cable and casing or just the inner cable.
At the risk of losing friends among the brake salesmen, I’ll begin by saying that your old brakes are probably adequate. In dry weather, they have enough stopping power to skid your back wheel or to lock your front wheel and rotate you over the handlebars. What more do you need?
Though your present brakes may be adequate, I do see two main improvements in contemporary brake design. First, the best of today’s brakes give much better interaction between lever effort and stopping power. Second, they have more stopping power for the extreme situations—stopping in the rain or stopping a heavily loaded touring bicycle. In addition, today’s aerodynamic sidepulls are so handsome that you might decide to upgrade simply because you like their looks. If you do decide to stick with your present brakes, you can make a noticeable improvement in their operation by installing new cables and casings and new pads.
Two parts of the bicycle deserve the overworked word “system.” One system, the gear train, makes you go, while another system, the brakes, makes you stop. There are six parts to the braking system: levers, cables, casings, calipers, pads, and the brake track surfaces of the rims. Let’s first talk about them one at a time, then look at the entire package.
For their January 1987 issue, Bicycling ran a very complete series of tests of braking systems that covered wet and dry stopping power and sensitivity. I’ve reused the results of those tests in this section. The tests revealed how much progress has been made with brake design. Many of the brakes tested produced a 0.5-0 stop with only a 13-pound lever force. (A 0.5-0 deceleration is a commonly accepted standard for the maximum braking pressure an inexpert rider can generate before locking the front wheel of the bike and flipping over the handlebars. It takes a skilled rider to keep the rear wheel of a bike on the ground during a 0.5-0 stop.)
___ Brake Levers ___
For the discussion that follows, I’ve assumed that you’re upgrading a bicycle with dropped handlebars, If you want flat handlebars, you’ll have to use brake levers designed for them and you have a wide variety of touring or mountain bike. levers to choose from. But since this section is primarily about brakes for bikes with dropped handlebars, I will focus on levers that fit dropped handlebars.
_____ Auxiliary Brake Levers _____
First, let’s dispose of the hallmark of gaspipe bicycles: auxiliary brake levers or “safety” levers. These awkward devices are actually the antithesis of safety because they reduce lever travel, especially if they’re misadjusted so that they bottom out on the handlebars. Auxiliary levers force you to place your weight in a poor position for maximum braking. Also, you can’t have rubber hoods with auxiliary levers, and rubber hoods are worthwhile. You rest your hands on them in one of the top positions. In fact, my favorite hand position for loaded touring is on top of the brake hoods.
Aero Brake Levers
The label aero was first applied to brake levers during Shimano’s aerodynamic design era, when they came out with the AX Parapul brakes. The aero type lever is more accurately described as rear cable exit, because it has the cable and casing coming out the back of the body instead of the top. This allows you to tape the brake cables to the handlebars. The resulting cable path from the lever to the calipers is shorter, but the curves are sharper. With old cables and casings, these sharp bends would create an undesirable amount of friction. However, with the new lined casings and careful cable routing, the brake response with these levers is the same as with conventional levers.
I’m slowly converting all of my bikes to aero levers. I bury both the brake cables and the bar-end shift lever cables under the handlebar tape. (Look Ma, no cables!) It takes me an afternoon to get all of the casings in exactly the right position and cut to exactly the right length. It’s almost as much fun as wheel building. Most of the high-quality brakesets now offer aero levers as an option.
Table 1 shows the type of levers that are available with each model of brakeset. “Aero” means only aero levers are available; “std” means only standard levers. “Std/A” indicates the availability of either type of lever, and “both” means the lever can be used with either top or rear exit cables.
TABLE 1. Brakesets. [coming soon]
This is a unique model that does not fit into one of the common categories.
_ Lever Return Springs __
Lever return springs are another of those neat little improvements that reduce brake lever force and make cycling more pleasant. After you bicycle for a few years, you learn to live with a /io-HP engine, which teaches you that friction is your mortal enemy. When you apply the brakes, you first have to overcome the cable-casing friction, then you have to overcome the caliper return spring force, and finally you pull the pads against the rims. Lever return springs fight cable-casing friction. If the only return spring is the one located in the calipers, then that spring has to be made to overcome worst-case, cable- casing friction. With two light springs, one in the lever and one in the caliper, brake response becomes lighter.
Shimano and Dia-Compe came out with lever return springs at about the same time. Shimano introduced Shimano Linear Response (SLR) in the 105 gruppo and is letting it percolate up the line. The logic is that racers are used to Campagnolo brute force brake response and they’ll have to gradually become accustomed to light brakes. Dia-Compe calls their lever return spring design Balanced Response System (BRS), and they’ve installed it on all of their aftermarket brakesets. I feel that once you try either of them, you’ll want it. (Table 1 shows which levers have lever return springs.)
_ Lever Reach _
Lever reach is the distance from the inside of the handlebar to the outside of the brake lever. Brakes with a longer reach can move farther before they bottom on the handlebar, which lets you either use a caliper with a higher mechanical advantage or set your brake pads with more clearance.
The reach of your levers should match the size of your hands. If you have small hands, buy a pair of Dia-Compe, SunTour Superbe Pro, or Weinmann short-reach (junior) levers. Short-reach levers typically have a reach of 55mm compared to 65mm for standard-reach levers. This means a 10mm reduction in lever travel, which means less braking power. Small hands also have less power. Thus, riders with small hands need a highly efficient brakeset.
When you brake from the drops, the span from the crook of your thumb to the crook of your first finger has to be larger than the brake lever reach. When you brake from the tops, with your thumb resting on the brake hoods, your fingers have to reach even further out. I obtained 12 different brakesets and I made a special jig to measure lever reach. (FIG. 1 shows howl measured lever reach, while Table 1 records the actual measurements.)
___ Handlebar Clamp Diameter ___
Handlebar clamps come in three diameters: 22mm for steel handlebars, 23.8mm for inexpensive alloy handlebars, and 24 or 24.2mm for quality alloy
handlebars. Almost everyone supplies the large 24.2mm clamp, which works on 24mm or 23.8mm handlebars with no problem. The better levers use an Allen wrench rather than a screwdriver to tighten the clamp. Campagnolo uses a nut and you need a Campagnolo 8mm T-wrench to install the brake levers.
___ Lever Mechanical Advantage ___
Mechanical advantage is the ratio of the travel of the low point of the lever to the travel of the cable. Most brake levers have a mechanical advantage of about 4:1 so you can mix and match brakes and brake levers. (FIG. 2 shows how I measured mechanical advantage and Table 1 shows the mechanical advantage of the various brake levers.)

FIG. 1 Brake lever reach.
__ Brake Lever Construction __
The best brake levers have forged alloy bodies with a bushed pivot for the lever and a separate attachment for the clamp. (All of the levers in Table 1 are made this way.) Economy levers have bodies pressed from sheet aluminum and a single shaft serves both the clamp and the lever, which pivots on plastic bushings. This is not a good construction because overtightening the clamp can bind the lever. Levers with cable length adjusters and/or quick-releases are usually a sign of an economy brakeset. Quality brakes usually incorporate these features in the calipers.
In the past, top-quality levers were always drilled because buyers expected it. However, drilled levers aren’t always lighter. Campagnolo makes their drilled Super Record levers from a heavier gauge aluminum than their undrilled Nuovo Record levers, which are lighter. (Table 1 shows which levers are drilled.)
___ Brake Hoods ___
All quality brake levers have rubber hoods, which provide a comfortable hand position. Many of the current levers have anatomically molded hoods with grooves for your thumbs. These are right- and left-handed. Some hoods are made of softer rubber than others. The soft hoods don’t last as long in smoggy climates.
_ Cables and Casings _
You can significantly improve the performance of your present brakes by installing better cables and casings. This will reduce friction and give you more powerful braking. Tests run by Shimano 1 that nearly half of the force transmitted through an unlined casing is lost in friction. Just keeping the cables greased isn’t adequate. That’s why most of the top-quality brakesets now use either plastic-coated cables or plastic-lined casings, or both.
If it takes significantly more lever movement to put on your rear brake than the front, that’s telling you that the long rear cable is stretching and the casing is compressing. When the Mann County pioneers were cobbling together mountain bike prototypes ten years ago, they mated Magura motorcycle brake levers with Mafac cantilever brakes. They had to use motorcycle cables be cause bicycle cables and casings gave away all of the extra braking power. In the same vein, much of the Campagnolo Nuovo Record brake’s splendid reputation came from the oversized Campagnolo cables.
Casing quality is as important as cable quality. Both casing compression and cable stretch waste lever travel and make your brakes feel spongy. The best casings are made of square wire and have a polyethylene, Teflon, or nylon inner liner. Some makers put a low-friction coating on the cable, which is a poor idea if it results in a thinner cable.

FIG. 2 Mechanical advantage. LI/L2 — mechanical advantage ol lever C1/C2 = mechanical
advantage of caliper.
Everything else being equal, a low-priced bicycle with open cables and short sections of casing stops better than an expensive model with full-length casings. Everything isn’t equal of course, especially when the exposed sections of cable get rusty. When you replace your brake cables, don’t buy the $2 specials. Instead, buy an expensive set with lined casings and oversize cables. One of these sets will cost you about $10, but it will double your braking pleasure. (Table 1 shows cable diameter and casing construction.)
_Brake Calipers_
Table 1 describes 16 sidepull models and 4 unique brake designs: the Campagnolo C-Record, the Mathauser Hydraulic Brake, the Scott Superbrake, and the Weinmann Delta Pro. It used to be that the main criterion for sidepull brake quality was how faithfully the maker copied the Campagnolo Nuovo Record. No longer. The best of today’s sidepulls start where the Nuovo Record leaves off. This includes anti-friction thrust bearings between the calipers, stiffer caliper arms, and lighter springs. A thrust bearing is needed because the calipers are forced together by strong braking. If there’s friction between the calipers, they won’t respond to small changes in lever force.
Many of the new sidepulls offer either a recessed attachment bolt or the normal exposed bolt. Watch out for this option. Short-arm sidepulls usually come with the recessed bolt, which won’t fit your old front fork. Order the kind that matches your fork and rear brake bridge. (Table 1 shows which brakes have thrust bearings.)
_ Brake Caliper Reach _
Most of the new, high-performance sidepulls are short-arm models de signed for racing bicycles, which have the brake bridges right next to the tires. Many of those nice old frames that you want to upgrade were designed for centerpull brakes and fenders, and the brake attachment point is in the next county. Before you order replacement brakes, install wheels of the correct size on your bicycle and measure the distance from the brake attachment holes to the center of the rim’s brake path. The brake calipers have an oblong slot for the pad attachment that typically provides about a centimeter of adjustment.
Many sidepull brakes come in two models, short-reach and standard- reach. The short-reach models have a higher mechanical advantage and they’re stiffer, but your bicycle must be designed for short-reach brakes. (Table 2 gives typical brake reach dimensions for the various kinds of brakes, while Table 1 shows the actual figures for both the short-reach and standard-reach brakes. FIG. 3 shows how brake caliper reach is measured.)
An offset bolt can be used to lower the mounting point for sidepull brakes by 5mm, 8mm, or 10mm. This lets you use short-reach brakes on bicycles designed for standard brakes. I think offset bolts are ugly and they reduce the brakes’ rigidity. It makes more sense to buy the right reach brakes for your bicycle. Using 27-inch wheels on a bicycle designed for 700C moves the brake path 4mm closer to the mounting bolt.
____ The Centerpull Option ____
Weinmann and Dia-Compe make short-, medium-, and long-reach centerpull brakes in two or three different price levels. Some mixte frames are designed to use a medium-reach, centerpull brake on the rear, It makes a very neat installation. However, for most normal 10-speed applications, a modern short- or medium-reach sidepull brake will stop more positively and more sensitively than a centerpull. The exception is old bicycle frames that need brakes with a 6Omm+ reach. For these, the long-arm centerpull is your best choice.
__Caliper Mechanical Advantage__
The mechanical advantage of the brakeset is the product of the mechanical advantages of the brake levers and the calipers. For Table 1, I measured the mechanical advantage of the calipers by measuring the length of the two caliper lever arms. The typical long-reach sidepull caliper has a mechanical advantage of 1.0. The short-reach model has a mechanical advantage of about 1.2. It isn’t a precise measurement because it changes when you raise or lower the brake pads in the slots.
TABLE 2. Brake Reach [coming soon]
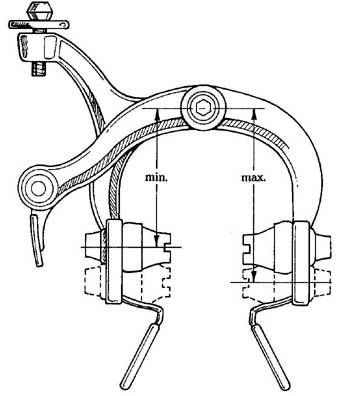
FIG. 3 Brake caliper reach.
Brake designers keep inventing dream brakes that have a low mechanical advantage for the first part of the movement—until the pads contact the rim. Then the mechanical advantage increases for better braking efficiency. The old bicycle books show all kinds of exotic brakes that tried to achieve this dream.
The dreaming process continues today. The Cunningham Powermaster and the similar SunTour Roller Cam brakes for mountain bikes use a contoured cam. Shimano’s Parapul brake also used a contoured cam. Campagnolo’s C- Record and Weinmann’s Delta brakes use a parallelogram to give a variable mechanical advantage. All five of these brakes have to be precisely adjusted. You can’t just set the pads the proper distance from the rim with the cable adjuster. Shimano has decided that the adjustment (calibration is probably a better word) is too complicated, so they’ve dropped the Parapul brake and replaced it with a high-performance sidepull.
__Caliper Quick-Releases__
A brake quick-release lets you spread the calipers and pull a bicycle wheel down between the brake pads without deflating the tire. The adjustable type of quick-release, which has a range of positions between open and closed, allows you to open your brakes wide enough to still be usable while limping home with a broken spoke. You used to get the second type of quick-release on Campagnolo Nuovo Record sidepulls and not on the imitations. Now it’s fairly common. The quick-release can be on the caliper, on the brake lever, or on the cable attachment point. Only the quick-release on the calipers is infinitely adjustable. (Table 1 shows the kind and the location of the quick-release.)
___ Cable Adjusters ____
As brake pads wear and cables stretch, you shorten the cable to bring the pads back to their proper position. Actually, the cable adjuster lengthens the casing, but this accomplishes the same purpose. The adjuster can be on the brake lever, the caliper, or (with a centerpull brake) at one of the cable attachment points.
___ Brake Pads ___
A pair of replacement pads can change the character of your brakes. The makers balance a range of performance characteristics, including braking efficiency, wear resistance, dry stopping power, wet stopping power, and freedom from grabbing. They also balance the potential for lawsuits from powerful brakes against that of lawsuits from anemic brakes. The original equipment pads on lower-priced brakes are compromised towards higher lever forces and non-expert users. Consumer’s Union can take some of the credit for this. They think that front brakes should be so feeble that even the most incompetent cyclist can’t go over the handlebars. The pads on top-quality racing sidepulls are also compromised towards higher lever forces because that’s what the racers are used to.
The aftermarket pads from Aztec, Kool-Stop, and Scott-Mathauser are designed for high braking efficiencies, both wet and dry. An efficient brake pad gives more stopping power for a given lever pull. Carried too far, this gives grabby brakes. Efficient brake pads require high-quality, low-friction brakes that are responsive to small changes in lever force. If you install efficient brake pads on worn, spongy old brakes, you won’t be able to modulate the delicate pressures needed to stop smoothly.
If you use your brakes heavily on a long descent, the pads will get very hot. This is a major problem with tandems. Though I haven’t seen any test data on pad melting, Aztec, Kool-Stop, and Mathauser advertise high-temperature performance. The Modolo sintered metal brake pad is also designed for high- temperature service.
There are no advantages to notches or slots on brake pads. They only cause the pads to wear faster, and there’s good evidence that wet-weather braking is made worse by blotted pads, which act as water reservoirs. Some pads include hemispherical washers to let you precisely align the pads with the rims. This avoids the awkward task of bending the calipers to toe in the pads at the front and reduce the squeal. Bending calipers is a poor idea anyway, especially with top-quality forged calipers. The brake makers suggest that you sand the back of the pads instead. Most quality sidepulls include a wheel guide between the caliper and the pad so that racers can change wheels faster. The latest pads are molding this guide into the rubber. (Table 3 provides a description of the surface found on a variety of different pads and evaluates their stopping power.)
Brake Track Surface
A good set of calipers and pads alone does not guarantee good braking. The wheel rim material and the nature of the brake track surface are also involved. Special pads are made for wet-weather stopping with steel rims, but they’re hard to find. The Fibrax Raincheater is one model that I know about. The problem in marketing these special pads is educating the unsophisticated bikers who ride cheap bikes with steel rims.
The brake track on the rim should be smooth, not serrated or dimpled. Dimples don’t help dry braking and they make wet braking worse since it takes more wheel revolutions to wipe off the water. Serrations or dimples also greatly increase brake pad wear. I feel that brakes work better when the brake tracks are vertical rather than slanted.
Although you can mix and match brake levers and calipers, you’re more likely to buy a complete brakeset. Table 1 shows you the performance and mechanical details of the widely available, top-quality brakesets and several medium-priced models. The weights shown in Table 1 are for the complete front and rear brakeset, with the short-arm brakes and cables and casings. A set of front and rear cables and casings weighs about 180 grams.
The trend of OEM and aftermarket buyers to include the brakes in a gruppo is affecting the brake marketplace. The small companies are having a hard time getting a profitable share of the market, regardless of their product quality.
____ Campagnolo ___
Campagnolo makes brakes at six different price levels. The names are confusing. The top brake is called Record, C-Record, or Delta. Take your choice. With 65 separate parts in just one housing, it’s a very sophisticated brake. Only Campagnolo could pull it off. The parallelogram housing moves the pads quickly at first and then the mechanical advantage Increases. The original 1984 version was recalled while the prototypes were being tested. They added adjustments and changed the materials. The present C-Record has individual Allen screws at the front and rear of the pads for precise toe-in adjustment.
In 1983, to celebrate their 50th Anniversary, Campagnolo produced the Cobalto sidepull brake, which has a beefier front caliper than the old Record (now called Nuovo Record) and a jewel at the center of the calipers. The Cobalto brakeset was included in the C-Record gruppo while the Delta brake was being revised. C-Record and Cobalto levers allow you to route the cables out the top or out the back of the lever body. Cobalto brakesets are sometimes included in Super Record gruppos. A frugal dealer may include a Super Record brakeset in the Super Record gruppo. The Super Record is a Nuovo Record brakeset with drilled levers and Cobalto calipers without the jewel.
The Nuovo Record brakeset is Campagnolo’s original Model 2040 sidepull that was introduced for the 1968 Olympics. Nuovo Victory uses the same calipers as the Super Record except that the quick-release is two-position rather than variable. Nuovo Triomphe uses the same calipers as Nuovo Record with a two-position quick-release. The 1988 Chorus sidepulls continue Campagnolo’s unique mixture of art and engineering.
___Dia-Compe___
Dia-Compe started out 15 years ago cloning Weinmann sidepull and centerpull brakes so precisely that the parts were interchangeable. Dia-Compe has grown a lot since those days. They now have a major assembly plant in Fletcher, North Carolina that supplies a very broad range of brakes to the OEM market. Dia-Compe’s model names have been confusing because the OEMs mix and match levers and calipers.
Dia-Compe is making a serious run at the aftermarket with three sidepull models that incorporate their Balanced Response System. All three have aero dynamic levers with lever return springs and light caliper springs. BRS 400 uses Royal Gran Compe calipers. BRS 300 uses Royal Compe II calipers. BRS 200 uses the SunTour Alpha II calipers. Dia-Compe is particularly proud of the stiff new tighter-weave cables and molybdenum-impregnated casing liners that are used in the BRS brakesets.
____ Mathauser Engineering ____
Bill Mathauser and Ed Scott were partners in Scott-Mathauser. The partnership dissolved in 1975 with Scott keeping the rights to the Mathauser name. Bill Mathauser now runs his own firm, Mathauser Engineering. He has developed a hydraulic bicycle brake that’s a beauty. He avoids the problem of fluid leaks by providing a completely sealed system and using “belloframs” instead of pistons and O-rings. The brakes are elegantly engineered and have a very light feel.
TABLE 3.
___ Modolo ___
Modolo is an Italian brake company that has good availability in the aftermarket. They produce three basic models: Master Professional, Professional, and Speedy. All three models have the same dimensions but they differ in material and finish. The Master Professional is hard anodized and has a titanium mounting bolt. The Super Prestige is the white finished version of the Professional. The Speedy is Modolo’s bargain brake. All Modolos use sintered metal brake pads that stop splendidly in the rain and erase the hard anodizing from your rims in jig time.
__ Scott __
Ed Scott makes Scott-Mathauser brake pads. He developed the Scott Superbrake to overcome all of the design deficiencies that he perceives in conventional brakes. It’s a design tour de force. It’s probably the most rigid brake made, with the largest, stiffest pivot bearings. It’s a center-pivot, top-pullrather than a sidepull. The calipers are like a pair of scissors and the cable comes in from one side. The cable leaves the bottom of the front lever and runs directly to the front brake. The Superbrake requires very little lever movement.

PHOTO 1 Unconventional brakesets: left to right, Mathauser Hydraulic, Campagnolo
C-Record, and Weinmann Delta Pro.
__ Shimano __
The three lines of Shimano brakes—Dura-Ace, 600 EX, and 105—all reflect Shimano’s extensive design and road testing effort in 1985. When the aerodynamic bubble burst, Shimano decided that the users of quality components
wanted conservative equipment that looked like Campagno4o. Campagnolo Super Record brakes were their design benchmark; “less friction, less flex” was their battle cry. The key improvement was caliper thrust bearings, but there were dozens of other minor improvements.
I think that Shimano succeeded in meeting their design goals. All three Shimano sidepulls stop with less lever effort and more sensitivity than the Super Record or any other brakeset that I’ve tried. You can have aero or standard levers with all three series. I particularly like the 105 brakes with the lever return springs.
___ SunTour ___
SunTour brakes are made by Dia-Compe. The three lines—Superbe Pro, Sprint, and Cyclone—are very similar, with more bells and whistles on the top line. Superbe Pro and Sprint have a ball thrust bearing between the inner caliper and the bolt and greased washers between the calipers. Superbe Pro has internal coil springs for the calipers and pads that can be adjusted for toe-in. Aero levers are available for all three and a short-reach standard lever is available for Superbe Pro.
____ Weinmann ____
Weinmann is a full-line brake company with factories in five countries. They make a complete line of sidepull, centerpull, and cantilever brakes for the OEMs. They’re being hurt by the current trend to include brakes in the gruppo. Weinmann makes two exotic brakes. The Delta Pro is a knee-action brake with a variable mechanical advantage. The Turbo is a centerpull that wraps the cable around a threaded drum and screws the pads into the rim. I’ve only seen Turbos at the bike shows. The 590SQ is Weinmann’s low-priced sidepull for the aftermarket.
__ Everybody Else __
CLB, Galli, Mavic, and Zeus make Campagnolo Nuovo Record look-alike sidepulls. Distribution of the brakes made by all these companies is quite limited.
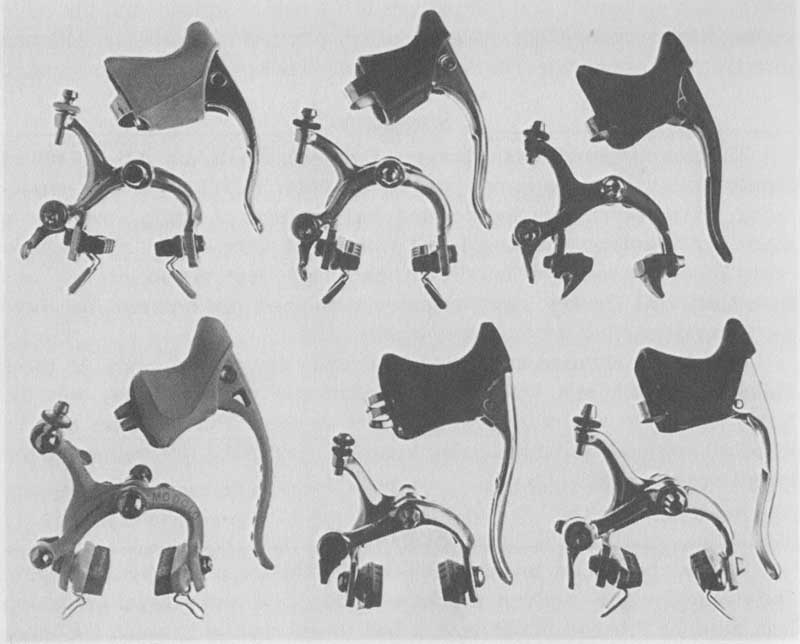
PHOTO 2 Sidepull brakesets: top left to right, Campagnolo Cobalto, Campagnolo
Nuovo Record, and Dia-Compe BRS 400; bottom left to right, Modolo Professional,
Shimano 105, and SunTour Superbe Pro.
Some Favorite Brakes
The Shimano Dura-Ace on the Trek and the Shimano 105 on the Paramount are my favorite brakes. I’ve got an old set of Campagnolo Nuovo Records on the Redcay that I’ve souped up with Dura-Ace pads. This is my reference standard, and there’s no doubt that the Shimano brakes take less lever force and are more responsive than brakes made by their competitors.
I’ve been playing mountain bike brake games with my loaded touring bike. I started out with Dia-Compe braze-on centerpulls. They were pretty, but they really weren’t up to stopping a loaded touring bike in the wet. So I had the Dia Compe bosses removed and SunTour Roller Cam bosses brazed on, with the rear brake located under the chainstays. This worked well, gave good control, and I was able to lock my wheels under all circumstances. Then, when Shimano came out with the U-Brake, I got a pair, since they fit on SunTour bosses. They’re just as powerful and require even less lever force.
