In addition to the bike itself, you will want to buy a couple of other items. They range from essential things for the protection of your bike and your person to accessories that make cycling more comfortable or more interesting. This section will show you what to get and how to choose the individual items you’ve decided to buy.
Gear for the Rider
In this first section, we’ll look at the items you may want to buy for your own protection.
Helmet
If any single accessory is important, it’s the bicycle helmet. If you do fall off your bike and hit your head on the pavement or against some obstacle, the helmet will most likely reduce the impact to the point where what might have been a significant injury becomes a mere scrape, and it can save your life in a serious accident.
The modern cycling helmet is remarkably light and comfortable—and effective. The main protection is offered by a ¾-inch thick layer of crushable foam material, while the exterior skin consists of a thin layer of a hard smooth plastic. In case of a fall, the foam is crushed and thereby passes on the energy absorbed in the impact slowly enough to protect the brain—or at least to significantly decrease the likelihood of serious injury. The smooth outer skin allows the helmet to skid along the surface of the road, reducing the rotational force on the neck.
All bicycle helmets sold in bike stores in the U.S., and most other countries these days, are good, though none are perfect. They reduce the impact but can’t eliminate it. That applies to the cheap ones as well as the expensive ones. They all pass the same tests. The big difference in price is largely reflected in their comfort and styling: expensive helmets have more ventilation and may look more attractive.
The first step is to measure the size of your head (using a tape wrapped around your head just above the ears). With that figure, the bike shop personnel can tell you what your helmet size will be. Try on several helmets in your size that visually appeal to you—or, if you’re on a tight budget, have prices you can afford. You’ll find that they don’t all fit the same way: some fit better on a long, relatively narrow head; others fit better on a rounder skull.
Whereas the standard helmet is designed in a variety of sizes for a typical male skull, some models are designed wider, and that often makes them more suitable for women. Women’s heads tend to be wider relative to their size. But not all people are average. Consequently, a male with a smallish but wide head may be well fitted with a woman’s model, and if you’re a woman but have a relatively narrow head, look at a small version of a regular men’s model rather than a women’s.
Choose any one that feels comfortable, then make final fitting adjustments using the foam inserts provided and by readjusting the straps. The helmet should fit firmly enough so that it does not twist around on your head when you turn your head, or bob up-and-down when moving. The straps should be adjusted so that you can get about a finger thickness between your neck and the chin strap. Make sure the straps are adjusted so that the helmet can’t come off and the chin strap can’t slip over your chin.
Cycling Shoes
Simple bikes with conventional pedals can usually be ridden with any kind of shoes that are not too bulky and have a firm sole. But special cycling shoes—definitely needed if your bike has clipless pedals—will significantly add to your comfort.
For use with clipless pedals, the matching plates (there are several standards, such as Shimano, Look, and Ritchie) must be installed. Their position is adjustable, and they should be set so that the ball of the foot is over the pedal axle and your feet rotate naturally with the pedal revolution. Adjust the release spring force so that you can easily twist your foot out in case of a sudden need to escape.
I recommend shoes with Velcro fasteners. Many shoes have shoelaces that get covered by Velcro straps. Either solution is safer than having conventional shoelaces dangling loose, which may get caught in the chain and cause a fall.
Cycling Clothing
You can get special cycling shorts, tights, jerseys, jackets, gloves, and even socks. They are all designed with cycling in mind, and they’ll improve your riding comfort. If you don’t want to dress the part quite this seriously, wear clothing you already have, providing it’s light, flexible, and comfortable.

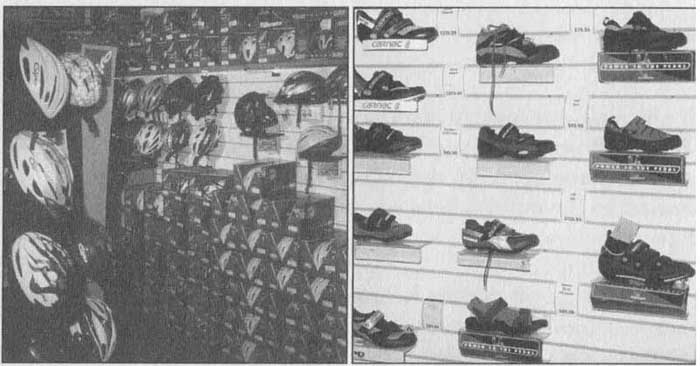
FIG. 1. A selection of bicycle helmets in a store display.
FIG. 2. A variety of cycling shoes in a store display.
Cycling shorts and gloves are padded in the area of contact with the saddle and the handlebars respectively. The padding significantly increases comfort on longer rides. Especially with gloves this is important, because it prevents injury to the nerve endings in the palms of the hand.
The most comfortable material for cycle clothing is wool, especially if it’s been enhanced by blending it with a small percentage of a highly elastic synthetic material that keeps its shape better, such as spandex (also known as Lycra).
Rain Gear
If you live in a part of the world where the weather is not sufficiently predictable to always stay dry (or if you’re serious enough about cycling to do it even if the weather is not perfect), at least get a rain jacket. It should close with a generous flap in the front, and it should be long enough in the back to cover your rear when you’re bent over in the saddle. Rain pants and even rain booties are also available, but they may be more hassle than they’re worth.
Sunglasses and Sun-block
If you’re out for a protracted time in sunny weather, I recommend you use both sunglasses and sun block. I don’t think there is ever any justification to get a sunscreen lotion with less than the highest available protection factor. In addition to sunglasses, I suggest a visor that clips to the helmet, to reduce the blinding effect of a low sun.
Gear for the Bike
In this section, we’ll consider the products to buy that can be considered tools and accessories for the bicycle. First, a word of warning concerning any gadgets you may want to install on the bike. Make sure they’re attached firmly, and check their attachments regularly. Accessories that come loose sometimes cause grave danger. To give just one example, there have been a number of very serious accidents caused by loose front fenders.
If the mounting stays come loose, the whole thing can finish up caught in the front wheel, bringing the bike to a sudden stop and pitching the rider over the front—head first. Avoid things like that by remaining alert to the condition of the bike and its accessories, and getting them fixed immediately.
Bar-Ends
Bar-ends are installed at the ends of flat mountain bike handlebars to make them more comfortable and versatile. Adjust them so that they project forward, pointing up by only about 10 to 15 degrees.
Lock
Get a lock to improve your chances of keeping your bike for a long time. The popular U-shaped locks—certainly those made by Kryptonite—are a good choice, but large-diameter cable locks from the same manufacturer are more versatile and harder to crack. Don’t just lock the bike by itself but to something immovable. It’s best to take the front wheel out and lock it up with the rear portion of the bike. If your bike has a seat with a quick-release, you may even have to remove it, and either lock it as well or take it along with you. The same goes for anything else that’s not solidly anchored on the bike: remove things such as lights, bags, and cyclo computer.
Water Bottle
Bicycle water bottles are mounted by means of a little metal cage installed on the frame. Get at least one—two if you’ll be going on longer rides in remote areas and drink frequently, especially if it’s hot and you’re exerting yourself. Another solution is a hydration system worn on the back, such as the Camelbak.
Pump
You’ll need at least a small pump that can be carried on the bike, and preferably a floor pump with integral pressure gauge for use at home. The small pump can either be the type that fits between the frame tubes (make sure you get a size that fits), or a “telescoping” one that literally fits in a jersey pocket. If you want to trade some money for effort (pray, why are you buying a muscle-powered bike?), you can buy an inflator using pressurized CO gas cartridges.
Make a note of the pressure to which your tires should be inflated for any kind of use (more for smooth roads than for rough ones) and check them before every ride, at least on a road bike. To check the pressure, buy a small tire pressure gauge if the pump does not have a built-in gauge, but be prepared to add air each time you do, because checking the pressure always releases some air.
Lights
If your trip can possibly extend into darkness, or even just dusk, you should have lights with you. Spectacularly bright lights are now available for serious night riding. If you’ll be riding in the dark only occasionally and in an urban or suburban environment, you may be adequately served with just a big rear reflector or a flashing rear light, strapped to the seatpost, and an easily removable battery-operated front light that’s clipped to

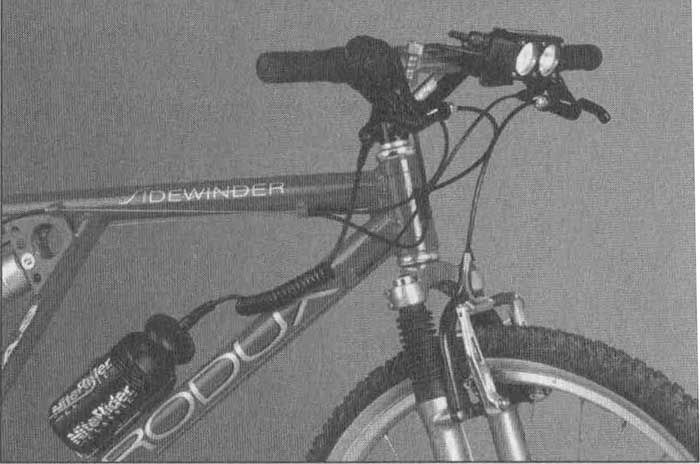
FIG. 3. Bright cycling lights. These dual-beam high- output lights from
NiteRider are typical for what is available for serious nighttime riding
these days. But they are not cheap.
the handlebars. Aim the front light at a point on the road about 20 to 30 feet straight ahead of you. Don’t count on front or side reflectors protecting you: reflectors are only visible to those whose headlights are aimed at them. Although that’s always the case with anybody who might endanger you from the rear (assuming his or her lights are working), that’s not the case with those who might run into you from ahead or the side.
Cyclo Computer
Useful for telling you not only how fast you’re going but also how far and, on sophisticated models, how fast you are pedaling. That can be helpful for orientation (in combination with a map or route instructions). Most are connected with electric wiring to a sensor that is mounted on the fork, and are used together with a magnetic device that must be installed on the front wheel.
Heart Rate Monitor
If you’re serious about using your bike for fitness, speed, and performance, get a heart rate monitor, or HRM. It’s a wristwatch-type device with a sensor that is tied around your chest to pick up and display your heartbeat. It usually comes with an instruction manual that explains its use. You can get maximum benefit from your HRM by reading (Googling) about it.
Bags
You may need at least a small bag to keep some items such as tools, a spare tube, and the light when not in use. Most convenient are wedge-shaped bags that fit under the back of the saddle. Carrying your stuff in a backpack is possible but gets uncomfortable, especially on longer trips. Handlebar bags are OK too, providing they are firmly held either with a clip, as provided on Cannondale bags, or with a bracket at the handlebars in combination with a bungee cord to stop the bag from swaying when you ride over bumps.
To attach heavier bags, such as for touring, you’ll need to get racks installed on the bike. They’re available for the front and the rear, and if you are planning on doing that, you should make sure before you buy the bike that it has the requisite hardware (bosses and eyelets) welded to the frame to mount racks. There’s also a rack that can be simply clamped to the seatpost; it’s adequate for a smallish bag or package.
Trailers
Another good way to carry things with the bike is by means of a trailer attached to the bike. There are two- and one-wheel models available, and the former are probably also the safest way of carrying a child.
Attachment and Removal of Accessories
Finally on this subject, some general advice. First, be aware that some accessories have a dual function, of which sometimes the secondary one turns out to be the more important one.
Consider, for example, the front reflector. Although it’s of limited use (tending to lull you into believing it makes you visible to any and all riders who might run into you from in front), the bracket with which it’s mounted is an essential safety component on bikes with cantilever brakes. Without it, a broken or dislodged front brake cable would likely lead to the straddle cable getting caught on the tire, stopping the front wheel instantaneously and sending the rider over the handlebars. So leave that bracket there, even if you’re not planning to use the front reflector (use a headlight instead).
The other aspect is that any accessory must be attached properly. If it’s not, either fix it immediately or remove it altogether. Loose and broken accessories can be a hazard at worst, and at best they detract from your riding enjoyment.
Tools and Spares
You may not want to worry about things going wrong with the bike, but it will still be best to prepare for it. We’ll discuss essential maintenance and basic repairs in Sections 11 and 12 respectively. You already know to take a pump. The best way to carry the other tools is in a little pouch that can be attached to the wires of the saddle and closed tightly with a cinch strap to stop the tools from rattling.
The minimum of tools you should carry on the bike for a trip in excess of 30 minutes is the following:
--tire patch kit or spare tube (preferably both)
--set of tire levers
--set of Allen wrenches (2, 3, 4, 5, and 6 mm)
--small screwdriver

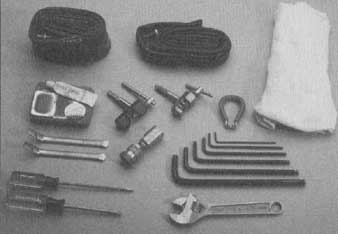
FIG. 4.A selection of simple bicycle tools That can be carried on The bike
for a longer trio. These tools also serve well as The basis for a simple
home workshop.
-- cloth (to wipe your hands after working on the bike)
For longer rides (day trips) also get the following:
--chain tool
--crank bolt tool or 8 mm Allen wrench to fit crank bolt
--small adjustable wrench
--spoke wrench
Alternately, you can buy a special compact multitool, such as the Alien, that takes the place of all but the cloth and the patch kit.
If you carry lights, also take spare bulbs and batteries.