No, this guide is not a repair manual, and you’ll have to look elsewhere for extensive bicycle repair instructions. Just the same, there are a couple of problems that are so common that you ought to be able to fix them yourself, if only because that will help you get the bike back home before getting it fixed properly in a bike shop.
Don’t tackle anything yourself that you don’t feel comfortable with doing and aren’t sure you understand how it works. If you’re at all uncertain about what you’ve done, take the bike to the bike shop to have a professional fix it for you.
In this section, we’ll cover the following simple repair jobs:
-- puncture repair by replacing tube
-- patch tube
-- missing gear shifts
-- loose crank U poor braking
Fixing a Flat
Rather than show you how to patch a tube, we’ll just cover the simpler method of replacing the inner tube. If you don’t have a spare tube, or if you want to patch the puncture when you get home, see the following section, “Patching a Tube.”
Tools and Equipment:
--set of tire levers
-- pump, preferably also a tire pressure gauge
-- spare tube
Procedure
Remove the wheel from the bike, using the quick-release (or if the bike has bolt-on wheels, a fitting wrench), after releasing the brake cable at the brake or the lever. (Refer to earlier section for wheel removal and reinstallation.)
2. If necessary, deflate the tube completely by pushing in the valve stem (in case of a Presta valve, first unscrew the little round nut at the tip of the valve).

FIG. 1. The first step in removing a tire: insert the tire lever
under the tire bead and hook the other end on a spoke.
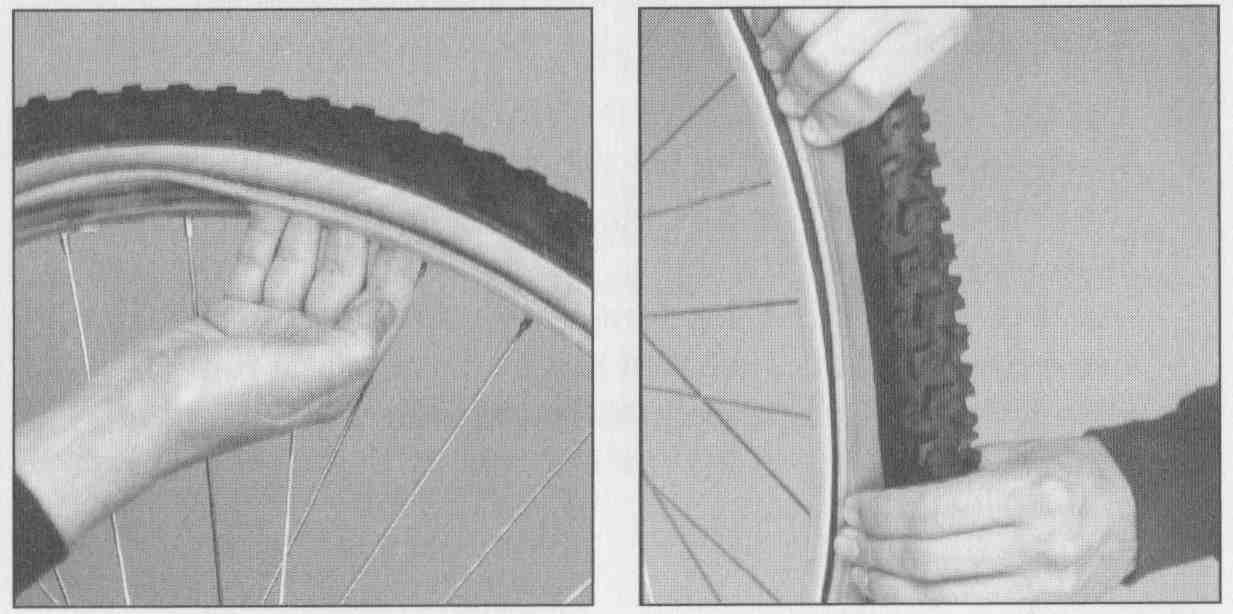
FIG. 2. Remove the tire by hand, or by pulling the tire lever
around, to clear The bead over The edge of The rim. FIG. 3. Reinstall
the tire by pulling it over the rim by hand. Ease the process by working the
rest of the bead into the center of the rim.
3. Work one side of the tire into the deeper center of the rim, starting opposite the valve and working both ways toward it. The object is to loosen the tire bead in the area near the valve so it’ll be easier to lift it off there.
4. Place a tire lever under the tire bead as shown in FIG. 1; use it to lift the tire bead up and hook the notch in the short end of the tire lever onto a spoke.
5. If the tire seems to lift off well, just grab the lever and pull it all the way around, pushing the rest of the bead off.
6. If it won’t come off that easily, use the second tire lever about three spokes from the first one, then the third tire lever about three spokes in the other direction.
7. Now that side of the tire should be loose enough to lift it off the rim by hand over its entire circumference.
8. Push the valve through the hole in the rim from outside to inside. If it’s held in place by a little round nut, remove that nut first.
9. Remove the rest of the tube from under the tire.
10. Check both the inside and the outside of the tire for any object that may have caused the puncture, and remove it. Also check to make sure the ends of the spokes are covered by the rim strip. If not, move the rim strip into position, or use several layers of adhesive tape to cover any projecting spoke ends.
11. Put the new tube in place under the tire, and insert the valve through the hole in the rim, then slightly inflate the tube. Reinstall the nut over the valve stem if one was installed.
12. Put the tire bead back over the rim by hand. If it seems too hard, let some air out of the tube and work the bead farther into the center of the rim. Start opposite the valve and work both ways toward the valve. The last section will be hard, but it can (and must) be done with your bare hands—don’t use a tire lever, because that might damage the tube. If you don’t succeed, ask someone at a bike shop to show you the trick.
13. Partially inflate the tire, knead it all around to put it the same distance between rim and the ridge on the sidewall, and inflate it to its final pressure.
14. Put the wheel back on the bike as explained, making sure you center it properly, tighten the quick-release or axle nuts properly, and re-tension the brake.
Patching a Tube
This procedure is based on the tube being removed after following the instructions for the procedure.
Tools and Equipment:
-- tire patch kit
-- pump
Procedure:
1. Try inflating the tube and check where air escapes. If it’s not obvious, submerge it in water to see where air escapes. Dry the tube.
2. Sand, and then wipe, an area around the hole that’s slightly bigger than the patch you’ll be using.
3. Spread tire adhesive from the patch kit thinly and evenly over the area you just cleaned. Wait 2 minutes in warm weather, 4 minutes in cool weather.
4. Remove the aluminum foil backing from the adhesive side of the patch but leave the transparent plastic on the other side in place.
5. Place the patch on the tire, centered around the hole. Press it down firmly over its entire area. Stretch tube and patch together in several directions and make sure no part of the patch lifts off.
6. Inflate the tube to a moderate pressure and wait to make sure it holds air before reinstalling it.
Fix Gear Shift Problems:
If the gears don’t engage properly when shifting, first make sure it’s not because you are trying to shift into one of the combinations you should avoid anyway because they cross the chain. If it happens with other gear combinations, find the adjusting barrel for the derailleur in question (front or rear).
1. With the shifters, select the gear that engages the largest chainring in the front with the smallest cog in the rear. Lift the rear wheel and turn the cranks forward. If it either does not work at all or only very noisily, find out what’s not working properly—the front derailleur or the rear derailleur.
2. Adjust the cable adjuster for the derailleur that’s not working. First turn it in half a turn and see whether it gets better. If it does, turn it in further or less far until it works properly. If it gets worse, turn the adjuster in the other direction and repeat until it’s working correctly.
3. With the wheel off the ground, make all the shifts with the other derailleur, keeping the one you just adjusted in place. If necessary also tighten or loosen the adjuster for this derailleur.
4. If whatever you do, the derailleur either “dumps” the chain, shifting beyond the smallest or biggest chainring or cog, or does not quite reach the biggest or smallest chainring or cog, adjust the derailleur’s set-stop screws in accordance with steps 5 or 6 below.

FIG. 4. Detail at derailleur adjustment: To adjust the tension of the cable,
screw the barrel adjuster in or out the two little screws are adjusted to
limit the range at travel of the derailleur.
5. Loosen or tighten the screw marked L to move the chain further or less far in the direction of the biggest cog (rear derailleur) or small chainring (front derailleur).
6. Loosen or lighten the screw marked H to move the chain further or less far in the direction of the smallest cog (rear derailleur) or big chainring (front derailleur).
Tighten Loose Crank:
Sometimes, the cranks come loose as you are riding, especially on a new bike.

FIG. 5. Detail drawing at crank attachment: To tighten the crank when it’s
loose. screw in the crank bait.
FIG. 6. Adjusting the brake pad. The brakes only work properly it the brake pads touch the rims as shown in Fig.3.
Tools and Equipment:
-- wrench part of crank tool or 8 mm Allen wrench (depending on the type of crank bolt)
Procedure:
1. To avoid the problem, check the crank bolts at least once a week during the first month.
2. To do that, or to fasten it if it came loose anyway first remove the dustcap, if installed.
3. Tighten the crank bolt with the crank bolt tool (either an Allen wrench, if there was no dustcap; or the wrench part of the crank tool, if there was a dustcap).
4. Reinstall the dustcap, if one was installed.
Adjust Brake
If the brake does not seem to work adequately, first make sure the rims are not wet, dirty, or greasy.
Tools and Equipment:
-- cloth or abrasive pad
-- solvent
Procedure:
1. Thoroughly clean the sides of the rims where the brake pads rub, using a solvent and an abrasive pad if they were greasy.
2. If the brakes still don’t work properly, try adjusting the cable tension.
3. To get more powerful braking, turn the cable adjuster out, effectively lengthening the cable casing a little, thus applying the brakes earlier.
4. Check to make sure the brake now does not rub against the side of the rim when it’s not supposed to be engaged. If that’s the case, turn the adjuster in a little until the optimum position is found.
5, When it’s adjusted right, hold the barrel adjuster with one hand and tighten the locknut with the other.
6. If you can’t solve the problem this way, take the bike to a bike shop or consult a repair manual.
7. If the brakes rub on the rims intermittently, get the wheel trued by a bike shop as soon as possible.