There is more to repairing and maintaining a bicycle than merely following instructions. However systematic the step-by-step guidelines in much of what follows may be, they cannot fully substitute for hands-on experience.Three additional factors will be necessary: the ability to investigate the problem logically, some knowledge of the way basic things like ball bearings and screw threads work, and the ability to handle simple tools.
Applied Thinking
Although I can’t teach you to think, I can help you by reminding you of the need to do it in the first place. I’ve known otherwise smart people reduced to utter helplessness when con fronted with a simple bicycle problem, not because they were inherently unable to think, but merely because they failed to realize that logical thought, applied to the problem at hand, would have enabled them to solve it. Conversely, there are simple folks who, by applying a kind of logical thinking, quickly establish what is wrong and how to go about correcting the situation.
Don’t just think, ‘my bike is broken down’, but establish just which part of the bike is not operating. Consider what the symptoms are. Then, re minding yourself of the way the bike and its major components work, imagine what may be the possible causes. Eliminate them one by one, until you’ve come to the actual cause. Try to correct it, and if you can’t, determine what would lessen its impact.
Consider what must be tightened, adjusted, lubricated, replaced or straightened. Think about your best way of handling the tools: what will fit, what’s the effect of leverage, which way to turn, etc. If something does go wrong — a part breaks, a tool slips, something gets jammed up or damaged — consider what can be done about that problem. That’s applied thinking. Also use this kind of applied thinking when confronted with a problem for which you don’t seem to have the proper tools. No hammer? Try a brick. Too short? Fit another item over the top. Novice? Find some other method of holding it. There are thousands of simple but ingenious answers to most problems. I can’t give you each of these possibilities along with the instructions for doing the job — the guide would take on the dimensions of the Gutenberg Bible, if I did. Just use applied thinking, and you will solve al most any problem.
Although this kind of thing is indeed difficult to learn from a guide, it’s easy enough to develop if you do it consciously, if you remind yourself of the need to do it in the first place. If you consider that the bicycle is still a simple machine, with a limited number of causes of any problem, and if you are aware that it works on easily under stood mechanical principles, you can train yourself to think the right way. The remaining factors required for efficient bicycle care — knowing how elementary bicycle components work and how to handle your tools — will be described in rather more detail below.
Nuts and Bolts
This section does not really deal with just nuts and bolts, but rather with any kind of screwed connections. Many of the bicycle’s components are either installed or assembled using this method. Each screwed connection consists of two parts: a solid round male part with external threading, and a hollow female part with matching internal threading.
The screw thread is essentially a spiral groove or ridge. Turning the two parts relative to one another makes the male part (bolt, screw or threaded axle) wind its way up into the female part (nut or other part with internal threading). If the two parts have clean, undamaged matching threads, this process presents little friction: you can turn them most of the way with little force or leverage.

When I speak of matching threads, I mean that the diameter or nominal size, as well as the other details shown in the illustration (pitch and thread angle), must be the same for both parts. Screw threading on most parts is fairly standardized. On most bicycles (except on low-quality American- built machines) standard metric screw threads are used. So any 6 mm screw will fit any 6mm nut. On other screwed parts — such as axles and bearing parts — there are some interchange ability problems, which shall be covered below.
Once the two matching parts are screwed so far that they ‘bottom out’, the slanted sides of the two members’ screw threads are pushed together on one side. This causes high friction — enough to hold them in place if adequately tightened and as long as vibration or force does not work to loosen the connection. Only if they are badly worn, and especially when subjected to excessive force or vibration, will they come loose. The threads on very badly worn parts that are forced will actually shear off, so they can not be tightened at all.
Such problems can often be eliminated by means of locking devices. There are several types: lock washers, locknuts, locking inserts and locking adhesives. Several of these methods are used on the bicycle’s components as supplied by some manufacturers. It may still be necessary to install a locking device yourself when thread ed parts do not remain tight or can not be tightened adequately in the first place.
A lock washer is a serrated or other springy washer that controls the friction force between the female part and whatever is holding it. Even an ordinary plain washer often helps, since it allows you to tighten the parts further before the friction between the seating surfaces becomes so great that the thread cannot do its job properly. For this reason it is advisable to always use a washer under every nut and similar threaded part, especially if one of the parts is of (soft) aluminum.
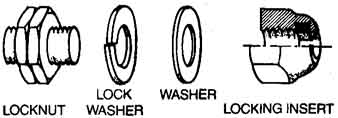
A locknut is a second nut, placed on top of or under the regular nut or other part with inside threads. As you tighten the two nuts relative to one another (this time that’s usually o.k. without a washer), they’ll push against opposite sides of the thread. The resulting balanced force resists the loosening effect of vibration quite effectively. On bearing parts a keyed washer is used between the two parts to prevent in correct adjustment. Placing a second nut over a regular nut that has tended to come loose — even if perhaps the screw thread is damaged locally — often helps as an emergency repair to hold things together that wouldn’t respond to normal tightening.
Locking inserts are sometimes used on vibration-prone small nuts on the bike. They take the form of a somewhat flexible plastic insert in the nut. Replacing ordinary nuts with such locking insert nuts will prevent many things from coming loose. Excellent places to use them are the brake attachments and mountings for accessories, such as fenders, racks and reflectors.
Locking adhesives are sometimes applied to the thread before tightening, if it is a part that must not be tightened, loosened or readjusted frequently. The most familiar trade name is Loctite. There are several types available — get a variety that does not form such a solid bond that you have difficulty breaking it again when you have to loosen the connection later: read the descriptions on the various tubes before you buy.
Always clean screw thread parts before installing, so they are free from rust and dirt, and do not install damaged parts. Use a fine metal wire brush to clean the male thread, then screw it into the female thread a few times before permanently installing, to re move rust and dirt if necessary. Unless you use a locking adhesive, apply lubricant to the screw threads before installing. This retards the formation of rust and prevents direct metal-to- metal contact which might prevent proper tightening, and will ease sub sequent loosening or adjusting.
Basic Tools
To tighten or loosen any screwed connection, both the male and the female parts must be held firmly as they are turned relative to one another. To hold such parts firmly, enough leverage and hold is required. Parts that are screwed directly into a threaded hole or onto a threaded boss on the bike require only one tool: the leverage provided when you hold the bike’s frame will be adequate. Screws, nuts, bolts and other small components each require specific tools, which must also be sized to provide the right fit and leverage. Using too big an adjustable tool on a small part may result in too much leverage and force, leading to damage when tightening. Similarly, tools that are too small may not do the job right either. Some types of tools inherently allow more lever age; thus, when tightening a screw- and-nut connection, it will be better to turn the nut with a wrench (high lever age), while holding the screw with the screwdriver (low leverage), than it would be to hold the nut while trying to turn with the screwdriver.
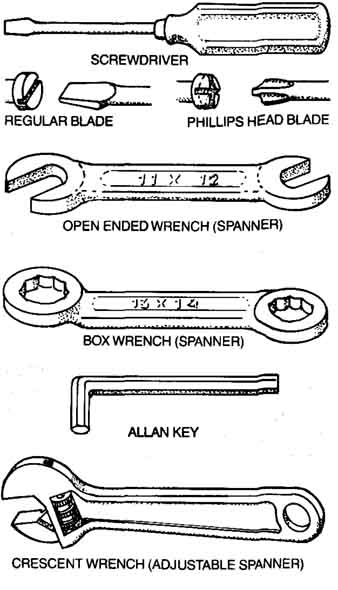
Get several sizes of screwdrivers and two complete sets of other wrenches (called spanners in Britain). The screwdrivers should include at least one small Phillips-head model, one flat blade type with a width of about 3 - 4 mm (approx. 1/8 in. - 5/32 in.), one with a blade width of about 6 mm (1/4 inch) and one short stubby one with an even wider blade. A big, long screw driver may come in handy for other jobs, where you use it to get leverage. Always use only properly fitting tools to prevent damage.
The best way of selecting wrenches is to get a set of 6 mm to 16mm open- ended wrenches and a similar set of box wrenches. In addition, you may get two adjustable wrenches of the type illustrated, called crescent wrenches — I’d say one 6-in long model and a great big one of 8-or 10-in length. The former size can easily be taken along on the bike, the latter one should probably stay in the workshop and doubles as a hand-held vice. Finally, you may have to get some Allen keys:
L-shaped hexagonal wrenches to fit the bolts with a hexagonal recess of ten used on bicycles these days; 4, 5 and 6 mm are the most common sizes, although kickstands may re quire an 8 mm model and some handlebar stems havea7mm recess—get whatever sizes are required for your bike.
When selecting tools, consider that only the best will give satisfactory service. Don’t be fooled by terms like ‘economy tools’: such things may be cheap, but they will not be economical in the long run. The best may initially seem expensive, but will save you back the price difference quickly, giving both longer and better service and causing less damage to your bike’s components. If you want to economize, do it by selecting tools wisely: only get those tools that are actually required for your bike — you can do without certain sizes. Take your time to establish just which tools, and in which sizes, are required for your bike. This will also help keep the weight down when you take tools along.

Angular contact (adjustable) bearing: ball retainer; groove;
balls cone; lock washer; etc.
Ball Bearings
Most moving parts of the bicycle run on ball bearings. Although they differ quite a bit in size, they are otherwise similar to one another. The type used almost universally on bicycles is the one illustrated above and is referred to as angular contact bearing or adjustable bearing. The other illustration shows the non-adjustable cartridge bearing, which is used on some components in the highest price class. The latter are not inherently superior, but are often better sealed and require less maintenance. On the other hand, they must be completely replaced when they become loose or fail to run smoothly due to corrosion or after extensive wear. Angular contact bearings, on the other hand, are easily adjusted, lubricated and overhauled by the cyclist himself.

Although I shall give specific instructions for bearing work in each of the descriptions of the following sections that deal with bearing work, it can not hurt to put you in the picture first. The angular contact bearing Consists of two races, referred to as cone and cup respectively, and a set of bearing balls. The balls may either lie loose or they may be mounted together in a bearing retainer. Make sure you install that retainer the right way round: so that neither the cone nor the cup touches the body of the retainer. If loose balls are used — and any retainer may be replaced with loose balls of the appropriate size — the balls must be free to move a little; achieve that by installing one ball less than the absolute maximum number that would seem to fit the cup. The space between cup and cone must be generously lubricated, usually with bearing grease, although if you can take the trouble to refill the bearing after every ride, a heavy mineral oil would be even better.
Adjusting a bearing amounts to closing (or opening) the gap between cup and cone slightly. This is done by screwing the appropriate part in or out a little, locking it in place with the lock nut or similar device once it is in the right position. The bearings should all be adjusted so that they turn freely without resistance, yet without any noticeable ‘play’. To overhaul a bearing, the entire unit is disassembled and any defective parts — always the balls, and also the cup and cone in case they show pits, grooves or corrosion — are replaced. Reassembly is easiest if the cup is first filled with a generous layer of bearing grease to hold the balls in place.
At most locations there is a set of two bearings — one at either end of the axle. Adjusting the one will also affect the other. On some cheaper hubs and on all other bearings only one side is actually adjustable. On pedals that is the outside bearing; on cranks it’s the one on the left (i.e. opposite the chain); on the head-set it is the upper bearing.
Bearing work is best done with special tools for the job, which minimize the damage done and ease the work. For wheel bearing adjustment, cone wrenches are used: very thin open- ended wrenches, sold in bike stores. They come in several sizes and you will need two of whatever sizes fit the cones on your bike. Special bearing tools for bottom bracket and head-set work are also available; make sure you get a type that fits the particular makes and models of these components on your bike. Alternately, this work can be done — after a fashion — with provisional tools, as will be explained in the applicable sections of the guide.
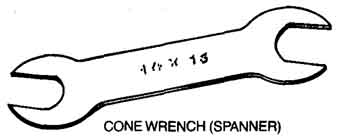
CONE WRENCH (SPANNER)
Control Cables
Derailleurs, hub gears and most brakes are activated by means of Bow- den cables. These consist of a flexible metal wire inner cable and a hollow spiral-wound outer cable, which is plastic-coated to keep out dirt and moisture. The outer cable takes up the compressive forces and is anchored at fixed points on the bike; the inner cable takes up tension forces and is attached by means of a nipple at the handle and a clamp bolt at the mechanism to be activated. Cables come in several thicknesses and should be selected with the purpose in mind: brake cables are thicker and have stronger nipples to match the recess in the brake handle. Nipples can take several different forms, so make sure you get the type to match your brake handle or gear shifter.
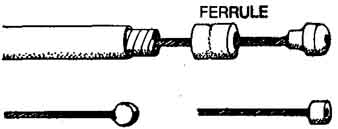
The end of the outer cable is protected by means of a little ferrule; it is usually necessary to cut back the plastic coating locally to install it. The ferrule serves to stop the cable end from slipping inside the anchor point on the bike. Cut off the outer cable (bought by the running foot) so that no hook is formed at the end, because that would interfere with the free movement of the inner cable. The cable must be long enough, and routed so that no ‘kinks’ are formed any where (replace cables that are dam aged this way). The inner cable must be cut off so that the end does not fray; it is best to solder the strands together at the end where it is cut off, since frayed ends make adjustment or reinstallation impossible and may lead to injury. Replace inner cables that are frayed anywhere except at the end protruding from the clamp. Allow the inner cable some excess length, to make it easier to adjust while holding it taut with pliers — at least an inch should protrude.
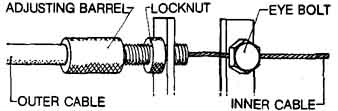
In many cases a barrel adjuster is installed somewhere in the cable to make adjustment of the cable tension easy. Hold the adjuster with one hand while loosening the locknut; then screw the adjuster in or out as appropriate; finally, hold the adjuster again, while tightening the locknut. Some other cables, such as those used on the brakes of mountain bikes, may rely on a simple knurled round adjusting nut built into the handle. When the range of the adjuster has been taken up completely, readjust the clamping position of the cable on the mechanism. Screw the adjuster in as far as it will go, then loosen the clamp bolt, pull the cable taut with a wrench or pliers, and tighten the clamp bolt. Fine adjustments are then again made with the barrel adjuster or the adjusting nut on the handle.
Soldering
Electrical wire ends are more reliable and control cable ends do not fray when they are soldered. Use an electric soldering iron with an output of at least 60 watt and rosin core soldering wire. Clean the wire ends and any contact before soldering. Heat the metal to be joined with the soldering iron, then add the soldering wire while still holding soldering iron and connection together. Let the liquefied soldering material penetrate the joint. Finally hold the contact in place while removing the heat source, waiting for it to cool (the soldering metal on the joint becomes dull) before you let go of it. In addition to control cable ends, you can solder contact eyes to electric wires and solder together the strands of the copper wire to stop them from fraying and to provide a better contact.
Seat and Handlebar Adjustment
For safe, comfortable and efficient cycling, the correct positions of saddle and handlebars are critically important. Once these are correctly established, mark them by engraving the handlebar stem and the seat post to reflect this position for quick adjustment when the bike has been disassembled or readjusted for any reason. If you’re still growing — that may be up to age 22—these things must be checked and corrected regularly, say every two months. In that case, mark the position with adhesive tape, in stead of engraving. Whenever you ride another bike, it will be a great help if you can quickly determine the correct positions and carry out these adjustments before you hop onto it. Proceed as follows to establish the correct fit, then follow the instructions in sections 4 and 5 for Handlebar Adjustment and Saddle Adjustment respectively.
To establish the correct seat height, place one pedal in the lowest position, holding the bike close to a post or a wall from which you can support yourself. Wear shoes without heels (e.g. cycling shoes, slippers or light sneakers). Now mount the bike, leaning against the post or the wall to keep yourself and the bike perfectly vertical. Reach down for the pedal with the heel of the foot. The leg should be al most stretched, with just a little play left in the knee joint. Now pedal back ward to establish whether you are indeed sitting straight: you should not have to rock from side to side when pedaling. On bikes with a coaster brake, pedaling backward is not possible; in that case you’ll have to do a little actual cycling in this position to make sure you’re sitting right. Once you cycle properly, you should not keep the heel of the foot on the pedal — then the ball of the foot (the second joint of the big toe) must lie over the center of the pedal. For adjustments see Section 5.
To find the correct forward position of the saddle, place the pedals in the horizontal position. Now measure with an improvised plumb line (e.g. a big nut or bolt on a piece of twine) whether the knee joint of the forward leg is vertically above the pedal axle. Again, details for correction can be found in Section 5. The top of the saddle should also be close to horizontal; this adjustment, too, is described in Section 5.
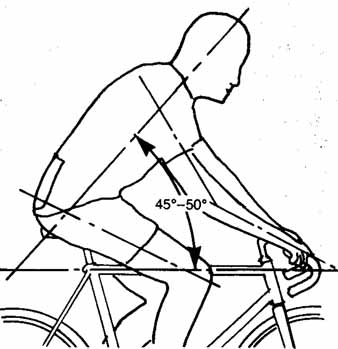
Now for the handlebars, take a look at the illustration, which shows a ‘relaxed’ riding posture. The highest point of the handlebars should be as high as, or slightly lower than, the top of the saddle. The distance between saddle and handlebars should be such that your body roughly forms a triangle as shown, with the arms slightly bent at the elbows and the shoulders roughly midway between saddle and handlebars. This is a relaxed position, which allows for variation during actual cycling by holding the handlebars in a different position (in the case of drop or racing’ bars). If you ride a mountain bike or another model with flat handlebars, adjustments to your posture for increased power or reduced wind resistance are not so easy to make. On mountain bikes you may have to temporarily lower the saddle with its quick-release during a steep descent. However, for normal riding this position of saddle and handlebars is about optimal. Height adjustments of the handlebars are covered in Section 4; the distance between saddle and handle bars is varied by means of replacing the handlebar stem by one with a different length.

Lubrication
Lubrication is needed to minimize friction and to prevent wear and dam age of the bicycle’s moving parts. But don’t just pour oil or smear grease in and around the bike’s moving parts: lubrication and cleaning should go hand in hand — clean and lubricate selectively, then wipe off any excess lubricant. Excess lubricants attract dirt and moisture, and this mixture only makes things worse.
The ultimate lubricant for most parts is mineral oil (e.g. motor oil). Unfortunately, bicycles are no longer equipped with oiling nipples, so that they must now mainly be lubricated with grease. That’s relatively easy, because grease stays in place longer than oil. However, it does require disassembly of parts that could other wise be left alone. At least once a year all bearings should be disassembled and refilled with bearing grease. The chain should be washed out in solvent and then immediately lubricated per haps four times a year — more often if you cycle in bad weather; details in Section 6. Chain lubricant and bearing grease can be bought at bike stores or motorcycle stores; oil and bearing grease are readily available at hard ware and automotive parts stores as well.
Most other parts of the bike are probably best lubricated with the thin penetrating kind of mineral oil that comes in spray cans, such as WD-40 or the lightest form of LPS. Use it with the tubular nozzle that is supplied with the spray can, to aim as accurately as possible. Treat all the various pivots of the bicycle’s mechanisms, as well as the points where cables disappear into outer cables, this way. Before you lubricate, clean these parts and the area affected with a dry rag or brush; wipe excess lubricant off when you’ve finished.
Cleaning the Bike
To keep the bicycle operating properly, it may be enough to merely clean and lubricate the moving parts as described above. However, a complete cleaning job will not only keep the bike looking pretty, it will also increase its life and makes for more pleasant riding, handling and maintaining. I suggest doing this work at least four times a year — more often if you ride a lot in inclement weather and in dusty or muddy terrain. Here’s how you go about it.
1. Wipe off any loose dirt with a rag or a soft brush. The most suitable brushes for all cleaning jobs are the cylindrical so-called bottle brushes; get two different sizes — a big one and a smaller one that fits in the smallest nooks and crannies.
2. Wash off any remaining dirt with a wet rag or brush, rinsing it out in plenty of water. Greasy dirt will come off better when you use water and soap, then rinse with water. Try not to get water in the bearings of the bike’s moving parts (wheel axles, pedals, bottom bracket, head-set) and on the saddle, especially if it is a real leather one.
3. Remove any really persistent greasy dirt, using a mixture of kerosene (that’s called paraffin in Britain) and about one part in ten of motor oil. You can use any other solvent, even without mixing in the oil, providing you immediately wipe if off to prevent the formation of rust. Alternately, spray on special cleaning oil or lubricant, and rub off with a clean rag.
4. Take particular care to clean in hard-to-get-at places, like between the chainwheels and inside brakes and derailleurs.
5. If necessary, remove any corrosion of blank metal parts, using metal polish, and of scratched or chipped painted surfaces with sandpaper.
6. Lubricate, using the lubricants suggested, according to the instructions in the preceding section, all pivot points and the points where inner cables disappear into outer cables or guides.
7. With a soft clean cloth, spread acid-free Vaseline on the blank metal parts, except the rims’ braking surfaces. Paintwork may be protected with car wax; however, if there are scratched and chipped areas which you have sandpapered, these must be touched up with paint, using a small brush first (see Section 12), and then allowed to dry at least 24 hours before you apply wax.
Note: For this and many other jobs, the wheels should be raised off the ground, e.g., with the aid of a simple display stand. Some other jobs are best done when the bike is raised higher of the ground on a special repair stand or placed upside down. In the latter case, place it on a home-built handlebar support to avoid damage to cables and controls. Instructions to build repair supports are contained in Section 13.
Regular Maintenance Check
The instructions in this guide do not only cover repairs, but also preventive maintenance: not only things to do when the bike breaks down, but also things to do in order to prevent break downs before they develop. I suggest three levels of maintenance checks at different time intervals to keep your bike in optimal condition. Here follows a very rough outline of these check ups. Refer to the appropriate sections of the guide for detailed instructions as to just how these various jobs can best be performed. Just don’t neglect ‘instant maintenance’, though: repair anything you notice between check ups as soon as you can.
Daily check-up. Do this work before you get on the bike each day you ride it. It takes only a couple of minutes to perform, but could well save your life; at a minimum it will assure your ride is as efficient, safe and comfortable as possible.
1. Check the brakes for effective ness; adjust if necessary.
2. Check the tire pressure; inflate if necessary; take the pump along.
3. Check whether the wheels turn freely and are held firmly in the frame.
4. Check whether saddle and handlebars, brake handles and shift levers are in their proper positions and properly tightened.
5. If you may be riding in the dark, make sure your lights are installed and operating.
Monthly check-up. That’s what I call it, but if you ride in bad weather a lot, it may be advisable to do it more frequently. First clean and lubricate the bike according to the instructions given in the preceding sections of this section, then proceed as follows, referring to the detailed instructions in the remaining sections wherever necessary.
1. Check all nuts, bolts and other attachments (including specifically those of cranks and chainwheels); tighten or replace anything that is not fastened properly.
2. Check whether the wheels are true (i.e. don’t seem to wobble side ways as they are turned) and the spoke tension is evenly high on all spokes on the same side of each wheel.
3. Check whether the wheels line up and that there is no frame or fork damage. See Sections 3 and 4 for instructions.
4. With the bicycle on a repair stand or upside-down (taking the precautions mentioned above), check the tires for sharp embedded objects, wear or damage, making any necessary correction or replacement as described in Section 9, The Wheels.
5. Check and, if necessary, adjust the bearings of wheel hubs, crank-set and pedals, following the instructions in the appropriate sections.
6. Check the operation of the gears, and make any adjustments necessary, as outlined in Section 7 or 8.
7. Check the brake shoes of rim brakes for correct alignment and wear; adjust or replace if necessary, as described in Section 10.
8. Check the chain for wear and tension, as outlined in Section 6.
9. Put the bike back ‘on its feet’ and correct any problems that may still exist, as evidenced in a test ride, using all the gears and the brakes consciously and critically.
10. Check the contents of your re pair kit and first aid kit, to make sure they are complete.
Biannual check-up. At least that’s what it should be if you ride both in winter and in summer. If you only use the bike in summer, this work should at least be done at the end of the sea son; in that case, do another monthly check at the beginning of the next season. I’ll refrain from step-by-step instructions for this: just do everything listed for the monthly check-up and, in addition, clean and lubricate the chain, overhaul all bearings, replace and lubricate all cables, and carry out all other jobs that may seem appropriate, such as replacing the handlebar tape. This is also the time to touch up scratched paint and to replace older tubes and worn tire covers.
Prev: Know Your Bike
top of page