Unless you ride with a mechanically-adept companion, on any kind of day ride, club ride, or noncommercial tour you must be prepared to handle the occasional flat tire or broken cable or spoke. In practice this is much simpler than it sounds. Carry basic tools and spares, and learn how to use them, and you seldom need be delayed more than a few minutes.
Care
Check Out Your Bicycle Before Riding
To minimize the chances of a mechanical problem developing during a ride, make these checks before starting out.
Check that the quick-releases are both closed and locked tight.
Check that the crankset and headset are both free of play. As you push the bike forward, squeeze each brake lever in turn.
Check that the wheels are free of side play.
Spin the wheels to check that they are “true” (i.e., not wobbly) and pluck the spokes to check that all are reasonably tight.
Check inflation by pressing the tires between fingers and thumbs for low pressure.
It’s extremely important to check that the wheel axles are fully inserted in the dropouts and securely locked in place by the quick- releases (see Figure 2.1). Front wheels are often removed when bikes are carried in or on a car, and it’s easy to accidentally trip and release a quick-release lever while loading or unloading bicycles from a vehicle or moving them in or out of homes or garages. If the quick-release isn’t properly tightened, the front wheel could possibly drop out of the fork or the rear wheel could ride up against the stays.
On all quality bicycles, the front and rear axles are secured and held in place by pressing home a quick-release lever. To get the feel of your quick-release levers, practice releasing and tightening them several times.
Lever tension can be adjusted by a quarter or half turn of the milled round nut on the other end of the axle. Adjust your axles so that they are tightly locked in place when the lever is pressed home (parallel with the bicycle fork or stays). It’s best to have an experienced rider or bicycle shop employee demonstrate how to do this and show you exactly how tight a properly adjusted quick-release lever should be.
After a Ride
Your bike should be wiped over with a soft towel after every ride to remove dirt and grease. It should also be lubricated regularly. Most small moving parts require periodic lubrication with a spray or drip lubricant. Chains require lubrication about once every 300 miles.
Wheel, crankset, pedal, and headset bearings should also be adjusted and lubricated annually, perhaps more often if they are not sealed, or if the bike is used frequently in wet weather. And leather saddles should be conditioned regularly, using saddle soap on top and neat’s-foot oil underneath.
Preventing Punctures
The average clincher tire will go about 1,000 miles between flats, and mountain bike tires will go much farther. Proper inflation helps prevent flats, so avoid riding on soft tires. Keep a lookout for glass on the road and if you see any, warn other riders behind you. Check tires regularly for bald spots and replace tires in time. The rear tire wears twice as fast as the front, because the rear wheel supports most of your weight. Rotating helps lengthen tire life. Also check tires for bulges that indicate a damaged casing.
You might also consider installing metal tire savers that extract nails before they can enter your tires. (A tire saver is a small, fork- shaped piece of metal that engages and plucks out nails that stick in a tire.) Unfortunately, because of the tire surface width, tire savers will not work on mountain bikes.
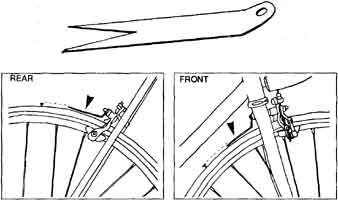
THE TIRESAVER: The tiresaver is a forked metal strip bolted to
the front and rear brake attachments of a road bike. The forked part is
set about 1/8 inch above the tire surface, twill engage the heads of most
nails that may lodge in the tire. The rotation of the wheel pulls out the
nail, which then flies off to one side. NOTE: A tiresaver won’t work on
a mountain bike because the tire surface is too wide.
If your tire develops a slow puncture and will stay inflated and rideable for half an hour or so at a time, it is often preferable to keep inflating the tube rather than to spend time changing it.
Liquid tire fillers or heavy-duty tubes are best avoided, because their heavy weight will slow you down. But in thorn- or cactus- filled areas, like the Mexican desert, you should install “Mr. Tuffy” plastic liners inside the fattest lightweight tires you can find for your mountain bike.
Minor Repairs
Some bike shops sell or rent a videotape that illustrates exactly how to carry out basic do-it-yourself bicycle repairs and maintenance. You should also consider enrolling in a bicycle repair clinic offered by a bicycle club or bike shop.
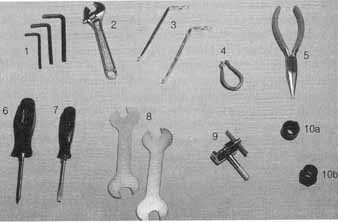
For touring, you should carry a basic tool kit including the items
shown here:
1) set of 4-5-6 mm hexagonal wrenches (Allen wrenches); 2) small adjustable wrench; 3) tire irons; 4) spoke wrench; 5) needle-nose pliers; 6) Phillips screwdriver; 7) flat-bladed screwdriver; 8) pair of cone wrenches; 9) chain rivet extractor; 10 a) freewheel remover (two-prong Suntour model); or 10b) freewheel remover (splined Shimano model). For day rides, you should carry at least the first seven items. It is also advisable to carry the following spare parts: tube, rim tape, two spokes, rear brake cable, and rear derailleur cable.
For day rides you need a small basic tool kit that includes a set of 4-5-6 mm L-shaped hexagonal wrenches (often called Allen wrenches), a small adjustable wrench, a pair of needlenose pliers, two aluminum tire irons, a spoke wrench, and a Phillips and a flat bladed screwdriver. For touring you also need a pair of cone wrenches, a chain rivet extractor, and a freewheel remover, if you have a freewheel. Most bike shops carry compact, lightweight tool kits that contain all these tools in a handy pouch. You should also carry at least one spare tube, a spare rim tape, two spare spokes for each size used, one spare rear brake cable, and one spare rear derailleur cable.
If riding a mountain bike or tandem, make sure the spare cables are tandem length. For extended touring you should carry at least three spare tubes, several additional spokes, and a tube patch kit. I also carry a six-inch length of old tire (minus the bead), which can be used as a patch inside a tire should it split. On a tour I also carry a small can of spray or drip oil and a crank bolt wrench.
Finally, I always carry a frame pump on the bike. For Presta valves, get one with a thumb lock pumphead that fits securely on the valve. Such a pump will inflate tubes to about 90 pounds per square inch (psi.). You may also like to have a floor pump at home that will inflate tubes to 125 psi. or more. Make sure any pump you buy fits the valves you are using.
Unfortunately, this isn’t a repair manual so I can’t tell you step by step exactly how to change a tube or replace a broken cable or spoke. There are several good basic bike repair books or web sites that go into much greater detail. But here are a few tips on how to handle minor repairs that may occur while out riding.
Changing a Tube
If you have a flat tire while riding, pump both brakes to slow and stop the bike. The flat tire itself will also slow you down. Should the front tire go flat, the bike will become harder to steer, and you must keep the handlebars straight while braking. Once you have stopped, get off the road and find a grassy, shady spot.
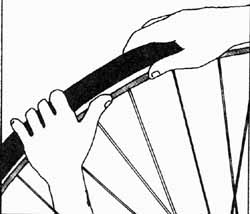
CHANGING A TUBE: When replacing the tire, knead the bead of
the tire back on the rim, using only your hands, if possible.
Release the brake on the wheel with the flat. If the front tire is punctured, trip the quick-release and remove the wheel. If it’s the rear wheel, move the chain onto the smallest cog and chainring. Remove all bags, bottles, etc. and turn the bike upside down. Then remove the wheel. (With some bikes, the rear wheel can be removed without inverting the bike.)
Look for a visible thorn, nail, or piece of glass. Remove it from the tire in one piece if you can. Lay the wheel down and use the tire irons to carefully remove the bead of one side of the tire from the wheel. Then remove the tube completely from the rim. Run your fingertips around inside the tire, feeling for any protruding sharp points. If you find one, try to remove the thorn, nail, etc., from the outside. Do not leave any sharp object inside the tire.
Pull the tire to one side and check that the rim tape covers the spoke-heads. Insert a new tube. Pump in a small quantity of air, just enough to keep the tube extended inside the tire. Then, using your hands, start at the valve and knead the bead of the tire back on the rim. If the last few inches of tire absolutely refuses to go back on the rim, make sure that the beads on the opposite side of the tire have dropped into the deepest part of the rim. If that doesn’t work, you may have to use very gentle pressure with a tire iron to finally get the tire back on. Take great care not to pinch the tube between rim and tire. (When a tire is this difficult to replace, it often indicates that the tire is not compatible with the rim.)
Pinch the sidewalls between fingers and thumbs all the way around the circumference of the rim to release the tube should it be caught. Inflate the tube lightly. Then deflate it. Run your fingers and thumbs around the tire, pinching the sidewalls together once more. Then inflate the tire hard and replace the wheel on the bike.
Squeeze the air out of the punctured tube and carry it in your bag. You do not need to patch a tube on the road. Repair it either when you reach home, or at the end of the day’s ride if on a tour.
Rather than buy a tube patch kit I purchase a dozen 1¼” diameter patches from a bike shop plus some rubber cement, sandpaper, and a yellow china-marking pencil. The pencil is invaluable for marking the location of the puncture, and the larger 1¼” patches enhance your chances of sealing the leak. If your tubes are not made of butyl, you may require special patches.
Replacing Broken Cables
Replacing a broken cable is something you can learn only by watching it being done. However, you can spare yourself some grief by buying spare cables that have the correct-sized lug on one end. The other end should be neatly cut and either brazed or soldered, or else sealed with a nipple, so that it cannot unravel. When threading it through the housing, rotate the cable in the opposite direction to that in which it is wound. Unless you have a pair of special cyclist’s cable cutters, never buy a cable that has a different-shaped lug at each end. You are expected to cut off the undesired lug, but without special cutters you will not make a clean cut and the cable will not thread through the housing on your bike.
If you have a broken brake or front derailleur cable, you can probably manage to finish your ride for the day. But if the rear derailleur cable goes, you must usually stop and replace it.
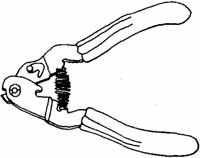
special cable cutters
Replacing a Broken Spoke
Should a spoke break on the front wheel, or on the left side of the rear wheel, replacing it is usually a simple operation that can be done in a few minutes without removing the wheel from the bicycle.
On the other hand, if during a day ride, a spoke breaks on the freewheel (right) side of the rear wheel, consider returning to your car or heading for a bike shop, if one is nearby. The reason for this advice is that to thread a new spoke on the right side of the rear wheel necessitates first removing the freewheel or freehub cogs. On a tour, assuming you are carrying a freewheel remover, you can remove the freewheel by using a large wrench or vise at a repair garage. All this, of course, refers to a conventional freewheel.
How about a freehub?
To unlock a freehub and remove the cogs, you have 3 options: (1) carry a rather bulky tool called a chain-whip; (2) carry a mini-whip tool called a cassette cracker; or (3) if neither is available, you can, in an emergency, block the smallest cog with a screwdriver and put weight on the crank to unscrew it. To make option 3 clearer: above the rear dropouts, where the chain and seat stays meet, almost every frame has a small triangular opening. Through this triangle, you can insert a screwdriver so that it lies between two teeth of the smallest cog. This effectively prevents the cog from turning. How ever, it should be used only as a last resort because it can slightly damage the enamel finish in the triangle area.
A Cassette Cracker does essentially the same thing but without risk of damaging the bike’s finish. New as this was written, cassette crackers are becoming widely available. However, current models would not fit Hyperglide cogs.
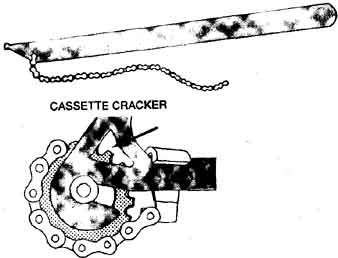
CHAINWHIP, CASSETTE CRACKER, TRIANGULAR OPENING: The arrow is
pointing to a triangular opening in the seat stay, through which a screwdriver
may be inserted to loosen the outer cog on the cassette hub. NOTE: This
is an expedient which is resorted to only when a cassette cracker or chainwhip
are not available.
To carry out options 2 or 3, move the chain onto the largest cog and onto the smallest chainring. Place the cranks at 3 and 9 o’clock. Attach the mini-whip or screwdriver. Now place your full weight on the forward pedal. The entire rear wheel assembly should rotate while the small cog, prevented from moving by the mini-whip or screwdriver, begins to unscrew. Once loosened, the small cog can be easily unscrewed and the cogs removed from the freehub cassette.
If a spoke is broken anywhere but close to or inside the nipple, twist the broken spoke and unscrew it out of the nipple. Remove the other broken piece of spoke from the wheel hub. Thread a new spoke in its place. You may have to bend it a bit in the process. Insert the threaded spoke end into the nipple and tighten with a spoke wrench.
If the spoke is broken too close to the nipple, partially remove the tube and tire so that you can replace the nipple with a new one. Then tighten the spoke and replace the tube and tire.
Should a spoke break within an hour or so of the end of your day’s ride, consider nursing the bike along for the rest of the way, taking care not to break a second spoke. You may have to release a brake to do so.
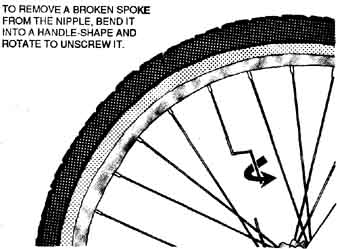
Remove a broken spoke
Other Repairs
Among less common but easily remedied roadside adjustments you can handle yourself are these:
The chain skips a tooth on the rear cog every few seconds. This is due to a tight spot in the chain. Place the chain on the middle chainring and the smallest cog. Slowly rotate the chain backward by hand while you watch the rear derailleur pulleys, where the tight spot can be seen.
Move the tight spot to midway between the crankset and the rear derailleur. Using both hands, hold the chain by its sideplates on each side of the tight spot and flex it vigorously. This usually corrects the problem.
The rear derailleur does not drop back onto the smallest cog when you release the gearshift lever. This can usually be remedied by adjusting the screw marked “H” (for high gear) on the rear derailleur counterclockwise or outward, using a Phillips screwdriver or a pocket knife.
The chain overshifts and drops between the largest cog and the rear wheel spokes. This can usually be remedied by adjusting the screw marked “L” (for low gear) on the rear derailleur. Turn the screw clockwise or inward.
In contrast, if the chain refuses to go all the way onto the largest cog, turn the screw counterclockwise or outward. When adjusting derailleurs, usually only a quarter- or half-turn of the adjusting screw is necessary.
Next: Bicycling for Youth and Longevity
Prev: Selecting the Best Bike
top of page