Servicing a chain
The chain absorbs more punishment than any other bicycle part. Although chains rarely snap, they do become worn and loose. To lessen this wear, wipe the chain with a solvent-soaked cloth when ever dirt builds up on the links. Several times a year remove the chain for cleaning and lubrication.

Periodically check chain tension on one- and three-speed bikes. You can tighten a loose chain at the rear wheel, as shown below. If there is no more room for adjustment at the rear axle, the chain has worn and stretched. Fit a new one.
If the chain clatters or grates as you pedal, inspect it for wear. Sound links should sit firmly between the teeth, not ride up on them.
You can replace the chain of a one- or three-speed bike yourself, but take derailleurs to a bike shop. Replacement chains are usually too long. To find out how many links you must remove, test- mount the chain. Do not use the old one as a gauge; it may have stretched.
-- --
Cleaning a chain
Remove chain and soak it in kerosene for one hour. Clean off residue with a stiff wire brush (left). When chain has dried, install it. Then, drip chain oil into the links as you turn the chain through two complete cycles.
----
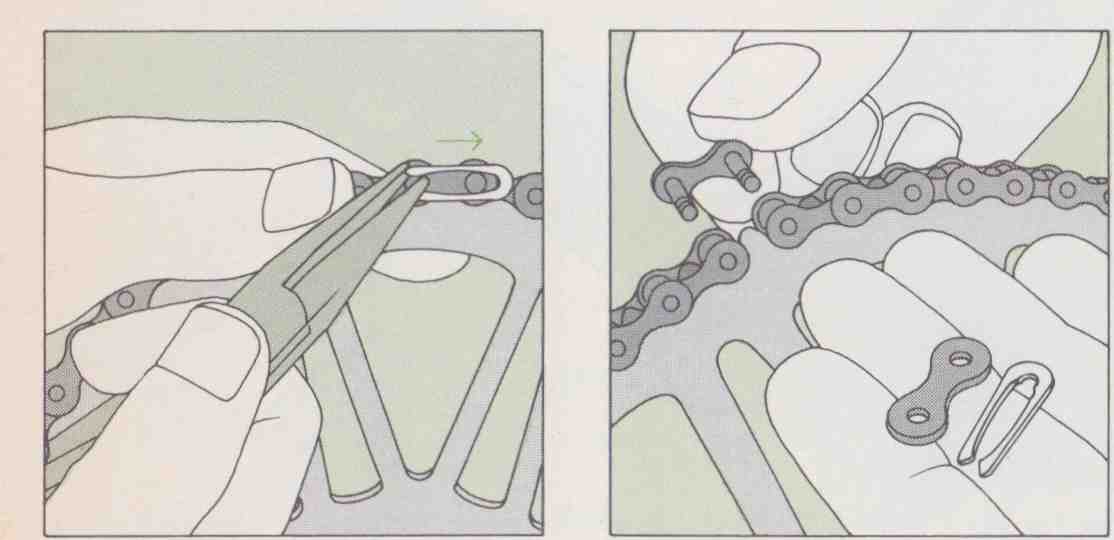
1. Locate chain connector and, with pliers, disengage clip or other fastener holding side plate in place.
2. Remove side plate. Pull connector tree to release the chain ends. Remove chain from bicycle.

3. Test chain by pulling on any two adjacent links. It there is a lot of play, replace the chain, if not, clean it.
4. Loosen rear wheel nuts and move wheel forward as far as possible in its slots. Holding it there, replace the chain.
---
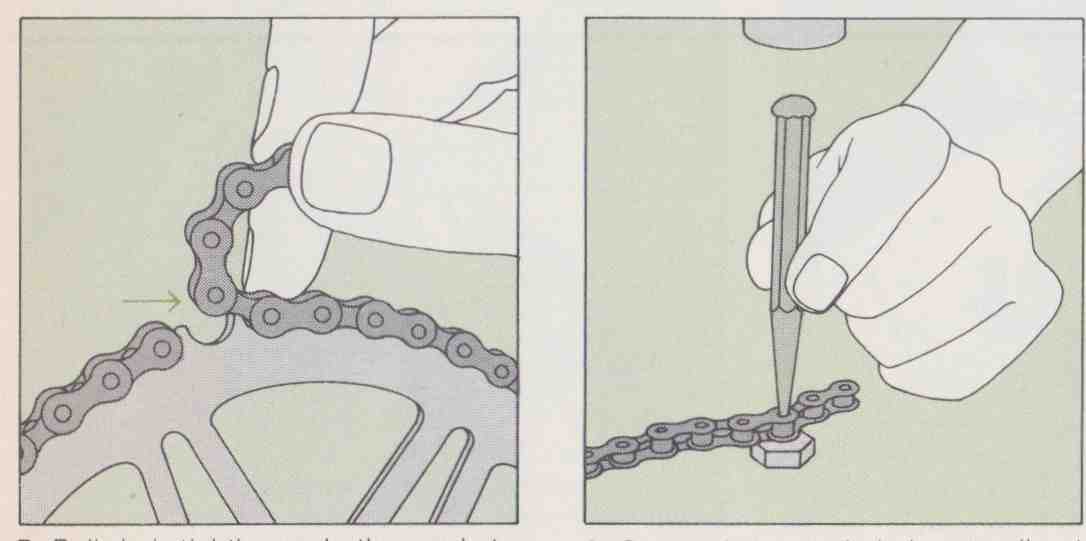
5. Pull chain tightly over both sprockets. If necessary, shorten chain by removing the proper rivet (arrow).
6. Center rivet over hole in a small nut and drive it out with a punch. If rivet is hardened, grind off its head.
---
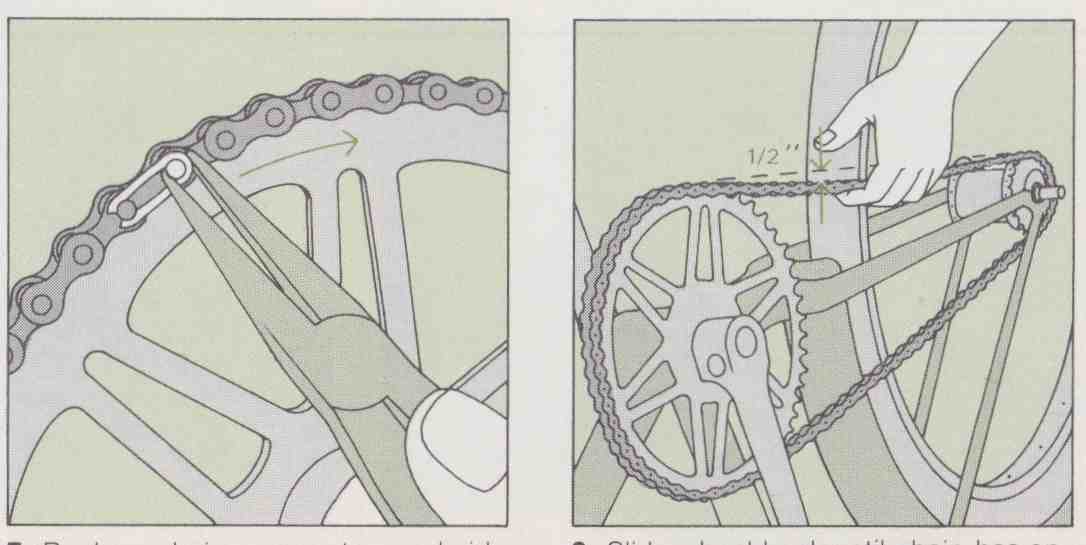
7. Replace chain, connector, and side plate. Crimp fastener in place. Its closed end must face direction of travel,
8. Slide wheel back until chain has only ½-in. of play; tighten wheel nuts. Be sure axle is even or wheel will wobble.
-- --
Replacing a freewheel
The freewheel must be replaced if a tooth chips off of it or if wear causes it to begin slipping. You must also remove the freewheel when changing a spoke on that side of the wheel. For either job you need a freewheel extractor. When you buy one, take the wheel to the bike shop, br there are many types of extractors. In purchasing a freewheel, make sure it has the same number of teeth as the old one. When replacing it, be careful not to strip the soft aluminum hub threads.

1. Put wheel axe in a vise, freewheel side up. Position extractor; make sure its pegs fit into slots in freewheel. Screw on wheel nut and tighten firmly
2. Remove wheel from vise and turn over, placing extractor between jaws of vise. Tighten vise.
3. Grip wheel rim and turn it counter clockwise until freewheel loosens. Turn wheel over in vise again, and, with a wrench, remove wheel nut.
4. Grip extractor and unscrew it and freewheel. To install new freewheel, just tighten it by hand and mount the wheel normal pedaling will tighten it correctly.
Servicing a hub gear
A three-speed bicycle’s shift mechanism rarely causes trouble if you lubricate the gear lever housing, rear cable pulley, and the rear hub every month. If the mechanism binds or slips, check the control cable. A kinked, frayed, or severed cable must be replaced. Bike shops sell re placement cables, complete with the outer casing. If the cable is sound, adjust it as shown in Steps 1, 9, 10, 11, and 12. Note the two types of fine adjustment mechanism illustrated in Step 11. Test shift action before riding bike.
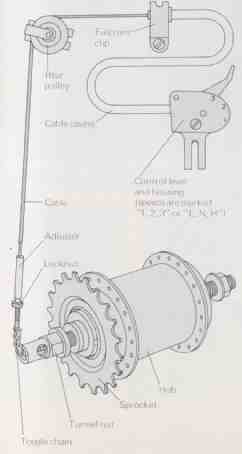
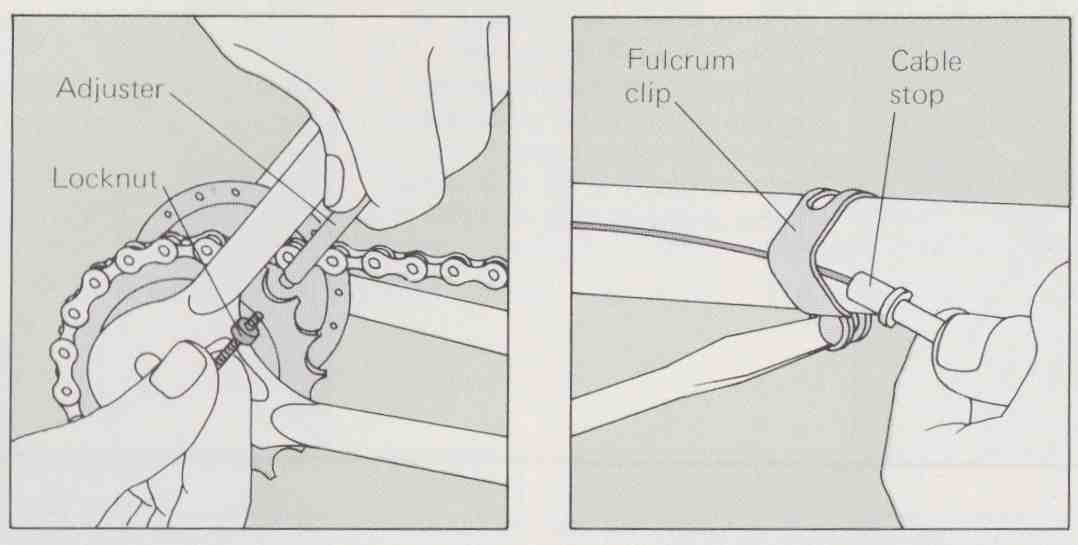
1. Loosen cable locknut near hub and detach cable adjuster from toggle chain. To adjust only, skip to Step 9.
2. Loosen the fulcrum clip with a screwdriver, then pull the cable forward until adjuster passes through clip.
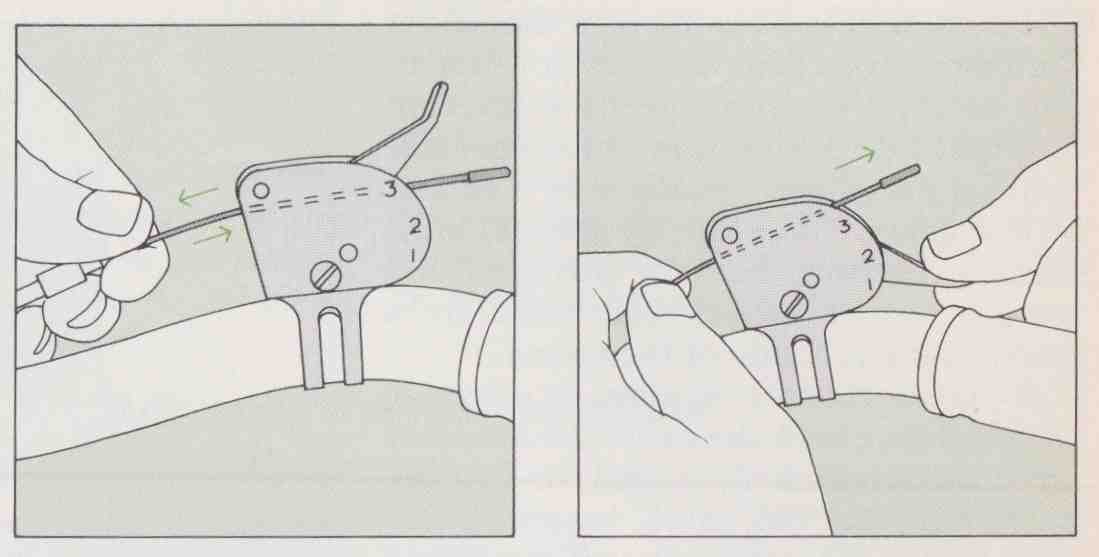
3. Flip gear lever to 3, or H, and push inner cable into gear housing to free its nipple. Draw up and back to remove.
4. Lightly lubricate end of new inner cable with bicycle oil Depress gear lever and push cable through housing.
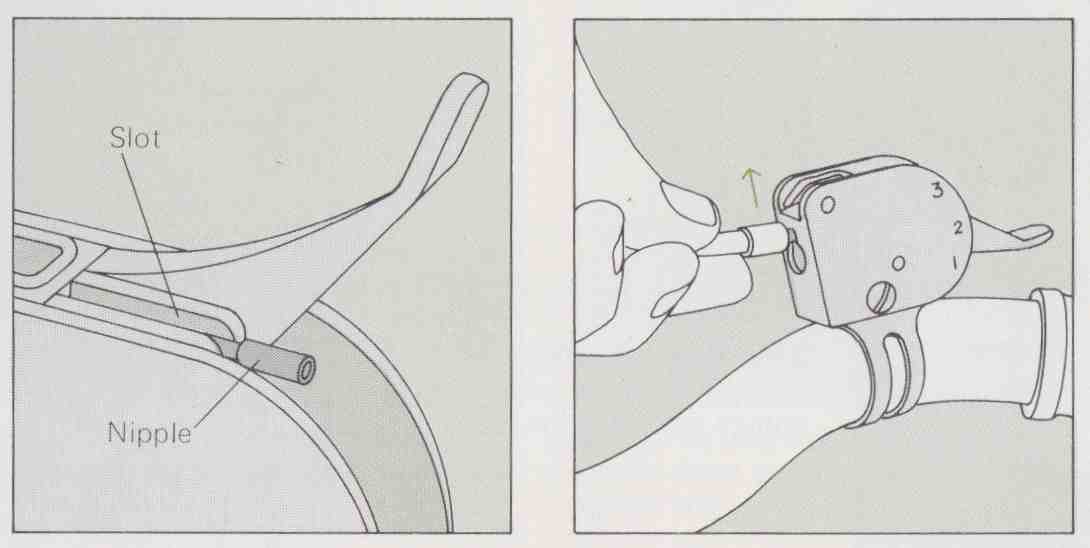
5. As shown in this top view, check that nipple is properly seated and that cable runs over slot in lever.
6. Slide outer casing end into wide part of slot in gear housing and push it upward to lock it into place.

7. Pass cable adjuster of the replacement cable under fulcrum clip and pull it until cable stop sits beneath clip.
8. Lubricate the rear pulley with bicycle oil and make sure that it spins freely. Then, feed the new cable over it.
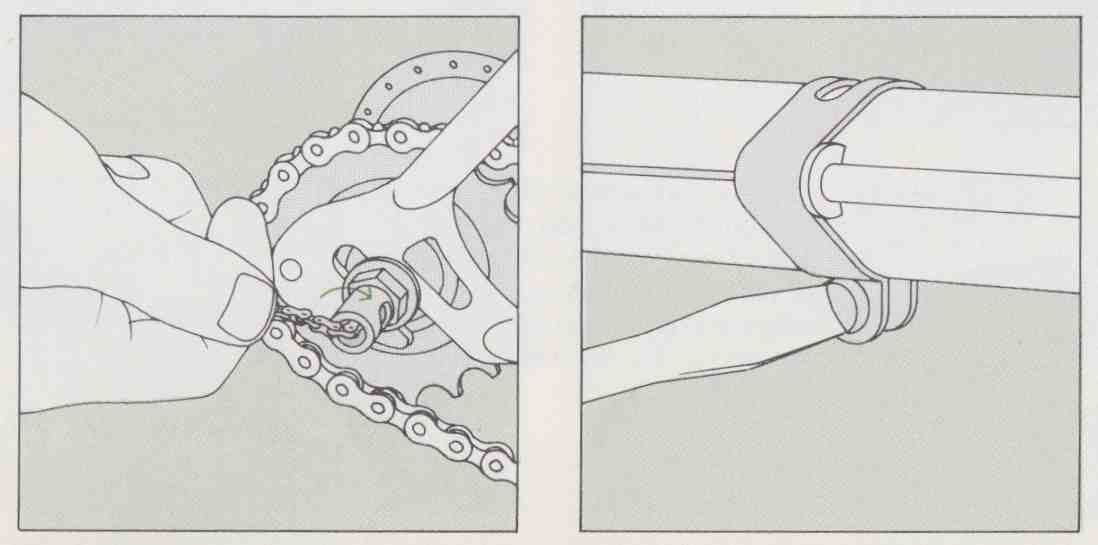
9. Grasp toggle chain, hold t perpendicular to axle, and turn clockwise until tight. Then, unwind halt a turn.
10. Attach cable to toggle. Then, slide fulcrum clip forward until cable is barely slack and tighten it. Shift to 2, or N.
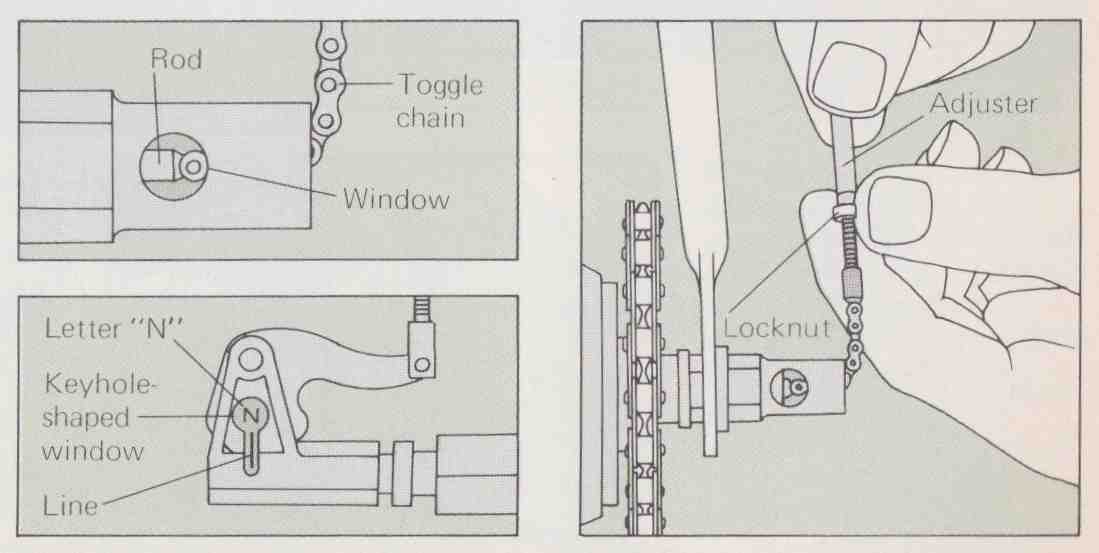
11. Turn cable adjuster clockwise until rod appears in window (top) or until 2, or N, and line are centered in keyhole.
12. Flip control lever to 3, or H, position, then screw locknut upward until it rests firmly against cable adjuster.
Replacing a derailleur gear cable on 5-and 10-speed bicycles
The derailleur is a mechanism that shifts the chain from gear to gear in order to give multiple forward speeds. A lever on the right side of the frame tube operates the rear derailleur, usually over a cluster of five gears. To obtain 10 speeds, bike- makers combine this rear cluster with a two-gear chain wheel, controlled by a lever on the left side of the frame.
If you encounter binding or slippage as you shift, check the cables and replace any that are kinked, frayed, or broken. To remove the old cable, loosen its anchor bolt at the gear cluster (Step 6) and pull cable forward through the guides. Finally, adjust lever to attain proper cable tension (Step 8).

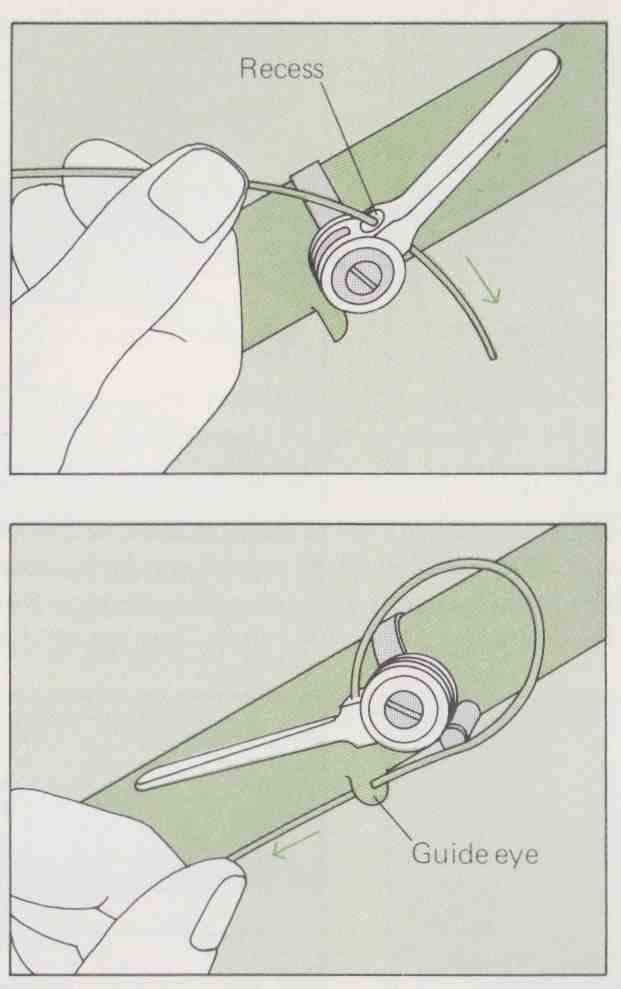
1. After removing old cable, set the gear lever at its halfway position and thread the entire length of new cable through the hole in the lever. Make sure that the nipple at the end of the cable is seated in its recess.
2. Pull the lever back as far as it will go. Feed the cable back through the levers guide eye and pull it tight.

3. Feed the cable through the guide channel just above the bottom bracket of the bike.
4. Pass the cable through the eye on the horizontal rear fork stay. Then, slip the short length of plastic outer casing over the cable end and push the casing forward until it rests against the eye.

5. Slide the cable through the cylindrical guide on the carrier mechanism. Pull the cable downward until the end of the outer casing touches the guide.
6. Move the 9 lever all the way forward. Slip the cable between anchor bolt washer and the lip on the anchor bolt flange. Pull the cable taut and tighten the bolt.
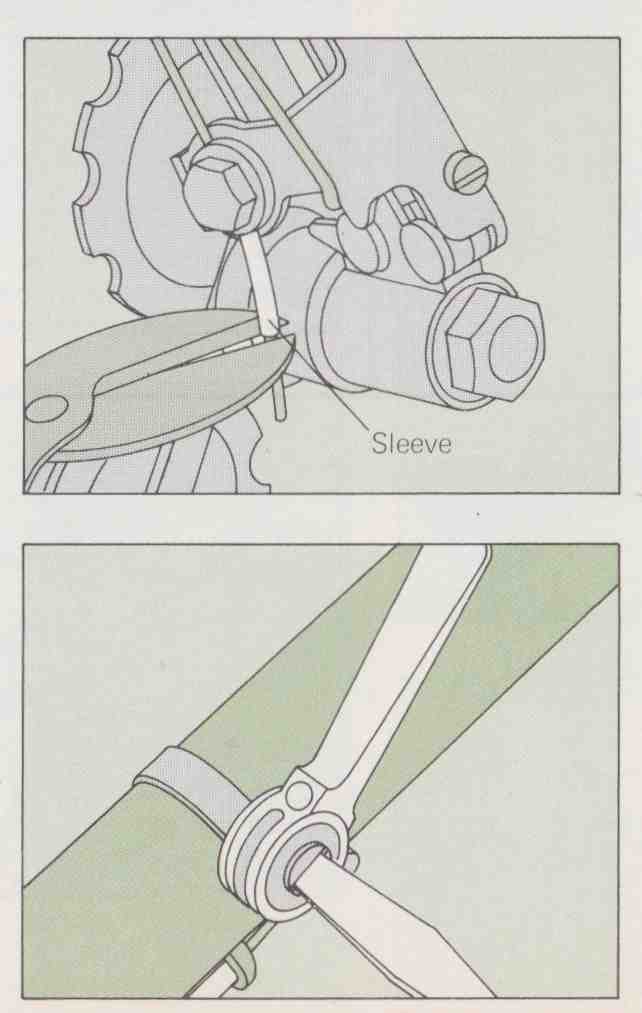
7. Push plastic protector sleeve (if supplied) up over the cable end until it rests against the anchor bolt. Snip off any surplus cable.
8. Test-ride the bike. If the gear lever is too loose, the chain will slip into high gear constantly. If it is too tight, the lever will be difficult to move. Adjust the center bolt of the lever for proper tension, if necessary.
Tuning a derailleur system
Derailleur systems slip out of adjustment more frequently than three-speed hub gears. You can avoid many problems by handling the bike with reasonable care. Limit the amount of off-pavement riding, which tends to loosen the delicate cages that transfer the chain from gear to gear. Shift gears while pedaling, not while coasting, and do not backpedal. Never lay the bike on its right side. If the shift lever binds, do not force it; inspect the system and make adjustments.
First, check the cables, as shown on the preceding page. Clean the sprockets and chain with a solvent-soaked cloth. If the chain is worn, have a qualified repairman replace it. Finally, check the shift cages. If they are dam aged, have them replaced. If they are only misaligned, adjust them yourself.
There are two types of cage adjuster, double screw and single screw. Adjusting either type is a trial and error operation. Have a helper raise the rear wheel clear of the ground and shift gears while you turn the pedal by hand. (A special stand, sold in bike shops, can make this a one- man job.) The adjusting screws must be set so that the chain does not overshoot the sprockets and fall off when it is shifted. But it should not rub against the cage in any gear between shifts.
Adjusting the front derailleur
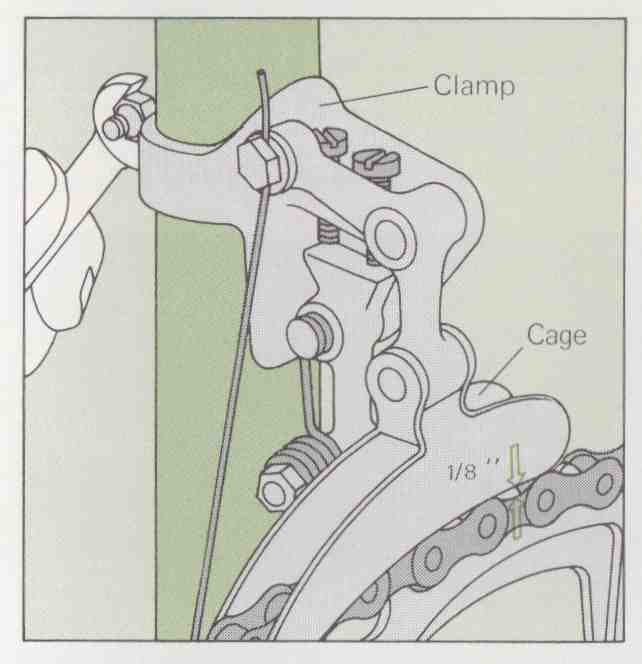
1. Set system in high gear and loosen clamp bolts. Position cage so that it is in. above the large chain wheel.
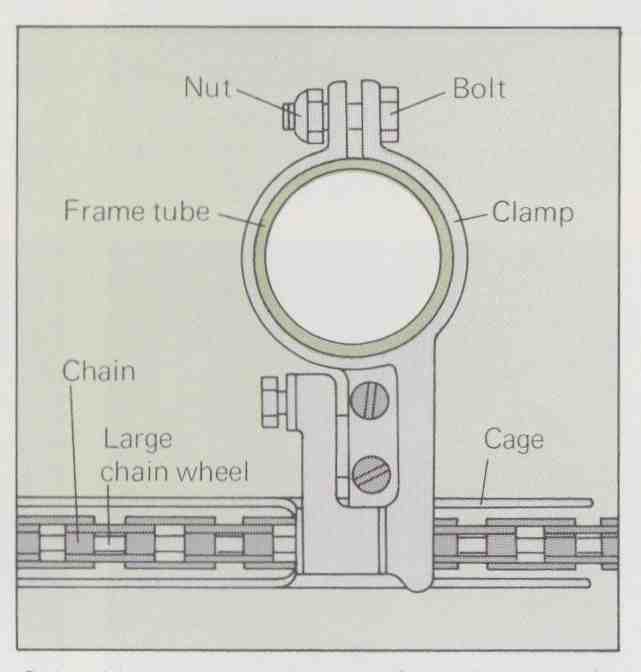
2. Looking down on the cage from above, make sure it is parallel to the large chain wheel, then tighten clamp bolts.
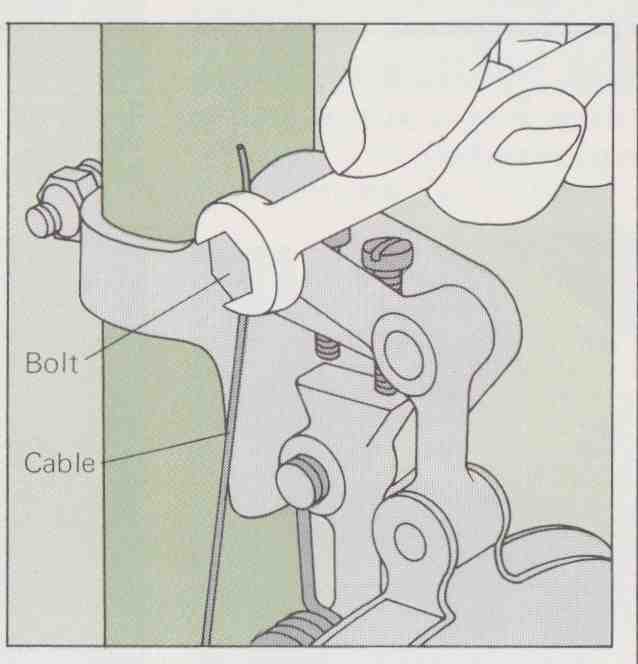
3. Push left gear lever all the way forward. Then, loosen cable anchor bolt. Pull cable taut and tighten bolt.
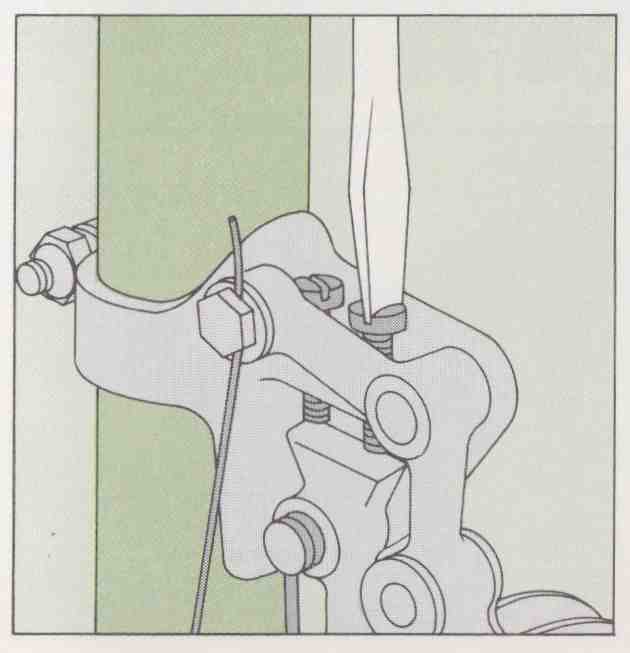
4. Some adjusters have separate screws for high and low gear; set them so that chain does not override sprockets or hit cage.
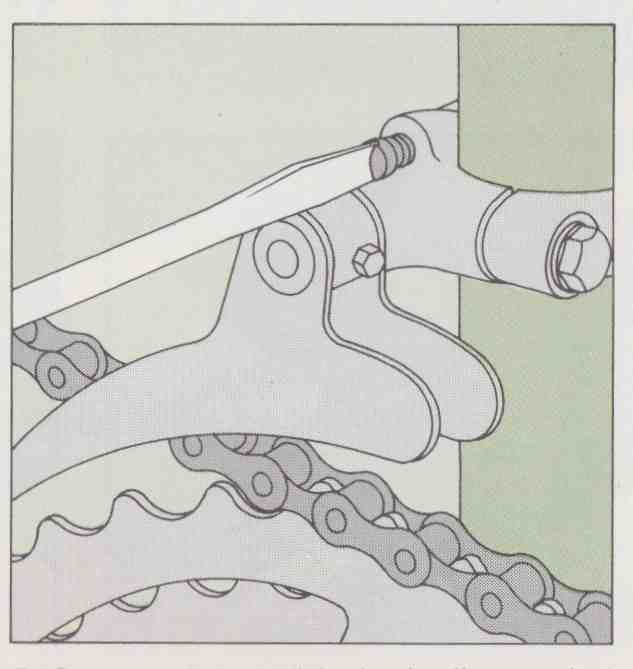
5. On one-screw models, back off screw lust enough so that chain shifts from small to large sprocket without overriding.

6. If chain still overrides large chain wheel after adjustment, carefully bend outer edge of cage slightly inward and test again.
Adjusting the rear derailleur
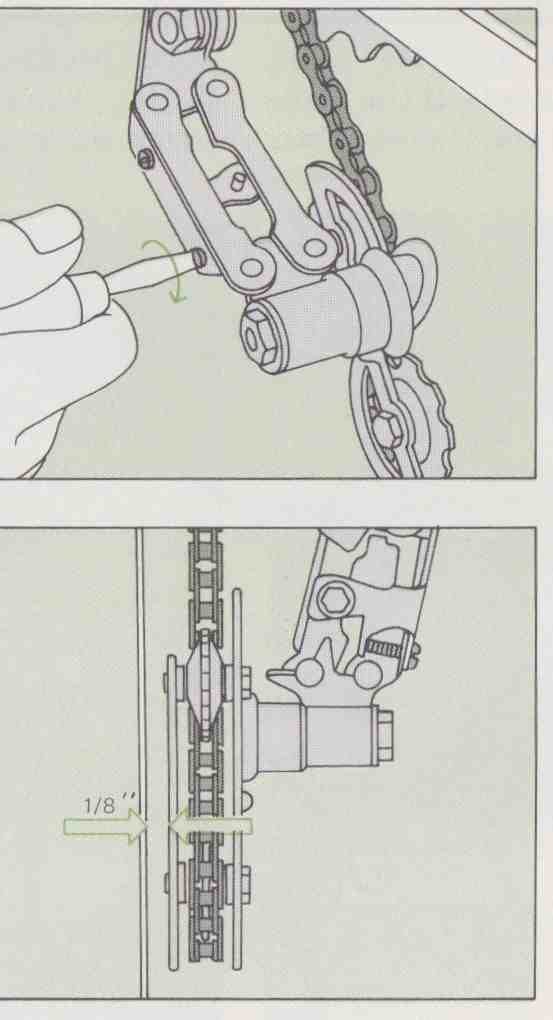
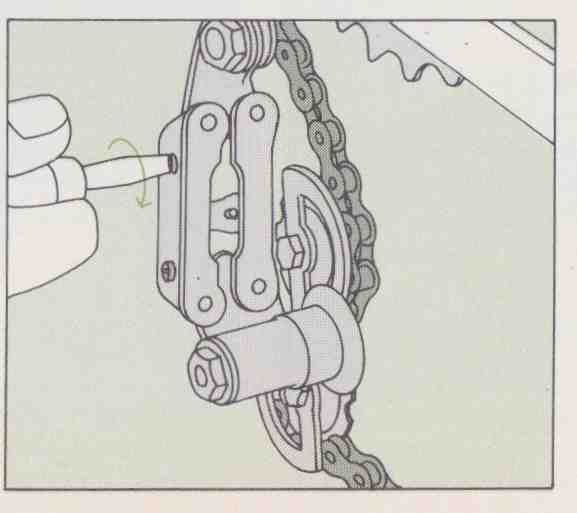
1. Pull right-side shift lever all the way back. Screw in lower adjuster until the chain rides on the center of the large sprocket without overriding. Test for position and overriding after every quarter turn of adjuster.
2. Check the clearance between the cage and the spokes. If it is less than 1/8 in., take the bike to a bicycle shop for adjustment.
3. Push right-side shift lever all the way forward. Screw in upper adjuster until the chain rides on the center of the smallest sprocket without overriding. Test for position and overriding after every quarter turn of adjuster.
Servicing a three-piece bottom bracket
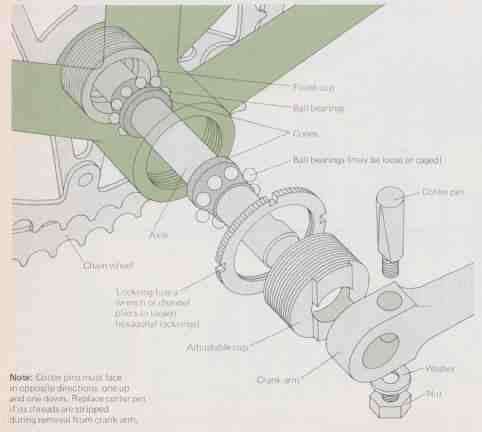
A three-piece bottom bracket is used on most imported bicycles. American-built bikes usually use a one-piece bracket. The bottom bracket assembly consists of the chain wheel, its arms, and the axle that connects them. The axle rides on two sets of ball bearings that are packed in grease. One of the two cups that holds these bearings can be adjusted to take up play in the axle.
The bracket assembly needs periodic maintenance. If your bike’s crank arms are fastened to the axle by cotter pins, you can do this work yourself. If the arms have no cotter pins, you must either buy the special tool required to remove the arms or leave the job to a bike shop.
Note: Cotter pins must face in opposite directions, one up and one down. Replace cotter pin if its threads are stripped during remove from crank arm.
Disassemble the crank and bearings once a year and repack the assembly with multipurpose bicycle grease. Do it sooner if you hear grating noises coming from the bracket as you pedal. Check the bearings and axle for damage and re place them if they are bad. These parts are not standardized, so bring the old ones along when you buy replacements. If the axle wobbles or binds, adjust the cups (Steps 3, 4, 10, and 11, below). If the crank arm is loose, adjust or replace the cotter pin.
Fitting a cotter pin
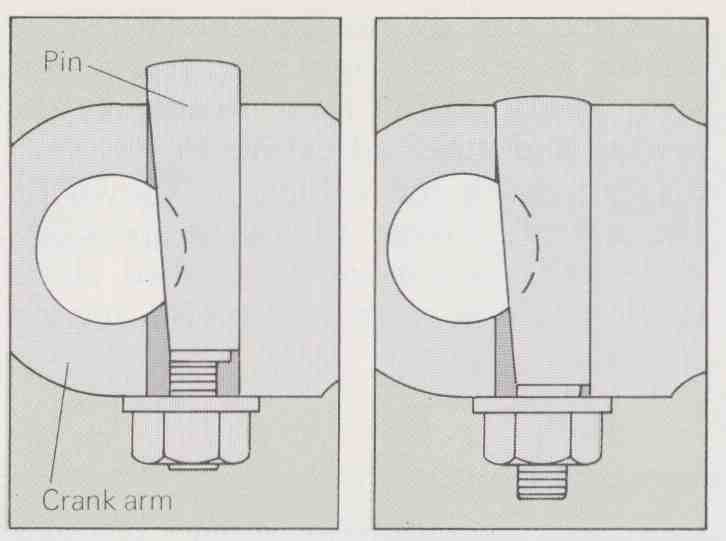
1. A cotter pin with a protruding head (left) can be adjusted; tap it down and retighten nut. A pin already flush with crank arm (right) must be replaced.
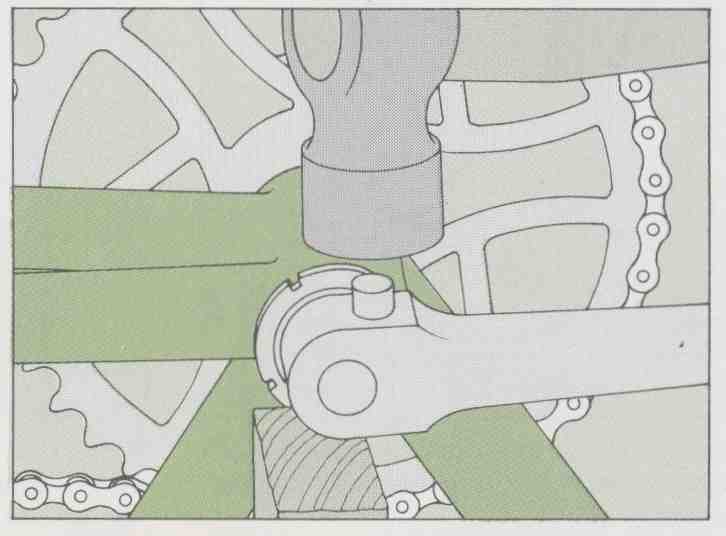
2. To remove old pin, first, remove nut and washer. Hammer the threaded end of the pin flush with the arm, then drive t out with a punch and hammer.
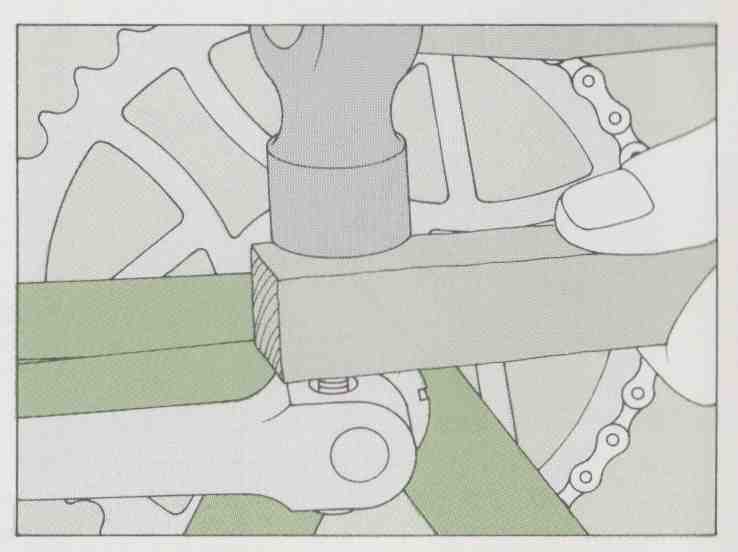
3. Support crank arm with two blocks of wood. Tap new pin into place, threaded end first. Enough thread must be exposed to accept nut and washer.
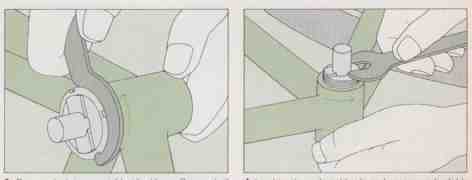
4. If pin will not pass far enough through crank, use a wooden block to protect its threads and tap pin flush with arm. Drive it out with a punch.

5. Examine flat side of pin for scratches caused by the sides of the crank arm hole. You must file down the replacement pin at these marks.

6. Place pin, flat side up, in a vise so that its threads are clear of the laws. Using a metal file, just remove the scratches Refit pin and washer, then tighten nut.
Adjusting and repacking a bracket

1. Remove chain, both cotter pins, and chain wheel. If chain wheel sticks, hold left crank arm firmly and twist wheel from axle,
2. Remove left crank arm. If it is wedged on tightly, strike arm as close as possible to its axle with a soft-headed hammer or mallet.
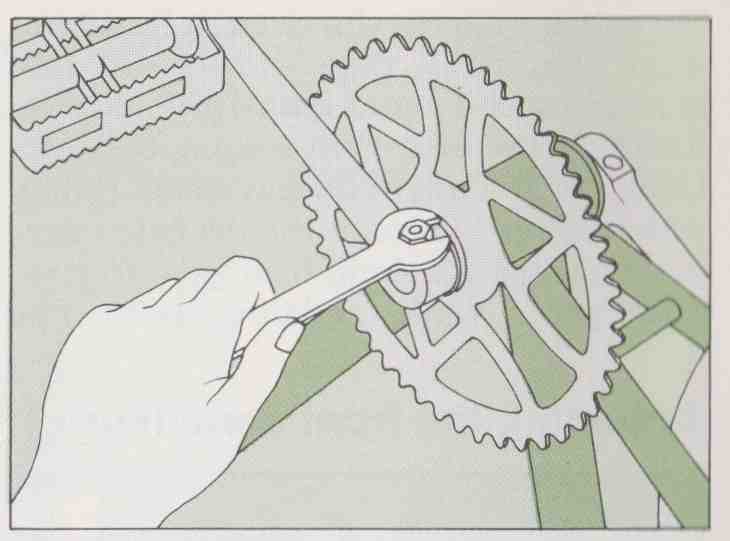
3. Remove lockring on right side. Use a C-wrench if the ring is notched (above) or an adjustable wrench if it is hexagonal. Turn ring counterclockwise.
4. Lay bicycle on its right side and unscrew adjustable cup. Hold free hand below fixed cup to catch loose bearings as you draw out axle and adjustable cup.
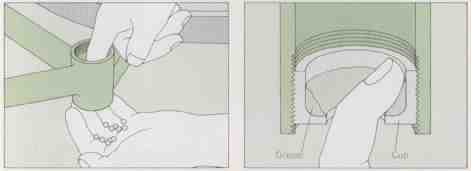
5. Poke remaining fixed cup bearings out through hole. Clean adjustable cup, axle, and all bearings in kerosene. Inspect parts for wear; replace if needed.
6. Clean fixed cup with kerosene and inspect. Have a worn cup replaced by a repair shop. Fill both cups with bicycle grease. Pack caged bearings with grease.
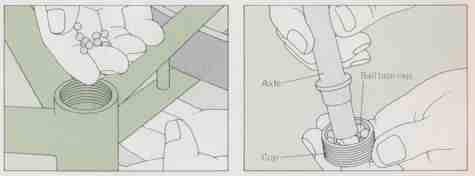
7. Plug the hole in the fixed cup with a finger and replace its bearings. Push loose bearings into the sticky grease to keep them from falling through hole.
8. Replace ball bearings in adjustable cup, pressing them securely into the grease. Carefully insert shorter end of axle through hole in the cup.

9. Gently lower axle and adjustable cup into housing, taking care not to disturb bearings in fixed cup Screw adjustable cup clockwise until snug.
10. Tighten adjustable cup with your fingers. It is correctly adjusted when there is no side-to side axle play or wobble, but the axle still turns freely.
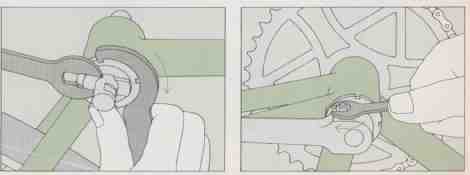
11. Hold the correctly adjusted cup in place with a wrench as you replace lockring. Tighten lockring with C-wrench or adjustable wrench; recheck adjustment.
12. Replace both crank arms and insert cotter pins, fitting them as shown on the preceding page. Replace each washer and tighten nut until it is snug.
Servicing a one-piece bottom bracket
Unlike the three-piece bottom brackets found on bicycles built in Europe and Japan, the assembly used by most American manufacturers is in one piece. In this design, the crank arm can never loosen and flop about.
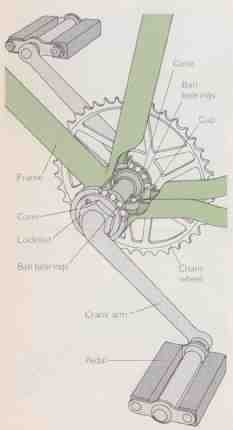
Like the three-piece bottom bracket, the one-piece design should be greased annually or whenever you hear grating noises as you pedal. If the crank binds or exhibits play (see Periodic checks), adjust the cones, following Steps 2, 3, 7, and 8 at right. If the cones are too tight, the crank will be difficult to turn; if they are too loose, it will wobble.

1. Remove the chain, then take off the left pedal by turning its axle clockwise with a wrench.
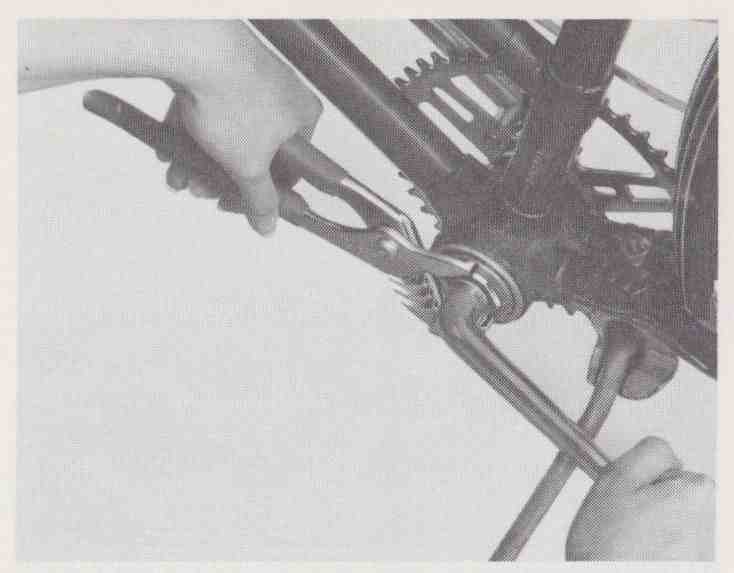
2. Grasp left crank firmly and loosen locknut by turning it clockwise with a wrench or pliers.
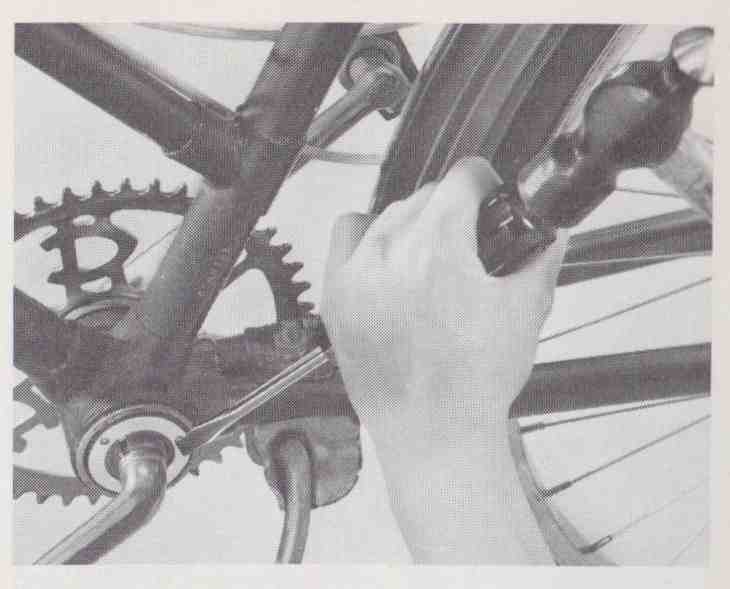
3. Place a punch or the tip of a screwdriver into notch on cone and tap so that cone turns clockwise.
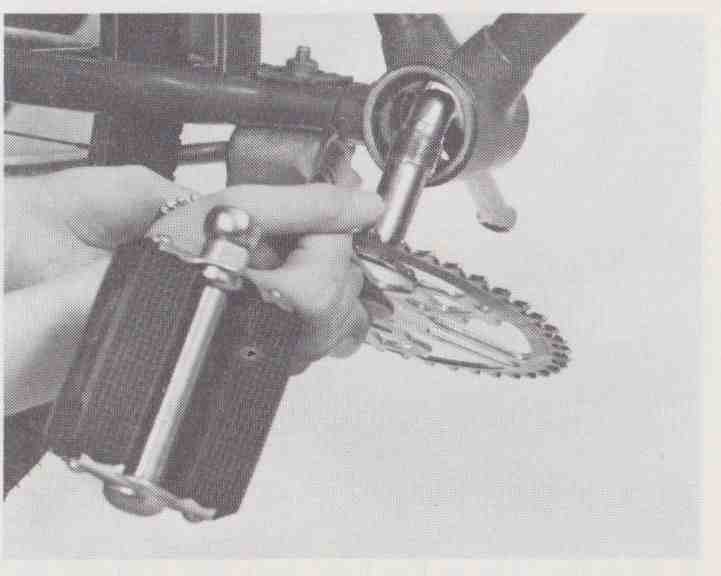
4. Slide locknut and cone off crank arm. Pull out crank arm and chainwheel from right side of bike.

5. Remove bracket bearings-taking care not to lose any-and clean them and the cup with kerosene.

6. Place a bead of multipurpose bicycle grease around the inner edge of the cup and replace bearings.

7. Replace crank arm. Install cup bearings and cone, and turn counterclockwise until there is no play.
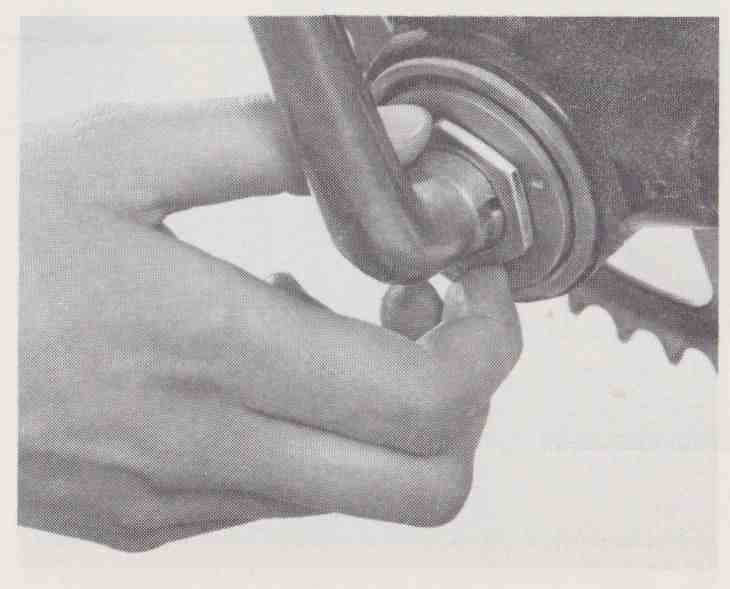
8. After adjusting the cone, replace locknut and tighten it counterclockwise until snug.
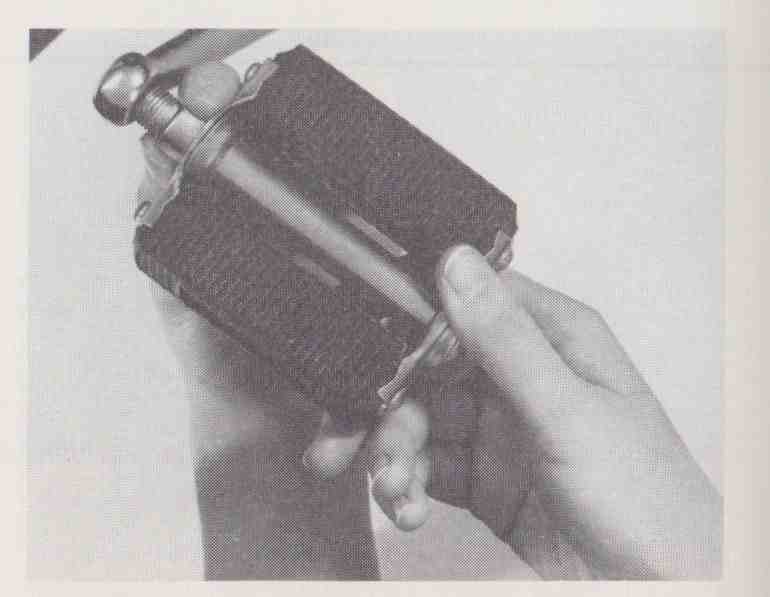
9. Check bracket again for play or binding, then replace left pedal and tighten counterclockwise

